


All AirCheck G2 Settings
92
3
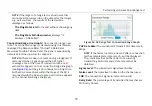
If the network is behind a Captive Portal, switch the
toggle to On to enable the
Captive Portal
setting.
4
Touch the down arrow
in the
Authentication
field,
and select and configure an authentication type from the
drop-down menu.
5
Enter all necessary Authentication credentials for the
security type used on the network, such as Encryption
type, Keys, EAP Type, Username, and/or Password.
6
If you want to use
DHCP
as the IP address mode, leave
DHCP enabled. To use a Static address, you must specify
the following:
Static IP Address
Subnet Mask
Default Gateway
Primary DNS
Secondary DNS
7
Select
Apply
to confirm your network configuration.
How to: Edit a network
1
Select the
(Edit)
icon.
2
Make the desired changes.
3
Select
Apply
.
How to: Delete a network
1
Select the
(Delete)
icon.
2
Select
Yes
in the pop-up confirmation message window.
Access Points
These settings allow you to add, edit, and delete APs and
their saved configuration.
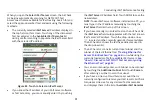
How to: Add an AP and configure AP settings
1
Select
Add AP
to open the
Configure AP
screen.
2
Select
BSSID
to bring up a text entry screen, where you
can use the keyboard to specify the AP's BSSID, and
select
DONE
.
3
Select
Alias Name
to bring up a text entry screen, where
you can use the keyboard to specify the AP's name, and
select
DONE
.
4
Touch the down arrow
in the
Authorization Class
field, and select an Authorization for the AP.
5
Select
Apply
to save your configuration.
6
Repeat Steps 1 through 4 to add more APs if needed.
How to: Edit an AP
1
Select
(Edit)
.


