


Getting Started
10
ReadyNAS for Home RAIDiator 5.3
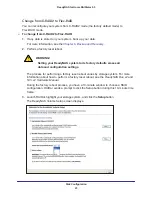
RAIDar displays a window that lists the ReadyNAS system or systems on your network
and provides details about the status of each system it discovers.
The default IP configuration is set to DHCP, which is how home routers assign IP
addresses by default.
If you are not using DHCP on your router, or if it is not working correctly, your storage
system cannot get an IP address. In that case, your system uses 192.168.168.168. If this
situation occurs, you must make a direct connection between your storage system and
your computer. To establish this connection, follow your operating system’s instructions
for assigning a static IP address to your computer in the 192.168.168 subnet.
If your ReadyNAS system is not detected, check the following and click
Rescan
to try
again:
•
Make sure the ReadyNAS device is turned on and is connected to your network.
•
Make sure your client computer that is running RAIDar is on the same subnet as the
ReadyNAS device.
•
If you are running RAIDar on Windows XP before SP2, disable the Internet
connection firewall.
4.
Highlight your ReadyNAS system and click the
Setup
button.
RAIDar opens your default browser and prompts you to log in to the storage system.


