


Installation Guide
6/29/2023
13
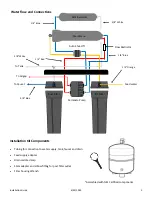
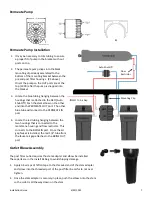
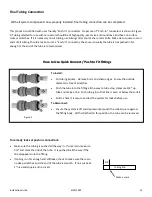
Final Tubing Connection
With all system components now properly installed, final tubing connection can be completed.
This product is outfitted with user friendly
“
Push
-
In
”
connectors. Proper use of
“
Push
-
In
”
connectors is shown in Figure
9. Tubing selected for use with connectors should be of high quality, exact size and roundness, and have no surface
nicks or scratches. If it is necessary to cut tubing, use tubing cutter tool or sharp razor knife. Make clean square cuts on
ends of all tubing. Should a leak occur at a
“
Push
-
In
”
connector, the cause is usually the tube is not pushed in far
enough or the end of the tube is compromised.
To remedy leaks at push in connections:
•
Make sure the tubing is pushed all the way in. If uncertain, measure
3/4”
and mark the end of the tube. It is pushed in all the way if the
line disappears into the fitting:
•
If tubing is in far enough and still leaks, check to make sure there are
no deep scratches and the end of the tube is smooth. If not, cut back
1”
nice and square and re
-
insert
3/4”
Make a mark
Tubing End
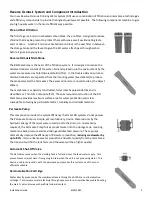
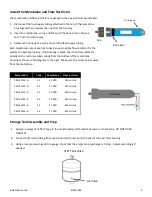
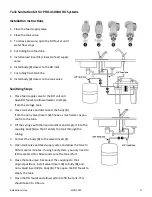
How to Use Quick Connect / Push to Fit Fittings
To Install:
•
Cut tubing Square
-
Remove burrs and sharp edges. Ensure the outside
diameter is free of scratches.
•
Push the tube into the fitting all the way to tube stop. (measure
3/4”
up
tube and make a line. Push tubing in so that line is even or below the collet)
•
Pull to check it is secure and test the system for leaks before use
To Disconnect:
•
Ensure the system is off and depressurized, push the collet square against
the fitting body. With collet held in this position, the tube can be removed
Figure 3
Содержание PRO-41000-A Series
Страница 20: ...Installation Guide 6 29 2023 20...


