


Configuring a Windows Client
19
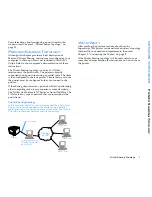
PEER-TO-PEER TOPOPLOGY
C
ONFIGURING
A
W
INDOWS
C
LIENT
Windows NT 4.0 Computers
Configuring a Windows NT 4.0 computer so it can
communicate with the printer involves installing a printer
driver, then configuring a printer port.
To install a printer driver:
1.
Insert the
SuperScript 1800 Solutions CD
into your
computer.
Note:
If the NEC SuperScript 1800 Solutions CD
Installer appears on the monitor shortly after the disk is
inserted, go to Step 4, if not, go to Step 2.
2.
From the desktop, double-click
My Computer
to open
the My Computer window.
3.
Double-click the
NEC SS1800
icon to start the installer.
As an alternative, right mouse button click on
NEC
SS1800
then select
Open
or
Autoplay
to start the
installer. If neither one of these methods work, double-
click
Setup.exe
which is located on the CD.
4.
When the
Welcome
dialog box appears, click
Next
to
begin the installation.
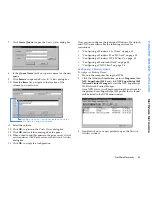
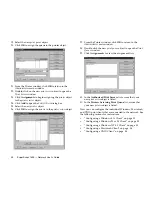
5.
When the
Select Components
dialog box appears, do the
following.
•
Select the printer driver(s) you want to install.
Note:
If selecting the Windows PostScript printer
driver (NEC 1800 PS Printer Driver), the NEC
PostScript Level 2 Upgrade Kit (Order No. 1802) must
be installed in the printer. See Chapter 8, “Printer
Options,” of the SuperScript 1800 User’s Guide for
more information.
Later, when the Add Printer Wizard appears, click the
Have Disk
button then navigate the
SuperScript 1800
Solutions CD
to the appropriate directory to get the
PostScript installation file. Depending on your
operating system, navigate to one of the following
directories
.
•
\Ss1800\Winnt\Ps
•
Select the
SuperScript 1800 Network Printer
Manager
.
•
The
Online User’s Guide
and
On-line Network
User’s Guide
are optional.
•
Do not select
SuperScript 1800 Status Monitor
. This
component does not work across a network.
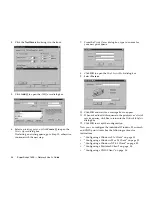
6.
When the
Setup
dialog box appears, do the following.
•
Select
Print Client
if this computer will be used to
send print jobs to the printer.
•
Select
Print and Administrative Client
if this
computer will be used to send print jobs and
administer the printer. The Network Printer
Manager will be installed.
7.
Follow the instructions that appear on your monitor to
complete the installation.
8.
Restart your computer after the driver is installed.
The printer port can now be configured.
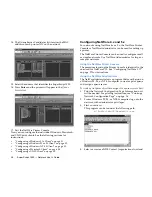
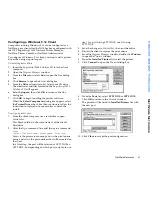
To configure a printer port:
1.
From the Windows NT
Start
button, point to
Settings
then select
Printers
to open the
Printers
window.
2.
Select the printer driver that was installed.
3.
From the
File
menu, select
Properties
to open the driver
properties window.
4.
Click the
Ports
tab to bring it to the front.
5.
Click
Add Port
to open the
Add Ports
dialog box.
6.
From the
Available Ports
list, select
NEC Network
Printer Port
.
7.
Click
New Port
to open the
Select Printer
dialog box.
8.
Navigate to the
Printer Name Lists
.
9.
Select the printer.
10. Click
OK
to return to the
Printer Ports
dialog box.
11. Click
OK
to return to the
Add Port
dialog box.
12. Click
OK
to return to the driver properties window.
13. Click
OK
to accept the configured port.
Содержание SuperScript 1800
Страница 1: ...S U P E R S C R I P T 1 8 0 0 NETWORK USER S GUIDE July 1999 808 878291 011A...
Страница 6: ...vi SuperScript 1800 Network User s Guide...
Страница 10: ...4 SuperScript 1800 Network User s Guide...
Страница 14: ...8 SuperScript 1800 Network User s Guide...
Страница 28: ...22 SuperScript 1800 Network User s Guide...
Страница 52: ...46 SuperScript 1800 Network User s Guide...
Страница 62: ...56 SuperScript 1800 Network User s Guide...
Страница 76: ...70 SuperScript 1800 Network User s Guide...


