3-4 Configuring Your System
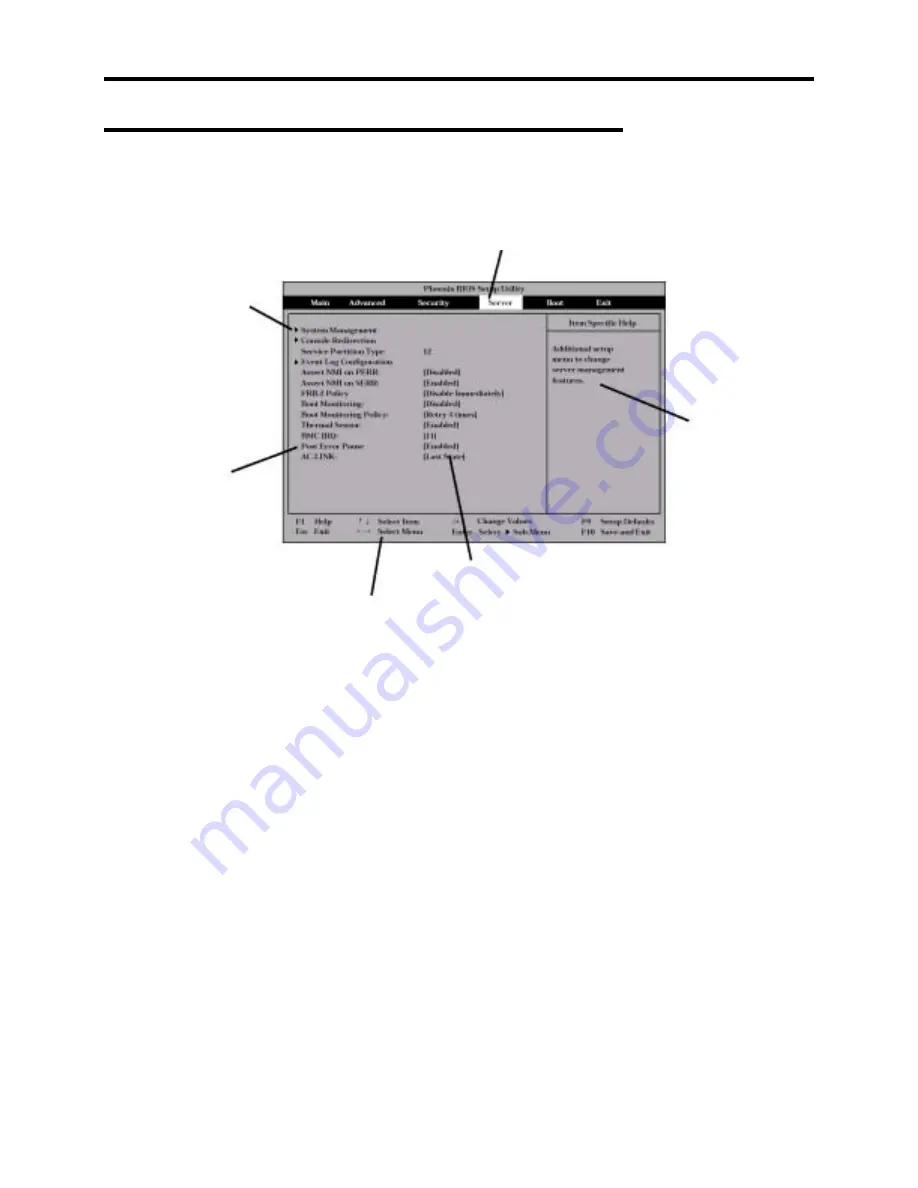
Description on On-Screen Items and Key Usage
Use the following keyboard keys to work with the SETUP utility. (Key functions are also listed at
the bottom of the screen.)
Indicates the current menu.
Indicates there are
submenus.
Online help
window
Setup item
menu
Parameter (high-lights upon selection) menu
Explanation of key functions menu
Cursor (
↑
,
↓
)
Selects an item on the screen. The highlighted item is currently
selected.
Cursor (
←
,
→
)
Selects the Main, Advanced, Security, Server, Boot, or Exit menu.
–
and
+
Changes the value (parameter) of the selected item. When a
submenu option (an option preceded by
8
) is selected, these keys
are disabled.
Enter
Press
Enter
to select (determine) parameters.
Esc
Displays the previous screen.
F1
Press
F1
when you need help on SETUP operations. The help
screen for SETUP operations appears. Press
Esc
to return to the
previous screen.
F9
Sets the parameter of the currently displayed item back to the
factory set parameter.
F10
Sets the parameter back to the one stored by the server before the
SETUP utility was started.
Содержание EXPRESS5800/120MF
Страница 1: ... EXPRESS5800 120Mf U s e r s G u i d e ...
Страница 2: ......
Страница 4: ......
Страница 12: ...x ...
Страница 24: ...1 6 System Overview Rear View 11 9 10 12 13 14 15 16 2 17 15 18 17 16 1 8 7 6 1 2 3 4 5 2 5 1 ...
Страница 58: ...1 40 System Overview This page is intentionally left blank ...
Страница 59: ...Chapter 2 Setting Up Your Server This chapter describes how to set up your server ...
Страница 202: ...4 62 Installing the Operating System and Utilities This page is intentionally left blank ...
Страница 214: ...5 12 Maintenance This page is intentionally left blank ...
Страница 229: ...Troubleshooting 6 15 Memory modules DIMM Group 3 DIMM Group 2 DIMM Group 1 ...
Страница 282: ...7 28 Upgrading your Server Removal Follow the installation instructions in reverse order to remove the backup device ...
Страница 304: ...7 50 Upgrading your Server This page is intentionally left blank ...
Страница 305: ...Chapter 8 Internal Cabling Diagrams Internal cable connections of the server are shown below ...
Страница 318: ...B 4 IRQ and I O Port Address This page is intentionally left blank ...
Страница 326: ...C 8 Installing Windows 2000 This page is intentionally left blank ...
Страница 340: ...10 Glossary This page is intentionally left blank ...
Страница 345: ...xx ...
Страница 346: ... ...