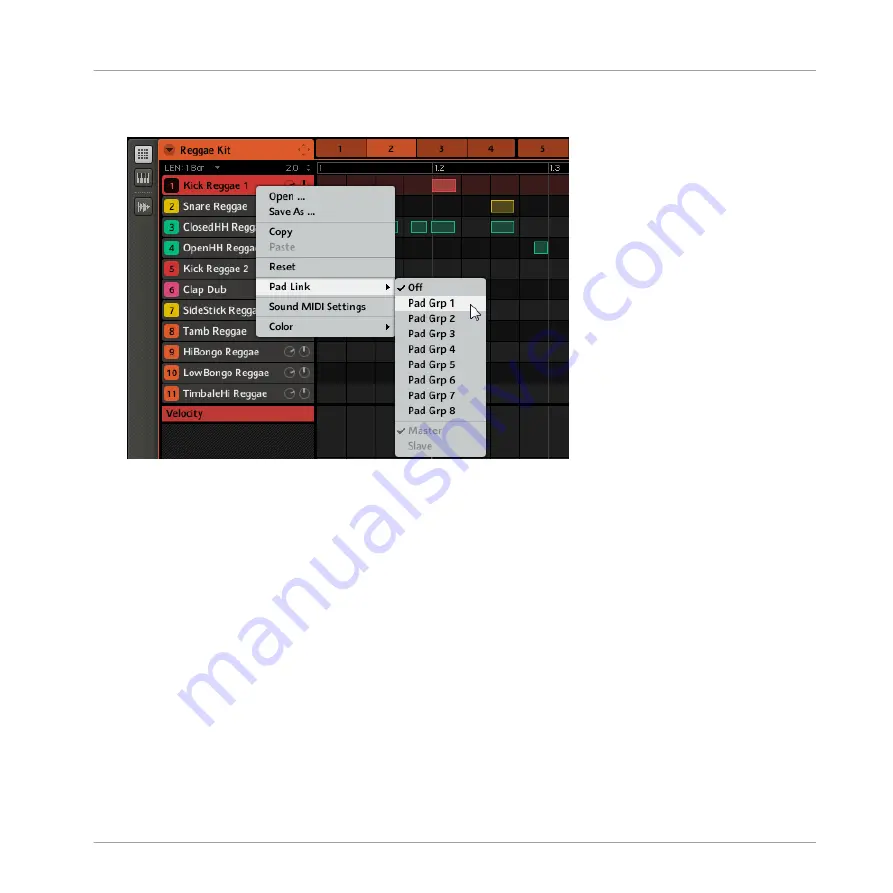
Native Instruments MASCHINE MIKRO MK2 Скачать руководство пользователя страница 201

2.

In the Pattern Editor, right-click ([Ctrl]+click on Mac OS X) the desired Sound and select
the 

Pad Link

 submenu from the context menu.

3.

Select the desired Pad Link group from the list.

4.

Repeat the process for each pad you want to include in the Pad Link group.

Releasing a Pad from a Pad Link Group

To release a pad from a Pad Link group:

Working with Patterns (Software)

The Pattern Editor


MASCHINE MIKRO MK2 - Manual - 201

Содержание MASCHINE MIKRO MK2

Страница 1: ...Manual...

Страница 2: ...NI and associated logos are registered trademarks of Native Instru ments GmbH Mac Mac OS GarageBand Logic iTunes and iPod are registered trademarks of Apple Inc registered in the U S and other countri...

Страница 3: ...e Str 29 30 D 10997 Berlin Germany www native instruments de USA Native Instruments North America Inc 6725 Sunset Boulevard 5th Floor Los Angeles CA 90028 USA www native instruments com Native Instrum...

Страница 4: ...s in the Parameter Area 29 2 2 7 Undo and Redo 30 2 2 8 Pinning a Mode 30 2 2 9 Using Two or More Hardware Controllers 31 2 3 Stand alone and Plug in Mode 32 2 3 1 Differences between Stand alone and...

Страница 5: ...3 1 Elements of the Browser 58 3 1 1 DISK Button 59 3 1 2 File Type Selector 60 3 1 3 Tag Filter 60 3 1 4 Search Field 61 3 1 5 RESULTS List 62 3 1 6 Audition Controls 64 3 1 7 Loading Groups with th...

Страница 6: ...on Envelope and Destination 97 4 2 5 Page 5 LFO and Destination 99 4 2 6 Page 6 Velocity Destination and Modwheel Destination 100 4 3 Using VST AU Plug ins 101 4 3 1 Loading a Plug in 102 4 3 2 Openin...

Страница 7: ...t from Sounds 137 5 Working with Groups 140 5 1 The Group Properties 140 5 1 1 Group Source Properties SRC 140 5 1 2 Group Groove Properties GRV 141 5 1 3 Group Macro Properties MCR and Macro Controls...

Страница 8: ...173 6 1 10 Recording Automation in the Step Sequencer 174 6 1 11 Step Grid Pattern Length and Quantization 175 6 2 Editing Patterns 177 6 2 1 Selecting Quick Selecting and Quick Editing Events Notes 1...

Страница 9: ...py and Paste Patterns 206 7 2 5 Moving Pattern Slots 207 7 2 6 Resetting a Pattern Slot 207 7 2 7 Rendering Audio from Patterns via Drag and Drop 208 7 2 8 Rendering MIDI from Patterns via Drag and Dr...

Страница 10: ...rtion 238 8 6 2 Lofi 239 8 6 3 Saturator 240 9 Using Effects 244 9 1 Applying Effects to a Sound a Group or the Master 245 9 2 Bypassing Effects 249 9 3 Applying Effects to an External Instrument 251...

Страница 11: ...ling and Sample Mapping 279 11 1 Controlling Sampling from the Hardware 279 11 1 1 Recording a Sample Hardware 279 11 1 2 Editing a Sample Hardware 282 11 1 3 Slicing a Sample Hardware 287 11 1 4 Mapp...

Страница 12: ...endix Tips for Playing Live 330 14 1 Preparations 330 14 1 1 Focus on the Hardware 330 14 1 2 Customize the Pads of the Hardware 330 14 1 3 Check Your CPU Power Before Playing 330 14 1 4 Name and Colo...

Страница 13: ...333 14 3 Special Tricks 333 14 3 1 Changing Pattern Length for Variation 333 14 3 2 Using Loops to Cycle Through Samples 333 14 3 3 Load Long Audio Files and Play with the Start Point 333 15 Glossary...

Страница 14: ...ver having to stop the music Since you can integrate it into any sequencer that supports VST Audio Units or RTAS plug ins you can reap the benefits in almost any software setup or use it as a stand al...

Страница 15: ...topics MASCHINE Hardware Control Reference Controller Editor Manual Hereafter is a quick description of each of these documentation sources Your First Stop the Setup Guide A printed Setup Guide is in...

Страница 16: ...it as a powerful and highly versatile MIDI controller to pilot any oth er MIDI capable application or device This is made possible by the Controller Editor software a little application that allows yo...

Страница 17: ...urator Module now offers two additional modes that emu late tape and tube saturation See section 8 6 3 Saturator Transient Master effect The Module collection now includes a new Transient Master effec...

Страница 18: ...elements still control the MASCHINE plug in instance See section 2 3 4 Controlling your Host s Transport Functions in Plug in Mode Quick Select Events The new shortcut SHIFT SELECT pad allows you to...

Страница 19: ...er it s always worth a look Furthermore the following formatting is used Text appearing in drop down menus such as Open Save as etc and paths to loca tions on your hard disk or other storage devices i...

Страница 20: ...and knobs on the MASCHINE controller For better reference we applied a special formatting here throughout the document the ele ments are capitalized and numbered so the buttons are written Button 1 8...

Страница 21: ...2 While holding SHIFT press PLAY and release it 3 Release SHIFT Welcome to MASCHINE Manual Conventions MASCHINE MIKRO MK2 Manual 21...

Страница 22: ...s to all of them MASCHINE s factory library is already completely tagged and you can also import your own Samples to the Library and tag them as well To learn more about the Browser please read chapte...

Страница 23: ...ps and the Sounds within them More information on the Master can be found in chapter 12 The Master Patterns A Pattern is a sequence that plays Sounds from the current Group A Pattern is therefore usu...

Страница 24: ...ects internal MASCHINE effects as well as the Input Module and the MIDI Out Module Effects FX MASCHINE comes with many different effects You may also use VST AU effect plug ins too Up to four effects...

Страница 25: ...menu Full screen view is also available from your computer keyboard via the F5 function key 2 2 2 Hiding the Browser Hardware Press and hold NAVIGATE now press Button 5 to hide the Browser To bring i...

Страница 26: ...he Browser from your computer keyboard via the F10 function key 2 2 3 Minimizing the Arranger Hardware Press NAVIGATE Button 6 to minimize the Arranger to the currently selected Group slot and again t...

Страница 27: ...to minimize the Control area to its topmost row containing the MASTER GROUP and SOUND tabs along with the Module slot tabs Software Click the Minimize button showing an arrow to the left of the Contr...

Страница 28: ...on Lane Software Click the Automation Lane button on the bottom left of the Pattern Editor to show and hide it The Automation Lane button You can also show hide the Automation Lane from your computer...

Страница 29: ...avigate with the hardware and software Hardware On the MASCHINE hardware controller you can use the Page buttons to navigate through the Parameter pages Whenever there is more than one page it will be...

Страница 30: ...d before saving Hardware On the MASCHINE hardware controller perform the Undo operation by pressing SHIFT pad 1 To perform the Redo operation press SHIFT pad 2 Software In the software use the common...

Страница 31: ...more than one instance of the MASCHINE software running on your computer you can control each instance with a different controller See 2 3 3 Controlling Various Instances with Different Controllers f...

Страница 32: ...host please refer to the documentation included with your host software If you did not install the plug ins when installing the MASCHINE software please refer to the printed Setup Guide or the PDF ve...

Страница 33: ...rom your host to switch between MASCHINE s Scenes or record automation using the Macro Controls To learn more about these have a look at chapter 10 5 Triggering Scenes via MIDI and 5 1 3 Group Macro P...

Страница 34: ...s MASCHINE and MASCHINE MIKRO Rule 2 MASCHINE controllers legacy and MK2 get focus before MASCHINE MIKRO controllers legacy and MK2 Rule 1 has priority over rule 2 2 3 4 Controlling your Host s Transp...

Страница 35: ...nu Bar Windows depicted Preferences in the Plug in menu 2 4 1 Preferences General Page The General page holds a few global settings To display the General page click the General tab on the left Basic...

Страница 36: ...start MASCHINE again Recording Audio Prefer Project Folder If this checkbox is marked the Samples you record will be put in a subdir ectory of the folder where your Project is saved If not your record...

Страница 37: ...m together moving the slider until they are played at exactly the same time As soon as you can hear a flanger like effect you know you are close to the correct Sync Offset Slave value Keep on adjustin...

Страница 38: ...pressing your mouse button and dragging up or down Input Quantize This allows you to select one of the three quantization options when play ing live on the pads None no quantization Record quantizatio...

Страница 39: ...a Project to load automatically when you start a new Project within a Digital Audio Workstation The field displays the location of the Template Project currently selected for use Click the folder icon...

Страница 40: ...folder icon to the right you can change the path for example if you moved your sample folder to another location Please consult chapter 3 Browser for more information on adding your own samples Basic...

Страница 41: ...not be tag ged if you add them like this see chapter 3 Browser for more informa tion on importing and tagging your files Paths to Samples that you added via the import function from the Browser will a...

Страница 42: ...to another hard disk or to another location on the same hard disk You can resize the Preferences window at your convenience using the usual method on your operating system You can also resize each col...

Страница 43: ...LOCATIONS section of the Plug ins page you can manage the storage folders of all the plug ins available Click the folder icon to the right of an entry to change the path of that plug in directory The...

Страница 44: ...automatically detect plug ins that are added or re moved or deselect any plug ins that are not working correctly for any reason MANAGER Section In the MANAGER section of the Plug ins page you can enab...

Страница 45: ...t of available plug ins up to date Clicking RESCAN will check the integrity of your plug ins and allow you to automatically detect plug ins that were added or removed or deselect any plug ins that are...

Страница 46: ...64 bit plug ins installed then no 64 BIT or 32 BIT tab will be shown respectively If you plug a MASCHINE instance into your DAW keep in mind that a 64 bit MASCHINE plug in will host 64 bit plug ins on...

Страница 47: ...is translated into velocity val ues starting from Soft 3 a soft touch is enough to get a big velocity value through Linear to Hard 3 you really have to hit the pad hard to get a big velocity value Dis...

Страница 48: ...city Scaling The Knobs 1 4 allow you to adjust the Brightness Pad Sensitivity Contrast Left and Contrast Right respectively When you re done press SHIFT CONTROL again to quit the MIDI mode and get bac...

Страница 49: ...r of the Group they are belonging to Load with Colors Color settings are saved with your MASCHINE files Projects Groups Sounds etc If you uncheck Load with Colors checked by default the saved colors w...

Страница 50: ...nding tab at the top 2 5 1 Audio Page The Audio page holds settings related to your audio interface The Audio page of the Audio and MIDI Settings window Setting Description Driver Select your audio dr...

Страница 51: ...be a very small delay between when you hit a pad and when you actually hear it You should therefore experi ment with this setting so that it is as low as possible without overloading your CPU or intr...

Страница 52: ...ts The choices made here will determine which inputs can be used when sam pling external sources for example Outputs By clicking Outputs you will be presented with a list of the 16 stereo out puts fro...

Страница 53: ...your system You can activate deactivate each output by clicking the fields in the Status column which displays the current status of the corresponding port Clock Offset Use the Clock Offset control to...

Страница 54: ...o switch Scenes remotely by sending MIDI Program Change messages to MA SCHINE More on this in section 10 5 Triggering Scenes via MIDI 2 6 1 Sync to External MIDI Clock MASCHINE can be controlled exter...

Страница 55: ...ock If Sync to External MIDI Clock is checked the Play button in the MASCHINE Header and on the MASCHINE controller are deactivated 2 6 2 Send MIDI Clock MASCHINE can also send a MIDI Clock signal to...

Страница 56: ...Send MIDI Clock activated Basic Concepts Connecting External MIDI Equipment MASCHINE MIKRO MK2 Manual 56...

Страница 57: ...erns instruments and effect presets This is done by tagging them which means categorizing them by using keywords Given that the MASCHINE software has some advantages over the hardware in this case suc...

Страница 58: ...ts of the Browser The elements of the Browser 1 DISK button Use the DISK button to switch between the Browser and access to your com puter hard disks Browser Elements of the Browser MASCHINE MIKRO MK2...

Страница 59: ...into the Search field to perform a search Results are displayed in the search result list below 5 RESULTS list The RESULTS list displays all files that match your query 6 Tag Editor The Tag Editor all...

Страница 60: ...f MASCHINE Projects 1 Groups 2 Sounds 3 Patterns 4 instruments presets 5 effect presets 6 and Samples 7 Clicking one of them will cause only the files of the selected type to be dis played in the RESU...

Страница 61: ...be used to categorize your file in a general way SUBTYPE With the SUBTYPE you can narrow down the description of your file even further If the tags don t fit in the Tag Filter display use the scroll b...

Страница 62: ...utton showing a little cross resets both text search and tag search 3 1 5 RESULTS List The RESULTS list shows all the files that match your query From the list you can load the desired file into your...

Страница 63: ...is an effect preset it will be loaded into the selected Module slot If it is a Sample it will be loaded into the Sound slot currently in focus The Sampler Module will be automatically loaded in Modul...

Страница 64: ...ject while it is playing Autoload is not available when browsing Projects Autoload is not only useful to look for an appropriate Sound Group effect or Sample but can also be very inspiring with a Patt...

Страница 65: ...ox Load Patterns checkbox enabled default Groups will be loaded together with their Pat terns This allows you to use the Patterns you have saved with the Groups Upon loading all Patterns of the Group...

Страница 66: ...other Samples are missing MASCHINE tries to guess their path start ing from the path you just indicated IGNORE Click this button to continue loading your Project without locating the missing Sample Y...

Страница 67: ...ser on the Hardware you will have to import them into the Library Importing files does not mean they will be moved from the directory they currently reside in they will only be referenced by the Brows...

Страница 68: ...enabled showing the available volumes In the tree view navigate to the directory that contains your files To expand close a folder double click its name or click the folder icon at its left The Brows...

Страница 69: ...s To select all files in a folder simply click the folder After you have selected the desired file s add it them to the Library by clicking the IMPORT button at the bottom right of the Browser You wil...

Страница 70: ...time you can edit the tags of files already in the Library by selecting them in the RESULTS list while browsing the Library and clicking the EDIT button at the bottom right of the Browser If multiple...

Страница 71: ...category columns in the Tag Editor there is an add new entry Adding a new tag in the TYPE column To add a new tag click on this entry enter the tag name with your computer keyboard and press Enter The...

Страница 72: ...function for the MASSIVE Module in a Sound The Quick Browse function is activated by clicking the magnifying glass next to the file name in the left part of the Control area If you click the magnifyi...

Страница 73: ...the MASTER tab in focus On the displays of your controller the Browser is organized as follows The left display allows you to select the file type and the desired tags for narrowing your search The r...

Страница 74: ...eft Display BANK TYPE and SUBTYPE Fields The three other fields at the bottom of the left display allow you to select tags in the three cat egories of the Tag Filter see section 3 1 3 Tag Filter Dial...

Страница 75: ...ow you to directly load the next or the previous file from the search result list in order to be able to compare them easily just like Autoload in the software See section 3 1 6 Audition Controls for...

Страница 76: ...elected Sample will be loaded by press ing Button 7 ADD If ADD is disabled the new Sample will replace the current Sample if any If ADD is enabled the current Sample will stay in place and the new Sam...

Страница 77: ...roups each Group offers 16 Sound slots and each Sound slot can hold one Sound In the software Sound slots are displayed in the column at the left of the Pattern Editor and you can select them by click...

Страница 78: ...will define its role and sonic characteristics For example in the picture above the Control area displays the content of Module slot 1 in which a Sampler Module is loaded by looking at the tabs in th...

Страница 79: ...se a Sound to send MIDI notes to your host application or your external MIDI equipment VST AU instrument plug ins You can use any VST AU instrument plug in from Native Instruments and third party manu...

Страница 80: ...und Slots 2 4 will not be effective See section 4 9 3 MIDI Output from Sounds for more info You can also sample directly to a Sound slot This will automatically load a Sampler in Module slot 1 Read ch...

Страница 81: ...he right display Software 1 Click the Sound slot in which you want to load a Module At the top left of the Control area click the SOUND tab On the right you see the four tabs of Module slots 1 4 2 Cli...

Страница 82: ...the bottom of the Module menu holds a few commands for managing Module presets Open Allows you to open a Module preset you have previously saved Save As Allows you to save the current Module settings...

Страница 83: ...types of Modules If a Module provides more than eight parameters these will be split into Parameter pages each page containing up to eight parameters Hardware 1 On your MASCHINE hardware controller p...

Страница 84: ...on on how to bypass Module slots please refer to section 9 2 Bypassing Effects where the procedure is illustrated and described in detail 4 1 6 Moving Modules The MASCHINE software provides you with a...

Страница 85: ...s notably means that a Module cannot be inserted between two existing Modules via drag and drop Moving Modules Across Sounds and Groups Moving Modules is not only possible within the same Sound but al...

Страница 86: ...while holding the mouse button two things will happen The Control area will switch to the Module content of that Group You can then drop the Module on one of its Module slots The Pattern Editor will...

Страница 87: ...he content of the target Sound slot then drop the Mod ule on the desired Module slot Hint Using the Controller to Select the Target Object While you are dragging a Module and holding the mouse button...

Страница 88: ...ing options for loading Modules as well as saving and recalling Module presets The commands for saving Module presets are found at the bottom of the Module menu Module Menu Entry Description Save As S...

Страница 89: ...ry library imported into the MASCHINE Browser so that you can browse and load its factory presets directly from MASCHINE ready for loading Hardware Module presets for the MASSIVE plug in in the Browse...

Страница 90: ...e library Urban Arsenal 2 of the MASSIVE plug in in the Browser 1 At the top of the Browser check that the DISK button is not active if it is click it to de activate it Working with Sounds Sound Basic...

Страница 91: ...e preset from the Module menu by selecting the Open command then navigating your file system and selecting the desired preset file extension mfxp 4 2 The Sampler Module The Sampler Module allows you t...

Страница 92: ...efault value is 8 the minimum 1 and the maximum 32 voices You can also set this to Legato in that case the polyphony is set to 1 and the Sampler performs a continuous pitch transition be tween consecu...

Страница 93: ...e Available options are Standard and Vintage Model If you choose Vintage in Mode you can select between two Models MP60 and S1200 which emulate the sound of two legendary Samplers that are often used...

Страница 94: ...ope section allows you to tailor your Sample in terms of its loudness over time The Type selector The Type selector allows you to choose from three different types of Amplitude Envelopes De pending on...

Страница 95: ...not only to be ing hit but also to being held so using the ADSR envelope you can make the pads be have like a MIDI keyboard and sustain a note only for as long as it is held down Parameter Descriptio...

Страница 96: ...Page 3 FX and Filter Sampler parameters page 3 of 6 FX and FILTER on the controller Sampler parameters page 3 of 6 FX and Filter in the software FX This is a small selection of basic effects not to be...

Страница 97: ...it Filter Modes Description Off No filter LP2 LP2 is a low pass filter with Cutoff and Resonance Cutoff can be modulated by Velocity the Modulation Envelope the LFO or the MIDI Modulation Wheel BP2 BP...

Страница 98: ...es for the envelope to reach its maximum level Hold How long the envelope will stay at its maximum level Decay With Decay you adjust how fast the envelope drops to the sustain level in ADSR mode in AH...

Страница 99: ...O and Destination in the software LFO The LFO Low Frequency Oscillator is another modulation source based on waveforms with different shapes LFO Controls Description Type Here you can choose the shape...

Страница 100: ...the amount of modulation for the following targets Parameter Modulation Destination Pitch Tune parameter of the Pitch Gate section on page 2 Cutoff Cutoff parameter of the Filter section with filter t...

Страница 101: ...Cutoff parameter of the Filter section with filter types LP2 HP2 BP2 only on page 3 Volume This allows you to modulate the volume which is what velocity normally is used for Modwheel Destination Here...

Страница 102: ...ess the CONTROL button to enter the Control mode 2 Press SELECT the pad you want to load the instrument to 3 Press Button 3 to put the focus on the SOUND tab 4 Make sure MODULES is activated to show M...

Страница 103: ...nstrument plug in chromatically using the pads on the MASCHINE hardware press SHIFT PAD MODE to quickly toggle to Keyboard mode See section 6 1 2 Pad Modes for more info Software 1 In the Control area...

Страница 104: ...odule menu of the first Module slot only Module slot 1 can host instrument plug ins 4 Select Plug ins from the menu to get a list of all available instrument plug ins Working with Sounds Using VST AU...

Страница 105: ...If you find a good sound setting save it as a preset as described in section 4 1 5 By passing Module Slots To play the instrument plug in chromatically using the pads on your controller click the Key...

Страница 106: ...s for plug ins as described in the following text Software When a plug in has been assigned to a Module slot the plug in icon will appear in the Quick Browse area An EDIT icon appears when the mouse c...

Страница 107: ...arameters of a plug in by automatically organizing them into Parameter pages and assigning them to the Knobs 1 8 under the displays Having the plug in parameters on Parameter pages in MASCHINE has fol...

Страница 108: ...ng Up Parameter Pages As with any Module the parameters of a VST AU plug in Module are organized into pages Each Module can have up to 32 pages each containing 8 knobs which can be assigned to the plu...

Страница 109: ...ult number of pages listed in the menu vary with each plug in Clear All Assignments Removes all Parameter pages and creates a new empty Page 1 without assign ments Apply Auto Mapping Deletes all pages...

Страница 110: ...from the Page menu if you want to stop assigning parameters When Learn mode is active you can manually change the focus of the knobs by clicking the de sired knob in the Parameter area Once you have...

Страница 111: ...Learn mode The white dot disappears and an abbreviation of the parameter s name is displayed under neath the MASCHINE knob to confirm the parameter is assigned You can exit Learn mode before assigning...

Страница 112: ...oves the existing parameter assignment for this knob and copies it to the clipboard Paste Plug in Parameter Pastes the parameter assignment on this knob and removes it from the clip board A parameter...

Страница 113: ...bmenu The preset is loaded into the plug in Each VST AU plug in might handle its presets or patches programs differently Please re fer to the plug in documentation to know how to expose its presets or...

Страница 114: ...en the Sound Group and Master level Here we describe how to select a particular set of Properties at the Sound level but the procedure is the same at the Group and Master levels At the Sound level fol...

Страница 115: ...ontrol area click the SOUND tab 3 At the bottom left of the Control area click the GRV or OUT button in the Property selec tor The corresponding Properties are displayed in the Parameter area on the r...

Страница 116: ...ter area to step through the various Parameter pages if any 2 Use the mouse to adjust the values of the parameters in the displayed page 4 4 3 Sound Groove Properties GRV The Groove Properties control...

Страница 117: ...ured in fractions of a whole note Invert Allows you to invert the Swing function so that instead of being delayed in the Pattern events will be triggered ahead of time How Swing Affects the Rhythm An...

Страница 118: ...Sound s Output Properties allows you to route the audio output of your Sound and define auxiliary sends or Aux sends Aux sends allow you to send a definable amount of your Sound s audio output to oth...

Страница 119: ...cting as bussing point as well as the 16 external stereo outputs Out 1 16 Level Here you adjust the level of the signal that gets sent to the Aux 1 destina tion Aux 2 Section Output The destination fo...

Страница 120: ...abled the Sound will be fed into Aux 2 before the Level and Pan settings of the Main section on page 1 are applied 4 5 Managing Sounds This section describes the global editing functions available for...

Страница 121: ...t nor when loading another Module in its Module slot 1 To rename a Sound slot 1 Double click the desired Sound slot The Sound slot s name gets highlighted 2 You can now edit the name of the Sound slot...

Страница 122: ...at the bottom of the Color Palette The pads of the MASCHINE MK2 controller mirror the Sound colors you select By default Sounds inherit the color of their Group But you can choose another default col...

Страница 123: ...e Save File As dialog Your Sound is now saved The Sound will be added to the Library and is ready to be tagged in the Browser see section 3 4 Tagging your Files for more info on this Even if you don t...

Страница 124: ...ler will stay in Duplicate mode until you press DUPLICATE again See section 2 2 8 Pinning a Mode for more info Software To copy and paste Sounds in the software 1 Right click on Mac OS X Ctrl click th...

Страница 125: ...ion line appears at the potential places where you can drop the Sound slot 3 When the insertion line appears at the desired location release the mouse button The Sound slot takes its new place in the...

Страница 126: ...y live and to test different sequences together When used on Sounds the Solo only applies to the current Group The Sounds in other Groups won t be affected At the Group level the Mute function is an a...

Страница 127: ...3 turns all Sounds on NONE Button 4 turns all Sounds off in the selected Group The Solo mode on the controller Muting Sounds and Groups Mute works in the same way as Solo 1 Hold MUTE Your controller s...

Страница 128: ...the muted Sounds back in one at a time while holding the MUTE button 4 6 2 Mute and Solo in the Software Soloing a Sound To solo a Sound right click on Mac OS X Ctrl click the pad icon on the left sid...

Страница 129: ...Sound click on the pad icon on the left side of the Sound slot in the Pattern Editor Muting a Sound To unmute the Sound click on the pad icon again Muting a Group To mute a Group click on the Group ic...

Страница 130: ...performance e g to create stutter beaks as a workflow aid to stop long oneshot Samples that still continue playing after you have stopped the sequencer as a first panic button if you are not sure whe...

Страница 131: ...import a Pattern will be created and added A REX file loaded in Sound slot 1 4 9 Using MIDI with Sounds MASCHINE provides you with flexible MIDI facilities that can be used in many situations Incomin...

Страница 132: ...onfigure your Sounds for sending MIDI notes instead of generating audio see section 4 9 3 MIDI Output from Sounds When MASCHINE is used as plug in you can record the notes you play on the pads as MIDI...

Страница 133: ...d MIDI Batch Setup do the following 1 Click the little arrow in the Group header above the Sound slots to open the Group menu and choose Sound MIDI Batch Setup from the menu Alternatively you can righ...

Страница 134: ...MIDI Channels Select this radio button to have Sounds mapped to individual MIDI chan nels This is useful if you want to play a Sound in a tonal way Sounds to MIDI Notes Select this radio button to hav...

Страница 135: ...lar Sound see section 4 9 2 Sound MIDI Settings 4 9 2 Sound MIDI Settings You can also assign individual Sounds to incoming MIDI notes This is done in the Sound MIDI Settings window 1 Right click on M...

Страница 136: ...ehavior Any incoming MIDI note will trig ger the Sound as long as the Sound is in focus Sound MIDI Settings Description Status Section Enable To enable custom MIDI settings for the Sound click this ch...

Страница 137: ...han the Scene settings 4 9 3 MIDI Output from Sounds You can output MIDI notes from individual Sounds allowing you to control any MIDI capable application and or external MIDI gear from MASCHINE s seq...

Страница 138: ...t Module is loaded into Module slot 1 of a Sound the other three Mod ule slots 2 4 are bypassed Software 1 Select an empty Sound slot by clicking it 2 In the Control area click the SOUND tab to select...

Страница 139: ...otes on the specified channel while you play the pads and or a Pattern is playing You will notice that the Sound was automatically renamed to MIDI Out When the MIDI Out Module is loaded into Module sl...

Страница 140: ...For general information on how to display and adjust the Properties please refer to section 4 4 1 Selecting a Set of Properties and 4 4 2 Adjusting the Properties 5 1 1 Group Source Properties SRC Th...

Страница 141: ...es GRV The Groove Properties control the rhythmic relationship between events for the selected Group Sound or the Master level By shifting some of the events you can e g give a shuffling ternary touch...

Страница 142: ...ng live since you can choose a set of parameters from various Sounds in the Group and from the Group itself to manipulate on one screen without hav ing to switch screens Macro Controls also allows you...

Страница 143: ...This is done in the Macro Properties of the Group Each Macro Control can be assigned to one destination with the full range of the selected parameter Macro Controls are bipolar knobs with a range of 1...

Страница 144: ...acro 1 8 in the context menu After an assignment is made a blue dot at the top left of the parameter shows that it is assigned to a Macro Control On the Macro page you will see the name of the assigne...

Страница 145: ...er from the assigned Macro Control right click on Mac OS X Ctrl click the parameter and select Remove Macro Control from the context menu or In the Group s Macro Properties remove the parameter assign...

Страница 146: ...CC to a MASCHINE Macro Control 1 Go to the Macro Properties by selecting the GROUP tab and then clicking the MCR button in the Property selector 2 Right click on Mac OS X Ctrl click the desired Macro...

Страница 147: ...connected MIDI controller When the MIDI CC has been received the white dot will stop flashing and stay continu ously lit indicating that the Macro Control is now assigned to a MIDI CC If you want to l...

Страница 148: ...h MASCHINE Macro Control has a unique Automation ID which is provided to your host DAW by the MASCHINE plug in Please refer to your host DAW documentation to find out more about host automation Access...

Страница 149: ...d a definable amount of your Group s audio output to Sounds in other Groups for further processing Read the section 9 4 Creating a Send Effect to get to know more about how to set up a classic send ef...

Страница 150: ...destina tion Aux 2 Output The destination for Aux 2 available destinations are None no output de fault setting Master any other Sound within other Groups acting as bus sing point as well as the 16 ext...

Страница 151: ...section describes the global editing functions available for Groups and Group slots 5 2 1 Naming Group Slots By default Group slots are named Group A H If you load a Group e g from the Browser into a...

Страница 152: ...Changing the Group s Color You can change the color of each individual Group in the software To do this 1 Right click Ctrl click on Mac OS X the desired Group slot and select Color from the context m...

Страница 153: ...re To save a Group 1 Right click on Mac OS X Ctrl click the Group slot in the Arranger and select Save As from the context menu A Save File As dialog appears By default the Group file inherits the nam...

Страница 154: ...vailable in the Browser for use in other Projects 5 2 4 Saving a Group with its Samples Sometimes it is useful to have the ability to save a Group with its Samples outside of the MA SCHINE Library If...

Страница 155: ...ave with Samples from the context menu You will be presented with the Save Group with Samples window 2 In this window adjust the settings see table below and click SAVE to confirm or CAN CEL to cancel...

Страница 156: ...with its Samples See section 12 2 1 Export Audio for more info 5 2 5 Copying and Pasting Groups You can copy and paste Groups across Group slots in your Project Hardware To copy a Group from one Group...

Страница 157: ...t and select Paste from the context menu All parameters of the Group will be copied except for the Clips of that Group its Patterns though will be copied as well 5 2 6 Moving Group Slots You can reord...

Страница 158: ...can now select this Group via the Group button whose letter appears at the left of the Group slot 5 2 7 Resetting a Group Slot Resetting a Group slot will remove the Sounds and effects it contains and...

Страница 159: ...INE has a different approach to handling and naming parameters please refer to this list to find out how MPC Program settings are being translated into MASCHINE settings MPC Parameter MPC500 1000 2500...

Страница 160: ...Filter1 Resonance x x x Filter Resonance Filter1 Velocity to Fre quency x Velocity Cutoff Mixer Level x x x x Track Level Mixer Pan x x x Track Pan Velocity to Level x Velocity to Volume Mute Group x...

Страница 161: ...t You will be prompted with the MPC Import window 3 In the Input section of the window window select one of the import options see table below 4 Click OK to start the import procedure Working with Gro...

Страница 162: ...ate Group Import Single Bank If you only want to import a single Bank choose this option Use the drop down menu to the right to select which Bank you want to import The list below shows you a preview...

Страница 163: ...ame time Your controller switches to Pattern mode This is indicated by the lit PATTERN button The hardware displays in Pattern mode On the right display you will see all available Pattern slots of a P...

Страница 164: ...g consequences Its Pattern is displayed in the software s Pattern Editor You can then modify it both from your controller and in the software Its Pattern is referenced by a Clip for the selected Group...

Страница 165: ...lready contains a Pattern it will be replaced by the copied Pattern You can select the target slot in another Pattern Bank After you have selected the source Pattern switch to the desired Pattern Bank...

Страница 166: ...nd make it permanent In Pad Mode mode you make settings on the left display and on the right display you will see the corresponding assignments for your pads The Pad Mode mode on the controller Parame...

Страница 167: ...gly VELOCITY Knob 4 Here you can adjust the exact velocity value used in the Fixed Velocity mode see above The base key can also be changed by using Buttons 5 8 Buttons 5 6 will shift the base key in...

Страница 168: ...To release a pad from a Pad Link group 1 Press the Group button of the pad you want to release from its Pad Link group 2 Hold the PAD MODE button 3 Deselect KEYBD Keyboard if it is already selected t...

Страница 169: ...ress ERASE together with a pad while recording all events at the current play position are deleted see section 6 2 2 Deleting Events Notes Take your time to set up the pad sensitivity and velocity sca...

Страница 170: ...immediately even if REC is not enabled 3 Each pad now represents one step of a 16 step sequence you can activate a step by pressing a pad once lighting it up If you press it again the step is removed...

Страница 171: ...a given rate Note Repeat mode on the controller displays 1 While holding NOTE REPEAT hold the pad you want to play record The notes will now be repeatedly triggered at the selected rate shown on the...

Страница 172: ...by pressing Button 1 you can then release PAD MODE Press Button 2 to enter Keyboard mode If you hit the pads now you will hear that they all play the same Sound but each with a different pitch The pit...

Страница 173: ...ntroller 1 First make sure the song is playing PLAY must be lit and your controller is in Control mode CONTROL must be lit if it s not please press it 2 Hold AUTO WRITE 3 Turn one of the Knobs 1 8 und...

Страница 174: ...will not be automatable whereas the same Module loaded in a Group or Sound will have its parameters automatable Almost all parameters meeting these requirements including the Macro Controls are autom...

Страница 175: ...next step back to its default value 6 1 11 Step Grid Pattern Length and Quantization Step Grid The set of all steps in any Pattern is called Step Grid The Step Grid is the frame where you create and e...

Страница 176: ...ue low resolution like note and change the Pattern Length setting using PATTERN Knob 1 to create variations of a Pattern If you select an small value high resolution like 1 64th you can create stutter...

Страница 177: ...ally applied to the Pattern on its next cycle according to the current value indicated on the right display and by the lit pad PLAY REC Input Quantization when playing and when recording Your playing...

Страница 178: ...ke more complex selections your controller provides you with a useful tool the Select mode To select events in your Pattern 1 Hold SELECT to enter Select mode or press SELECT Button 1 to pin the Selec...

Страница 179: ...efined by the START and END values to the left right As the selection interval moves some events are included into the selection while other are excluded from the selection Knob 4 EVENT Selects indivi...

Страница 180: ...under the UP and DOWN labels on the right display Knob 1 2 START END Define the selection s start and end points in the timeline for the current Sound All notes within this time interval and within t...

Страница 181: ...the length of the selected events by one step long increments possible re sizings thus depend on the current Step Grid resolution If the events have differ ent lengths the length differences are reta...

Страница 182: ...ch the Pattern contains events If your pads are in Keyboard mode the lit pads show you the pitches of the selected Sound for which the Pattern contains events In other terms you don t need to press an...

Страница 183: ...ck to where you were before 6 2 3 Copy and Paste Events Notes You can also copy and paste selected events notes 1 To copy the selected events notes press SHIFT pad 11 COPY 2 To paste them press SHIFT...

Страница 184: ...notes up press SHIFT pad 16 OCTAVE If nothing is selected all events notes in the Pattern will be affected 6 2 6 Compare Split This function allows you to compare a selected Pattern with its previous...

Страница 185: ...For a comprehensive list of hardware shortcuts please view the Hardware Control Reference available from the Help menu Working with Patterns Controller Editing Patterns MASCHINE MIKRO MK2 Manual 185...

Страница 186: ...Pattern editing tool of the MASCHINE software 7 1 1 Pattern Editor Overview This overview of the Pattern Editor introduces you its main parts and control elements The Pattern Editor 1 Group View butto...

Страница 187: ...Scene in the Arranger see chapter 10 Creating a Song using Scenes The Clip will take the name of the Pattern if any and the number of its Pattern slot Create Clips from various Patterns to form an arr...

Страница 188: ...rn slot 1 selected You can distinguish between different Pattern states by the brightness of the Pattern slots the brightest Pattern slot represents the selected Pattern dim Pattern slots on the pictu...

Страница 189: ...cision of all Pattern editing actions including quantization To select the step size that will apply to all your editing actions click the STEP menu in the Edit controls at the bottom left of the Patt...

Страница 190: ...Grid resolution to another value right click on Mac OS X Ctrl click the Pattern slot and choose Quantize or Quantize 50 in the slot s context menu If some events notes are selected the quantization wi...

Страница 191: ...automatically detects and re moves these double notes while quantizing 7 1 4 Adjusting the Pattern Length Similarly to the Step Grid another grid defines the available values for the Pattern Length i...

Страница 192: ...turn it off allowing you to freely set the Pattern Length You can now change the Pattern Length accordingly You can do this in two ways To adjust the Pattern Length click the number in the right part...

Страница 193: ...d note to current selection Shift click selected note Remove note from selection Drag in Step Grid s background Multiple selection selection frame Click in Step Grid s background Deselect all notes Ed...

Страница 194: ...der the Mouse cursor 7 1 6 The Zoom Tool Using the Zoom Tool you can zoom in and out horizontally in the Pattern Editor on the time axis Click the Zoom Tool a little magnifying glass at the bottom of...

Страница 195: ...Pattern by selecting Split You can see that a Pattern has been edited by way of an asterisk symbol displayed in its Pattern slot and next to the context menu s Compare entry The new state will be con...

Страница 196: ...r and inversely 7 1 9 Recording and Editing Automation If you take a closer look at the knobs on the Parameter pages in the Control area you will no tice they have an outer ring that changes its color...

Страница 197: ...on trolled by selectors e g for selecting an operating mode or a filter type cannot be auto mated The parameter must be at the Group or Sound level parameters at the Master level can not be automated...

Страница 198: ...their relative lengths although they change their absolute values To create automation points double click in the Automation Lane other points on this step will be replaced Another way to create autom...

Страница 199: ...data present The automation points will snap to the cur rent Step Grid If you want to automate Group parameters just click on the GROUP tab in the Control area to be presented with available parameter...

Страница 200: ...gger other pads in the same Pad Link group A pad set to Slave will only trigger its own Sound even if it is part of a Pad Link group but be triggered by pads set to Master within the same group You ma...

Страница 201: ...u from the context menu 3 Select the desired Pad Link group from the list 4 Repeat the process for each pad you want to include in the Pad Link group Releasing a Pad from a Pad Link Group To release a...

Страница 202: ...matically set to Master when added to a Pad Link group This means that hitting its pad will also trigger all other Sounds of that Pad Link group To set the status of a Sound from Master to Slave 1 In...

Страница 203: ...ger this Sound as well 7 2 Managing Patterns This section describes the global editing functions available for Patterns and Pattern slots 7 2 1 Naming Patterns When creating a Pattern you might want t...

Страница 204: ...e hosts will utilize the Enter key as it is mapped to some function of the host software In this case click anywhere else in the MASCHINE plug in window to confirm the name you have entered Saving Pat...

Страница 205: ...select In the Arranger all Clips referencing this Pattern will also mirror the selected color The color you select will also be mirrored by the pads on the controller when you are working in Pattern...

Страница 206: ...y a Pattern click the Step Grid s background to deselect any selected events notes right click on Mac OS X Ctrl click the Pattern slot and choose Copy from the slot s context menu Copying a Pattern No...

Страница 207: ...horizontally toward the desired loca tion As the mouse cursor moves an insertion line appears at the potential places where you can drop the Pattern slot 3 When the insertion line appears at the desi...

Страница 208: ...V or AIFF file according to the Options in the Export Audio Settings To render Patterns to audio files 1 In the Arranger select the Group you want to export audio from and in the Arranger time line se...

Страница 209: ...name in the Group Header A pop up window will inform you about the rendering status 5 As soon as rendering is finished the mouse cursor will display the name of the audio file you are about to drag Y...

Страница 210: ...seful if you want to use or edit them in another application The Patterns will be exported as MIDI files according to the Sound MIDI Batch Setup so you need to set that up before see chapter 4 9 1 Sou...

Страница 211: ...MIDI Batch Setup to fit your needs click APPLY to confirm and close the pop up window and click the Dragger icon again For more information on Sound MIDI Batch Setup see section 4 9 1 Sound MIDI Batc...

Страница 212: ...Project please read chapter 8 Effect Reference Available Effects Many types of effects are available and nearly all applications are represented You will of course find traditional effects such as del...

Страница 213: ...o the right the slower it will react Longer Attack times let more transients through Release The time the compressor will take to stop compressing after the input sig nal falls below the threshold Wit...

Страница 214: ...the slower it will react resulting in a softer transition between the gated and the not gated parts of the signal Hold The Hold parameter is used to determine how long the gated signal is held lower v...

Страница 215: ...the overall level once you have set the desired effect in order to counterbalance the gain or loss of level that might occur Attack Sharpens softens the attack phases in your signal With the knob at t...

Страница 216: ...Thrs This value determines the threshold where the Limiter kicks in If you use it to prevent your signal from clipping leave it at 0 dB if you want to make your signal louder dial the Knob to the lef...

Страница 217: ...Maximizer on the controller 8 2 Filtering Effects 8 2 1 EQ Use the EQ to boost or cut selective frequencies of the audio signal The EQ is mainly a tool to tailor your audio signal to taste by cutting...

Страница 218: ...nd Ranges from 40 Hz to 16 kHz Gain Gain control for the first mid frequency band Mid Band 2 Freq Frequency selector for the second mid frequency band Ranges from 40 Hz to 16 kHz Gain Gain control for...

Страница 219: ...Output Gain Gain control for the EQ altogether Page 2 of the EQ on the controller 8 2 2 Filter Filter with selectable characteristics that can be modulated via LFO or envelope There are many applicat...

Страница 220: ...defines how much the Filter gets modulated by the modulation source Source Here you can select between three different modulation sources LFO LFO Sync and Envelope Depending on your choice for the mo...

Страница 221: ...ost effec tive on melodic sounds but can also be used on hi hats to make them more vivid or on a voice sample to create a doubling effect thereby making it sound as if there were several voices It wor...

Страница 222: ...sounds a bit like the Chorus but the difference between them is that the Flanger modulates the signal faster it is equipped with a feedback mechanism and can be synchronized to the tempo of the Proje...

Страница 223: ...e Shape Envelope Change the shape of the envelope here Stereo This parameter widens the stereo field of the effect Feedback Amount Adjusts the amount of output signal fed back into the input Invert In...

Страница 224: ...signals With high Split settings the effect becomes more gritty and crackling Depth Contour Contour determines the extent to which the input volume affects the inten sity of the effect Amount Determin...

Страница 225: ...ut Increasing this parameter will increase the intensity of the effect Stereo This parameter widens the stereo field of the effect Output Invert Inverts the settings of the Freq Shifter Mix Mix lets y...

Страница 226: ...he LFO in a range from 0 03 Hz up to 8 Hz Speed LFO Sync Defines the speed of the LFO in note values from 16 1 one cycle every 16 bars up to 1 16 note Shape Envelope Change the shape of the envelope h...

Страница 227: ...eates deep soundscapes in the Group named FX The Ice reverb in the software Parameter Description Room Color With lower settings the general sound is a bit more muffled The higher the Color value the...

Страница 228: ...e Adjust the size of the virtual room here Eq Low Low band EQ to cut or boost bass frequencies High High band EQ to cut or boost high frequencies Position Pan This pans the dry signal This is useful b...

Страница 229: ...pleasing results The Reflex reverb in the software Parameter Description Room Color At lower settings the general sound is a bit more muffled the higher the settings the brighter it sounds Smooth Wit...

Страница 230: ...om This allows you to choose one of four basic characteristics of the Reverb General Bright Guitar and Shatter Size Adjust the size of the virtual room here Eq Low Low band EQ to cut or boost bass fre...

Страница 231: ...mount of the effect in relation to the dry original audio signal The Reverb on the controller 8 5 Delays 8 5 1 Beat Delay The Beat Delay is specialized for creating delays that are synced to the tempo...

Страница 232: ...copies of the signal and longer decays Crossover Allows for panning the feedback signal rhythmically in the stereo field Color Defines the basic frequency of the feedback circuit lower values result i...

Страница 233: ...ns and rearranging them as a cloud the Grain Delay is useful for creating ambient textures Increase Size Space and Density to quickly transform any sound into an evolving ambient texture As a unique e...

Страница 234: ...e grains Rev This button produces a reverse playback of the grain Cloud Space Determines the spacing between the grain clouds the higher the value the bigger the space between the clouds Density Creat...

Страница 235: ...field of the effect Values go from 0 no stereo to 100 full stereo Page 2 of the Grain Delay on the controller 8 5 3 Grain Stretch The Grain Stretch effect uses granular synthesis to manipulate the spe...

Страница 236: ...in size is corrected by the pitch Size Adjusts the size of the grains Out Mix Mix lets you adjust the amount of the effect in relation to the dry original audio signal The Grain Stretch on the control...

Страница 237: ...rd mode You can select between different chord styles such as minor or major Chord Chord mode Here you can choose from different chords to be applied to your audio sig nal Tune It allows you to transp...

Страница 238: ...unt Determines the basic amount of distortion Color At lower settings the general sound is a bit more muffled the higher the settings the brighter it sounds Feedback Amount Adjust the amount of output...

Страница 239: ...e audio signal for an interesting vintage effect at subtle settings and heavy digital distortion at extreme set tings The Lofi in the software Parameter Description Resample SR SR stands for Sample Ra...

Страница 240: ...a the Mode selector the first parameter on the left Since the three modes provide different sets of parameters each of them is described separately below Parameter Description Mode Mode Selects betwee...

Страница 241: ...Saturator in Classic mode on the controller Tape Mode The Tape mode emulates the soft compression and pleasant saturation induced by recording to analogue magnetic tapes It can be used lightly to add...

Страница 242: ...e mode in the software Tube Mode Parameter Description Drive Amount Adjusts the level of the input signal This directly affects the amount of tube distortion Charge In Tube mode the Saturator provides...

Страница 243: ...und EQ Bypass Enable this button to bypass the EQ section Bass Adjusts the level of the low frequency band Highs Adjusts the level of the high frequency band Output Gain Adjusts the output level of th...

Страница 244: ...slot 1 to Module slot 4 Overview of applying effects using Module slots This picture does not include advanced routings like send effects For Sounds Module slot 1 is often used to contain an instrumen...

Страница 245: ...SOUND tab press the Group button A H of the Group containing that Sound and press SELECT the pad of that Sound or simply hit its pad if pads are in Group mode 5 Make sure MODULES Button 4 is activated...

Страница 246: ...information on editing effect parameters please read 4 1 4 Adjusting the Mod ule Parameters If you created a nice effect setting you can put it to further use by saving it as a Module preset Please r...

Страница 247: ...the GROUP tab in the Control area 3 If you want to apply the effect to a Sound click the Group slot of the Group containing that Sound in the Arranger click the desired Sound slot in the Pattern Edito...

Страница 248: ...he list Upon your selection the effect is loaded and its parameters are displayed in the Parame ter area below in the example underneath we selected the Phaser effect in the Module menu Loading a Modu...

Страница 249: ...want to return to a dry unaltered sig nal such as after applying so much Reverb that you can t hear the dry signal anymore or to get rid of feedback while using the Delay for example Hardware 1 Press...

Страница 250: ...ains a Sampler or Input Module Be careful bypassing the slot will mute the whole Sound Software 1 If you want to bypass an effect of the Master click the MASTER tab in the Control area 2 If you want t...

Страница 251: ...ternal audio as well This external audio can come from the inputs of your audio interface if MASCHINE is used in stand alone mode or from your host if MASCHINE is used as plug in To do this we will ch...

Страница 252: ...plug in can re ceive audio from the host only Please refer to your host documentation to find out how to route audio channels to the virtual audio inputs of the MASCHINE plug in Hardware 1 Press the C...

Страница 253: ...to set SOURCE to the desired external source from EXT IN 1 4 11 Select another Module slot by pressing Button 6 8 12 Press SHIFT BROWSE to open the Module list on the right display and browse the ava...

Страница 254: ...loaded in Module slot 1 and its parameters are displayed in the Pa rameter area underneath 3 You will now see two parameters one knob for the level of the input and a selector that lets you select a s...

Страница 255: ...ffect This is done by loading an effect into its first Module slot Route a portion of the desired audio signals from their original Sounds and Groups to that send effect This is done via the Output Pr...

Страница 256: ...ponding Modules MASCHINE effects in the example underneath 7 Turn Knob 5 to browse the available Modules 8 When you have found the effect you want to use press Button 8 to load it You can also use but...

Страница 257: ...ear the bottom of the list if you want to load a VST AU plug in Upon your selection the effect is loaded and its parameters are displayed in the Parame ter area When you load an effect into the first...

Страница 258: ...ess SELECT the pad of that Sound or simply press its pad if pads are in Group mode 4 Make sure MODULES Button 4 is deactivated to show the Properties 5 Press Button 8 OUT to display the Output Propert...

Страница 259: ...to the send effect click the Group slot of the Group containing that Sound in the Arranger click the desired Sound slot in the Pattern Editor and click the SOUND tab in the Control area 3 Click OUT i...

Страница 260: ...he output of a send effect into another send effect using the method described above see 9 4 2 Routing Audio to a Send Effect This opens up virtually endless routing possibilities When setting up comp...

Страница 261: ...same thing as creating a send effect but extended to the Group level As described in the previous section 9 4 Creating a Send Effect you can set up four effects for every Sound in the Group adding up...

Страница 262: ...s of a combination of the Beat Delay with the Filter Try out some other multi effects from the Library to get some ideas on how to set up your own multi effect Your own presets can also include any co...

Страница 263: ...The multi effect Group Dual LFO Filtered Delays in the software Using Effects Creating Multi effects MASCHINE MIKRO MK2 Manual 263...

Страница 264: ...eper in the Arranger with Scene 2 selected This is how Scenes work Only one Scene is played at a time In each Scene i e each column of the Arranger you can choose to play one particular Pattern of eac...

Страница 265: ...enced Pattern See 7 2 1 Naming Patterns for more on this 10 1 Selecting a Scene Hardware 1 Enter Scene mode by holding the SCENE button You can pin the Scene mode by press ing Button 1 at the same tim...

Страница 266: ...to select the Scene in which you want to create or delete a Clip see 10 1 Selecting a Scene for more info 2 Press the desired Group button A H to select the Group from which you want to select a Patt...

Страница 267: ...the selected Group from the selected Scene press PATTERN Button 4 REMOVE The Clip is deleted and the corresponding Pattern will not be played by the selected Scene anymore The Pattern itself is left...

Страница 268: ...available for Scenes and Scene slots 10 3 1 Naming Scene Slots By default Scene slots are named Scene 1 64 You can rename Scene slots manually Naming is only available from within the software but an...

Страница 269: ...lt color by selecting Use Default Color at the bottom of the Color Palette By default each Scene has a different color But you can choose a common default color for Scenes in Preferences Colors Scenes...

Страница 270: ...new Scene slot next to it containing the exact same Scene and settings name color The following Scene slots will shift one step to the right Removing a Scene slot will simply delete the slot and its...

Страница 271: ...Scene slot Copying a Scene will put it in the clipboard allowing it to be pasted later while cutting the Scene will additionally remove it from its Scene slot The Clips the name and the color of the...

Страница 272: ...refer to chapter 12 2 Exporting Audio for information on exporting audio On the other hand if you are preparing a track for performing live you will probably want to switch back and forth between dif...

Страница 273: ...3 While holding the first pad press the pad corresponding to the end Scene The start and end Scenes along with all Scenes in between are played one after the other in a loop On your controller the pad...

Страница 274: ...MA SCHINE provides you with two additional settings to fine tune the jumps between the Scene currently playing and the next loop range selected The Scene Sync setting lets you quantize the Scene trans...

Страница 275: ...s lit The default value SCENE pad 15 means that the next time you select a new Scene or loop range the switch will happen once the cur rent Scene has played to the end 3 Press a pad to select the desi...

Страница 276: ...disable the Retrigger setting click the RETRIG check box The next time you select a new Scene or loop range it will start from the beginning 10 5 Triggering Scenes via MIDI The Scene MIDI Settings let...

Страница 277: ...enable the Scene MIDI Settings Input section MIDI Note If this radio button is checked Scenes will be controlled by incoming MIDI notes Channel From this drop down menu select the MIDI channel the Sce...

Страница 278: ...essages Program Change 1 will trigger Scene 1 and the following Scenes will be triggered by the subsequent Program Change numbers Channel From this drop down menu select the MIDI channel the Scenes sh...

Страница 279: ...p your Samples controller 11 1 3 Slicing a Sample Hard ware software 11 2 4 Mapping a Sample Software thereby creating multi sample Sounds with individual velocity and note ranges volume and panning T...

Страница 280: ...s on the left display After you press Button 5 START the input signal level exceeding this threshold will start the recording You can then manually stop the recording by pressing Button 5 STOP again T...

Страница 281: ...oaded into Mod ule slot 1 of the Sound and your Sample can be played back by pressing the corresponding pad on your controller The recorded Sample is shown on the right display here with the Playhead...

Страница 282: ...more info on selecting Zones in the MAP page The Sample can be played back at any time by pressing the corresponding pad on your control ler When the Sample is played back the Playhead indicator verti...

Страница 283: ...note is held This can be useful to loop either a whole Sample or part of it e g to simulate a longer tone Note this technique requires that you choose either AHD or ADSR as the Amplitude Envelope in...

Страница 284: ...Audio Editing The EDIT page additionally provides several audio editing functions to process your Sample Audio editing functions on the right display of the controller Use Button 5 and 7 to select th...

Страница 285: ...ample and places it into the clipboard for later use COPY This copies the selected region of the Sample to the clipboard for later use PASTE This pastes the cut copied region of the Sample replacing t...

Страница 286: ...dependently from the time signa ture of the source This is more suited for non rhythmic Samples In this mode on ly one parameter is available SPEED see below AUTO DTCT Beat mode only If AUTO DTCT Auto...

Страница 287: ...and or time stretching to the selected region in the Sample 11 1 3 Slicing a Sample Hardware Press SAMPLING and then Button 3 to show the SLICE page The SLICE page allows you to prepare Slices that yo...

Страница 288: ...tion Knob 2 Higher values will cause more Slices to be detected because more transients will be recognized lower values will result in less slices This parameter should be adjusted until all the music...

Страница 289: ...using Knob 4 Hold SHIFT when turn ing the Knob to adjust the parameter in finer increments Button 6 8 RESET Reset your Slice edits using Button 6 ADD Add another Slice according to the current Mode s...

Страница 290: ...s Sound the pads on your controller will switch to Keyboard mode and a new Pattern will be created with one note for each pitch so that the Pattern reproduces the original unsliced Sample Addi tionall...

Страница 291: ...replace the current Sample s but instead it will be inserted in a new Zone of the Sound 4 Press Button 8 to load the Sample A new Zone will be created that contains the added Sample 5 Press SAMPLING...

Страница 292: ...er page 3 of 3 tune gain and pan settings Parameter Description TUNE Tune control for the Zone Knob 1 GAIN Volume level for the Zone Knob 2 PAN Panorama position for the Zone Knob 3 11 2 Controlling S...

Страница 293: ...e Editor appears 3 At the top of the Sample Editor click the RECORD tab leftmost tab to show the RE CORD page Now you can adjust various recording settings at the top of the RECORD page and record a n...

Страница 294: ...een the available inputs If the Source selector is set to Ext you can select from the four external stereo inputs available in MASCHINE For each of them you can choose between the left channel the rig...

Страница 295: ...u want to stop the recording yourself by clicking STOP 3 3 START STOP and CANCEL Click START to start the recording If you have set the Start Mode selector to Sync MA SCHINE will wait for the next bar...

Страница 296: ...tory All recorded Samples are stored in the Recording History and displayed as mini waveforms at the bottom of the Record page The following actions are available Click any mini waveform to select the...

Страница 297: ...st the start and end points of the Sample en able Loop mode adjust the start and end points of the loop and set a crossfade between the end and start points of the loop If your Sound contains more tha...

Страница 298: ...mplitude Envelope in the Sampler s Parameter pages see 4 2 1 Page 1 Voice Settings and Engine The loop s start and end points can be edited via the Start and End parameters Alternatively you can also...

Страница 299: ...s click and drag your mouse horizontally for scrolling through the waveform and vertically to zoom in out 7 Playhead indicator When the Sample is played back this white vertical line shows you the cur...

Страница 300: ...it into the clipboard for later use Copy This copies the selected region of the Sample to the clipboard for later use Paste This pastes the cut copied region of the Sample replacing the region of the...

Страница 301: ...elected region Pitch shifting and time stretching can be applied independently The Timestretch window The following parameters are available Parameter Description Pitch section Pitch shifting paramete...

Страница 302: ...umber of bars you have set and the computed tempo value If Auto Detection is disabled you can directly define the tempo of the original au dio in BPM New BPM Beat Mode only Defines the target tempo of...

Страница 303: ...sounds of a drum loop for example but is also good for preparing a loop to be played back at another than the original tempo without changing its pitch or timing If your Sound contains more than one...

Страница 304: ...The SLICE page in the software 1 Slicing Mode settings Sampling and Sample Mapping Controlling Sampling from the Software MASCHINE MIKRO MK2 Manual 304...

Страница 305: ...e detected because more transients will be recognized lower values will result in less Slices This parameter should be adjusted until all the musically significant slices are being detected in the wav...

Страница 306: ...the original unsliced Sample A new Pattern with the notes representing the Slices of the Sample Play around with the slicing feature by removing some of these notes quantizing or com pletely rearrang...

Страница 307: ...When the Slice is played back the Play head indicator 8 shows you the current play position within the waveform 6 Slice menu Remove sample from map Removes the Sample from the map See 11 2 4 Mapping...

Страница 308: ...just individual Slices by dragging their borders Dragging the border of a Slice adjusting its start point You can also copy an individual Slice to another Sound by drag and drop Sampling and Sample Ma...

Страница 309: ...nd a velocity range for each Sample included in the Sound In other terms the Sample will be triggered only if the played note is within its Zone s key range and velocity range The Zones can overlap al...

Страница 310: ...Zone Drag your mouse vertically to adjust the key range With your mouse at the bottom of the Mapping area the Zone will cover the root note only dragging your mouse up will extend the Zone s key range...

Страница 311: ...iginal pitch The root note is also indi cated by the colored key on the virtual keyboard 7 to change it you can drag it to another note on the keyboard Low Note Sets the lowest note key of the selecte...

Страница 312: ...in of the selected Zone Pan Sets the panorama position of the selected Zone 4 Info bar Displays the file name and the length of the Sample contained in the last selected Zone Click and hold the little...

Страница 313: ...and clicking each Zone Several actions on Zones are available with your mouse in the Mapping area see the next paragraph for more info 7 Virtual keyboard Below the Mapping area the virtual keyboard r...

Страница 314: ...ange in which the Sample will be trig gered Drag the higher lower border of a Zone Adjusts the Zone s velocity range in which the Sample will be triggered Drag a corner of a Zone Simultaneously adjust...

Страница 315: ...esired Master Properties 1 Press CONTROL to enter Control mode 2 Press Button 1 to select MASTER 3 Make sure MODULES Button 4 is deactivated to show the Master Properties 4 Press Button 5 MIX Button 6...

Страница 316: ...rameters are on a single Parameter page the arrow of the Page menu is greyed out and disabled 2 Use the mouse to adjust the values of the parameters in the displayed page 12 1 1 Master Mix Properties...

Страница 317: ...to adjust the panoramic position of each Group in the stereo field These controls are also available in the Output Properties of the re spective Groups see 5 1 4 Group Output Properties OUT for more i...

Страница 318: ...WING and turning the Control encoder To change the Swing value of a Group activate SWING hold the corresponding Group button and turn the Con trol encoder To change the Swing value of an individual So...

Страница 319: ...INE is running as a plug in the external stereo outputs Out 1 16 available in the Output selector will correspond to virtual outputs in your host Alternatively you can quickly alter the Level value of...

Страница 320: ...r Groups Sounds or your complete song as audio files in order to edit them further in other applications or burn a CD The format of the exported audio files is WAV The export function is only availabl...

Страница 321: ...The Export Audio window The Export Audio window allows you to configure how you want to export audio Following pa rameters are available The Master Exporting Audio MASCHINE MIKRO MK2 Manual 321...

Страница 322: ...export the output signals of specific Sounds to individual audio files When this entry is selected a list appears underneath with the Sounds available for exporting Empty Sound slots and muted Sounds...

Страница 323: ...mastering EXPORT Click EXPORT to start exporting your audio file s according to the current set tings CLOSE Click CLOSE to close the window without exporting anything 12 2 2 Saving a Project with its...

Страница 324: ...e submenu in the Plug in menu You will be presented with the Save Project with Samples window 2 In this window adjust the settings see table below and click SAVE to confirm or CAN CEL to cancel the op...

Страница 325: ...n Preferences User Paths see section 2 4 2 Preferences Defaults Page for more info Click the folder icon on the right to select another name and or path Delete Unused Files Enable this checkbox to del...

Страница 326: ...ffects complex routing Increasing your RAM may save you a lot of trouble Make sure you have the most recent version of the MASCHINE software installed You can find the latest available version followi...

Страница 327: ...ppened You will find the crashlog in the following folders Windows My Documents Native Instruments Maschine Crashlogs Mac OS X Users Library Logs CrashReporter 13 1 4 Updates Whenever you encounter pr...

Страница 328: ...lve the problem you can use the Online Support Form to contact the Technical Support team of Na tive Instruments The Online Support Form will ask you to enter information about your hard ware and soft...

Страница 329: ...r Registration Support team www native instruments com regsuppfrm 13 2 4 User Forum In the Native Instruments User Forum you can discuss product features directly with other users and with experts mod...

Страница 330: ...elocity scaling to your personal taste see sec tion 2 4 6 Preferences Hardware Page to learn how to do that you will have even more fun playing MASCHINE 14 1 3 Check Your CPU Power Before Playing Some...

Страница 331: ...gear such as a drum machine a synthesizer or another sequencer that is able to send MIDI Clock hook it up to the MASCHINE controller s MIDI IN socket and activate Sync to External MIDI Clock from MAS...

Страница 332: ...arrangement by switching Scenes or changing the loop range By using a short value for the Scene Sync you can quickly combine Scenes and create new variations Please refer to section 10 4 Playing with...

Страница 333: ...Button 1 to create variations of a Pattern If you select an even smaller value like 1 64th you can create stuttering breaks and rolls 14 3 2 Using Loops to Cycle Through Samples You can use loops to...

Страница 334: ...he selected Group slot Sound slot Pattern slot or Module slot This way you can listen to this object in the current context of your song Automation Automation allows you to record changes of parameter...

Страница 335: ...and Groups to process their audio You then only have to set up the desired Sound s and Group s of your Project to send some of their audio to this bussing point This basically is the way to set up sen...

Страница 336: ...ou can see events for all Sounds slots Group view or for the select Sound slots only Keyboard view Groove Properties The Groove Properties control the rhythmic relationship between events for the sele...

Страница 337: ...ach event one row per semi tone This mode is well suited for melodic instru ments e g synthesizer The Keyboard view of the Pattern Editor and the Keyboard mode on your controller are bound together If...

Страница 338: ...and get mixed The Master bus can also have up to four insert effects loaded in its Module slots These effects are applied to all Groups and the Sounds within them Module Modules can be sound sources o...

Страница 339: ...If you enter Keyboard mode on the controller Keyboard view gets automatically enabled in the software and inversely Parameter Pages The Parameter pages constitute the biggest part of the Control area...

Страница 340: ...tate of MASCHINE Properties Properties are sets of parameters available at each Project level i e for each Sound each Group and for the Master that are independent of the Modules loaded in that Sound...

Страница 341: ...en as a whole these samples are a digital representation of the origi nal sonic wave The number of samples contained in one second of audio signal defines the sample rate of the signal Note In this co...

Страница 342: ...ns with them etc Sound Sounds are the building blocks of all sound content in MASCHINE They are organized into Groups that can hold up to 16 Sounds each Sounds can be played directly from the pads on...

Страница 343: ...er minute BPM Time Signature The time signature of a Project or song defines both the Project s time unit e g the quarter note and the Project s bar length measured in that unit e g four quarter notes...

Страница 344: ...le of a Sound has its own Zone i e its own key range and velocity range In the MAP page of the Sample Editor Zones are represented by rectangles You can build up complex sets of Zones to make your Sou...

Страница 345: ...MIDI page 52 Routing page 51 Audio driver selecting 50 Audio interface 331 selecting inputs and outputs 51 settings 50 Audition Controls 59 64 AUTO WRITE button 173 Autoload 64 definition 334 Automat...

Страница 346: ...Bypassing effects 249 Module slots 84 C Choke All Notes 130 Chorus 221 Classic saturation 240 Clip creating 266 definition 335 removing 266 Color Group 152 Pattern 204 Scene 269 Sound 121 Compare Pat...

Страница 347: ...ram files importing 159 Duplicate Group 156 Scene 270 Sound 123 Dynamics effects 212 E EDIT page controller 282 software 297 Effect categories delays 231 distortions 238 dynamics 212 filtering 217 mod...

Страница 348: ...217 EQ Filter mode 97 Equalizer 217 Events copying controller 183 definition 336 deleting controller 182 editing in the software 193 introduction 24 moving controller 183 pasting controller 183 select...

Страница 349: ...261 333 muting and soloing 126 naming 151 Output Properties OUT 149 pasting 156 Properties 140 resetting slot 158 saving 153 saving with Samples 154 soloing 126 Source Properties SRC 140 working with...

Страница 350: ...ntroller 172 quick erasing events 182 quick selecting events 178 selecting notes 179 Keyboard view 186 195 definition 337 L Latency 51 330 337 LFO 219 222 225 Library importing your own files 67 Limit...

Страница 351: ...Mix Properties MIX 316 Output Properties OUT 318 Master output 280 Master Properties 315 Maximizer 216 Metaverb 228 Metronome 169 MIDI 14 compensating delay 53 configuring 52 connecting external equip...

Страница 352: ...roup 126 MUTE controller 127 N Name Group slot 151 Pattern 203 Scene slot 268 Sound slot 120 New features in MASCHINE 1 8 17 Note Repeat 171 332 Notes copying controller 183 deleting controller 182 ed...

Страница 353: ...ller 182 deleting events notes software 193 doubling controller 164 duplicating controller 165 editing controller 177 editing software 186 in the software 186 introduction 23 moving 207 moving events...

Страница 354: ...225 Pinning a mode 30 Pitch Group 141 Pitch scale 172 Plug in 32 definition 340 Switching instances 33 Plug ins 101 64 bit 32 bit 45 Preferences Colors page 48 Defaults page 37 General page 35 Hardwa...

Страница 355: ...Recall Module preset 89 RECORD page controller 279 software 293 Recording aids Metronome and Count in 169 Redo 30 Reflex 229 Reset Group slot 158 Pattern slot 207 Sound slot 125 Resochord 236 RESULTS...

Страница 356: ...ntroller 279 recording software 292 slicing controller 287 slicing software 303 Sampling mode controller 279 Saturator 240 Save Group 153 Group with Samples 154 Module preset 88 Pattern 205 Sound 122...

Страница 357: ...ftware 303 Solo 332 definition 338 Sound or Group 126 SOLO controller 127 Song 264 Sound applying effects to 245 Color 121 copying and pasting 123 definition 342 duplicating 123 Groove Properties GRV...

Страница 358: ...roller 170 definition 343 Step sequencer controller 170 Step size controller 175 software 189 Swing definition 343 Sync to External MIDI Clock 54 T Tag Editor 59 70 Tag Filter 59 using 60 Tags 70 crea...

Страница 359: ...V View switching 24 Voice Settings Group 141 VST plug ins 101 W What s new in MASCHINE 1 8 17 Index MASCHINE MIKRO MK2 Manual 359...

Отзывы: