Blades
FIG. XX
BLADE SHARPENING (FIGURE YY)
Always check for blade sharpness before using; because dull blades greatly reduce
cutting effectiveness. Over time, the used blades will develop a back bevel. While re-
sharpening, blades will not recover entirely until the back bevel is completely leveled out.
NOTE: Thinner blades are easier to sharpen, but they also break easier.
•
Always wear gloves and safety glasses.
•
Grind blade using a 4” diameter disk with 120 or
fi
ner grit. Be careful not to catch
disk on edge or corner of blade.
•
Pass grinder along blade edge starting on one end and continuing in one direction
being careful to hold grinder at proper angle of blade. Grind until sharp.
•
While using a high quality
fi
ne tooth hand
fi
le, follow the same procedure as above.
•
Blades are sharp. Use extreme caution.
•
Have plenty of sharp blades on each job so on-the-job blade sharpening is elimi-
nated.
•
It is best to re-sharpen dull blades on proper bench or belt grinder in the shop, so
the blades are ready for the next job.
SELF-SCORING BLADE SHARPENING (FIGURE ZZ)
It is important to keep the “wings” on these self-scoring blades sharp. Use a
fi
le on the
edge. Sharpen the
fl
at part of the blade, the same way as described above.
CARBIDE TIPPED BLADE SHARPENING
To sharpen carbide tipped blades, a carbide grinding wheel is necessary, ie: silicon
carbide or green wheel.
DITCHING
CROSS ROOM DITCHING (FIGURE ZZ)
When removing hard to remove ceramic, Vct or vat, cross-room ditching will help to
make the removal easier. Using a blade 5 to 16 cm (2” to 6”) in width, make ditches 1’ to
2’ apart in the same direction the machine will be removing the goods (See Figure EE).
This “relieves” the pressure holding the tiles together. If ditching helps and the goods are
coming up easy, try using a wider blade to ditch with.
CHECKER BOARD DITCHING (FIGURE AA)
To make carpet removal and debris cleanup easier, checker board ditching is very help-
ful. Using as wide of a self-scoring blade as possible, make ditches 4’ to 6’ apart cross-
ways from the way the machine will be removing the goods (See Figure FF). Running
the machine crossways from the ditches will make smaller pieces of debris to be hauled
away. Instead of large gummy rolls of carpet, there are small squares that can be rolled,
palletized, put on a dolly or folded with the sticky side in. This makes removing the debris
easier and reduces the amount of debris.
Fax: 763-535-8255
25
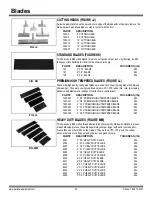
1” BLADES (FIGURE XX)
Short pro
fi
le blades where a rigid blade application is needed. Thickness greatly reduces
breakage. Used for VCT & adhesive rescrape. Works well for parking deck coatings, epoxies
& elastomeric coatings.
7091
1” X 4” BLADE
.094
7092
1” X 8” BLADE
.094
7093
1” X 10” BLADE
.094
7094
1” X 12” BLADE
.094
PART# DESCRIPTION
THICKNESS (IN.)
FIG. YY
Front of Blade
Back Bevel
CROSS ROOM DITCHING
Ditch
2” to 6”
Blade
Tile
1’ to 2’
Strips
Figure ZZ
Run the machine the same direction
that the ditches are made
Carpet 4’ to 6’
apart
Use as
large of a
blade as
possible for
ditch
Figure AA
Run the machine crossways from the
directions that the ditches are made
CHECKER BOARD DITCHING
Self-Scoring Wing
Front of Blade
Содержание 5700-aus
Страница 1: ...Read Manual Before Operating Machine ALL DAY BATTERY RIDE ON SCRAPER INSTRUCTION MANUAL Rev B 401810...
Страница 2: ......
Страница 44: ...Parts List and Diagrams Fax 763 535 8255 info nationalequipment com 44 5700 BATTERY WIRING...
Страница 46: ...Parts List and Diagrams Fax 763 535 8255 info nationalequipment com 46 5700 MACHINE WIRING...


