


2200M4JE-HO-iS2-N_2014.04.
Chapter 5 Maintenance and Inspection
Screw Compressor i-series
5.1 Precautions for Maintenance and Inspection
5-1
Chapter 5 Maintenance and Inspection
5.1
Precautions for Maintenance and Inspection
Before starting maintenance/inspection work after completely recovering the refrigerant from
the unit, make sure that the main motor power, control power and power for instruments and
valves are turned off and that the turned-off switches are protected from any unauthorized
access. In addition, attach a notification tag to inform other workers that the turned-off
switches must not be turned on (lockout/tagout).
Also when a manual valve is closed, take proper actions so that it cannot be operated by other
workers and attach a notification tag stating that the device must not be opened (tagout).
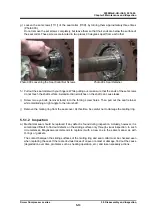
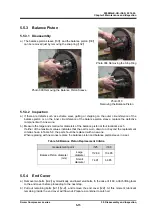
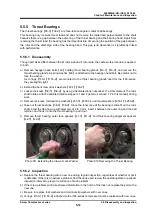
When disassembling, inspecting or handling the compressor, be sure to fully understand the
procedures before starting the work. This manual does not provide complete procedures for
disassembly and assembly of the compressor. It just explains the points for servicing the
compressor.
If complete assembly and disassembly of the compressor has to be done, consult our local
office or service center.
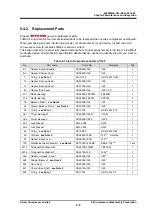
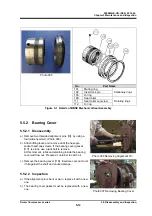
When replacing any parts of the compressor, use
genuine parts. If you do not
use genuine parts, unexpected problems may occur.
Do not modify the compressor or any of its parts without MAYEKAWA's permission. It may
cause the compressor to be damaged or disabled from maintaining its normal functions.
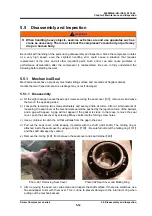
When disassembling the compressor, remove it from the unit frame and place it on a work
bench. Before removing the compressor from the unit frame, recover the refrigerant from the
unit properly and check that the pressure inside the compressor is atmospheric.
Prior to the removal of the compressor from the unit frame, check that the high temperature
side (discharge side) is cooled down to at least 40°C or lower.
Disassemble the compressor on a rigid and flat work bench.
When removing the compressor from the unit frame and placing it on the work bench, follow
the instructions in "3.1 General Precautions for Installation" and "3.2.3 Transfer" in this
manual.
Do not allow anyone other than qualified personnel to lift and carry the compressor or the
package.
For compressor disassembly/assembly, use specified tools that are properly functioning.
When handling heavy objects, exercise extreme care and use safe auxiliary tools such as stud
bolts (safety bolts).
When handling a heavy object, use a crane or other lifting device. Otherwise, the work must
be done by at least two people.
When working as a team, ensure that all workers have clear understanding of the work
procedure.
Let qualified personnel turn on/off each power supply, taking care to avoid electrical shocks.
Any other electrical or manufacturing work that requires qualification must be done by qualified
personnel.


