48
MultiVOIP 200 User Guide
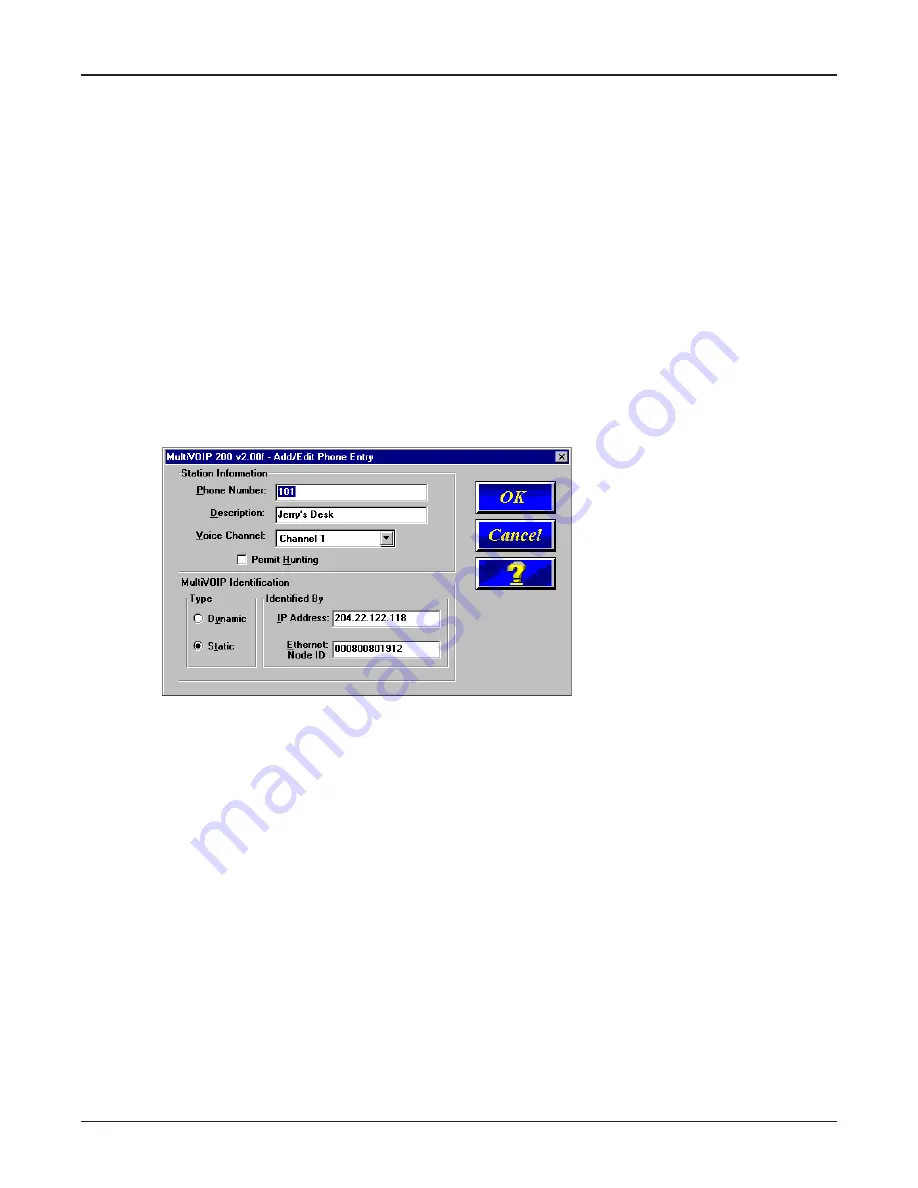
Server IP address), then this slave MultiVOIP will be defined as using Dynamic addressing and the
IP Address field in the Identified By group will grey out (be inactive).
If a Proxy Server with a static IP address is in front of the slave MultiVOIP, then the Identified By IP
Address field must contain the address of the Proxy Server.
If the slave MultiVOIP is connected directly to the Internet, then its addressing mode must be Static.
If the slave unit is using Static addressing, then the IP Address field in the Identified By group has to
contain the Static IP address of the slave MultiVOIP.
The Ethernet Node ID is a 12-digit Identification Number assigned to each unit. This Ethernet Node
ID number is a hardware identification number that is affixed to each unit during the manufacturing
process and cannot be changed. This ID number (for example, 0008005xxxxx) is located on an ID
plate attached to every unit. This ID number has to be entered in the Ethernet Node ID field for the
telephone number entered in the Phone Number field. If you are assigning a Phone Number for a
slave unit, the Ethernet Node ID has to be for that slave unit.
If this plate is damaged or missing, you can also obtain the ID number by Telneting to the unit. From
the MultiVOIP Telnet Server menu, choose the Voice over IP Configuration option which takes you to
the Main Menu. In the Main Menu, choose System Information and the ID number is presented in the
Ethernet Port Address of the System Information menu.
When you enter this information and click OK, the information is loaded into the phone directory
database.
To add a second entry, click Add(+) and the Add/Edit Phone Entry dialog box is again displayed.
The same data needs to be added for channel 2. After the two local entries are added to the
database, then you need to turn your attention to the entries for the remote MultiVOIPs. The same
data has to be added for each remote MultiVOIP.
To establish the phone directory database for a remote MultiVOIP, you do not have to enter phone
numbers, but you have to check the Slave option in the Database Type group. When you click the
Slave option, the Update Database From group becomes active. You need to enter the IP address of
the MultiVOIP that you established as the Master.
Содержание MultiVOIP 200
Страница 1: ...Voice Fax over IP Networks Voice Fax Over IP Networks Model MVP200 User Guide...
Страница 5: ...Voice Fax over IP Networks Chapter 1 Introduction and Description...
Страница 14: ...14 MultiVOIP 200 User Guide...
Страница 15: ...Voice Fax over IP Networks Chapter 2 Installation...
Страница 21: ...Voice Fax over IP Networks Chapter 3 Software Loading and Configuration...
Страница 40: ...40 MultiVOIP 200 User Guide...
Страница 41: ...Voice Fax over IP Networks Chapter 4 MultiVOIP Software...
Страница 59: ...Voice Fax over IP Networks Chapter 5 Remote Configuration and Management...
Страница 67: ...Voice Fax over IP Networks Chapter 6 Warranty Service and Tech Support...
Страница 73: ...Voice Fax over IP Networks Appendixes...
Страница 82: ...82 MultiVOIP 200 User Guide...
Страница 83: ...Voice Fax over IP Networks Glossary...
Страница 96: ...96 MultiVOIP 200 User Guide...


