12
Assembly instructions
Important info before you start assembling
Use the list of components on page 4 and 5 to check the completeness
of the components supplied.
We recommend assembling the model on a clean and perfectly flat surface
to ensure that the structure is free of warps and that the components are
not damaged during assembly. Be sure to cover the surface with clear
plastic film to avoid the components sticking to the surface.
Joints between EPP components are best made using UHU
®
POR. In this
case, apply a thin film of adhesive to both surfaces to be glued. Then
allow it to air-dry for about ten minutes. Then press the parts together.
The strength of the joint is determined by the pressure you exert, rather
than the length of time you exert it. When CFRP section rods have to be
inserted into EPP parts, press the section rods into the appropriate slot,
then trickle low-viscosity (thin) Zacki-ELAPOR
®
super liquid onto them. A
small amount of activator spray will help to harden the adhesive. All other
glued joints can be made using standard Zacki-ELAPOR
®
.
All carbon rods, with the exception of the 0.8 x 500mm carbon rods, are
supplied cut to length. Although the rods are supplied cut to length, you
may need to trim them slightly. Therefore, make sure the carbon rods are
the correct length before gluing them into place.
The supplied 0.8 x 500mm carbon rods have not been cut to length.
For each assembly stage, it is then specified how many of these rods
are to be used and still have to be cut to length. These 0.8mm rods are
numbered 1-14. We recommend that you hold the carbon rod in position,
and cut it to length using pliers or side-cutters. The kit includes an ample
supply of carbon rods.
These written instructions are intended only as a supplement to the
illustrations. All briefly described assembly steps are explained in more
detail there.
Preparing the individual components
To ensure the rudders move freely when the model is flying, fold all rudder
flaps through 180° prior to assembly. Then leave them in this position for
about an hour.
Fig. 1
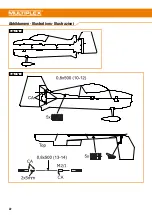
Glue the carbon fiber flat sections into the elevator and the vertical tail.
Then glue the rudder horn into the rudder.
Fig. 2
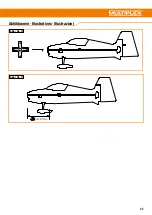
Glue the wing halves and the tailplane to the center fuselage section.
Fig. 3
To ensure reinforcement, glue the carbon fiber rods into the underside
of the fuselage and into the lower fuselage section. Further, glue the
EPP carbon rod holders to the underside of the wing and the 3D-printed
undercarriage reinforcements to the lower fuselage section. Then glue the
elevator servo (
Hitec HS-40 #112040
) into place, making sure it is flush
with the upper surface of the wing.
Fig. 4
Glue the lower fuselage section to the underside of the fuselage.
Fig. 5
Glue the two undercarriage rods into place. Subsequently glue the carbon
fiber struts to the fuselage and the wing as shown.
Fig. 6
Glue the wheel cover holders to the wheel covers. Then glue the
undercarriage legs and the CFRP wheel axles to the axle retaining
brackets. Remember to make one right-hand and one left-hand assembly.
Now fit each wheel on its axle followed by a spacer ring, and glue the
spacer rings into place with a small amount of adhesive.
Check that the wheels are free to rotate. Now place the wheel caps on the
wheel axles and glue the two undercarriage covers to the undercarriage
legs.
Fig. 7
Glue the aileron servo (
Hitec HS-5065MG #113065
), the rudder servo
(
Hitec HS-40 #112040
) and the two aileron horns into place from above.
Use a servo tester or your radio control system to set the aileron servo
to neutral.
Then screw the double rudder horn to the servo arm extension. Suitable
screws are supplied in the servo accessory pack. Open up the servo arm
extension using a 1.5mm drill bit and screw the ball heads into place with
the balls facing upward. Now screw the servo arm onto the servo, making
sure it points forward in the direction of flight.
Assemble the aileron linkage as shown in the illustration. Attach an M2
x 20mm threaded coupler to one end of the CFRP rod. Screw a ball
socket onto the threaded coupler, holding the threaded coupler in pliers
to prevent it turning. Determine the length to the rudder horns and cut
the rod to the correct length. Then glue the ball socket into place. You
can now fine-tune the pushrod length using the threads; ensuring both
ailerons are horizontal. Now screw the pushrod onto the rudder horn,
making sure the ball head points inward.
Fig. 8
Glue the upper fuselage section and the rudder to the center fuselage
section.
EN


