background image

19

  Slide shoulder pads to lowest position in the

lateral guide slots of the slide carrying plate,


tilt

buttons a little towards outside and take pads
out of guide slots


Unbutton shoulder pads and hip belt from car-
rying plate

  Remove lines from receptacles of carrying

plate

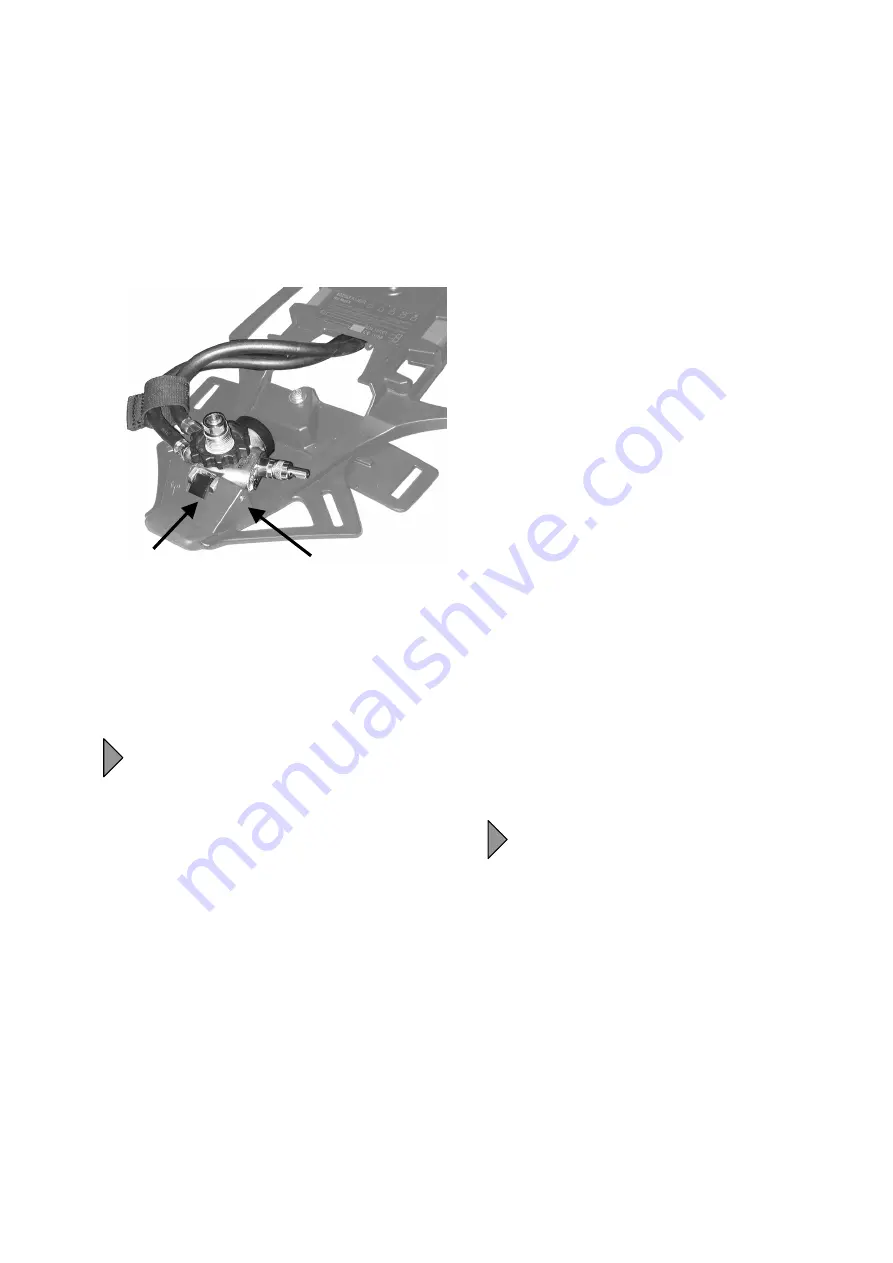
  Remove pressure reducer from carrying plate

by pushing the spindle out (e.g. with a small
screwdriver); 

do not 

push up the stop spring

Fig. 7

  Set slide carrying plate to smallest position,

push lock and take out the slide plate


Clean carrying plate and cylinder strap, as well
as slide plate at max. 60°C


Clean harness in a suitable washing machine
at max. 60°C

  Clean lines, pressure reducer and pressure

gauge, resp. ICU, by hand

Do not submerge pressure reducer into
water


Totally dry all AirMaXX components in a drying
cabinet at max. 60°C

5.4

Function and Tightness Check


Visually check the high pressure gaskets (see
5.5.2)


Connect compressed air cylinder(s) to carrying
plate (see 4.2.1, 4.2.2)

  Check all AirMaXX components for visible

malfunctions, such as incorrectly assembled
harness, loose compressed air cylinder(s), in-
correctly fitted lines, etc.


Open cylinder valve(s); depending on the cyl-
inder size, the operating pressure must be at
least 270bar at 300bar cylinders, resp. 180bar
at 200bar cylinders.


Close cylinder valve(s)

  After 60 seconds the pressure drop in the

pressure gauge, resp. the ICU, must not ex-
ceed 10bar


Check the warning device (see Sect. 5.5.1)

5.5

Pressure Reducer Check

5.5.1

Warning Device

  Connect lung governed demand valve to me-

dium pressure line

  Open cylinder valve(s); the pressure at the

pressure gauge must be at least 120bar


Close cylinder valve(s)

  Carefully activate flushing mode of lung gov-

erned demand valve (see Instruction Manual of
lung governed demand valve)


Observe pressure gauge, resp. ICU


The warning signal must sound at 55

±

5bar

5.5.2

High Pressure Gaskets


Visually check the sealing ring of the cylinder
connector in the pressure reducer. Damaged
sealing rings have to be replaced.

5.5.3

Overhaul


The overhaul of the pressure reducer may only
be performed by MSA or an authorised service
centre

5.6

Filling the Compressed Air
Cylinders

5.6.1

Filling with a Compressor

  Check compressed air cylinders for valid test

date, visible technical defects, such as dam-
aged valves, in which case they should not be
filled


Check for humidity in the connecting thread, if
necessary, dry completely


Fill the cylinders at a compressor according to
Instructions with dry breathing air according to
EN 12021

  After cooling down to ambient temperature,

check whether the maximum operating pres-
sure has been reached, if necessary, refill

5.6.2

Filling Completely Empty Cylinders

Completely empty (pressure-free) cyl-
inders must be dried to preclude an ex-
cessive moisture content.

  Fill compressed air cylinders completely at

least twice including slow discharge. Assure
that during discharging there is no icing at the
valve. If necessary, reduce the discharge flow
with dosed closing of the cylinder valve

Stop


Spring

Spindle

Содержание AirMaXX

Страница 1: ...AirMaXX...

Страница 2: ...2 Deutsch 3 English 13 Der Umwelt zuliebe gedruckt auf 100 Altpapier MSA AUER AirMaXX MSA 2002...

Страница 3: ...MaXX 10 5 8 2 Druckluft Flaschen 10 5 9 Fehlfunktionen 10 6 Bestellangaben 10 Sie haben sich f r einen MSA Pressluftatmer der Baureihe BD Bauart AirMaXX im Folgenden Air MaXX genannt entschieden Wir b...

Страница 4: ...aten z B MSA AUER AutoMaXX Der Druckminderer reduziert den Flaschendruck auf ca 7 bar Das Sicherheitsventil reagiert im Falle einer Fehlfunktion bei einem Druck von ca 11 bar um Besch digungen zu verh...

Страница 5: ...druck 5 bis 8 bar dynamisch Betriebstemperatur 30 C bis 60 C 4 Bedienung 4 1 Hinweise Der AirMaXX darf nur in gepr ftem und gewartetem Zustand zum Einsatz kommen Bestell Nr der Gebrauchsanleitung Soll...

Страница 6: ...le nach unten klappen bis sie ein rastet Freies Ende des Flaschenbandes auf das Klettband des Flaschenbandes auflegen und festdr cken Festen Sitz der Druckluft Flaschen kontrollie ren und ggf korrigie...

Страница 7: ...ber den Zweitanschluss ist aufgrund des Mehrverbrauchs an Atemluft durch die zu rettende Person die verk rzte Einsatzzeit zu ber cksich tigen 4 9 F llen mit dem Quick Fill Abb 5 Durch die Quick Fill F...

Страница 8: ...einer Alterung und sind den rtlichen Verh ltnissen entsprechend in regelm igen Abst nden zu kontrollieren und ggf auszutauschen 5 2 Hinweise Die Pflege und Wartung sollte nur von autorisierten Persone...

Страница 9: ...er bzw ICU darf innerhalb von 60 Sekunden nicht mehr als 10 bar abfallen Pr fung der Warneinrichtung durchf hren siehe 5 5 1 5 5 Pr fung des Druckminderers 5 5 1 Warneinrichtung Lungenautomat am Mitte...

Страница 10: ...aXX Z mit ICU 100 27 601 AirMaXX S Z mit ICU 100 27 602 AirMaXX Q mit ICU 100 27 603 AirMaXX S Q mit ICU 100 27 604 AirMaXX Z Q mit ICU 100 27 605 AirMaXX S Z Q mit ICU 100 27 606 AirMaXX mit ICU S 10...

Страница 11: ...r 300 bar gef llt mit arretierbarem Ventil D5103 973 6 8 Liter 300 bar leer mit arretierbarem Ventil D5103 980 Druckluft Flaschen All Composite 6 8 Liter 300 bar gef llt 100 19 154 6 8 Liter 300 bar l...

Страница 12: ...12 Notizen...

Страница 13: ...e 20 5 8 1 AirMaXX 20 5 8 2 Compressed Air Cylinders 20 5 9 Malfunctions 20 6 Ordering Information 20 You have chosen a compressed air breathing ap paratus from the series BD the AirMaXX Con gratulati...

Страница 14: ...MaXX The pressure reducer reduces the cylinder pressure to approx 7bar The safety valve activates at a pressure above 11bar to prevent damage and to assure the supply of breathing air The audible warn...

Страница 15: ...sure Connection 200 resp 300 bar Medium Pressure Connection 5 to 8 bar dynamic Operating Temperature 30 C to 60 C Part No Instructions for Use 4 Use 4 1 Remarks The AirMaXX may only be put into use in...

Страница 16: ...r strap and push tight Check tight position of compressed air cylin ders retighten if necessary 4 3 Adjusting the Carrying Plate Fig 4 Push catch clips on inside of AirMaXX together in direction of ar...

Страница 17: ...increased air consumption from the person being rescued will shorten the service time 4 9 Filling with Quick Fill Fig 5 With the Quick Fill the compressed air cylinders of the AirMaXX can be filled d...

Страница 18: ...valves and if required with the respective facepieces 5 2 Remarks Care and maintenance should be per formed only by authorised personnel Do not use organic solvents like nitro dilution alcohol spirit...

Страница 19: ...ng device see Sect 5 5 1 5 5 Pressure Reducer Check 5 5 1 Warning Device Connect lung governed demand valve to me dium pressure line Open cylinder valve s the pressure at the pressure gauge must be at...

Страница 20: ...with ICU 100 27 604 AirMaXX Z Q with ICU 100 27 605 AirMaXX S Z Q with ICU 100 27 606 AirMaXX with ICU S 100 27 607 AirMaXX S with ICU S 100 27 608 AirMaXX Z with ICU S 100 27 609 AirMaXX S Z with IC...

Страница 21: ...iter 300 bar empty with arresting valve D5103 980 All Composite Cylinder 6 8 liter 300 bar filled 100 19 154 6 8 liter 300 bar empty 100 19 155 6 8 liter 300 bar filled with arresting valve 100 19 156...

Страница 22: ...22...

Страница 23: ...23 Notes...

Страница 24: ...erlin Phone 49 30 6886 555 Telefax 49 30 6886 15 17 E Mail contact msa europe com Southern Europe Regional Head Office Italy MSA Italiana S p A Via Po 13 17 I 20089 Rozzano MI Phone 39 02 89 217 1 Tel...

Отзывы: