MRM LFP Скачать руководство пользователя страница 23

LFP Quick Start Guide

19

LFP Quick Start Guide

LFP

Quick Start Guide

Chapter 3  

Using Film mode to record and 

play back camera movements

About Film mode

In Film mode you can record the movements of the head and changes to 
the lens focus, zoom, and iris settings as a single “

move

”, and then play 

that move again later. 

In addition to recording live moves, you can define a move by defining its 
start and end points (including lens settings and other parameters), and 
the LFP can generate the move by interpolating between the points. 

There is no practical limit on the number of moves you can store, 
although there is a total time limit of 174 axis minutes. For example, if 
you record the movements of 4 axes simultaneously, the total time storage 
capacity is about 43 minutes. 

The LFP remembers the stored moves even if you power off, and even if 
you change modes and then come back to Film mode. To go into Film 
mode: 

In the LFP menu choose 

CHANGE MODE


>


FILM MODE

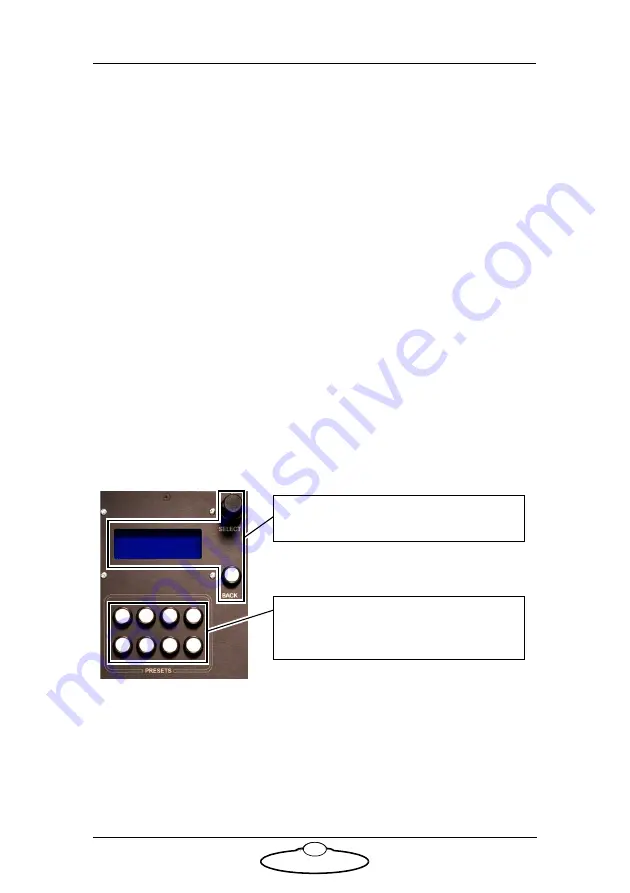
Once in Film mode you record, play, and 
modify moves by using the menu. 

You can also assign existing moves to the 

PRESETS

 buttons, and then play the 

moves with the buttons. See page 35. 

Содержание LFP

Страница 1: ...LFP CONTROLLER Quick Start Guide Document version LFP QSG 20160421 MSA 21 v6 14 Part number MRMC 1168 02...

Страница 2: ...in this document is accurate and up to date Mark Roberts Motion Control continuously strives to improve their products and may make changes to the hardware firmware and software described in this docu...

Страница 3: ...to record and re use static camera positions 16 About Broadcast mode 16 Recording a preset 16 Using a preset 17 Modifying a preset 17 Chapter 3 Using Film mode to record and play back camera movements...

Страница 4: ...h a hard stop 66 Setting up a lens axis for manual zeroing 66 Setting up a lens axis for automatic homing 66 Zeroing a lens ring with a slip clutch 67 Using a FIZ pot 68 Calibrating the FIZ pot 68 App...

Страница 5: ...using the Large Format Panel LFP camera head controller from Mark Roberts Motion Control MRMC You can use the LFP as a standalone controller attached to an MRMC camera head The LFP is a robust contro...

Страница 6: ...at normal speed and play it back slowly in stop frame or slow motion mode Back Pan You can set up the pan axis to automatically compensate for rotation axis movement to keep the camera on target Soft...

Страница 7: ...V 5A ETHERNET POWER IN 3 hole plug 24 Volts DC Put the BOOT MODE switch to Up position Attach the power cables last Example head AFC The head and controller both use the same type of power supply bric...

Страница 8: ...or LED on the head Hint It is recommended that you do not use the POWER OUT socket on the LFP to power the head if you are using an Ethernet connection to the head If you do so then powering up the LF...

Страница 9: ...power cables 2 Press the SELECT knob to load the operating system into the head This is called loading the head If the load is successful the screen on the LFP displays a message similar to the follo...

Страница 10: ...is typically assigned to Roll or lens focus if such a facility is available Note that the physical effects of most controls are adjustable in the menu in terms of the limit range of motion direction...

Страница 11: ...ity The LFP has two main modes of operation Broadcast mode in which you can store and recall static camera positions This is described in Chapter 2 Film mode in which you can store and recall dynamic...

Страница 12: ...targets the camera upward in the scene To set the control directions you use the procedure below 1 On the LFP use the SELECT knob rotate and press to choose the menu sequence SET DIRECTION if you are...

Страница 13: ...LFP Quick Start Guide 9 FOCUS AUX Auxiliary focus control plugged into the LFP ZOOM AUX Auxiliary zoom control plugged into the LFP Menuoption Description...

Страница 14: ...axes manually you use the controls to point the camera in the direction that you want to use as the zero position for the head axes See Zeroing the axes manually on page 11 Zero the axes by homing th...

Страница 15: ...of the following options DIRECT ZERO ALL in Broadcast mode this option is only available if the Engineering menu option HOME AXIS ZEROING METHOD is set to ZEROING or HOME AXES DIRECT ZERO ALL in Film...

Страница 16: ...s with internal motors for the focus zoom and iris or if all of your external Lens Control Motors LCMs have homing enabled that is if the Engineering menu option HOME AXES SET HOME AXIS TYPE is set to...

Страница 17: ...abling can get wrapped around the head or if you have a lens with external lens control motors where you need to limit the travel of the lens axes Before the limits can be set or applied you need to z...

Страница 18: ...number in the menu now shows the current pan position of the head for example 31896 which is updated continuously as you pan the head 3 3 Use the joystick to pan the head so that the PAN MAX number i...

Страница 19: ...connect the control cables before the power cables and then set new soft limits after you have zeroed the axes page 13 Hint You can turn off the limits for one or more axes For example if you have an...

Страница 20: ...dcast mode To go into Broadcast mode In the LFP menu choose CHANGE MODE BROADCAST MODE Recording a preset 1 In Broadcast mode press the RECORD button The panel shows that you are now in Record mode SH...

Страница 21: ...buttons will go to that combination of head position and lens settings Modifying a preset 1 Press PLAY then the PRESETS button for the position you want to modify 2 When the head arrives at the preset...

Страница 22: ...LFP Quick Start Guide 18 The new fine tuned settings overwrite the previous settings for that button...

Страница 23: ...P can generate the move by interpolating between the points There is no practical limit on the number of moves you can store although there is a total time limit of 174 axis minutes For example if you...

Страница 24: ...he BACK button again by itself After you recover from a single press E Stop your axes retain their zero setting so you do not need to re zero them After you recover from a double press E Stop your axe...

Страница 25: ...playback the controller sends a brief signal to turn on the camera During playback no further camera trigger signal is sent the camera keeps running At the end of playback the controller sends a brief...

Страница 26: ...c signal to come in via the head through one of the following connectors Trigger In pin 3 on the TRIGGER connector on an AFC head that has the optional BCST70 panel or on any head with a Quad box or O...

Страница 27: ...time that you want the move to take in seconds 8 Press BACK then use option SET A B FAIRINGS UP FAIRING to set the acceleration for the start of the move For example a value of 25 means that the head...

Страница 28: ...OT press SELECT to begin playing the move When playing a move the panel displays SHOOTING If necessary you can stop a move at any time by using the BACK button To modify the move see Modifying a move...

Страница 29: ...d to it it will not be recorded as you will not be able to move it with the controls 3 Press BACK then choose menu option RECORD The panel shows NOT RECORDING along with the ID number of the move abou...

Страница 30: ...ed to the REC PLAY AXES menu and the move is not stored Playing back a move simple method 1 In Film mode choose menu option REC PLAY AXES PLAYBACK SELECT PLAY MOVE 2 Use the SELECT knob to choose whic...

Страница 31: ...t to wait for a sync signal CAMERA SETUP CAM SYNC see page 22 then the controller displays the message AWAITING CAM SYNC and playback of the move will not start until a sync pulse is received from the...

Страница 32: ...lay the move continuously until you press BACK to stop it REC SPEED the speed of the camera frames per second used when the move was recorded This number affects the playback speed which is also relat...

Страница 33: ...the number of frames per second that the camera is actually using when the move is played back If these are different the LFP will automatically adjust the speed of the playback a proportionate amount...

Страница 34: ...a camera trigger signal and sends a bloop trigger signal If camera sync is enabled page 22 the sequence of events when you try to play a move is as follows 1 READY TO GOTO 2 SELECT 3 PERFORMING GOTO...

Страница 35: ...For technical details see Camera trigger out on page 73 and Auto focus and bloop trigger out on page 73 1 In Film mode choose menu option CAMERA SETUP 2 Change the ENABLE option to TIME LAPSE This se...

Страница 36: ...ens axes stop just before triggering each exposure The head and lens axes essentially perform a go to at each frame then stop and hold position while the frame is exposed If you choose this option the...

Страница 37: ...u typically use this facility to manually correct a lens setting such as focus 1 In Film mode choose menu option REC PLAY AXES MODIFY SELECT PLAY MOVE 2 Use the SELECT knob to choose which move you wa...

Страница 38: ...ntrols When the move finishes it is automatically stored with your modification and you can immediately create another modified move in case your previous modification wasn t quite perfect READY TO GO...

Страница 39: ...hen you have assigned all the moves you want press BACK to return to the top level menu Playing a move with a Preset button 1 In Film mode press one of the eight white PRESETS buttons that you have as...

Страница 40: ...all the moves that you want to delete 3 Scroll to the HOLD SEL HERE 2 DEL option at the top of the list and press SELECT The moves are deleted and system memory is rearranged to provide the maximum am...

Страница 41: ...ET SCALES in Film mode The amount of scaling to be applied to the axes To automatically calculate the scale so the axis range matches the range of a FIZ pot controller see page 68 Damping SET DAMPING...

Страница 42: ...by changing OFF to ON You usually choose whichever controls have been assigned to Pan and Tilt such as JOY HORIZ and JOY VERT or the Pan Bars PB 1 and PB 2 Feathering GENERAL SETUP SET FEATHERING in F...

Страница 43: ...starts slowing down to come to a stop Goto speed SET GOTO SPEED in Broadcast mode or GENERAL SETUP SET GOTO SPEED in Film mode The speed of the head when going to a preset position in Broadcast mode...

Страница 44: ...oller model you ve got and how it has been configured for accessories For example the LFP is typically set up for the following controls JOY HORIZ Joystick Horizontal JOY VERT Joystick Vertical JOY RO...

Страница 45: ...time The names of the axes as they appear in the menu can vary in how they are assigned to the controls depending on how the controller has been configured for your particular head requirements and pr...

Страница 46: ...value See page 13 MAX MIN SET DIRECTION Controls Set the direction in which the controls operate See page 8 FWD Forward OFF Disable the control REV Reverse SET INPUT EXP Controls The sensitivity grad...

Страница 47: ...g to the start of a move in Film mode See page 39 INPUT VALUES Controls The current values of the controls updated continuously as you move the controls AXIS POSITIONS Axes The current values of the a...

Страница 48: ...s See page 20 ENABLE The type of signal used to trigger the camera during playback See page 21 MOMENTARY TIME LAPSE PULSE CONTINUOUS CAM SYNC The connection to be used for the incoming sync signal use...

Страница 49: ...X MIN SET SCALES Axes SCL The amount of scaling to be applied to the axes See page 37 SET DIRECTION Controls The direction in which the controls operate See page 8 FWD Forward OFF Disabled REV Reverse...

Страница 50: ...ing to be applied to the controls to filter out sudden jerks and twitches See page 37 SET INPUT EXP Controls The sensitivity exponential gradient of the controls See page 37 Off LOW MED HIGH SET ZRS Z...

Страница 51: ...ra on target The link is one way you can still move the Pan axis with the controls but this has no effect on the Rotate axis BP SCALE prompts you to move the axes to different positions and then autom...

Страница 52: ...ne at a time using the homing facility if your head has it See page 12 SELECT AXIS Axes DIRECT ZERO Axes Zero the axes manually at their current position The menu displays the status as each axis is z...

Страница 53: ...DURATION MOVE SECONDS SET A B FAIRINGS UP FAIRING DOWN FAIRING GENERATE A B MOVE RUN GENERATED MOVE SELECT PLAY MOVE Test the move that you created See page 24 PLAY OPTIONS PLAYBACK SAME SPEED PLAYBA...

Страница 54: ...options See page 28 SET PLAYBACK TRIGGE INPUT TRIG1 GPI1 pin 3 TRIG2 GPI2 pin 4 TRIG3 GPI3 pin 5 TRIG4 GPI4 pin 6 This only applies to the MSA 20 Handwheels Trigger the start of playback and subseque...

Страница 55: ...L OPTIONS FRAMES FRAME TIME TYPE TL PLAYBACK PAIR PRESETS MOVES Assign recorded moves to the PRESETS buttons In Film mode you can then play a move by pressing the relevant PRESETS button In Broadcast...

Страница 56: ...tches on an axis updated as you move the controls The first digit is the limit status 1 one open when an axis reaches either one of its hard limit switches and 0 zero closed otherwise The second digit...

Страница 57: ...which the devices are powering up If you are using an Ethernet connection to the head avoid powering the head from the power output socket on the controller in order to avoid powering up the two devi...

Страница 58: ...can only move the focus zoom or iris axis into negative values then it means you are using a lens with external motors and that the axis value is increasing in the wrong direction on your particular...

Страница 59: ...gnal from the camera or external genlock system to trigger the start of the move recording or playback Start the camera running Check the cable and connector that the sync signal is going through and...

Страница 60: ...ettings back to the factory defaults and you will need to customise them again when you get the head back Introduction to LAN addresses Each device on an Ethernet network has a suite of three addresse...

Страница 61: ...usually the IP address shown in the above table unless it has been changed or unless you specified a different address when you ordered the head In any case the factory set IP address of a head is ord...

Страница 62: ...er The menu panel on the LFP displays a prompt similar to the following C MRMC 2016 MSA 21 v6 14 PRESS SELECT TO LOAD QUAD ETHER II 3 Press the SELECT knob to load the head If the head fails to load y...

Страница 63: ...to make sure the IP address is unique on the network If you are looking at the Head IP address then the displayed value is the IP address that the controller is looking for when it tries to load the h...

Страница 64: ...found for the head 7 4 Press BACK then SET HEAD IP ADDRESS 7 5 Enter the IP address that the controller found for the head 7 6 You can check that the controller can communicate with the head on the n...

Страница 65: ...nge the IP SN and GW addresses of the head if necessary 1 Find a PC that has Flair Motion Control Software installed on it or install Flair on your own PC 2 Attach the head to the PC with an Ethernet...

Страница 66: ...tup window are saved in the NetworkDirect ini file You can also edit this file by using the menu option Help View Network ini File If Flair cannot find the head on the network at the IP address shown...

Страница 67: ...e new IP address into the Network Setup window now and click on Save The Status temporarily changes to Not connected as Flair changes the IP address in the head then to Connected as Flair reconnects w...

Страница 68: ...nspect the values for the FOCUS ZOOM and IRIS displayed in the panel as applicable to your setup The values are updated as you move the controls FOCUS axis values must increase or become more positive...

Страница 69: ...his press BACK several times to return to the top of the menu tree then choose GENERAL SETUP INPUT SETUP SET INPUT DIR 8 Invert the relevant control for the FOCUS ZOOM or IRIS axis that you changed Th...

Страница 70: ...ontrols whenever you zero or home all axes in the future page 10 Setting up a lens axis for automatic homing 1 Choose menu option CHANGE MODE ENGINEERING MODE 2 Enter the PIN given to you by MRMC supp...

Страница 71: ...lens rings usually focus have no hard limit That is when you reach one end of travel such as focussing on infinity you can continue turning the ring and this will have no further effect as the ring s...

Страница 72: ...ues page 64 then adjust the direction setting of the FIZ pot control for that axis page 8 A FIZ pot differs from the controls on your LFP in that a FIZ pot has hard stops that limit its rotation range...

Страница 73: ...t all the way clockwise and press SELECT The display shows the calculated FIZ pot range For example 9834 7 Press BACK several times to return to the top menu level Caution Engineering mode is for adva...

Страница 74: ...tware connecting via the Ethernet port or legacy MSA Archiver software connecting via the SERIAL B port Centre position Flair mode The LFP only operates as a slave mimic device and boots up from Flair...

Страница 75: ...directions from the MSA Archiver software However this usage has largely been superseded by using MSA Ethernet Archiver software running over the Ethernet connection For pin out information see Serial...

Страница 76: ...ed that you do not use the POWER OUT socket to power the head if you are using an Ethernet connection to the head If you do so then powering up the LFP will simultaneously power up the head and in thi...

Страница 77: ...ector on an AFC head Quad box on an SFH 30 or SFH 50 head or Octo box on an SFH 50 head Note that some TRIGGER connectors might be internally configured with a jumper setting so that Pin 3 is a Trigge...

Страница 78: ...recording misses the bloop then you can start the camera in advance manually and the bloop will trigger as usual when the move starts Camera sync in For information on which pins you can use to input...

Страница 79: ...page 71 Bit rate 10Mbps 1 Watchdog 2 Out 3 In 4 N C 5 N C 6 Watchdog 7 Out 8 In 9 N C Serial A connector Serial A is an RS232 port used for updating the firmware in the LFP and for connecting the LFP...

Страница 80: ...chiver software The copying is controlled in both directions from the MSA Archiver software The Baud rate is 38 4kbps 1 N C 2 TX B 3 RX B 4 N C 5 GND 6 N C 7 N C 8 N C 9 N C 10 Auxiliary connectors fo...

Страница 81: ...e 77 Pan Bars connector 1 PB1A 2 PB1B 3 PB2A 4 PB2B 5 PB3A 6 PB3B 7 PB4A 8 PB4B 9 GPO6 10 GPO7 11 GPO8 12 GPO9 13 12V 14 PB1A 15 PB1B 16 PB2A 17 PB2B 18 PB3A 19 PB3B 20 PB4A 21 PB4B 22 5V 23 GND 24 GN...

Страница 82: ...24VOUT 3 N C Hint It is recommended that you do not use the POWER OUT socket on the LFP to power the head if you are using an Ethernet connection to the head If you do so then powering up the LFP will...

Страница 83: ...Guide LFP Quick Start Guide Appendix 4 Specifications Weight 2 4 Kg Power requirements 24 Volts DC 100 240 Volts AC Temperature range 0 45 C 32 113 F Humidity tolerance 0 to 85 relative humidity non c...

Страница 84: ...51 PAN AXIS 47 PING HEAD 60 PLAY OPTIONS 28 49 50 PLAYBACK 26 26 28 50 PLAYBACK ANY SPEED 29 49 50 PLAYBACK SAME SPEED 24 26 26 49 50 POS A 49 POS B 49 REC SPEED 50 RECORD 25 50 50 RECORD MOD 33 50 RE...

Страница 85: ...LFP Quick Start Guide 81 TL OPTIONS 51 TL PLAYBACK 32 51 TYPE 32 51 UP FAIRING 23 49 ZEROING METHOD 11 12 ZRS MASTER 42 46 ZRS SCALE 38 42 46...

Страница 86: ...n outs 73 controls 6 directions 8 D damping 37 DATA IN connector 71 pin outs 74 DATA OUT connector 71 pin outs 75 DataLink In DATA IN connector 71 pin outs 74 DataLink Out DATA OUT connector 71 pin ou...

Страница 87: ...outs 77 panel summary 70 pin outs 73 PLAY button 6 17 playing moves advanced method 28 simple method 26 time lapse 31 playing preset camera positions 17 POWER IN connector 71 pin outs 78 POWER OUT co...

Страница 88: ...order of events 30 T temperature range 79 time lapse playback 31 TRIGGER connector 73 trigger auto focus 73 trigger bloop 73 trigger camera 73 troubleshooting 53 Ethernet network 56 U underslung head...

Страница 89: ...LFP Quick Start Guide 85 Notes...

Страница 90: ...LFP Quick Start Guide 86 Notes...

Страница 91: ...LFP Quick Start Guide 87 Notes...

Страница 92: ...Mark Roberts Motion Control Ltd Unit 3 South East Studios Blindley Heath Surrey RH7 6JP United Kingdom Telephone 44 0 1342 838000 info mrmoco com www mrmoco com...

Отзывы: