


CHAPTER
7
Quick Reference:
MOTU Audio Setup
Provides several options for the 896mk3’s
AES/EBU sample rate conversion. See,
“Syncing AES/EBU devices” on page 25.
The 896mk3 driver provides a stereo return
back to the computer. This return feeds the
signal on any 896mk3 output pair directly
back to the computer, where you can record,
process, monitor or otherwise use it. This is a
great way to “bounce” full mixes, complete
with live audio routed through the 896mk3
only, back into the computer.
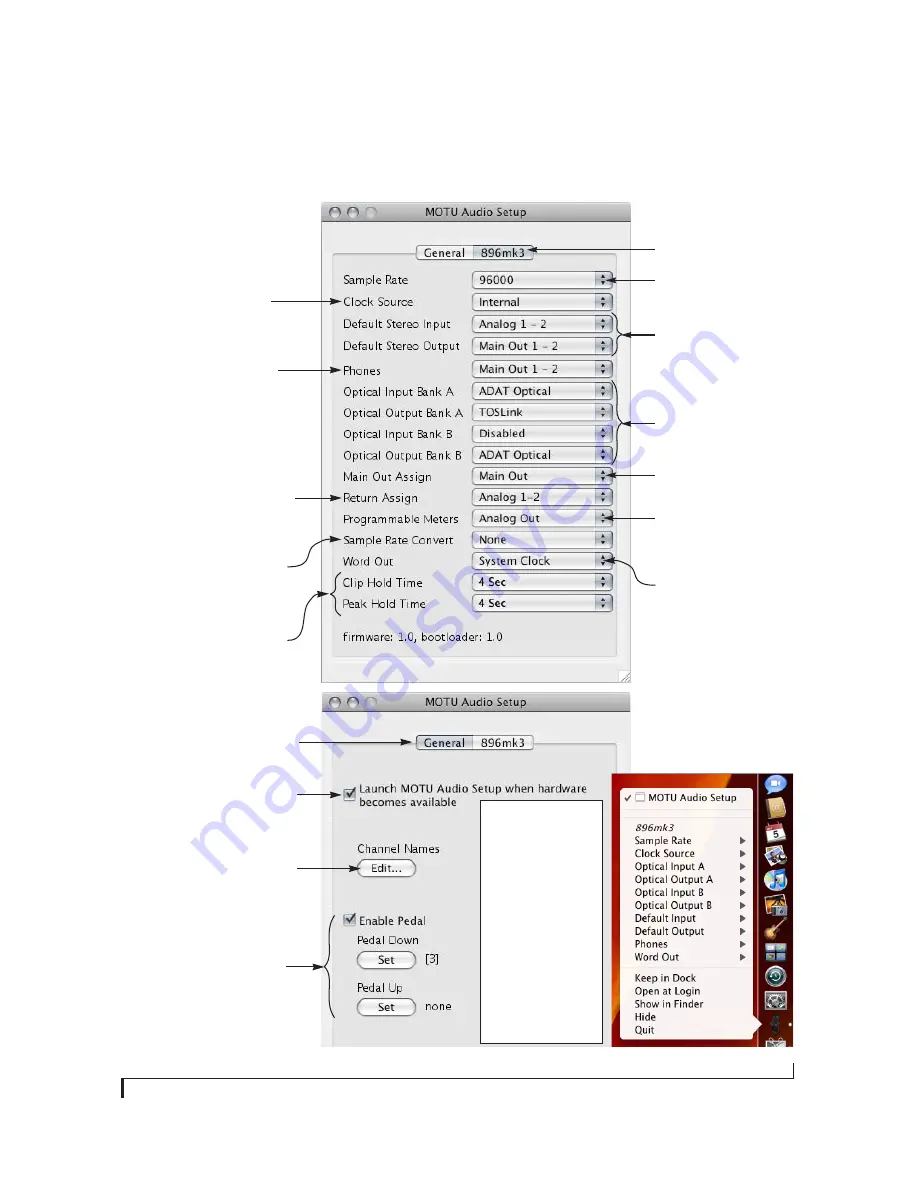
Determines the clock source for your
896mk3. If you’re just using the analog
ins and outs, set this to ‘Internal’. The
other settings are for digital transfers
via AES/EBU, S/PDIF or optical ports, or
for slaving the 896mk3 to word clock.
Specifies the stereo input and
output pair when the 896mk3 is
chosen for Mac OS X audio I/O.
Choose the global sample rate
for the system here.
If you are running an 896mk3
interface at a high sample rate
(88.2, 96, 176.4 or 192 kHz), this
option appears in the interface
tab. It lets you choose a word
clock output rate that either
matches the global sample rate
(e.g. 96kHz) or reduces it to the
corresponding 1x rate (e.g. 48kHz
instead of 192 kHz).
This menu lets you choose what you will
hear from the PHONES jack. To mirror the
main outs, choose
Main Out 1-2
. Or you can
mirror any other output pair. To hear the
phones as their own independent output,
choose
Phones 1-2
(at 44.1 or 48 kHz). At
higher sample rates, the phones must
mirror any other available output pair.)
Click the tabs to access general
MOTU FireWire interface settings
or settings specific to the 896mk3
(or other connected interface.)
Check this option if you would like the MOTU
Audio Setup icon to appear in the application
dock as soon as a MOTU FireWire interface is
detected (switched on, plugged in, etc.)
In the standard Mac OS X
fashion, the console
appears in the dock when
you launch it. If the
Launch
option is checked (as
shown above), the icon
appears as soon as you
switch on your 896mk3
interface. If you click and
hold on the dock icon
(instead of clicking it) or
control-click, a menu of
hardware settings appears
as shown to the right. You
can view and configure any
hardware settings from this
menu, without opening the
console window.
Click the General tab to access these settings.
Each optical bank can be config-
ured independently ADAT or
TOSLINK. Disable them when not
in use to conserve DSP and
FireWire bus bandwidth.
Choose the output pair you would
like the main outs to mirror, or
choose
Main Outs
to operate them
as their own independent pair.
If you have a foot switch connected to the
896mk3, these settings let you map the foot
switch to any computer keyboard key for
both the up and down position. For details
about how to set this up, see “Enable Pedal”
on page 41.
This button opens another dialog that lets
you assign your own customized names to
each 896mk3 input and output. For example,
if you have a lead vocal mic plugged into
input 1, you could name it “Lead Vox”. Your
customized names then appear in your host
audio application (if it supports Core Audio
input naming).
Lets you choose what to monitor
with the 896mk3’s programmable
front panel meters.
The
Clip Hold Time
controls how long the
top-most red LED remains illuminated after
clipping. Choose ‘Infinite’ if you want to be
able to clear the LED from Digital Performer.
The
Peak Hold Time
controls how long the
highest illuminated LED remains lit before
going dark.
Содержание 896mk3
Страница 8: ...8...
Страница 14: ...A B O U T T H E 8 9 6 M K 3 14...
Страница 16: ...P A C K I N G L I S T A N D M A C S Y S T E M R E Q U I R E M E N T S 16...
Страница 32: ...I N S T A L L I N G T H E 8 9 6 M K 3 H A R D W A R E 32...
Страница 42: ...M O T U A U D I O S E T U P 42...
Страница 68: ...O T H E R M A C O S X A U D I O S O F T W A R E 68...


