


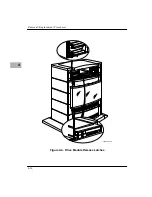


3 1/2- or 5 1/4-Inch Drive Modules
4-11
4
Replacement
1. Ensure that power to the host system is set to
STANDBY
and the
XR900 power cord is disconnected from the AC or DC power
source.
2. Note the device address setting on the drive you are
replacing, and set the address switch on the new drive to the
same device number.
3. Slide the replacement drive module gently into the drive bay
until it contacts the backplane connector.
4. Use firm steady pressure to seat the drive connector in the
backplane.
5. Reinstall the XR900 bezel, if the installation includes one.
6. Reconnect theXR900 chassis to the AC or DC power source:
– If the power supply is an AC unit, plug the power cord
back into the module and the AC outlet.
– If the power supply is a DC unit, plug the DC connector
into the power supply input and turn the –48Vdc power
source back on.
Содержание XR900 Series
Страница 1: ...XR900 Series Mass Storage Subsystem User s Manual MCPIOSA UM2 ...
Страница 9: ...x ...
Страница 11: ...xii ...
Страница 43: ...Operating Instructions 3 10 3 ...
Страница 46: ...Front Bezel 4 3 4 Figure 4 1 Bezel Removal 11051 00 9408 BEZEL LOCKS 1 EACH SIDE LATCH BUTTONS 1 EACH SIDE ...
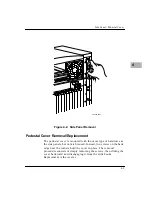
Страница 53: ...Removal Replacement Procedures 4 10 4 Figure 4 4 Drive Module Release Latches 11060 00 9409 ...
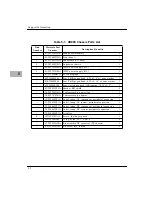
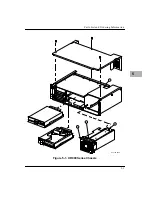
Страница 57: ...Parts List and Ordering Information 5 3 5 Figure 5 1 XR900 Series Chassis 11271 00 9503 1 3 2 4 ...
Страница 58: ...Support Information 5 4 5 ...


