


Removal/Replacement Procedures
4-2
4
Front Bezel
The XR900 front bezel (as well as the bezels for the Modular Chassis
card cage, fan trays, and power supplies) can be used in both
pedestal and rack/mast chassis configurations. The bezel is a
requirement for complete RFI shielding in either configuration. The
9U bezels used on the larger enclosures of a Modular Chassis
system are mounted on ball studs at the bottom and latched at the
top; the 3U bezel used on the XR900 enclosure is simply latched.
Screwdriver-operated locks at the upper corners prevent the
latches from being arbitrarily disengaged.
The suggested procedure for removal and replacement of the
XR900 front bezel is as follows:
Removal
1. Unlock the bezel latches (Figure 5-1) by rotating the locks a
quarter-turn inward from the ‘‘locked’’ icon to the
‘‘unlocked’’ icon with a Phillips screwdriver (clockwise on
the left side, counterclockwise on the right).
2. Unlatch the bezel from the enclosure by pressing the latch
buttons at either side of the bezel and pulling straight out.
Replacement
1. Press the sides of the bezel against the enclosure until the
latches at the sides snap into place.
2. Lock the bezel latches by rotating the locks a quarter-turn
outward from the ‘‘unlocked’’ icon to the ‘‘locked’’ icon with
a Phillips screwdriver.
Содержание XR900 Series
Страница 1: ...XR900 Series Mass Storage Subsystem User s Manual MCPIOSA UM2 ...
Страница 9: ...x ...
Страница 11: ...xii ...
Страница 43: ...Operating Instructions 3 10 3 ...
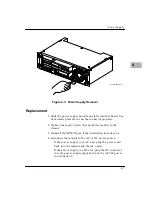
Страница 46: ...Front Bezel 4 3 4 Figure 4 1 Bezel Removal 11051 00 9408 BEZEL LOCKS 1 EACH SIDE LATCH BUTTONS 1 EACH SIDE ...
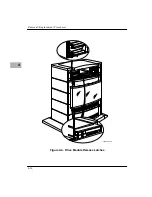
Страница 53: ...Removal Replacement Procedures 4 10 4 Figure 4 4 Drive Module Release Latches 11060 00 9409 ...
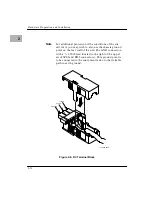
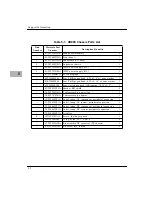
Страница 57: ...Parts List and Ordering Information 5 3 5 Figure 5 1 XR900 Series Chassis 11271 00 9503 1 3 2 4 ...
Страница 58: ...Support Information 5 4 5 ...


