


17
TriStar MPPT-600V-TR Operator's Manual
Recommended Tools:
•
Wire strippers
•
Wire cutters
•
#2 & #0 Phillips screwdriver
•
slotted screwdrivers
•
Pliers
•
Drill3/32” (2.5 mm) drill bit
•
Level
•
hack saw (cutting conduit)
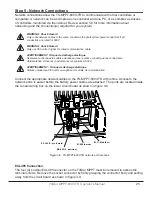
3.2 Wiring Zones
The 600V solar circuits must be separated from the low voltage battery circuits and
communication wiring within the wiring box. Figure 3-1 below shows the high voltage and low
voltage zones (shaded) within the wiring box. There is overlap in the zones as pictured because
the removable wiring divider separates the high voltage solar wiring and low voltage wiring. Solar
high voltage wiring should be routed below the removable wiring divider. The yellow
Solar
Terminal Bridge
must be properly fitted in place before making the solar power terminal
connections.
The battery wiring and all communication cables must only be routed within the low voltage
wiring zone. After the solar wiring is installed, the wiring divider should be secured in place, and
the battery cables routed above the divider. Detailed installation steps are provided in the
following sections.
NOTE:
If ALL field wiring, including communications cable, is rated for 600V, wiring
zone separation is not required. In this case, it may be more convenient to remove the
high-low voltage wiring box divider, and terminate conduit that contains mixed voltage
conductors at one point.


