background image

HIM

20 

The Interface Solution Experts

Smart HART

 Loop 

Interface and Monitor

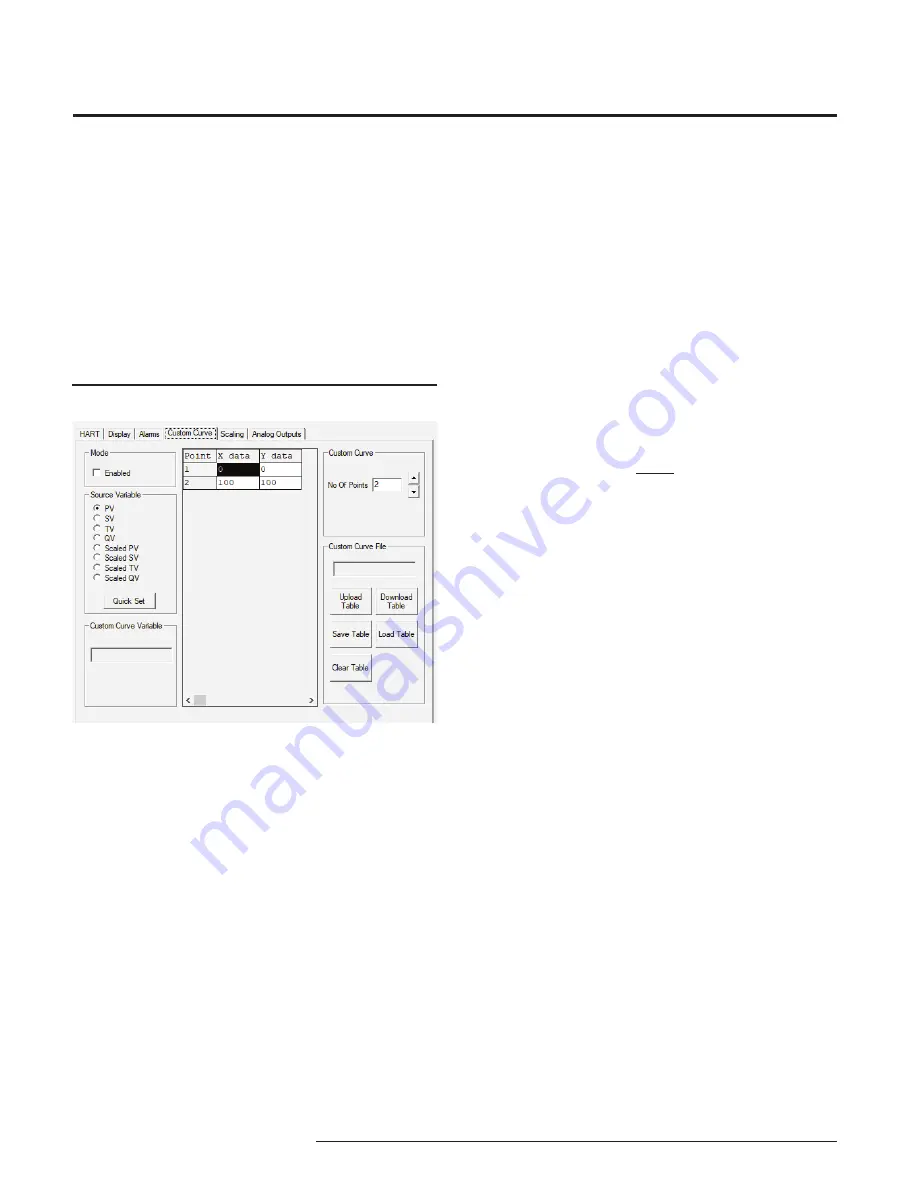
Custom Curve Tab

The custom curve tab allows you to set up a custom 
curve of up to 128 points.  A custom curve can either 
be created from scratch or loaded from a previously 
created comma separated value (.csv) file.  To program 
the Analog Outputs parameters, change the settings 
in the 

Custom Curve

 tab, then press 

Download Table

.  

See the descriptions below of the various sections of 
the screen. 

Mode

Check the 

Enabled

 box to begin programming the 

custom curve.

Source Variable

The 

Source Variable

 defines the variable that the 

custom curve will calculate.  Notice that if you select a 
scaled variable, you may need to click on the 

Scaling 

tab and verify the settings for your scaled variable.

Quick Set


The 

Quick Set

 button causes the software to configure 

the HIM’s custom curve settings to match those 
currently entered in the PC Software.

Figure 13.

  Custom Curve Tab

Custom Curve Variable

The 

Custom Curve Variable

 displays up-to-the-second 

information on the value of the Custom Curve.  Press 
the 

Monitor

 button to display the variable information.

Custom Curve

The middle section of the screen displays the custom 
curve table.  After enabling custom curve mode and 
setting the variable to be monitored, continue by 
selecting the number of points for the curve.  Enter the 
actual linearization points into the custom curve table, 
inserting the source variable into the X Column, and 
the corresponding data (i.e. the °C, °F, Gallons, PSIG, 
Millimeters, etc.) into the Y Column.


Note:


When entering data in the linearization table, make 

sure that you enter a number into every open cell. 


Custom Curve File

These buttons allow you to manipulate custom curve 
files, including the important 

Save Table

 command that 

will save a table to your hard drive.

Upload Table

Moves a custom curve file from the connected HIM to 
the PC Software for editing or storage.

Download Table


Configures the HIM by downloading the custom curve 
table from the PC Software to the HIM.

Save Table

Saves a displayed custom curve table to memory on 
your computer’s hard drive.

Load Table

Loads a previously saved custom curve table.

Clear Table

Clears the displayed custom curve table.

When you have finished changing all your settings, 
download the information to the HIM using the 

Download Table

 button.  If you have selected a scaled 

variable, you should also click on the 

Scaling

 tab and 

set the scaling parameters.

Содержание HIM

Страница 1: ...D e m a n d M o o r e R e l i a b i l i t y All product names are registered trademarks of their respective companies User s Manual HIM No 224 778 00G November 2018 Smart HART Loop Interface and Moni...

Страница 2: ...s Europe Australia 16650 Schoenborn Street North Hills California 91343 6196 U S A Tel 818 894 7111 Fax 818 891 2816 E mail info miinet com TOLL FREE 1 800 999 2900 www miinet com 1 Lloyds Court Manor...

Страница 3: ...Inputs 5 Outputs 5 Options 5 TX Power Supply 5 HIM Dimensions 6 Specifications 7 Configuring the HIM 8 Terminal Designations 9 Installing the HIM 10 Installing the HIM into the Loop 10 Bench Checking...

Страница 4: ...nting 30 Making the Electrical Connections 30 Recommended Ground Wiring Practices 30 CE Conformity 30 Power Sourcing Parameters for General Locations Intrinsically Safe and Non Incendive Type N Applic...

Страница 5: ...es uses the model and serial numbers of our instruments to track information on each unit that we sell and service If a problem occurs with your HIM check for a tag affixed to the unit listing these n...

Страница 6: ...Quaternary Variable Process Data and Instrument Diagnostic Information HIM HART Interface Module Breaks Out Data from Smart HART Instruments HART Primary Master Smart HART Multivariable Mass Flow Tra...

Страница 7: ...nge Configurable from 1 to 247 Unit will assume a MODBUS address of 01 by default Baud Rate Interface supports the following 300 600 1200 4800 9600 19 2k MODBUS interface will support even odd and no...

Страница 8: ...folder 2 Double click the installation program located in the folder Follow the prompts to correctly install the program Once the Configuration Program is installed on the PC the unit can be connecte...

Страница 9: ...6 10 11 12 HART Input 2 MODBUS Outputs and 1 Analog Output MB1AO Dual Alarm 2PRG HIM 1 2 3 7 8 9 10 11 12 TX HIM 10 11 12 IN IN A MODBUS 2 1 2 3 4 5 6 10 11 12 HART Input 2 MODBUS Outputs MB No Alarm...

Страница 10: ...Computer Moore Industries PC Configuration Software Communication Cable 250 ohms 0 01 Accurate to 0 009 of span e g HP Model 3487A 24Vdc 10 Microsoft Windows based PC 16Mb free RAM 20MB free disk spa...

Страница 11: ...OM 0 ADDR COMMON NC normally closed NO normally open 4 20mA DCS Sensor Input NO NC 24Vdc Power Source R HART Multivariable Field Instrument Temperature Pressure Level and Flow Analog Output tied to An...

Страница 12: ...ADY INPUT TRIP 2 TRIP 1 COM 0 ADDR COMMON NC normally closed NO normally open 4 20mA DCS Sensor Input NO NC DC GND 24Vdc Power Source DCC R must be 250 and 1100 Ohms R HART Multivariable Field Instrum...

Страница 13: ...The Interface Solution Experts 13 HIM Smart HART Loop Interface and Monitor Figure 7 HIM Output Wiring with Active Output and Passive Output...

Страница 14: ...device was configured HIM Tag A phrase used to identify a HIM Figure 8 HIM PC Configuration Software Screen HIM Device Status Displays how the HIM is functioning giving a brief summary of any errors...

Страница 15: ...ing the HIM to function as the Primary HART Master in the application means that any other HART device in the loop must be configured either as a HART Secondary Master 1 per loop or as a HART Slave up...

Страница 16: ...9 HART Slave Device Long Format Address Settings Screen To convert HEX to Decimal code perform the following steps Access the Calculator feature in Microsoft Windows by opening the Start menu Next sel...

Страница 17: ...econd increments Directly below the Toggle checkbox are two list boxes to select the variables that you would like to be displayed Notice that if you select a scaled variable it is important to check...

Страница 18: ...r failure has occurred in the connected HART device Configuration Changed Bit 6 Relay trips whenever it detects that the connected HART device has had its configuration changed Cold Start Bit 5 Relay...

Страница 19: ...s information returned by certain HART instruments This provides flexibility to the requirement of alarming on additional status information Choosing this feature you are given the ability to spec ify...

Страница 20: ...n Custom Curve The middle section of the screen displays the custom curve table After enabling custom curve mode and setting the variable to be monitored continue by selecting the number of points for...

Страница 21: ...set the Source as SV Set the Input Range to 0 and 400 F and the Output Range to 4mA to 20mA Click Quick Set to download the new configuration file to the HIM Output Current Box The Output Current Box...

Страница 22: ...til the analog output matches the minimum point 4mA for a 4 20mA output when you click the Fix Output at Low Point button After the low point is trimmed press the Fix Output at High Point button Read...

Страница 23: ...to measure the level of a tank in either centimeters inches or PSI Since the tank is only 300 centimeters 10 feet high the full range of the primary variable PV output from the DP transmitter is 0 4 3...

Страница 24: ...ast significant bits in the first register Selecting Swapped MSW most significant word will reverse the order storing the most signifi cant bits in the first register and the least significant bits in...

Страница 25: ...erature Pressure Level Flow Multivariable HART Communicator can be connected anywhere on the loop COM IN TX IN MODBUS output with MODBUS option A B S RS485 RS232 Converter TO serial COM port of PC MOD...

Страница 26: ...it 1 EEPROM fail Bit 2 EEPROM configuration checksum error Bit 3 EEPROM calibration checksum error Bit 4 EEPROM blank Bit 5 Out of range error Bit 6 Division by zero error Bit 7 Configuration data bad...

Страница 27: ...te 1 Additional Status Byte 2 Additional Status Byte 3 Additional Status Byte 4 HART Primary variable float format HART Secondary variable float format HART Tertiary variable float format HART Quatern...

Страница 28: ...aming error Overrun error Parity error No error Undefined Invalid selection Passed parameter too large Passed parameter too small Too few bytes received Device specific command error In write protect...

Страница 29: ...nformation can be considered as valid Another example using Tables 4 and 5 the following value in MODBUS Register 13 0000 0000 0001 1001 binary or 19 hexadecimal or 25 decimal implies Primary variable...

Страница 30: ...eceiver and a transmitter SPA 2 HIM etc Hence your shield ground connections should be appropriate for the type of signal line being shielded The shield should be grounded at the receiver and not at t...

Страница 31: ...and not to Buyer s customers or the users of Buyer s products unless Buyer is an engineering contractor in which case the policy shall extend to Buyer s immediate customer only This policy shall not...

Отзывы: