BODY ±
Window Glass
42-9
HANDLING OF AUTO WINDOW SEALER
Keep the sealant in a cool place, not exposed to the direct
rays of the sun. Do not place any heavy article on the sealant
nor press it, otherwise it will become deformed. Avoid storing
the sealant for more than 6 months, because it will lose its
sealing effect.
BODY PINCH-WELD FLANGE SERVICING
Before servicing the body pinch-weld flange, remove old
adhesive completely. If the flange requires painting, bake it
after painting is completed.
WORKING PROCESS
Window glass installation procedure
Body side
Cleaning of adhesion surface
Cut off the residual adhesive until the
thickness is less than 2 mm. Clean the
adhesion surface with isopropyl alco-
hol, and let dry for 3 minutes or more.
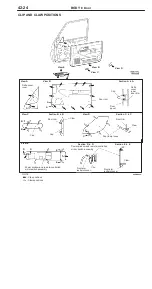
Attaching of clip, spacer and dual
lock fastener
Attach the clip, spacer and dual lock
fastener to set the positions for the glass
to be installed.
Application of primer
Apply to the adhesion surface of the
body and let dry for 3 minutes or more.
Window glass side
Reusing the glass
Replacing the glass
Cleaning of adhesion surface
Completely cut off all of the residual
adhesive. Clean the adhesion surface
with isopropyl alcohol, and let dry for
3 minutes or more.
Cleaning of adhesion surface
Clean off any dirt adhering to the adhe-
sion surface with isopropyl alcohol, and
let dry for 3 minutes or more.
Gluing of window spacer, glass stoppers and dual lock fastener
Glue the window spacer, glass stoppers and dual lock fastener along the standard position
on the glass outer circumference.
Application of primer
Apply sufficient primer evenly to the adhesion surface so that there is no patchiness. After
application, let dry for 3 to 30 minutes.
Application of adhesive
Within 30 minutes after applying the primer, apply the adhesive evenly all the way around
the inside edge of the glass.
Installing the glass
After applying the adhesive, lightly press the glass evenly so that it adheres
completely.
Cleaning
After removing any adhesive that is sticking out or adhering to the body or
glass with a spatula, etc., clean off with isopropyl alcohol.
Checking for water leaks
Carry out a shower test to check that no water will leak through.
Содержание Pajero Pinin 1999
Страница 32: ...NOTES ...
Страница 73: ...13A 1 FUEL CONTENTS GASOLINE DIRECT INJECTION GDI 13A FUEL SUPPLY 13B ...
Страница 190: ...NOTES ...
Страница 191: ...13B 1 FUEL SUPPLY CONTENTS FUEL TANK 2 Fuel Pump Module 4 ...
Страница 214: ...NOTES ...
Страница 222: ...NOTES ...
Страница 256: ...NOTES ...
Страница 274: ...NOTES ...
Страница 282: ...NOTES ...
Страница 360: ...NOTES ...
Страница 412: ...NOTES ...
Страница 443: ...32 1 POWER PLANT MOUNT CONTENTS ENGINE MOUNTING 2 TRANSMISSION MOUNTING 3 ...
Страница 446: ...NOTES ...
Страница 447: ......
Страница 448: ......
Страница 449: ......
Страница 450: ......
Страница 451: ......
Страница 452: ......
Страница 453: ......
Страница 454: ......
Страница 455: ......
Страница 456: ......
Страница 457: ......
Страница 458: ......
Страница 459: ......
Страница 460: ......
Страница 461: ......
Страница 462: ...34 1 REAR SUSPENSION CONTENTS GENERAL INFORMATION 2 SPECIAL TOOLS 3 REAR SUSPENSION ASSEMBLY 4 ...
Страница 467: ...NOTES ...
Страница 468: ...BASIC BRAKE SYSTEM 35A ANTI SKID BRAKING SYSTEM ABS 4WD 35B 35A 1 SERVICE BRAKES CONTENTS ...
Страница 499: ...NOTES ...
Страница 531: ...NOTES ...
Страница 541: ...NOTES ...
Страница 554: ...STEERING Steering Wheel and Shaft 37A 13 REMOVAL SERVICE POINTS AA STEERING WHEEL REMOVAL MB990803 ...
Страница 649: ...NOTES ...
Страница 650: ...INTERIOR 52A SUPPLEMENTAL RESTRAINT SYSTEM SRS 52B 52A 1 INTERIOR AND SUPPLEMENTAL RESTRAINT SYSTEM SRS CONTENTS ...
Страница 728: ...54A 1 CHASSIS ELECTRICAL CONTENTS CHASSIS ELECTRICAL 54A SMART WIRING SYSTEM SWS 54B ...
Страница 836: ...54B 1 SMART WIRING SYSTEM SWS CONTENTS GENERAL INFOMATION 54B 1 SPECIAL TOOLS 54B 5 TROUBLESHOOTING 54B 6 ...
Страница 883: ...NOTES ...
Страница 919: ...NOTES ...


