12
GB
D
F
E
I
NL
P
GR
RU
TR
GB
GB
GB
GB
GB
s
s
s
s
s
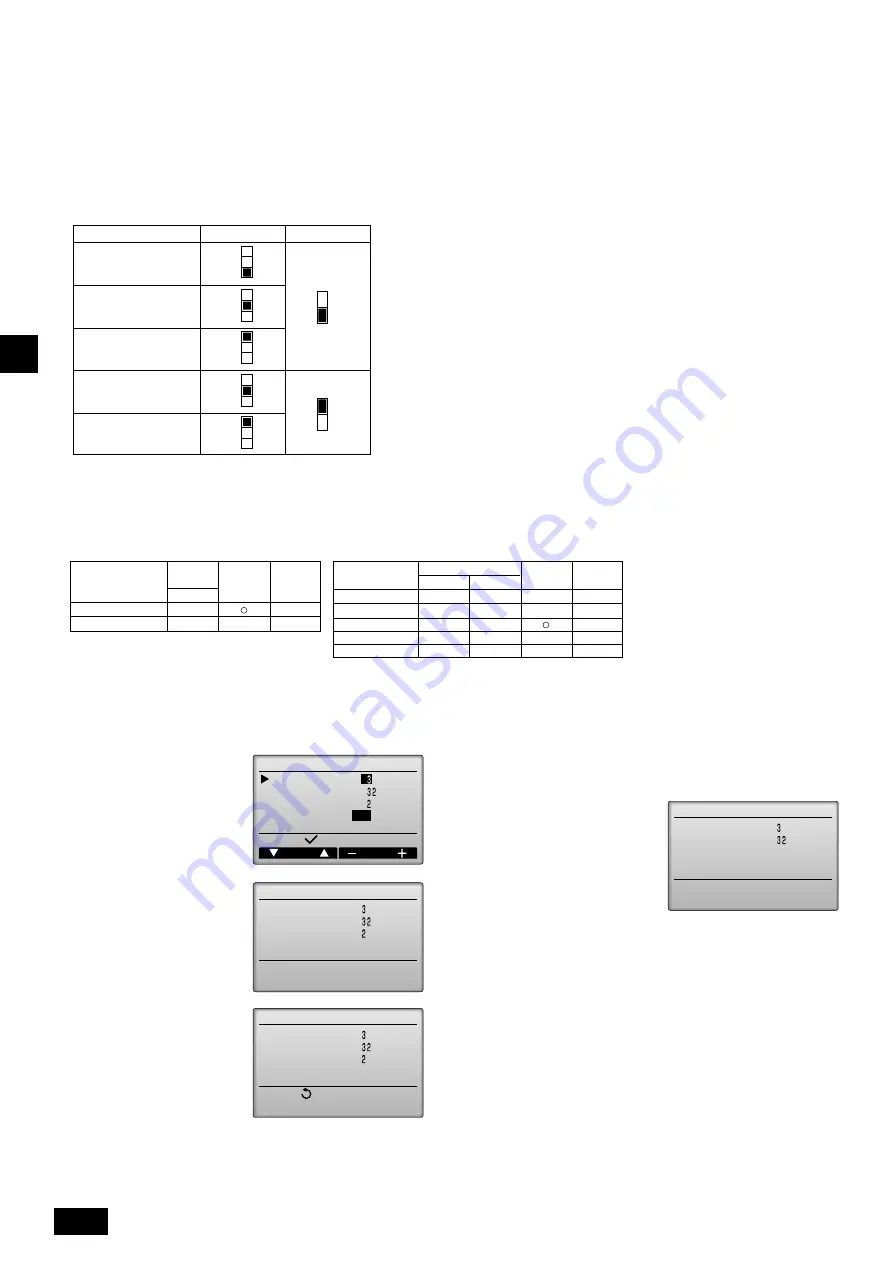
To set the external static pressure from the function selection screen on the remote controller (Only PAR-30MAA)
Follow the instructions below and the instructions detailed in the remote controller manual for how to set the switches.
1. Set the function setting No. 32 (Switch setting/Function selection) to “2”.
2. Set the function setting No. 8 and No. 10 to appropriate values, according to the external static pressure.
Function setting
Cursor
Address
Select:
M-NET address
Function No.
Data
Function
Set
/ Conf
Function setting
Sending data
M-NET address
Function No.
Data
Function setting
Setting completed
M-NET address
Function No.
Data
Return:
Function setting
Checking
M-NET address
Function No.
Data
9.5. Selecting the static pressure
Five levels of external static pressure (50Pa/100Pa/150Pa/200Pa/250Pa) are available for selection.
Set the setting either by using the switches on the control board (SWA and SWC) or from the function selection screen on the remote controller.
Notes:
•
When the static pressure setting was set from the remote controller, the actual setting and the switch setting on the control board may not match because
the latest setting from the remote controller overrides the previous setting. To check the latest static pressure setting, check it on the remote controller, not
on the switch.
•
If the static pressure setting for the duct is lower than that for the unit, the fan of the unit may repeat start/stop, and the outdoor unit may remain in a stopped
state. Match the static pressure settings for the unit to that for the duct.
s
s
s
s
s
To set the external static pressure with the switches on the control board
s
s
s
s
s
To confirm the setting
1. Select Function setting from the Service menu to bring up the Function
setting screen. (Refer to the remote controller manual for how to set the
items in the service menu.)
2. Using the F1 through F4 buttons, set the settings for the M-NET address,
Function No., and Data, select “Conf”, and press the Enter button.
3. “Checking” will appear on the
screen, and when signal transmis-
sion is successfully completed, the
current settings values will be dis-
played.
Notes:
•
The actual static pressure setting and the Dip switch setting may not
match if the setting was set from the remote controller.
•
To check the static pressure setting, check it on the remote controller,
not on the dip switch.
External static pressure
SWA
SWC
50Pa
100Pa
150Pa
200Pa
250Pa
3
2
1
3
2
1
3
2
1
1
2
1
2
3
2
1
3
2
1
Set the switches on the control board (SWA and SWC) as shown in the table at left.
[Important]
Be sure to write down the settings for all
functions in the “Current setting” row if any
of the initial settings has been changed.
Selection
Function
setting No.
Switch setting
Function selection
1
2
No. 32
Initial
setting
Current
setting
External static
pressure setting
Function setting No.
50Pa
100Pa
150Pa
200Pa
250Pa
No. 8
1
2
3
2
3
No. 10
1
1
1
2
2
Initial
setting
Current
setting
Selecting a function
*
The steps below explain how to set the settings on the MA Smart Re-
mote Controller.
s
s
s
s
s
To change the settings
1. Select Function setting from the
Service menu to bring up the
Function setting screen. (Refer to
the remote controller manual for
how to set the items in the serv-
ice menu.)
2. Using the F1 through F4 buttons,
set the settings for the M-NET ad-
dress, Function No., and Data,
select “Set”, and press the Enter
button. The settings signals will
be sent from the remote control-
ler to the indoor units.
3. “Sending data” will appear on the
screen, and when signal trans-
mission is successfully com-
pleted, “Setting completed” will
appear. Press the BACK button
to return to the Function setting
screen.
Содержание PEFY-P-VMHS-E
Страница 131: ......


