••••••••••••••••••••••••••••••••••••••••••••••••••••••••••••••••••••••••••••••••••••••••••••••••••••••••••••••••••••••••••••••••••••••••••••• Beginning
11
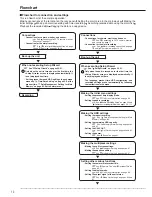
Copy the data
• Setting the copy device.
See “ Add/Remove HDD Device” or “ Add/
Remove DVD/CD Drive” on pages 80-82.
• Setting the copy function.
See “ Copy Data to Copy 1 Drive” or “ Copy
Data to Copy 2 Drive” on pages 44, 45.
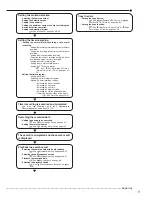
Setting the motion detection
• Selecting the camera number.
• Setting the detection areas.
• Setting the sensitivity.
• Setting the minimum number of dots for starting the
motion detection operation.
• Setting the detection interval.
See “Motion Det” on pages 58, 59.
Setting the timer recording
• Setting the normal/alarm recording or pre-alarm
recording.
• Setting the recording rate/picture grade for normal
recording.
• Setting the recording rate/picture grade for alarm
recording.
• Setting the motion detection recording.
• Selecting the camera selection during the alarm
recording and trigger for alarm recording.
• Setting the alarm recording time.
• Setting the pre-alarm recording time.
• Setting the PTZ camera preset.
See “ Set Recording Pattern A
(Normal/Timer) to D (Timer)” on pages 51-
53.
• Setting the timer program.
• Setting the holiday.
• Selecting the timer program number.
• Making the timer recording settings.
• Selecting the day of the week.
• Selecting the start time.
• Selecting the end time.
• Selecting the program mode.
• Selecting the motion detection mode.
(• Selecting the special day of the week.)
See “Timer” on pages 56, 57.
Timer recording is executed and completed
See “ Warnings and their appropriate
countermeasures” on pages 114, 115.
Searching the recorded data
• Setting the device to be searched.
See “ Select Source Device” on page 42.
• Setting the alarm list search.
See “ Search by Alarm List” on page 100.
The search is completed and the search result
is displayed
Playback the search result
• Selecting the camera number to be played back.
See “ Multiplexer Setting” on pages 66, 67.
• Selecting the split/sequence screen.
See “ Multiplexer Setting” on pages 66, 67.
• Playback the recorded data.
See “ Basic playback” on page 98.
• Selecting the playback speed.
See “ Various playback functions” on pages
86, 87.
Содержание 16CH DIGITAL RECORDER DX-TL5000U
Страница 143: ...872C355B2 PRINTED IN MALAYSIA ...

