


E-SOUM-PLUS Rev E
22
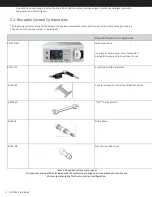
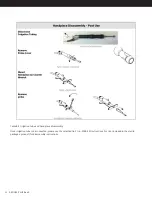
Figure 6.1.1 Console Rear
The front of the console features a receptacle for the handpiece cable and an irrigation pump head, in which the irrigation
tubing is inserted. A large color LCD screen provides information on system status and set points for ultrasound amplitude,
pulse rate and irrigant flow rate with respective controls on the panel below. Additional controls for ultrasound enable/
standby and menu access are provided on the left of the display panel. An ultrasound timer indicates the elapsed time, in
which the ultrasound was on.
1 2 3
4
5
6
A B C D E F 7 8 9
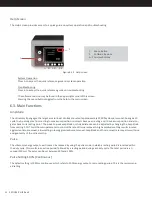
Figure 6.1.2 SonicOne Clinic Console Front
Buttons A-F perform various functions, depending on the information displayed on the screen. The display screen
shown is the Main Screen used for all major control functions.
The handpiece receptacle is keyed in order to facilitate connection. The red dot on top of the receptacle must be in
line with the corresponding red dot on the handpiece cable.
6.2.
Menu Functions
The standard screen is the Main Screen. Additional screens are the Options and the Help Screen. Both the Options and
Help screens can be accessed by pressing the menu button to toggle through the three main screens; Main Menu, Options
and Help.
Main Screen
The Main Screen allows control of the main system functions such as Amplitude, Pulse and Flow.
Ultrasonic Timer
A B C D E F
1.
Amplitude setting
2.
Pulse setting
3.
Flow setting
4.
Enable/standby button
5.
Ultrasound timer
6.
Menu button
7.
Handpiece cable receptacle
8.
Indicator for flow direction
9.
Irrigation pump head
A-F Custom buttons


