


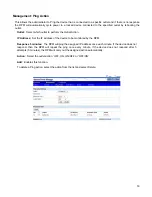
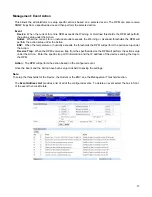
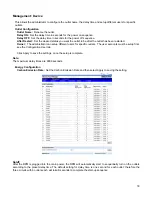
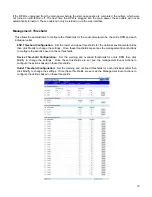

8
5. Installation
This RPM series is
ONLY
intended to be installed in an indoor temperature controlled environment that is free of
conductive contaminants. DO NOT operate the RPM in: extremely dusty and/or unclean areas, locations near
heating devices, water or excessive humidity, or where the RPM is exposed to direct sunlight. Select a location,
which will provide good air circulation for the RPM at all times. Route power cords so they cannot be walked on or
damaged.
To ensure safety a
Qualified Service Personnel
should perform the installation.
Make sure that the AC Utility outlet is properly grounded.
Do not install the RPM if there is not at least 30 feet (10 meters) or more of wire between the electrical outlet
and the electrical service panel.
The RPM comes with the mounting brackets pre-installed. To mount the RPM into a rack perform the following
procedure:
1. Select the desired location for the RPM.
2. Align the mounting holes of brackets with the notched hole on the vertical rail and attach with the retaining
screws.
3. Connect the Ethernet cable to the RPM.
4. Connect the output devices to the RPM outlets.
5. Connect the input power cord of the RPM to the wall outlet.
Note 1:
The default setting for the IP address is DHCP enabled. If the RPM cannot get the IP from DHCP server, the IP
address will stay at the
default IP address 192.168.0.216
Note 2:
To setup the network system for RPM, it is strongly recommended to build up the power monitoring network
system, which is isolated from the others, in order to maintain reliable system operation.