background image

Specifying the Place for an Insert

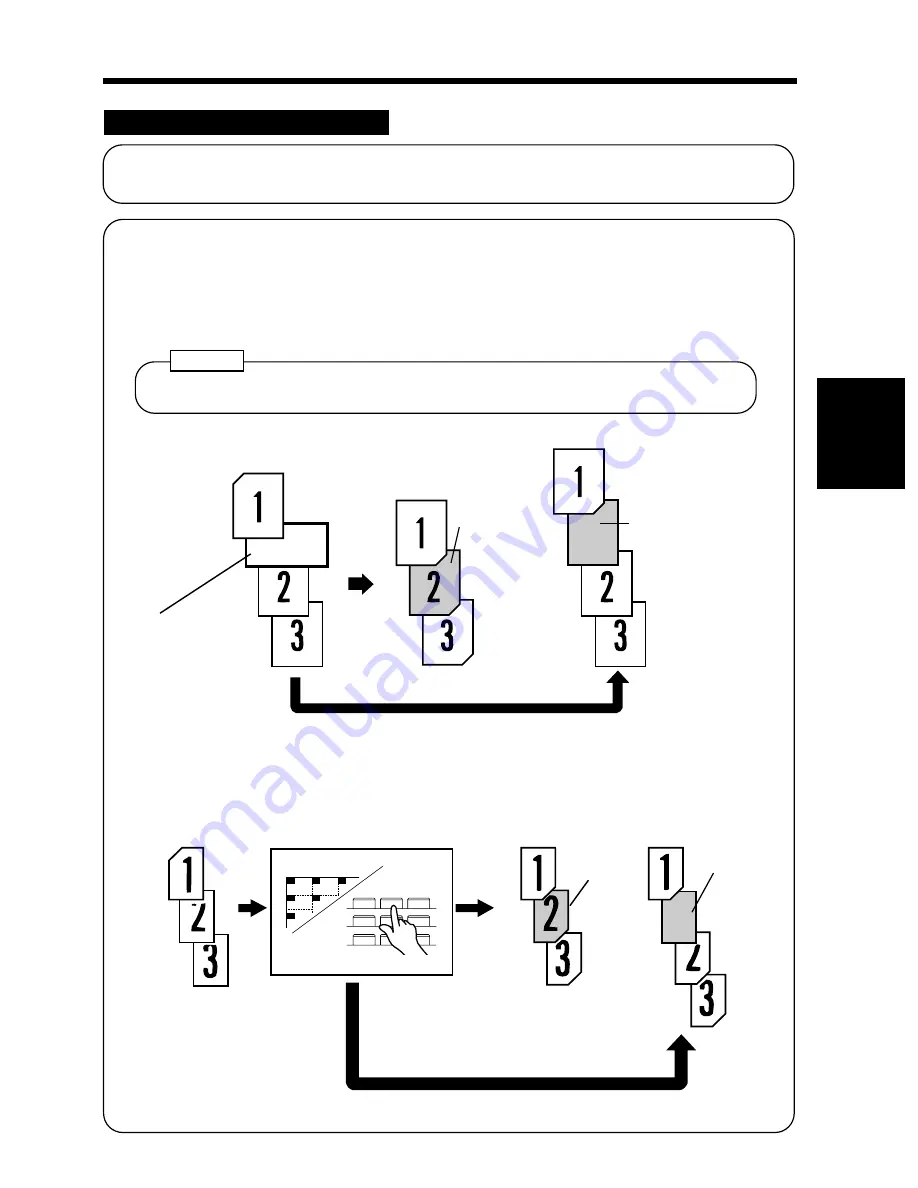
In the Page Insertion mode, you must specify where to place an insert. Two ways are available to
specify the insert places, either ADF Detection or 10-Key Input.

1149O048AA

Original Set

Copy Set

Insert Marker
Example: 
2nd from top

Insert

Insert

1149O048AA

Copy Set

1149O049AA

1

2

3

4

5

6

7

8

9

1

2

3

6

7

11

2

10-Key Input

Using the 10-Key Pad, define the places for inserts.  

 p. 66

<Up to 20 places can be defined.>

1149O049AA

Original Set

Copy Set

Non-Copied
Insert

Copied
Insert

Copy Set

ADF Detection cannot be operated when the Mixed Original Detection mode is set.

NOTE

ADF Detection (automatic detection)

Put a sheet of paper of a different size from the originals at your desired places in the
original set (for convenience, let us call this paper the insert marker), load the original set
onto the document feeder, and let the copier start the original count sequence.  

 p. 64

<The copier automatically detects and sets the places for inserts.>

Ch

a

p

te

r 3

M

aki

ng C

o

p

ies

7. Auxiliary Functions

63

Содержание EP2080

Страница 1: ...ration relates is in conformity with the specifications below This declaration is valid for the area of the European Union EU only Product Type Copying Machine Product Name EP2080 Options PF 204 PF 104 PF 4D AFR 12 AF 5 ST 104 S 106 ST 210 S 207 AD 8 D 102 DT 103 Plug In Counter Standards Safety EN 60 950 1992 Safety of information technology equipment including electrical business equipment EMC E...

Страница 2: ... Copier Care of Copier Supplies Chapter 2 Getting to Know About Your Copier p 5 1 Typical Types of Copies You Can Make with Your Copier p 6 2 System Overview p 8 3 Copier Parts and Accessories p 10 4 Control Panel Keys and Indicators p 16 5 Using the Touch Panel p 18 What is the Touch Panel How the Screen is Organized Operating the Touch Panel 6 Turning ON and OFF and Initial Mode p 20 Turning ON ...

Страница 3: ...sity p 40 5 Selecting the Original Copy Type p 42 1 1 1 2 2 1 2 2 1 2in1 2 2 2in1 1 2in1 1 2 2in1 1 Book 1 Book 2 6 Finishing Mode p 48 Non Sort Sort Sort Staple Group Hole Punch Manual Staple Auto Dual Function 7 Auxiliary Functions p 58 Cover p 58 Auto Original Count p 61 Page Insertion p 62 OHP Interleaving p 68 File Margin p 72 Edge Frame Erase p 74 Contents Chapter 2 Getting to Know About You...

Страница 4: ... Drawer is empty Appears p 102 2 When the Message Replenish Toner Appears p 106 3 When the Message The Staple Cartridge is empty Appears p 108 4 When the Message A paper misfeed has been detected Appears p 112 Misfeed Location Displays p 112 Misfeed Clearing Procedures Copier Fusing Transport Section p 113 Copier Paper Take Up Section p 114 Copier Multi Bypass Tray p 115 Paper Feed Cabinet 2 Drawe...

Страница 5: ...eeder Automatic Document Feeder Sorter 10 Bin Sorter 20 Bin Staple Sorter 10 Bin Staple Sorter 20 Bin Paper Feed Cabinet 2 Drawer Type Paper Feed Cabinet 1 Drawer Type Duplex Cabinet Duplex Unit Data Controller 2 Care of the Copier p 138 Cleaning 3 Function Combination Matrix p 140 4 Description of Copy Paper Size and Zoom Ratio Table p 143 5 Index p 144 Chapter 7 Miscellaneous Chapter 2 Getting t...

Страница 6: ...irection in which the copy paper is fed as indicated by the arrow is called the feeding direction 1151O107AA Width and Length 139O1610A When we talk about the size of the original or copy we call side A width and side B length A Width B Length 1139O1620A Crosswise When the original or copy has a length shorter than its width we call it crosswise and use symbol C or 1139O1610A Lengthwise When the o...

Страница 7: ...ins about the operating environment conditions and precautions for use 1 Installing the Copier p 2 Installation Site Power Source Space Requirements 2 Precautions for Use p 3 Operating Environment Using the Copier Properly Moving the Copier Care of Copier Supplies 1 ...

Страница 8: ...ll ventilated place A dry place A dust free location An area not subject to undue vibration A stable and level location Power Source The power source voltage requirements are as follows Space Requirements To ensure easy copier operation supply replacements and service maintenance adhere to the recommended space requirements detailed below Allow a clearance of 150 mm or more at the back of the copi...

Страница 9: ...er dans un environnement réunissant des conditions de confort santé et de sécurité il est préférable de bien aérer la pièce ou se trouve le copieur REMARQUE NEVER place a heavy object on the copier or subject the copier to shocks NEVER open any Doors or turn OFF the copier while the copier is making copies NEVER bring any magnetized object or use flammable sprays near the copier ALWAYS insert the ...

Страница 10: ...2 Precautions for Use Chapter 1 Safety Notes 4 ...

Страница 11: ... Screen is Organized Operating the Touch Panel 6 Turning ON and OFF and Initial Mode p 20 Turning ON and OFF Initial Mode 7 Auxiliary Functions p 21 Panel Resetting Auto Panel Reset Auto Copy Start Auto Power OFF Energy Saver Interrupt Mode Check Access Number Chapter 2 Getting to Know About Your Copier This chapter gives you a brief description of the system and preliminary information about the ...

Страница 12: ...py p 42 Sort p 48 1149O025AA A A 1149O025AA 1 sided 1 sided 1149O026AA B B A A 1149O026AA 1 sided 2 sided 1149O027AA B A A B 1149O027AA Book 1 sided 1149O028AA B A A B 1149O028AA 2 in 1 1149O029AA 3 2 1 3 2 1 3 2 1 3 2 1 1149O029AA Sort 1149O030AA 3 2 1 1 1 1 2 2 2 3 3 3 1149O030AA Group 3 2 1 1 1149O031AA 1149O031AA Sort and Staple 3 2 1 3 2 1 1149O032AA 1149O032AA Hole Punch Chapter 2 Gettng to ...

Страница 13: ...ry Functions p 58 1149O004AA 1149O004AA Reduced Full Size Enlarged 1149O013AA 1149O013AA Cover p 58 1149O014AA Page Insertion p 62 1149O017AA OHP Interleaving p 68 1149O015AB 1149O015AC File Margin p 72 1149O016AA 1149O016AA Erase p 74 Chapter 2 Getting to Know About Your Copier 7 ...

Страница 14: ...or stacks Staple Sorter ST 210 Option Automatically staples and or punches holes in copy sets or stacks that are sorted or grouped by the same function as that of S 207 1139O0030A Duplex Unit AD 8 Option Mounted in the Paper Feed Cabinet AD 8 automatically turns over 1 sided copies to make 2 sided copies 1136O020A 1136O059AA 1139O1222A Duplex Cabinet PF 4D Option Turns over 1 sided copies to make ...

Страница 15: ...copies of each Duplexing Document Feeder AFR 12 Option In addition to the function of the AF 5 it can turn over 2 sided originals for making copies Paper Feed Cabinet PF 204 Option Equipped with two paper drawers each capable of holding up to 500 sheets of copy paper 80 g m2 Paper Feed Cabinet PF 104 Option Equipped with a large capacity drawer to hold up to 2 500 sheets of copy paper 80 g m2 1138...

Страница 16: ...nd Indicators p 16 7 Original Cover Holds the original placed on the Original Glass in position 8 Power Switch Use to turn ON and OFF the copier p 20 9 Multi Bypass Tray Holds up to 50 sheets of plain paper as well as thick paper OHP transparencies and other special paper p 32 10 Multi Bypass Tray Extender Slide this Extender out when using large size copy paper 11 Right Door Open to clear a paper...

Страница 17: ...n the corresponding Corona Unit if unwanted lines are produced on the copy p 139 6 Imaging Unit Lock Release Lever Operate when replacing the Imaging Unit For Technical Representative only 7 Dehumidifier Switch Turn ON to prevent condensation from forming on the PC Drum when power is turned OFF For Technical Representative only 8 Fusing Unit Lock Handle Hold onto this Handle when lifting the Upper...

Страница 18: ...Single Feed Tray Place a single sheet of original on the tray to make a copy or copies of it p 30 6 Document Turnover Exit Unit Door Lock Release Key Hold down when opening the Document Turnover Exit Unit Door p 120 Duplexing Document Feeder only 7 Stapler Door Open to replace the Staple Cartridge p 108 Staple Sorter only 8 Sort Bins Hold sorted or grouped copies 9 Lock Release Lever Press to unlo...

Страница 19: ...rted or grouped copies 3 Non Sort Bin Holds copies made in the Non Sort mode 4 Lock Release Lever Press to unlock the sorter pp 110 121 5 Data Controller See the operator s manual for Data Controller for details Data Controller 3 Copier Parts and Accessories 1149O074AA 1 2 3 4 5 Chapter 2 Getting to Know About Your Copier 13 ...

Страница 20: ...105 2 4th Drawer Holds up to 500 sheets of paper p 105 3 Paper Descent Key Press when adding paper or clearing a paper misfeed p 105 116 4 Misfeed Clearing Guide Plate D Open to clear a paper misfeed p 118 Duplex Unit and Duplex Cabinet 1149O076AA 1 2 4 1151O009AA 3 Chapter 2 Getting to Know About Your Copier 14 ...

Страница 21: ...s Paper Feed Cabinet 1 Drawer Type 5 3rd Drawer Holds up to 2500 sheets of paper p 104 6 Paper Descent Key Press when adding paper or clearing a paper misfeed pp 104 117 1151O010AA 6 5 Chapter 2 Getting to Know About Your Copier 15 ...

Страница 22: ...nterrupt Key p 22 Press to interrupt a current job with a different one Press it again to return to the previous job 7 Energy Saver Key Press to set the copier into the Energy Saver mode p 21 8 Access Mode Key Press to enter the access number p 22 9 10 Key Pad Use to enter The number of copies to be made p 25 The zoom ratio to be used p 38 The number of originals Note It does not however clear the...

Страница 23: ...you can access the setting screen of a particular function and change or cancel the setting as necessary See Mode Check p 22 13 Display Contrast Knob Turn to vary the brightness of the Touch Panel Job Memory Input Drum Dehumidifier Zoom Memory Input User s Choice Meter Count Data Send Toner Replenisher User Mode 1 2 3 4 5 6 7 8 9 0 C 1149O003DA p R s 1 Z x I g Z x p I g p x1 000 ƒ d ª e R s 5 1 2 ...

Страница 24: ...ier status How the Screen is Organized 1 Supplementary Function Keys The Auxiliary Finishing Orig Copy and Basics keys are displayed When any of these keys is touched the corresponding supplementary function screen appears Touching Basics returns you to the Basic screen Example Auxiliary Function 1 Supplementary Function Keys 2 Message Display 3 Basic Function Key 4 Set Function 1149O263CA 1149O26...

Страница 25: ...e key is the current setting 4 Set Function Display Example Orig Copy 1 2 Finishing Sort and Staple Shows graphic representations of the settings currently made for Orig Copy and Finishing When you want to check for more details of the set functions press the Mode Check key p 22 Operating the Touch Panel You need only to lightly touch the key shown on the Touch Panel to select or activate the func...

Страница 26: ...FF function will automatically shut down the copier a given period of time after the last activity p 88 NOTE No of copies selected 1 Exposure Auto Zoom 1 000 Paper Auto Paper Finishing Non Sort Orig Copy 1 1 The settings of the initial mode vary depending on which option or options are mounted on your copier Example When the Automatic Document Feeder and Duplex Unit are mounted No of copies select...

Страница 27: ...nter the Auto Power OFF mode can be selected from 1 to 120 min The Auto Power OFF function can even be disabled For details see User s Choice p 88 Useful Tip The Auto Power OFF function shuts down the copier a given period time after the copier has been used last The initial setting is 60 min Auto Power OFF The copier is automatically shut down if the Auto Power OFF function is activated while it ...

Страница 28: ...the access number has been input to the copier Access Prompt Screen NOTES By pressing the Mode Check key on the control panel you can either check for or change the current settings Mode Check When you touch Exit after having checked the currently set functions the Basic screen reappears To change a certain function touch the corresponding key and then make the necessary change When the copy cycle...

Страница 29: ... Copying Overview offers quick at a glance instructions for making copies Each step is keyed to a page number with a more detailed description Chapter 3 Making Copies 1 1 1 2in1 1 1 2 2 2in1 1 2 1 Book 1 2 2 Book 2 1 2in1 1 2 2in1 Some Precautions for Making Copies p 46 Selecting Original Copy Type p 44 Non Sort Hole Punch Sort Manual Staple Sort Staple Group Select the Finishing Functions p 50 Au...

Страница 30: ... Panel will change the exposure level zoom ratio the type of copy and so on 1 Placing the Original Load the originals face up on the document feeder p 29 1151O16AA 1151O013AA Raise the Original Cover and place the original face down on the Original Glass p 26 2 Touch Paper p 34 3 Touch Zoom p 36 4 Touch Exposure p 40 Selecting the basic functions To change the copy paper size To change the zoom ra...

Страница 31: ...of copies From the 10 Key Pad set the desired number of copies to be made If you have entered an incorrect number press the Clear key C then enter the correct number 1 2 3 4 5 6 7 8 9 0 C 1139O2640A 1139P2640A 1134P342DA 9 Pressing the Start key When you press the Start key the copier starts the copy cycle To stop the copy cycle press the Stop key 1149O274CA 1149O265CA Chapter 3 Making Copies 1 Ba...

Страница 32: ...cent paper for the original Using plain paper or thick paper Place the original in the same way as the sheet originals 1 Gently lower the Original Cover 3 Place the original face down on the Original Glass 2 The original sizes that can be detected in the Auto Paper Select Mode are A3L B4L A4L A4C A5L When making copies from originals other than the above select the copy paper size When using wrink...

Страница 33: ...n incorrect order Do not look directly at the Original Glass surface as a strong beam of light is emitted NOTES Be sure to raise the Original Cover 15 or more before placing the original If the Original Cover is raised to an angle less than 15 the copier may fail to select the correct copy paper size or zoom ratio Do not place an original weighing more than 3kg on the Original Glass When placing a...

Страница 34: ...r Up to 20 sheets Using the Multi Bypass Tray Place the original on the Original Glass and make the control panel settings 1 The following functions cannot be selected for Manual Bypass Auto Paper Auto Size Book any of the finishing modes other than Non Sort 2 sided copying margin by reduction Erase and 2 in 1 separation NOTE Swing down the Multi Bypass Tray Slide the Guide Plate to the size of th...

Страница 35: ...er and then select Manual Check that Manual is selected on the Touch Panel 4 1149O269CB Using the Key Pad set the number of copies to be made 5 1 2 3 4 5 6 7 8 9 0 C 1139O2640A Press the Start Key to start the copy cycle 6 1134P342DA Chapter 3 Making Copies 33 ...

Страница 36: ...er automatically selects the paper of the optimum size according to the size of the original being used and zoom ratio selected for use AutoPaper 1149O280DA This mode is efficient when you want to make copies on paper of the same size as your originals automatically Useful Tip Touch Paper on the Basic screen and then touch Auto Paper 1 The copy paper size can be set manually according to your need...

Страница 37: ...pecific purposes as detailed below The setting can be made by using User s Choice p 87 Recycled paper When this setting is made the Display asks you whether or not to use that particular drawer as a possible candidate in the Auto Paper mode You may be using both recycled as well as plain paper loaded in your copier If for example you make this setting for the drawer loaded with recycled paper the ...

Страница 38: ...Auto Size Touch Auto Size to set the copier into the Auto Size mode 1 The copier provides most frequently used zoom ratios ready for immediate use Selecting a Ratio from among Fixed Ones Touch the appropriate original to copy size representation key You have three reduction and three enlargement ratios 1 Select the paper size Copy Paper Size p 34 2 This mode is very helpful for neat filing when yo...

Страница 39: ...o before using the or key Useful Tip This function lets you make a copy slightly reduced in image size from that of the original For a Slightly Smaller Image 1149O296DA Touch Minimal 1 A ratio of 0 930 has been factory programmed in Minimal but that ratio can be changed as necessary p 82 It comes in handy for making a copy without losing any portion of the original image from an original which has...

Страница 40: ...g up a Ratio from Memory 1149O300DB Touch User Set 1 From among the two ratios previously stored in memory select the desired one 2 1149O301CA It s a good idea for you to store frequently used zoom ratios in memory p 39 Useful Tip Using the 10 Key Pad You may use the 10 Key Pad to directly enter the zoom ratio Enter the desired zoom ratio from the 10 Key Pad 2 1 2 3 4 5 6 7 8 9 0 C 1139O4870A 1139...

Страница 41: ... then enter the correct one again Touch memory location key 1 or 2 in which to store the set zoom ratio 4 When a new ratio is stored the old one is erased The custom zoom ratios may be stored in memory by using the User Mode p 82 NOTES Enter the desired zoom ratio from the 10 Key Pad 3 1 2 3 4 5 6 7 8 9 0 C 1139O4870A 1139O4870A Touch Store 2 1149O160BA 1149O300DB 1149O303CA 1149O302CA Chapter 3 M...

Страница 42: ...to key is highlighted indicating that the copier is set into the Auto Exposure mode 1 The exposure level in the Auto Exposure mode can be made either Darker or Lighter by using User s Choice p 85 The copier has been factory set to automatically select the Auto Exposure mode User s Choice can be used to change this default setting to the Manual Exposure mode p 85 Useful Tips In the Manual Exposure ...

Страница 43: ...ssary 2 To make the image darker Touch Darker To make the image lighter Touch Lighter Photo Touch Photo The Photo key is highlighted indicating that the copier is set into the Photo mode 1 1149O306CA 1149O307CA When making copies in the Photo Mode Auto Exposure does not operate Select the desired exposure level in the Manual Exposure Mode NOTE Chapter 3 Making Copies 4 Basic Functions 41 ...

Страница 44: ...nals Two originals can be copied onto one copy 1149O407AA Original Copies 2 1 Only when a Duplexing Document Feeder is mounted Select 2 1 to make 1 sided copies from 2 sided originals 1149O410AA Original Copy 2 2 Only when a Duplexing Document Feeder and Duplex Unit are mounted Select 2 2 to make 2 sided copies from 2 sided originals 1149O406AA Originals Copy 1 2in1 accessed via 2in1 Only when an ...

Страница 45: ...nal which is the result of 2 in 1 copying You need twice as many sheets of copy paper as the original 1149O411AA Original Copies 2 2in1 1 accessed via Separation Only when a Duplexing Document Feeder is mounted Select 1 2in1 1 to make 1 sided page by page copies of a 1 sided original which is the result of 2 in 1 copying You need twice as many sheets of copy paper as the original 1149O403AA Origin...

Страница 46: ...ee if your original has a file margin in it The copier makes a necessary correction of margin position to make good copies out of it as long as you instruct it properly Original with a File Margin Original with no File Margin 1152O044AA If your original has a file margin Check your original for a margin Touch Margin Select the margin width from among 5 mm 10 mm 15 mm and 20 mm displayed under Orig...

Страница 47: ...ument feeder to count the number of originals for you Select Auto Count to let the document feeder count the number of originals Touch Auto Count Load your originals into the document feeder Press the Start key The document feeder starts feeding the originals loaded in it to count the number of originals At this time no copy cycle is run Unload the originals ejected onto the Document Exit Tray and...

Страница 48: ...en Book Copy is selected the zoom ratio is automatically set to 1 000 Select the desired zoom ratio and copy paper size User s Choice allows you to program a default zoom ratio paper size margin setting and erase setting p 87 Placing the Book on the Glass Correctly When the 2 in 1 function is selected the copier automatically selects a reduction ratio You can nonetheless make a full size copy If t...

Страница 49: ...lects an enlargement ratio You can nonetheless make a full size copy User s Choice allows you to program a default zoom ratio paper size margin setting and erase setting p 87 Precautions for 2 in 1 Separation Copying Chapter 3 Making Copies 5 Selecting the Original Copy Type 47 ...

Страница 50: ...rt 1st Bin 2nd Bin 3rd Bin Originals Copies 1076O146 Only when a Sorter or Staple Sorter is mounted This function is effective when making multiple copies from multiple originals Copies are sorted into complete sets of the originals Finishing Functions Sort Staple 1st Bin 2nd Bin 3rd Bin Originals Copies 1151O108AA Only when a Staple Sorter is mounted This function is effective when making multipl...

Страница 51: ...Staple Sorting or Grouping Manual Staple 1151O109AA Copies Only when a Staple Sorter is mounted This function allows you to staple copy sets already made in the Sort mode or copy stacks made in the Group mode The feature is efficient for stapling originals after making copies pp 52 53 The copier has been factory set to automatically select Non Sort in the initial mode Also the copier automatically...

Страница 52: ...Plain and recycled paper 20 Bin Up to 100 sheets 10 Bin Up to 50 sheets Special paper thick paper translucent paper OHP transparencies Up to 10 sheets Bin Capacity 10 Bin Sorter Staple Sorter 1st to 10th Bin Up to 25 sheets 20 Bin Sorter Staple Sorter 1st to 20th Bin Up to 50 sheets A4 or smaller Removing Copier from the Sorter After the Sort Group or Sort Staple mode is finished the bins will shi...

Страница 53: ... size of the copy paper for Hole Punch is A3 lengthwise and A4 crosswise only NOTES Manual Staple To staple copy sets made in Sort or copy stacks made in Group Check that each copy set or stack has been fed into the Sorter Bin 1 Copies made in Non Sort cannot be stapled manually NOTE Touch Staple Then the copy set or stack in the Sorter Bin will be stapled together 2 1149O320CB Chapter 3 Making Co...

Страница 54: ...can be stapled Never attempt to reach for the stapling position This can be dangerous NOTES This feature is useful for stapling originals after making copies Useful Tip Using the Manual Staple Function To use as a stapler When a 10 Bin Staple Sorter is mounted 1149O086AA Stapling Position Touch Staple Then the paper stack in the Sorter Bin will be stapled together 3 1149O320CB Chapter 3 Making Cop...

Страница 55: ...r can be stapled NOTE When a 20 Bin Staple Sorter is mounted 1149O085AA Stapling Position Make sure of the stapling position and press the paper stack against the bracket Never attempt to reach for the stapling position This can be dangerous NOTES Touch Staple Then the paper stack in the Sorter will be stapled together 3 1149O320CB This feature is useful for stapling originals after making copies ...

Страница 56: ...ls for the Finishing Functions Using the Automatic Duplexing Document Feeder Load the originals crosswise in the document feeder Ensure also that the stapling position is located as shown below Correct 1151O024AB Copies Originals loaded crosswise Stapling Position Placing the Original on the Glass Correct 1039O2230A Stapling Position Use Manual Staple to staple copies after they have been made Cha...

Страница 57: ...tic Duplexing Document Feeder Load the originals so that the punched holes in them are located as shown below Correct Placing the Original on the Glass Correct Hole Punch is possible only when your copier is equipped with a 20 Bin Staple Sorter NOTE 1149O089DA Punched Hole Position Originals Copies 1149O092EA Punched Hole Position Original Copy Chapter 3 Making Copies 6 Finishing Mode 55 ...

Страница 58: ...th 5th Bins 51st to 100th 26th to 50th sorted copies 11th to 20th 6th to 10th Bins If the number of copies selected exceeds 10 5 the copy cycle stops at the 50th 25th original Example Making 3 copy sets of a 30 page original set using a 10 Bin Staple Sorter Each of the top three bins contains 25 sorted copies Each of the 6th to 8th Bins contains 5 sorted copies 30 Page Original Set Auto Dual Funct...

Страница 59: ...on Sort Mosde The capacity of the Non Sort Bin 1st Bin is 100 50 in Non Sort If more than 100 50 copies are made in Non Sort the Sorter uses the 1st 2nd 2nd 3rd and subsequent bins to hold those excess copies To Make More Than 20 Copy Sets in Sort Mode 20 Bin Sorter and 20 Bin Staple Sorter only The maximum number of copy sets that can be sorted in a single copy run in Sort Mode is 20 If you need ...

Страница 60: ...erent Cover functions available Select the appropriate one according to your need The Cover key is shown only when the copier is equipped with a document feeder Functions Front Cover Copied Back Cover None 3 2 1 3 2 1 1149O039AA 1149O039AA Front Cover Copied Back Cover Blank 3 2 1 3 2 1 1149O040AA 1149O040AA Front Cover Copied Back Cover Copied 3 2 1 3 2 1 1149O041AA 1149O041AA 1149O390AA 1149O394...

Страница 61: ...s 9 Touch the key for Front or Back 2 1149O324DA Select the drawer in which paper for the cover has been loaded in step 5 7 Touch Enter 4 Load the paper for the cover e g colored paper in the drawer 5 Touch Input 10 1149O331CA 1149O093AA You can use the Multi Bypass Tray as the source of the paper for the cover Useful Tip 1149O326DA 1149O329DB 1149O328DA Chapter 3 Making Copies 7 Auxiliary Functio...

Страница 62: ...y to correct a number entry NOTES Count the number of your originals and enter that number from the 10 Key Pad 11 Touch Enter 12 The copier offers a function that automatically counts the number of originals Auto Count To use this feature see p 62 Useful Tip 1149O094AA 1 2 3 4 5 6 7 8 9 12 1149O045AA Chapter 3 Making Copies 7 Auxiliary Functions 60 ...

Страница 63: ...he document feeder 3 Press the Start key to start the original count sequence 4 The document feeder starts feeding the originals loaded on it to counter the number of originals At this time no copy cycle is run Unload the originals ejected onto the Document Exit Tray and reload them onto the Document Feed Tray Then press the Start key 5 1134P342DA 1149O095AA Touch Enter 2 1151O016AA Chapter 3 Maki...

Страница 64: ...ertion 1149O046AA Specify Page 2 for Insert Page Insertion Copied Inserts 1149O046AA Original Set Copy Set Insert The copier copies the page which is specified for an insert on paper for inserts e g colored paper Page Insertion Non Copied Inserts Original Set Copy Set Insert 1149O047AA Specify Page 2 for Insert The copier inserts a blank sheet of paper for inserts e g colored paper at any specifie...

Страница 65: ... 66 Up to 20 places can be defined 1149O049AA Original Set Copy Set Non Copied Insert Copied Insert Copy Set ADF Detection cannot be operated when the Mixed Original Detection mode is set NOTE ADF Detection automatic detection Put a sheet of paper of a different size from the originals at your desired places in the original set for convenience let us call this paper the insert marker load the orig...

Страница 66: ... paper source in which paper for inserts has been loaded in step 3 5 1149O334CA 1149O093AA ADF Detection Touch Page Insertion 1 Using Page Insertion 1149O338DA 1149O338DA Touch the paper size key for Insert Paper 4 You can use the Multi Bypass Tray as the source of the paper for the inserts Useful Tip Touch ADF Detection 7 1149O339DA Chapter 3 Making Copies 7 Auxiliary Functions 64 ...

Страница 67: ...direction different from the originals NOTE Load the original set containing insert markers into the document feeder 9 Press the Start Key to let the copier start the original count sequence 10 The document feeder starts feeding the originals loaded in it to detect the place for inserts At this time no copy cycle is run Remove the insert markers from the originals ejected onto the Document Exit Tr...

Страница 68: ... key to correct a number entry NOTES Touch the appropriate key for Copy Onto Inserts to select whether to copy onto inserts YES or not NO 2 1149O336DA Load the paper for inserts into the drawer 3 You can use the Multi Bypass Tray as the source of the paper for the inserts Useful Tip Touch Enter 6 Select the paper source in which paper for inserts has been loaded in step 3 5 Touch 10 Key Input 7 En...

Страница 69: ... 9 and 10 to enter numbers for placement positions no 2 and up There are from 1 to 20 positions for inserts NOTE From the 10 Key Pad enter a number for placement position no 1 10 Load the original set into the document feeder 13 Example 1 To place a copied insert at the 2nd position from top Copied Insert Copy Set Original Set 1149O046AA Press the Start Key The copy cycle is run for page insertion...

Страница 70: ...ct the appropriate one according to your need OHP Interleaving Functions OHP Interleaving can be available only when A4 or B5 paper is loaded in any paper source For Multiple Copy the copier should be equipped with a 20 Bin Sorter or 20 Bin Staple Sorter OHP Interleaving precludes 2 sided copying NOTES The copier copies onto OHP transparencies and after each transparency inserts a copied sheet of ...

Страница 71: ...he 1st set inserts a non copied sheet of paper after each transparency Also the copier sorts copies into a specified number of sets Non Copied Interleaves Originals Copies Copied Interleaves Originals Copies Extra Copies 2 sets Multiple Copy 2 1 2 2 1 1 2 1 2 1 1149O065AA 1149O065AA Copied Interleaves 2 1 2 1 2 1 2 1 1149O066AA 1149O066AA Non Copied Interleaves Extra Copies 2 sets Chapter 3 Making...

Страница 72: ...s can be placed on the tray 1 Select whether to copy onto the interleaves YES or not NO 3 Touch Enter 6 4 5 7 8 7 1149O052AA Select the size of Insert Paper 5 1149O349DA 1149O350DA Touch the key for the size of Insert Paper 4 1149O420DA Enter the number of copy sets to make from the 10 Key Pad 7 Touch Enter 8 Chapter 3 Making Copies 7 Auxiliary Functions 70 ...

Страница 73: ...49O097AA If you make each copy through the Original Glass start with the last page of the set Placing Originals p 26 NOTE Press the Start key and the copier starts the copy cycle in OHP Interleaving 10 Chapter 3 Making Copies 7 Auxiliary Functions 71 ...

Страница 74: ...direction to make a margin along the right edge of the copy The margin width can be selected from among 5 mm 10 mm 15 mm and 20 mm Margin by Reduction Original Copy 1149O061AA The image of the original is reduced to make a margin along the left edge of the copy The margin width can be selected from among 5 mm 10 mm 15 mm and 20 mm Original Copy 1149O062AA The image of the original is reduced to ma...

Страница 75: ...NOTE Touch Enter 6 Press the Start Key 7 The copy cycle is run for File Margin Loading the Originals in Margin Mode Using the Document Feeder Using the Glass Margin Position Original Placement Left Right Margin Position Original Placement Left Right Margin side on the left 1149O099AA Margin side on the right 1149O100AA Margin side on the right 1149O107AA Margin side on the left 1149O108AA 1149O203...

Страница 76: ...ame Erase Functions Erases an area of the original equivalent to a given margin from the left edge of the copy Left Edge Erase Erases an area of the original equivalent to a given margin from the right edge of the copy Right Edge Erase Frame Erase Erases a given width along the four edges Top Edge Erase Erases an area of the original equivalent to a given margin from the top edge of the copy Cente...

Страница 77: ...Erase Function Select the particular erase function Position 3 1149O357DA Select the erase Width 4 Touch Enter 5 The erase width represents that on the copy not on the original So use care when making a reduction or enlargement copy Example Erasing the center of an A3 size book original on a copy reduced by 0 707 NOTE 1145O414AA 15mm 20mm 0 707 Copy A4 lengthwise Book Original A3 1145O414AA 0 707 ...

Страница 78: ...B 1149O217AA Loading the Originals for Edge Frame Erase Using the Document Feeder Erase Function Original Placement Left Edge Erase Right Edge Erase Frame Erase Top Edge Erase Center Erase Frame Center Erase Erase Function Original Placement Left Edge Erase Right Edge Erase Frame Erase Top Edge Erase Center Erase Frame Center Erase 1149O212AA 1149O106AA 1149O114AB 1149O218AB Chapter 3 Making Copie...

Страница 79: ...enisher Drum Dehumidifier User s Choice and Data Send Chapter 4 Using the User Mode 1 Job Memory Input and Job Recall Job Memory Input p 78 Recalling a Job from Memory p 81 2 Zoom Memory Input p 82 3 Meter Count Toner Replenisher and Drum Dehumidifier p 83 4 User s Choice User s Choice Functions p 84 Making the User s Choice Settings p 90 Copy Track Function p 92 5 Data Send p 100 77 ...

Страница 80: ...Storing a Job Touch Job Memory Input 3 Select any one of the 10 job number keys from 1 to 10 For Account Job select any number from 1 to 5 Touch a job number key marked with 4 Touch Account Job if you want to store a job in Account Job memory To check for the details of the job stored touch Check and then touch the job number key 5 A job number key not marked with indicates that a job has already ...

Страница 81: ...hecked the settings touch Exit 6 The job settings appear on the Touch Panel Touch Exit on the Job Memory Input screen Then the Basic screen reappears 7 Chapter 4 Using the User Mode 1 Job Memory Input and Job Recall 79 ...

Страница 82: ...n appears in that key it indicates that the job program has been deleted Deleting a Program Press the User Mode key 1 Touch Job Memory Input 2 Touch Account Job if you want to delete a job in Account Job memory Job Recall 1134P365CA Touch Exit Then the Basic screen reappears 4 Chapter 4 Using the User Mode 1 Job Memory Input and Job Recall 80 ...

Страница 83: ...count Job memory touch Account Job and then the number key Check the settings made and then touch Exit The copier is set up for these settings and the Basic screen reappears 3 If the job recalled is not what you want touch Cancel Then the Job Recall screen reappears Job Recall 1134P365CA Chapter 4 Using the User Mode 1 Job Memory Input and Job Recall 81 ...

Страница 84: ...m ratio either 1 or 2 4 Touch Exit The Basic screen reappears 5 The zoom ratio can range from 0 500 to 2 000 The Minimal ratio can range between 0 900 and 0 999 NOTES User Mode 1134P356CA For example enter X1 234 as 1 2 3 and 4 in that order To correct an entry press the Clear key then enter the new ratio When a new zoom ratio is stored in a key number the old one stored in that key number is lost...

Страница 85: ...ch a case you can use Toner Replenisher to regain the normal image density quickly Do not turn OFF the Power Switch or open the Front Door while the copier is replenishing toner Toner is not replenished if the image density is sufficiently high The toner replenishing sequence ends automatically NOTES Drum Dehumidifier Touch Drum Dehumidifier to activate the Drum Dehumidifier function During times ...

Страница 86: ...User s Choice functions is given in six pages of menu from 1 6 to 6 6 To show the listing of each page touch the desired page number key at the bottom of the Touch Panel Mixed Orig Detection Language Selection Paper Priority Copy Mode Priority Expo Mode Priority Expo Level Priority Manual Expo Adjust Energy Saver Mode Auto Panel Reset Drum Dehumidifier Counter Removal Intelligent Sort Confirmation...

Страница 87: ...vel Priority Auto Select the default exposure level in the Auto Exposure mode either Lighter Normal or Darker The initial setting is Normal Manual Set the default exposure level in the Manual Exposure mode The initial setting is Normal Manual Expo Adjust Determine the default exposure level adjusting increments in the Manual Exposure mode as optimized by the type of original Mode 1 For users who f...

Страница 88: ...at automatically switches between Sort and Non Sort selecting Non Sort if only a single original is loaded and Sort if two or more originals are loaded in the document feeder The initial setting is ON Confirmation Beep Select whether to turn ON or OFF the beep that sounds each time a key on the Touch Panel is touched The initial setting is ON Original Thickness Select whether to allow Thin the use...

Страница 89: ...r When a Zoom ratio is selected that ratio is automatically selected when the 2 in 1 separation copy is set Auto Size is among the choices of zoom ratio The initial setting is 1 414 When a Margin setting is made that setting is automatically selected when the 2 in 1 separation copy is set The initial setting is no margin When an Erase setting is made that setting is automatically selected when the...

Страница 90: ...l Representative if you want to set 1 1 for Orig Copy Default Orig Copy Default Select the time it takes the Auto Power OFF function to be activated from 1 min to 120 min in 1 min increments Auto Power OFF shuts down the copier a given period of time after the last operation The initial setting is 60 min Consult your Technical Representative if you want to disable this function Auto Power OFF Mode...

Страница 91: ...ets that can be set using the 10 Key Pad The initial setting is OFF User Help Set the help code to be transmitted by the user when a Data Terminal is mounted For details consult your Technical Representative Chapter 4 Using the User Mode 4 User s Choice 89 ...

Страница 92: ...he desired User s Choice function is listed For example to change Finishing Priority from Non Sort to Sort touch 2 6 3 Touch the key of the desired User s Choice function For example touch Finishing Priority 4 The following screen appears on which NonSort is highlighted indicating that it is selected User Mode 1134P356CA Chapter 4 Using the User Mode 4 User s Choice 90 ...

Страница 93: ...Touch Sort 5 Touch Enter Repeat steps 3 to 6 to make new settings for other User s Choice functions 6 Touch Exit 7 Chapter 4 Using the User Mode 4 User s Choice 91 ...

Страница 94: ...r Mode 1134P356CA Touch User s Choice 2 Touch Administrator Mode 4 Enter the administrator number using the 10 Key Pad 5 Your Technical Representative is to program and change the administrator number For details consult your Technical Representative The administrator should remember the administrator number NOTES Touch 6 6 3 Chapter 4 Using the User Mode 4 User s Choice 92 ...

Страница 95: ...100 accounts touch 100 Accounts and then Enter 7 Initialize the Copy Track function data For example you may touch Yes and Enter 8 If you change the function be sure to initialize the Copy Track data NOTE Touch Enter 9 Touch Exit 10 Chapter 4 Using the User Mode 4 User s Choice 93 ...

Страница 96: ... Administrator Mode 4 Enter the administrator number using the 10 Key Pad 5 Your Technical Representative is to program and change the administrator number For details consult your Technical Representative The administrator should remember the administrator number NOTES User Mode 1134P356CA Chapter 4 Using the User Mode 4 User s Choice 94 ...

Страница 97: ...ould be a 4 digit number To correct a entry press the Clear key and then enter the new If you want to program an ID for other accounts repeat steps 7 through 9 If a new ID is programmed the old one is erased If a new ID entered already exists for another account the entry is rejected Enter a different ID NOTES Touch Enter 10 Touch Exit 11 Chapter 4 Using the User Mode 4 User s Choice 95 ...

Страница 98: ...ouch Administrator Mode 4 Enter the administrator number using the 10 Key Pad 5 Your Technical Representative is to program and change the administrator number For details consult your Technical Representative The administrator should remember the administrator number NOTES User Mode 1134P356CA Chapter 4 Using the User Mode 4 User s Choice 96 ...

Страница 99: ...er on which the target account is shown 7 Touch the Limit key of the target account 8 To correct a number entry press the Clear key and then enter the new number If you want to set Limit for other accounts repeat steps 7 through 9 NOTES Touch Enter 10 Touch Exit 11 Chapter 4 Using the User Mode 4 User s Choice 97 ...

Страница 100: ...P356CA Touch User s Choice 2 Touch 6 6 3 Touch Administrator Mode 4 Enter the administrator number using the 10 Key Pad 5 Your Technical Representative is to program and change the administrator number For details consult your Technical Representative The administrator should remember the administrator number NOTES Chapter 4 Using the User Mode 4 User s Choice 98 ...

Страница 101: ...set to clear the counters of all accounts at once Useful Tip Touch the counter key of the target account 8 Press the Clear key and then touch Enter 9 If you want to clear the counters for other accounts repeat steps 7 through 9 NOTE Touch Enter 10 Touch Exit 11 Chapter 4 Using the User Mode 4 User s Choice 99 ...

Страница 102: ...nction that allows the user to tell his her service shop the operating status of the copier by means of preset codes when a Data Terminal is mounted For more details consult your Technical Representative Chapter 4 Using the User Mode 100 ...

Страница 103: ... Section p 113 Copier Paper Take Up Section p 114 Copier Multi Bypass Tray p 115 Paper Feed Cabinet 2 Drawer Type p 116 Paper Feed Cabinet 1 Drawer Type p 117 Duplex Unit p 118 Duplexing Document Feeder p 119 Automatic Document Feeder p 120 Sorter Staple Sorter p 121 5 When Appears p 122 6 What Does Each Message Mean p 123 Chapter 5 When a Message Appears This chapter explains about the various wa...

Страница 104: ...ou cannot then start a new copy cycle The blinking drawer has run out of paper Example The 1st Drawer has run out of paper Fan the paper stack thoroughly Front Side Add paper by using the following procedure Load the paper stack into the drawer so that its front side faces down 2 Adding Paper The paper should be loaded no higher than Max Level Indicator NOTE Max Max 1145O555KA Slide the drawer bac...

Страница 105: ...nto the drawer so that its front side faces down 3 The paper should be loaded no higher than Max Level Indicator NOTE Slide the Edge Guides snugly up against the paper stack 4 Slide the drawer back in 5 Max 1145O555KA Chapter 5 When a Message Appears 1 When the Message The current Paper Drawer is empty Appears 103 ...

Страница 106: ...the left side of the drawer 3 Slide the drawer back in and press the Paper Descent Key 4 The 3rd Drawer has run out of paper when a drawer other than the 3rd is currently selected for use The 3rd Drawer has run out of paper when the 3rd Drawer is currently selected for use Steady Light Blinking Light Indication of the Paper Descent Key The paper should be loaded no higher than the Max Level Indica...

Страница 107: ...r stack into the drawer so that its front side faces down 2 The paper should be loaded no higher than Max Level Indicator NOTE Max 1145O555KA Slide the drawer back in 3 Chapter 5 When a Message Appears 1 When the Message The current Paper Drawer is empty Appears 105 ...

Страница 108: ...eft appears when toner is soon running out You can still make copies but the image density will become lighter and lighter It is recommended therefore that you replace the Toner Bottle with a new one as soon as possible When toner has run out the message shown on the left appears and you can no longer start a new copy cycle Replace the Toner Bottle by following the procedure given below 1149O127AA...

Страница 109: ... Power Switch or open the Door while the copier is replenishing toner NOTES Use the Toner Replenisher function available from the User Mode if the image is light immediately after the Toner Bottle has been replaced with a new one p 83 Toner Replenisher 1149O129AA Insert the bottle all the way into the copier until the marking on the bottle is aligned with the marking on the Toner Bottle Holder NOT...

Страница 110: ... Lever Stapler Door Taking hold of the Lock Release Lever of the Staple Sorter slide the Staple Sorter away from the copier 1 While lifting the Staple Cartridge Release Lever pull the Staple Cartridge out of its port 3 Pull the staple belt about 3 cm out of the new Staple Cartridge and break off that portion 4 Replacing the Staple Cartridge Check that no portion of the staple belt hangs out of the...

Страница 111: ... of paper into the 1st Bin and repeat steps 7 8 and 9 Remove the sheet of paper from the 1st Bin and check that staples have been driven into it 9 Replace the Staple Cartridge only after you are prompted to do that by the message Removing the Staple Cartridge before then will result in stapling trouble Immediately after the new Staple Cartridge has been loaded be sure to follow steps 7 to 9 DO NOT...

Страница 112: ...ge and break off that portion 4 Check that no portion of the staple belt hangs out of the cartridge Break off any portion of the belt that hangs out of the cartridge NOTE Insert the new Staple Cartridge in the direction of the arrow until it clicks into position 5 Close the Stapler Door and slide the Staple Sorter back against the copier 6 Place a sheet of paper into the space between the Non Sort...

Страница 113: ...been driven into it 9 Replace the Staple Cartridge only after you are prompted to do that by the message Removing the Staple Cartridge before then will result in stapling trouble Immediately after the new Staple Cartridge has been loaded be sure to follow steps 7 to 9 DO NOT turn the green gear near the cartridge inside the Stapler Unit NOTES Chapter 5 When a Message Appears 3 When the Message The...

Страница 114: ... First isolate the location then clear the misfeed according to the procedure applicable to the misfeed occurring at that particular location A blinking dot O indicates that there is a misfeed at that location A lit dot O indicates that there might be a sheet of paper stopped at that location Copier p 113 4 When the Message A paper misfeed has been detected Appears Multi Bypass Tray p 115 Paper Fe...

Страница 115: ...paper from the transport section 3 Slightly lift up the Upper Half of the copier and unlock Stopper M2 Gently swing down and lock the Upper Half of the copier Then close the Front Door 4 Be careful not to touch the areas marked with High Voltageand Caution HOTwith bare hands NOTE CAUTION The Fusing Unit and its surrounding areas may be extremely hot DO NOT touch any part except the Fusing Unit Han...

Страница 116: ...up the Upper Half of the copier and unlock Stopper M2 Gently swing down and lock the Upper Half of the copier Then close the Front Door 4 Open the Right Door and pull out the sheet of paper from the transport section 2 Slide out the drawer currently selected and unload the paper from the drawer 5 Fan the paper thoroughly and reload it 6 Gently slide the drawer back in 7 Chapter 5 When a Message Ap...

Страница 117: ...he copier Then close the Front Door 4 Unload the stack of paper from the Multi Bypass Tray 1 Open the Front Door Turn the Lock Release Lever counterclockwise to unlock and swing up the Upper Half of the copier Then lock Stopper M2 2 Fan the paper thoroughly and reload it on the Multi Bypass Tray 5 Chapter 5 When a Message Appears 4 When the Message A paper misfeed has been detected Appears 115 ...

Страница 118: ...cted and then unload the paper stack from it 3 To reset the paper misfeed indication on the Touch Panel open and close the Front Door 6 Slide the drawer back in 5 Fan the paper thoroughly and reload it 4 Close the Lower Right Door 2 Chapter 5 When a Message Appears 4 When the Message A paper misfeed has been detected Appears 116 ...

Страница 119: ...r 3 Close the Lower Right Door 2 Unload the paper from the drawer Fan the paper thoroughly and reload it 4 Slide the drawer back in and press the Paper Desent Key 5 To reset the paper misfeed indication on the Touch Panel open and close the Front Door 6 Chapter 5 When a Message Appears 4 When the Message A paper misfeed has been detected Appears 117 ...

Страница 120: ...e copier and unlock Stopper M2 Gently swing down and lock the Upper Half of the copier Then close the Front Door 6 Slide out the Duplex Unit and open Misfeed Clearing Guide Plate D Pull out the sheet of paper from the Duplex Unit 7 Securely close Misfeed Clearing Guide Plate D and slide the Duplex Unit back into the copier 8 Close the Left Door and Lower Left Door 3 Open and close the Front Door t...

Страница 121: ...Exit Unit 3 Raise the Duplexing Document Feeder Gently pull out the original from the Document Turnover Feed Unit 5 Close F1 6 Remove the original from the Original Glass and lower the Duplexing Document Feeder 7 Add the number of originals indicated on the Touch Panel to the bottom of the original stack removed in step 1 and reload the stack onto the Document Feed Tray 8 Close F2 4 Chapter 5 When...

Страница 122: ...tic Document Feeder Gently pull out the original from the Document Feed Unit 4 Close F1 5 Remove the original from the Original Glass and lower the Automatic Document Feeder 6 Add the number of originals indicated on the Touch Panel to the bottom of the original stack removed in step 1 and reload the stack onto the Document Feed Tray 7 Chapter 5 When a Message Appears 4 When the Message A paper mi...

Страница 123: ... from the transport section 2 Slide the Sorter Staple Sorter back to the copier 3 Open Misfeed Clearing Guide Plate S 2 Turn the misfeed clearing knob one turn in the direction shown ST 210 only 3 Pull out the copy from the transport section 4 Close Misfeed Clearing Guide Plate S and slide the Sorter Staple Sorter back to the copier 5 Chapter 5 When a Message Appears 4 When the Message A paper mis...

Страница 124: ...functioning Use another mode call your tech rep appears You can nonetheless make copies as long as you don t use that particular function Touching on the Touch Panel shows the following screen When you call your Technical Representative please give him her the code given on this screen Example Code C0920 Touching Exit in the upper right corner of the screen returns the Basic copying screen to the ...

Страница 125: ...le Cartridge is empty Please replace The staples have run out Replace the Staple Cartridge with a new one 3 When the Message The Staple Cartridge is empty Appears p 108 A paper misfeed has been detected Please remove the misfeed at A misfeed has occurred and no copy cycle can be initiated Clear the misfed sheet of paper 4 When the Message A paper misfeed has been detected Appears p 112 The section...

Страница 126: ...and copy paper size is outside the range from 0 5 to 2 0 to run a copy cycle in the Auto Size mode Cancel Auto Size and select the appropriate zoom ratio or change the copy paper size Please load Cover paper into the source indicated below Paper for covers has run out Load paper for covers Paper for covers is not loaded Please load Insert sheets into the indicated paper source The paper source spe...

Страница 127: ...ble only in Auto Paper or Auto Size Select Auto Paper or Auto Size Matching paper size is only in Special tray If OK press START The drawer selected for use has been set up for special paper loading by using User s Choice If you don t want the special paper place the desired type of paper of the corresponding size on the Multi Bypass Tray Special paper setting p 35 Auto Sizing and Manual Feeding c...

Страница 128: ...Chapter 5 When a Message Appears 6 What Does Each Message Mean 126 ...

Страница 129: ...ge is too dark The copy is blurry The copy has dark specks or spots The edge of the copy is dirty The image on the copy is not aligned properly The copy has lines 2 The Copier is not functioning as designed p 130 The Touch Panel shows nothing The Start key does not light up green No copies are fed out when the Start key is pressed Control panel keys do not respond The copier is not activated when ...

Страница 130: ...r by using Toner Replenisher of User Mode p 83 The message Replenish Toner is shown on the Touch Panel Replace the Toner Bottle p 106 The paper is damp Change the paper The image is too dark The exposure level for the Auto Exposure mode is set at Darker Change the setting of Auto Exposure Level of User s Choice p 85 Or cancel the Auto Exposure mode and select Manual Exposure to adjust the exposure...

Страница 131: ...Auto Size Mode to enlarge the copy to the appropriate size p 36 The original is not placed in the correct position when the zoom ratio is set at full size 1 000 Select the same copy paper size as the original p 34 Or reload the paper in the same direction as the original The reduction ratio selected is not in accord with the copy paper size When doing manual reduction copying Select the zoom ratio...

Страница 132: ...ion Check the Touch Panel and take action according to the message on the panel The copier was just turned ON and is warming up It takes the copier 60 sec to be ready for making copies after it has been turned ON Please wait Control panel keys do not respond The Interrupt key LED is lit up The copier is in the interrupt mode Press the Interrupt key to cancel the interrupt mode The copier is not ac...

Страница 133: ... Type Paper Feed Cabinet 1 Drawer Type Duplex Cabinet Duplex Unit Data Controller 2 Care of the Copier p 138 Cleaning 3 Function Combination Matrix p 140 4 Description of Copy Paper Size and Zoom Ratio Table p 143 5 Index p 144 This chapter gives complete specifications of the copier system and options plus care and reference information to facilitate your use of the copier Chapter 7 Miscellaneous...

Страница 134: ...r Feeding System First Drawer 500 sheets 2nd Drawer 500 sheets Multi Bypass Tray 50 sheets 80g m2 20 sheets Recycled paper or Special Paper Warm up Time 30 seconds or less First Copy A4C 6 0 seconds or less in Full Size Mode using First Copier Drawer Copy Speed Approx copies minute Full size 1 000 A3L 17 B4L 19 A4L 22 A4C 28 Magnification Ratios Fixed ratios Full size 1 1 0 005 Reduction ratios 0 ...

Страница 135: ... or less Dimensions Width 610mm Depth 505mm Height 125mm Weight 14 5 kg Duplexing Document Feeder AFR 12 Automatic Document Feeder AF 5 Document Feeding System Standard Mode 1 sided original 2 in 1 Single Feeding Mixed Original Detection Mode 1 sided Mixed Original Detection Lightweight Original Mode Kinds of Original Plain paper Original Weight 1 sided original Mode 2 in 1 Mode 50g m2 to 110g m2 ...

Страница 136: ... Sort Mode Group Mode Kinds of Paper Non Sort Mode Plain paper Recycled paper Special Paper T Thick paper Transparencies Translucent paper Sort Mode Group Mode Plain paper Recycled paper Paper Size Non Sort Mode Sort Mode Group Mode A5L to A3L Capacity of Bins Non Sort Mode Plain paper Recycled paper Non Sort bin 100 sheets 1st bin to 20th bin 50 sheets bin Total 1 100 sheets A4 or smaller weighin...

Страница 137: ... Mode Hole Punch Mode Kinds of Paper Non Sort Mode Hole Punch Mode Plain paper Recycled paper Special Paper T Thick paper Transparencies Translucent paper Sort Mode Group Mode Sort Staple Mode Plain paper Recycled paper Paper Size Non Sort Mode Sort Mode Group Mode A5L to A3L Sort Staple Mode A4L to A3L Hole Punch Mode A4C A3L Capacity of Bins Non Sort Mode Plain paper Recycled paper Non Sort bin ...

Страница 138: ...matic feeding from drawer Drawer Capacity 2 500 sheets 80g m2 Power Source DC24V supplied from copier Dimensions Width 610mm Depth 595mm Height 472mm Weight 36 5 kg Duplex Cabinet PF 4D Kinds of Paper Plain paper Recycled paper Weighing 60g m2 to 90g m2 Copy Paper Size A5L to A3L Multiple Copies 2 Sided Copies 50 sheets Power Source DC24V supplied from copier Dimensions Width 610mm Depth 595mm Hei...

Страница 139: ... Memory Max no of copies made by paper size 9 999 999 Max no of copies made by department 999 999 Max no of copies made by copy mode 999 999 Max no of copies made by department copy mode 99 999 Distinguishable Copy Modes Up to 16 types Power Source DC24V supplied from copier Power Consumption 5W or less Dimensions Width 180mm Depth 64mm Height 111mm Weight Approx 550 g Others A printer option reco...

Страница 140: ... any other detergent to avoid damage to the control panel keys and Display NOTE Control Panel 2 Care of the Copier 1139O1820A Original Glass Original Pad Wipe the surface of the Original Pad clean with a soft cloth dampened with mild home detergent 1139O1850A Front Door Wipe the surface of the Original Glass clean with a soft dry cloth Wipe the inside of the Front Door clean with a soft cloth 1139...

Страница 141: ...k into the original position Repeat steps 1 to 4 two to three times Wipe the surface of the Document Transport Belt clean with a soft cloth dampened with mild home detergent Hold the Document Transport Belt at both edges and pull it to the left to expose a fresh surface Wipe the fresh surface clean with a soft cloth dampened with mild home detergent 1139O1870A 1139O1880A 1139O1890A 1139O1900A 1139...

Страница 142: ... O Mixed Orig O O O O O O O O O O O O O Non Sort O O O O O O O O O O O O O O O O Sort O O O O O O O O O O O O O O O O Group O O O O O O O O O O O O O O O O Sort Staple O O O O O O O O O O O O O Manual Staple O Hole Punch O O O O O O O O O O O O O O O O Cover O O O O O O O O O O O Page Insertion O O O O O O O O O O O Single Copy O O O O O O Multi Copy O O O O O O File Margin Right O O O O O O O O O...

Страница 143: ... O O O A O Book 1 O O O O O O O O O O Book 2 O O O O O O O O O O Mixed Orig O O O O O O O O O O O O O O Non Sort D O O O F O O O O O O O O Sort O O O O O O O O O O A O O Group O O O O O O O O A O O Sort Staple O O O O O O O A O Manual Staple O O Hole Punch O O O O O O O O O O O A O O Cover O O O O O O O O O O O O Page Insertion O O O O O O O O O O O O Single Copy E O O O O O O Multi Copy O O O O O...

Страница 144: ...ed with A4 crosswise paper A4 lengthwise is next selected B5 size paper is next selected if neither A4 crosswise nor A4 lengthwise paper is loaded in the copier D The combination is possible if the copier is equipped with a Staple Sorter but not if the copier is equipped with a Sorter If Sorter or Staple Sorter is attached the function set first Non Sort takes precedence E The combination is possi...

Страница 145: ...4 A5 0 707 A6 0 500 B5 0 866 B6 0 610 A3 1 414 B4 1 224 A5 148 210 mm 5 3 4 8 1 4 A6 0 707 B6 0 866 A4 1 414 A3 2 000 B4 1 733 B5 1 224 A6 105 148 mm 4 1 4 5 3 4 A4 2 000 A5 1 414 B5 1 733 B6 1 224 B4 257 364 mm 10 14 1 4 A4 0 816 A5 0 577 B5 0 707 B6 0 500 A3 1 154 B5 182 257 mm 7 1 4 10 A5 0 816 A6 0 577 B6 0 707 A3 1 640 A4 1 154 B4 1 414 B6 128 182 mm 5 7 1 4 A6 0 816 A4 1 640 A5 1 154 B4 2 00...

Страница 146: ...el Reset User s Choice p 86 Auto Paper p 34 Auto Power OFF Mode pp 21 88 Auto Size p 36 B Basic Copying Overview p 24 Book 1 p 43 Book 2 p 43 C Calling up a Ratio from Memory p 38 Care of the Copier p 138 Cleaning p 138 Clear Key p 16 Confirmation Beep User s Choice p 86 Control Panel p 16 Copy Mode Priority User s Choice p 85 Copy Paper Size p 34 Copy Track User s Choice p 88 Copy Track Function ...

Страница 147: ...n Combination Matrix p 140 G Group p 49 H Hole Punch p 49 I Image Density p 40 Initial Mode p 20 Intelligent Sort User s Choice p 86 Interrupt Mode p 22 J Job Memory Input p 78 L Language Selection User s Choice p 85 M Making the User s Choice Settings p 90 Manual Bypass Copying p 32 Manual Expo Adjust User s Choice p 85 Manual Exposure p 40 Manual Staple p 49 Max Copy Sets User s Choice p 89 Misf...

Страница 148: ...ginal Copy Type p 42 Single Automatic Document Feeding Mode SADF Mode p 30 Size Counter p 83 Smaller Originals User s Choice p 86 Sort p 48 Sort Staple p 48 Special Paper User s Choice p 87 Special Paper Setting p 35 Start Key p 16 Stop Key p 16 Storing a Ratio in Memeory p 39 Storing a Zoom Ratio p 82 System Overview p 8 T Toner Replenisher p 83 Total Counter p 83 Troubleshooting p 127 Turning ON...

Отзывы: