background image

Table of Contents

1

Rev. /

1-1

1

Table of Contents

1

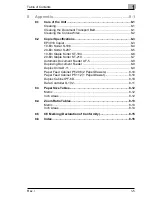
Table of Contents.......................................................1-7

2

Introduction ................................................................2-1

2.1

We Want You to Be a Satisfied Customer ..................................2-1

2.2

What is Energy Star®? .................................................................2-2

2.3

Guide to this Manual.....................................................................2-3
How Is this Manual Structured? ......................................................2-3
A Brief Explanation of the Conventions Used in this Manual ..........2-4
A Brief Explanation of Important Concepts and Symbols ...............2-5

3

Getting to Know Your Copier....................................3-1

3.1

System Overview ..........................................................................3-1
EP3010 Copier................................................................................3-1
EP3010 ...........................................................................................3-2
10-Bin Sorter/Staple Sorter (optional accessory)............................3-3
20-Bin Sorter/Staple Sorter (optional accessory)............................3-4
Automatic/Duplexing Document Feeder (optional accessory) ........3-5
Duplex Unit (optional accessory) ....................................................3-6
Paper Feed Cabinet (optional accessory).......................................3-7
Data Controller (optional accessory)...............................................3-8

3.2

The Safe Use of Your Copier........................................................3-9

3.3

Transporting the Copier .............................................................3-11

3.4

Setting Up the Copier .................................................................3-11
Operating Environment .................................................................3-11
Installation Site..............................................................................3-11
Space Requirements for the Copier..............................................3-12
Storage of Supplies.......................................................................3-12

3.5

Power Requirements ..................................................................3-12
Voltage and Frequency Tolerances ..............................................3-12

3.6

Switching the Copier On and Off...............................................3-13
Switching the Copier ON.............................................................. 3-13
Switching the Copier OFF ............................................................ 3-13

3.7

Control Panel Keys and Indicators............................................3-14

3.8

Layout of the Touch Panel .........................................................3-15

3.9

Please Observe the Following Precautions..............................3-16

Содержание EP3010

Страница 1: ...orter optional accessory 3 4 Automatic Duplexing Document Feeder optional accessory 3 5 Duplex Unit optional accessory 3 6 Paper Feed Cabinet optional accessory 3 7 Data Controller optional accessory 3 8 3 2 The Safe Use of Your Copier 3 9 3 3 Transporting the Copier 3 11 3 4 Setting Up the Copier 3 11 Operating Environment 3 11 Installation Site 3 11 Space Requirements for the Copier 3 12 Storage...

Страница 2: ... 4 10 Refilling the Paper Drawer 4 11 Standard Paper Drawer 500 sheets 4 11 Universal Paper Drawer variable paper size 4 12 Large Paper Drawer 2500 sheets 4 13 4 11 Changing the Toner Bottle 4 15 4 12 Changing the Staple Cartridge 4 17 10 Bin Sorter 4 17 20 Bin Sorter 4 19 5 How Would You Like Your Copy 5 1 5 1 Basics 5 1 Toggling Auto Exposure 5 2 Lightening Darkening Copies 5 3 Copying Photograp...

Страница 3: ...g a Copy Job Program 6 1 6 2 Recalling Copy Job Programs 6 3 6 3 Deleting Copy Job Programs 6 4 6 4 Checking Meter Counts 6 5 6 5 Activating Auxiliary Toner Replenisher Mode 6 6 6 6 Activating the Drum Dehumidifier 6 6 6 7 User Set 1 6 6 7 Set Mixed Original Detection Priority 6 7 Changing the Display Language 6 7 Setting the Paper Priority 6 7 Setting the Copy Priority 6 7 6 8 User Set 2 6 6 8 Se...

Страница 4: ...mbers 6 19 6 15 Viewing Meter Counts 6 21 6 16 Resetting Counters 6 23 7 Troubleshooting 7 1 7 1 If You Are Not Satisfied with Your Copy 7 1 7 2 If a Message Appears on the Display Panel 7 3 7 3 If Your Copier is Not Working Correctly 7 6 7 4 If the Tool Appears 7 7 7 5 How to Clear a Paper Misfeed 7 8 Copier Fusing Unit 7 8 Copier Paper Take Up Section 7 10 Automatic Document Feeder 7 12 Duplexin...

Страница 5: ...aple Sorter ST 104 8 6 20 Bin Staple Sorter ST 210 8 7 Automatic Document Feeder AF 5 8 8 Duplexing Document Feeder 8 9 Duplex Unit AD 11 8 9 Paper Feed Cabinet PF 206 2 Paper Drawers 8 10 Paper Feed Cabinet PF 112 1 Paper Drawer 8 10 Duplex Cabinet PF 6D 8 10 Data Controller D 102 8 11 8 3 Paper Size Tables 8 12 Metric 8 12 Inch Areas 8 12 8 4 Zoom Ratio Tables 8 13 Metric 8 13 Inch Areas 8 14 8 ...

Страница 6: ...1 Table of Contents 1 6 Rev ...

Страница 7: ... read this manual carefully before using your copier and keep it handy at all times Store the manual in the holder on the rear side of the copier For further information and assistance in the event of difficulties please contact l your Minolta Technical Representative l the Minolta Hotline or l our Web site http www minolta com Please keep the serial number located on the copier s rating plate and...

Страница 8: ...p to 60 Copiers with a high copying speed automatically switch to 2 sided copying mode This reduces the costs for copy media and the volume of paper consumed Did you know that manufacturing a sheet of paper requires 10 times as much energy as making a copy The conservation of paper thus also has a direct global effect on the conservation of energy This copier complies with the Energy Star energy e...

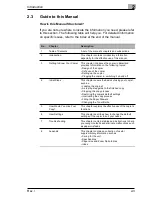
Страница 9: ...ting up the copier Plugging the copier in switching it on and off 4 Initial Steps This chapter covers the basics of using your copier such as Loading the original A step by step guide to the finished copy Stopping the copy process Restoring the copier s default settings Interrupting the copy process Filling the Paper Drawers Changing the Toner Bottle 5 How Would You Like Your Copy This chapter exp...

Страница 10: ... operation Ü The arrow marks the precautionary measure required to avoid the danger START Control panel button with the function START Staple Touch Panel box with the name Staple ERROR Touch panel display with the message ERROR Ü Individual action to be performed no further steps 1 Step 1 of a sequence of actions 2 Step 2 of a sequence of actions etc This is additional assistance Ü The action desc...

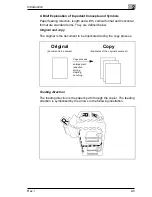
Страница 11: ...ned below Original and copy The original is the document to be duplicated during the copy process Feeding direction The feeding direction is the paper s path through the copier The feeding direction is symbolized by the arrows in the following illustration Original document to be copied Copy duplicates of the original document Copy process enlargement reduction sorting stapling punching ...

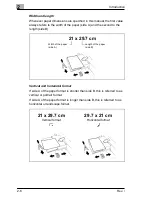
Страница 12: ... length side B Vertical and horizontal format If side A of the paper format is shorter than side B this is referred to as vertical or portrait format If side A of the paper format is longer than side B this is referred to as horizontal or landscape format 21 x 29 7 cm Width of the paper side A Length of the paper side B Vertical format Horizontal format 21 x 29 7 cm 29 7 x 21 cm ...

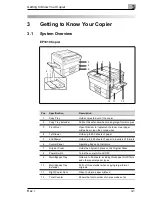
Страница 13: ...es 4 1st Drawer Holds up to 500 sheets of paper 5 2nd Drawer Holds up to 500 sheets of paper in a variety of formats 6 Control Panel Operating Keys and Indicators 7 Original Cover Holds the original in place on the Original Glass 8 Power Switch Turns the copier ON and OFF 9 Multi Bypass Tray Holds up to 50 sheets including thick paper OHP films and other special paper types 10 Multi Bypass Tray Ex...

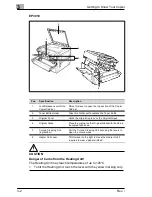
Страница 14: ... this lever to open the top section of the Copier Cabinet 2 Toner Bottle Holder Take this holder out to replace the Toner Bottle 3 Original Cover Holds the original in place on the Original Glass 4 Original Glass Place the original on the Original Glass with the side to be copied face down 5 Corona Cleaning Unit top bottom Pull the Corona Cleaning Unit out using the levers to clean the corona wire...

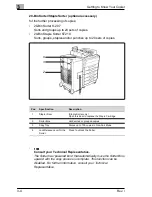
Страница 15: ...s Consult your Technical Representative The Sorter has powered bins that automatically move the Sorter Bins upward with the copy process is complete This function can be disabled For further information consult your Technical Representative 3 2 1 Pos Specification Description 1 Lock Release Lever for the Sorter Press to unlock the Sorter 2 Sorter Bins Hold sorted or grouped copies 3 Stapler Door S...

Страница 16: ...l Representative The Sorter has powered bins that automatically move the Sorter Bins upward with the copy process is complete This function can be disabled For further information consult your Technical Representative 1 2 3 4 Pos Specification Description 1 Stapler Door Staple Sorter only Open this door to replace the Staple Cartridge 2 Sorter Bins Hold sorted or grouped copies 3 Copy Tray Stores ...

Страница 17: ...eed Tray Extender Pull out this extender when copying large format originals 3 Document Feed Tray Place the originals on the Document Feed Tray with the side to be copied face up 4 Document Guide Plate Slide the Document Guide Plate to the size of the copy paper 5 Document Feed Unit Door Open to clear a misfed document in the Document Feed Unit 6 Original Placement Place the originals on the Docum...

Страница 18: ...urns copies over with storage drawer for supplies CAUTION Improper operation can cause damage to the Duplex Unit A foil is visible when lifting the Misfeed Removal Guide This foil is a component of the Paper Guide Do not remove or damage this foil Ü Never use sharp objects when clearing paper misfeeds 1 Pos Specification Description 1 Misfeed Removal Guide Open to clear a paper misfeed ...

Страница 19: ...paper each l Paper Feed Cabinet PF 112 With a Drawer for up to 2500 sheets of 80 g m paper each 4 3 1 2 PF 206 PF 112 Pos Specification Description 1 3rd Drawer Holds up to 500 sheets of paper 2 4th Drawer Holds up to 500 sheets of paper 3 3rd Drawer Holds up to 2500 sheets of paper 4 Paper Descent Key for Paper Drawer with illuminated indicator Press to open the Paper Drawer ...

Страница 20: ...accessory Records number and cost of copies l Data Controller D 102 Displays and records the number of copies costs incurred and data related to special user cards 1 Pos Specification Description 1 Data Controller See the manual for the Data Controller for details ...

Страница 21: ...t metal objects are accidentally introduced into the copier switch the copier off immediately unplug the power cord from the power outlet and contact your Technical Representative Ü Do not place coffee cups bottles or other containers with liquids on the copier If liquids get inside the copier they can cause fire or electrical shock In the event that liquids are accidentally introduced into the co...

Страница 22: ...oltage could result in a fire or cause an electrical shock Ü Never connect the copier to a multiple socket extension cord This could result in a fire or cause an electrical shock Ü Switch the copier off immediately unplug the power cable and contact your Technical Representative if the power cable is damaged This damage could result in a fire or cause an electrical shock Ü If an extension cable is...

Страница 23: ... 10 C per hour l Humidity of 15 to 85 maximum fluctuation of 20 per hour Installation Site The installation site must meet the following requirements l An area which is dry and free of dust l A level surface free of undue vibrations l Provision for good ventilation l A location away from curtains or other easily inflammable materials The unit must be protected from the following influences l Splas...

Страница 24: ...ool dry dust free location l Out of the reach of children CAUTION Toner presents a health hazard If swallowed toner is harmful to health Ü If your hands come into contact with toner immediately wash them carefully with cold water and soap 3 5 Power Requirements Voltage and Frequency Tolerances The copier needs a reliable consistent power supply Please call your in house technical support if requir...

Страница 25: ...ON Ü Press the Power Switch to the ON position Switching the Copier OFF Ü Press the Power Switch to the OFF position Help save energy The Auto Power Off function switches the copier off after a specified idle period This helps conserve energy See Setting the Auto Shut Off Mode on page 6 15 ON OFF ...

Страница 26: ...e Check Key Calls up the monitoring display 5 Touch Panel For the display and selection of various functions touch sensitive panel 6 10 Key Pad Use to enter numerical values 7 Access Mode Key Activates the access authorization function 8 Energy Saver Key Press to set the copier into the Energy Saver mode 9 Interrupt Key Press to interrupt and resume a copy cycle 10 Reset Key Resets the copier to i...

Страница 27: ...nformation Display Displays information about the current function selected number of copies etc Basic Menu Boxes Displays the current Basic Settings Selection box for Duplex Unit Duplex Unit only Select this box to preselect a 1 sided 1 in 1 or 2 sided 1 in 2 exposure Number of Originals Original Feeder only Touch this box to enter the number of originals to be processed by the Original Feeder Mi...

Страница 28: ... of Your Copier The copier may only be used for the tasks described in this manual Any other applications are considered inappropriate Certain types of documents may not be copied for further use or with the intent to pass copies of such documents off as the original These include l Money l Stamps canceled or uncanceled l Identification cards l Vehicle registration documents l Copyrighted material...

Страница 29: ... Feed the originals m Place the originals in the Document Feeder with the side to be copied face up or m Lift the Original Cover and place the original with the side to be copied face down on the Original Glass 2 Enter your access number if required and press the Access Mode Key 3 Adjust the basic functions as required m Exposure m Zoom m AUTO paper 4 Select an Orig Copy type as appropriate m 1 si...

Страница 30: ...e m Add cover sheet m Add interleaves m Set up file margin m Erase margins m Insert OHP interleaves 7 Enter the number of copies using the 10 Key Pad Did you type the wrong number Ü Press the Clear Key and reenter the number of copies 8 Start the copy process by pressing the START Key Do you want to abort the copy process Ü Press the STOP Key 1 2 3 4 5 6 7 8 9 0 C 1139O2640A 1134P342DA ...

Страница 31: ...han 15 2 Place the original on the Original Glass with the side to be copied face down 3 Align the rear left hand corner of the original with the arrow mark Press the rear edge of the original against the Original Positioning Plate Is the original transparent Ü Place a sheet of white paper of the same size on the original 4 Close the Original Cover For transparent originals only Original Positioni...

Страница 32: ...Copy type to make book copies Ü Center the book on the book mark on the Length Scale The copies will be made in the correct order 4 Close the Original Cover Is the book too thick to close the Original Cover Ü Leave the Original Cover open Ü To avoid being dazzled by the extremely bright light do not look at the Original Glass during the copy process CAUTION Improper use can damage the Original Gla...

Страница 33: ...s m A3 or B4 up to 30 originals 2 Slide the Document Guide Plate to suit the size of the originals Are you copying large originals Ü Fold the Document Copy Tray Extender out Is the Document Feeder feeding the originals incorrectly Ü Ensure that the Document Guide Plate is correctly adjusted and positioned right up against the paper Which originals can be used with the feeder Which functions are no...

Страница 34: ... 2 Wait until the START Key lights up green 3 Place the original on the Document Feed Tray with the side to be copied face down The original will be drawn in automatically and the copy process started 4 When the START Key lights up green again the next original can be inserted Which originals can be used with the feeder Which functions are not available single sheets of smooth standard paper not s...

Страница 35: ...ss number Did you type the wrong number Ü Press the Clear Key to clear your input 2 Press the Access Mode Key The display will change Did the display fail to change Then you have entered an incorrect access number Ü Enter your correct access number 3 Whenthecopy process is complete press the Access Mode Key again 1 2 3 4 5 6 7 8 9 0 C 1139O2640A 1134P438DA ...

Страница 36: ... have all settings displayed in an overview Check your copying settings and alter them as required 1 Press the MODE CHECK Key The display will change The currently set functions are displayed in an overview 2 Check your function settings Is one of the settings incorrect Ü Press the appropriate key to go straight to the area in which you can correct your setting Are your settings correct Ü Press th...

Страница 37: ...l of the copier The copier is reset to its default settings The number of copies shown on the information display is set to 1 4 8 Interrupting the Copy Process You can interrupt an extensive copy process to deal with an urgent copy job in between 1 Press the INTERRUPT Key on the Control Panel of the copier The current copy process is paused 2 Perform the urgent copy job 3 Press the INTERRUPT Key a...

Страница 38: ... side face up in the 1st Sorter Bin A key marked Staple will appear on the touch panel Is the Staple Key not on your Touch Panel Ü Ensure that the copies have been inserted into the 1st Sorter Bin and not in the Copy Tray 3 Press the Staple box The paper stack in the Sorter Bin will be stapled Which Staple Sorter do you have What is the maximum number copies you can staple 10 bin Staple Sorter up ...

Страница 39: ...tandard Paper Drawers is fixed and can be altered only by our technical after sales service 1 Pull the Paper Drawer out 2 Place the new paper carefully between the stationary paper size limiters 3 Ensure that the maximum paper filling height is not exceeded see mark on inside of the Paper Drawer 4 Close the Paper Drawer 1145O555KA Max ...

Страница 40: ...size and alignment 1 Pull the Universal Paper Drawer out 2 If required set the paper limiters to the new paper size 3 Place the new paper carefully between the stationary paper size limiters 4 Ensure that the maximum paper filling height is not exceeded see mark on inside of the Paper Drawer 5 Close the Paper Drawer 1145O555KA Max ...

Страница 41: ...or flashes if the paper supply in this Drawer is used up and it is not possible to switch over to another Paper Drawer 1 Press the Paper Descent Key for the Paper Drawer The Paper Drawer is automatically lowered 2 Pull the Paper Drawer out 3 Insert paper into the right hand side of the Paper Drawer Press the long side of the paper stack against the edge of the Drawer 4 Place a further stack of pap...

Страница 42: ...Rev 5 Ensure that the maximum paper filling height is not exceeded see mark on inside of the Paper Drawer 6 Push the Paper Drawer back again and press the Paper Descent Key The Drawer is automatically raised 1145O555KA Max ...

Страница 43: ...ash them thoroughly with soap and cold water Use only the Toner Bottles and toner specified for this copier The copying quality may otherwise be impaired 1 Open the Front Door of the copier 2 Swing out the holder together with the empty Toner Bottle and remove the Toner Bottle 3 Tap the new Toner Bottle against a hard surface to loosen any caked toner deposits 4 Shake the new Toner Bottle ...

Страница 44: ...rrow on the bottle is facing you 7 Align the mark on the bottle with the mark on the holder and swing the holder back until it snaps into position 8 Close the Front Door Copies still too light If your copies are still too light after changing the Toner Bottle activate the Toner Replenisher function See Activating Auxiliary Toner Replenisher Mode on page 6 6 ...

Страница 45: ...pty 1 Press the Lock Release Lever on the Staple Sorter and pull the Sorter off the copier 2 Open the Stapler door 3 Press the green button upwards and pull out the empty Staple Cartridge 4 Pull the staple belt about 3 cm out of the new Staple Cartridge Break this piece off so that it no longer extends past the end of the Staple Cartridge Lock Release Lever Stapler door ...

Страница 46: ...gainst the copier 7 Place a sheet of paper in the 1st Sorter Bin of the Staple Sorter 8 Touch the Staple box on the Touch Panel The Staple Sorter will then perform two to three test staplings 9 Ensure that the staples have been correctly placed Are the staples incorrectly placed Ü Ensure that the Staple Cartridge has been correctly inserted steps 1 to 6 and repeat steps 7 8 and 9 ...

Страница 47: ...Lock Release Lever on the Staple Sorter and pull the Sorter off the copier 2 Open the Stapler door 3 Press the green button down and pull out the empty Staple Cartridge 4 Pull the staple belt about 3 cm out of the new Staple Cartridge Break this piece off so that it no longer extends past the end of the Staple Cartridge Lock Release Lever Stapler door ...

Страница 48: ...gainst the copier 7 Place a sheet of paper in the 1st Sorter Bin of the Staple Sorter 8 Touch the Staple box on the Touch Panel The Staple Sorter will then perform two to three test staplings 9 Ensure that the staples have been correctly placed Are the staples incorrectly placed Ü Ensure that the Staple Cartridge has been correctly inserted steps 1 to 6 and repeat steps 7 8 and 9 ...

Страница 49: ...photographs l Toggle Auto Size Mode l Set Zoom Ratios l Enlarge or reduce originals by a standard ratio l Enlarge or reduce originals with user defined ratios l Save frequently used Zoom Ratios l Recall stored Zoom Ratios l Toggle Auto Paper Mode l Select Paper Drawers l Define the paper format for the Multi Bypass Tray l Toggle Mixed Original Detection Mode ...

Страница 50: ...inal 1 In the Basics Menu touch the Expo Photo box The display will change 2 Touch the Auto box The box will now be marked with a black background The Auto Exposure function is now active Ü To disable Auto Exposure touch the Lighter or Darker boxes to adjust the exposure manually Are your copies still too dark overall The default density for the Auto Exposure mode can be adjusted in the User Setti...

Страница 51: ... the density of the copies to suit your requirements 1 In the Basics Menu touch the Expo Photo box The display will change 2 Touch the Lighter or Darker boxes to change the exposure level of the copy as required Ü To enable the Auto Exposure function again touch the Auto box ...

Страница 52: ... The display will change 2 Touch the Photo box The box will now be marked with a black background The function is now active The Auto Exposure is disabled 3 Touch the Lighter or Darker boxes to change the exposure level of the copy as required Ü To disable the Photo function touch the Photo box a second time Ü To enable the Auto Exposure function again touch the Auto box ...

Страница 53: ...duction ratio Zoom Ratio suitable for the original and copy sizes 1 In the Basics Menu touch the Zoom box The display will change 2 Touch the Auto Size box The box will now be marked with a black background The Auto Size Mode is now active The display will change 3 Select the Paper Drawer to use for your copies Ü To disable Auto Size Mode touch the Auto Size box a second time ...

Страница 54: ...nge 2 Touch the x0 5 box to reduce the copy by 50 or Touch the A4 A3 box to make an A3 copy of an A4 original or Touch the Minimal for a minor reduction of the original Ü Touch the Full Size box to reset the zoom and make copies of the same size as your original Don t lose anything The Zoom Ratio for minimal reductions can be adjusted as required See Saving Frequently Used Zoom Ratios on page 5 8 ...

Страница 55: ...ge 2 Touch the appropriate selector box repeatedly to increase or decrease the ratio or Hold the selector box until the desired Zoom Ratio is displayed Ü Touch the Full Size box to reset the zoom and make copies of the same size as your original Speed things up If this is too slow for you use the following shortcut Select the standard Zoom Ratio box closest to the required value such as A4 A3 befo...

Страница 56: ... for the minimal copy 1 In the Basics Menu touch the Zoom box The display will change 2 Touch the User Set box The display will change 3 Touch the Store box 4 Enter the Zoom Ratio from the 10 Key Pad e g 1 3 0 0 an enlargement of 1 3 Did you type the wrong number Ü Press the Clear Key This clears your entry 1 2 3 4 5 6 7 8 9 0 C 1139O4870A ...

Страница 57: ...x 1 or 2 or Minimal to save the Zoom Ratio The previous Zoom Memory Box value will be cleared and replaced with your selection Keep Minimal minimal The Zoom Ratio for minimal reductions cannot be adjusted freely The ratio must remain within the x0 900 to x0 999 range ...

Страница 58: ...Zoom box The display will change Would you like to use the Zoom Ratio for minimal reductions Ü Touch the Minimal box 2 Touch the User Set box The display will change 3 Touch the Recall box 4 Touch the Zoom Memory Box with the desired Zoom Ratio The recalled value will be shown in the Zoom Ratio Display You can now use the recalled value for copying ...

Страница 59: ...3L B4L A4L A4C A5L 1 In the Basics Menu touch the Paper box The display will change 2 Touch the Auto Paper box The box will now be marked with a black background The Auto Paper Mode is now active Ü To disable Auto Paper Mode and use paper from the 1st Paper Drawer touch one of the Paper Drawer boxes such as Drawer 1 A4 Wrinkled and curled Wrinkled and curled originals are not always identified cor...

Страница 60: ...mat Do your Paper Drawers have special designations These trays contain special paper Ü See Setting Paper Drawers for Special Paper on page 6 14 Is the Manual box missing on your display The Manual Bypass Tray is not enabled Ü Open the Manual Bypass Tray and insert paper Up to 1000 copies without replenishing paper Fill two Drawers with the same paper size and orientation When the first Paper Draw...

Страница 61: ...e Manual Bypass Tray 3 Insert the copying paper into the Manual Bypass Tray as close as possible to the feeder 4 Ensure that the maximum paper filling height is not exceeded see marking on the Multi Bypass Tray Extender 5 In the Basics Menu touch the Paper box The display will change Which types of paper can be used Which functions are not available Individual sheets of smooth plain paper 60 to 90...

Страница 62: ...hes The display will change or Touch the Custom Size box to define a paper size The display will change m Touch the Cancel box to reset the values m Touch the X box and enter the new value on the 10 Key Pad m Touch the Y box and enter the new value on the 10 Key Pad m Touch the Enter box to confirm your input The display will change 8 Touch the Exit box to confirm your input ...

Страница 63: ...nals in the Document Feeder as shown or Place the originals on the Glass one at a time 2 Touch the Mixed Orig box The box will now be marked with a black background The Mixed Original Detection Mode is now enabled Ü To disable Mixed Original Detection Mode touch the Mixed Orig box a second time Do you need to process a variety of original sizes User s Choice allows you to default to Mixed Original...

Страница 64: ...e Original to Copy Modes Menu to l 1 1 Make full size copies l 2 in 1 Make 2 in 1 copies l 2 1 Make 1 sided copies of 2 sided originals l 1 2 Make 2 sided copies of 1 sided originals l Separation Separate 2 in 1 copies and books l 2 2 Make 2 sided copies of 2 sided originals ...

Страница 65: ...How Would You Like Your Copy 5 Rev 5 17 1 1 Mode full size copy Copy 1 sided originals to 1 sided copies 1 Insert the originals 2 In the Orig Copy Menu touch the 1 1 box 3 Start the copy process 1 1 Ö ...

Страница 66: ...and Duplex Unit only 1 Place the originals in the Document Feeder 2 In the Orig Copy Menu touch the 2 in 1 box The display will change 3 Touch the box shown in the illustration above right to make a 1 sided copy from two 1 sided originals or Touch the box shown in the illustration below right to make a 2 sided copy from four 1 sided originals 4 Touch the of Origs box The display will change 2 in 1...

Страница 67: ...ace the originals back in the Document Feeder and touch the of Origs box 6 Touch the Enter box to confirm your input or the Cancel box to cancel the process 7 Start the copy process And yet more settings The copier selects the appropriate Zoom Ratio in this mode You can select a different Zoom Ratio or paper size at any time however The default settings for the Zoom Ratio Copy Size Margin and Fram...

Страница 68: ...pies with Duplexing Document Feeder only 1 Place the originals across the Document Feeder as shown 2 In the Orig Copy Menu touch the 2 1 box The display will change 3 Touch the File Margin box if your originals have a file margin The display will change 1 2 Ö File Margin No File Margin ...

Страница 69: ...uld You Like Your Copy 5 Rev 5 21 4 Touch the 10 mm box if your original has a 10 mm file margin 5 Touch the Enter box to confirm or Cancel to clear your entry The display will change 6 Start the copy process ...

Страница 70: ...ouch the 1 2 box The display will change 3 Touch the of Origs box The display will change 4 Touch the Even or Odd box for an even or odd number of originals or Touch the Auto Count box followed by the START key The originals will be counted automatically The display will change Place the originals back in the Document Feeder and touch the of Origs box 2 1 Ö or ...

Страница 71: ...isplay will change 6 Touch the File Margin box if your originals have a file margin The display will change 7 Touch the 10 mm box if your original has a 10 mm file margin 8 Touch the Enter box to confirm or Cancel to clear your entry The display will change 9 Start the copy process File Margin No File Margin ...

Страница 72: ...ly l 2 book pages on two 1 sided copies l 2 book pages on one 2 sided copy Duplex Unit only 1 Place the originals lengthwise into the Document Feeder or Place a book with the pages to be copied face down on the Original Glass Center the book on the book mark on the Length Scale The copies will be made in the correct order 2 In the Orig Copy Menu touch the Separation box The display will change 2 1...

Страница 73: ...copies from a book bound on the left hand side m Make single sided copies from a book bound on the right hand side m Make 2 sided copies from a book bound on the left hand side m Make 2 sided copies from a book bound on the right hand side Start the copy process after making your selection And yet more settings The copier selects the appropriate Zoom Ratio for the separation of 2 in 1 originals Yo...

Страница 74: ...Copy 5 26 Rev 2 2 Mode Copy 2 sided originals onto 2 sided copies Duplex Document Feeder and Duplex Unit only 1 Place the originals in the Document Feeder 2 In the Orig Copy Menu touch the 2 2 box 3 Start the copy process 2 2 Ö ...

Страница 75: ...5 Rev 5 27 5 3 Finishing Use the Finishing Menu l To output copies without sorting grouping stapling or punching l To output sorted copies l To output grouped copies l To output sorted and stapled copies l To output punched copies ...

Страница 76: ... 1 Load your originals 2 In the Finishing Menu touch the NonSort box 3 Start the copy process NonSort Which paper types can be processed How many pages can be output per Sort Bin Plain paper Recycled paper 10 Bin Sorter up to 50 sheets 20 Bin Sorter up to 100 sheets Special paper thick paper transparencies translucent paper up to 10 sheets ...

Страница 77: ...staple your copies later insert your originals as shown at the right 2 In the Finishing Menu touch the Sort box Sorting Which paper types can be processed How many pages can be output per Sort Bin Plain paper Recycled paper 10 Bin Sorter up to 25 sheets 20 Bin Sorter up to 50 sheets A4 or smaller Stapling position Stapling position ...

Страница 78: ...ter Bins move up after the copy process is complete The Staple box appears on the Touch Display Didn t the Sorter Bins move up automatically Ü Press the RESET Key 4 Remove the copies from the Sorter Bins or Touch the Staple box on the Touch Display to staple your copies now ...

Страница 79: ... staple your copies later insert your originals as shown at the right 2 In the Finishing Menu touch the Group box Grouping Which paper types can be processed How many pages can be output per Sort Bin Plain paper Recycled paper 10 Bin Sorter up to 25 sheets 20 Bin Sorter up to 50 sheets A4 or smaller Stapling position Stapling position ...

Страница 80: ...ter Bins move up after the copy process is complete The Staple box appears on the Touch Display Didn t the Sorter Bins move up automatically Ü Press the RESET Key 4 Remove the copies from the Sorter Bins or Touch the Staple box on the Touch Display to staple your copies now ...

Страница 81: ...rter only 1 Insert the originals 2 In the Finishing Menu touch the SortStaple box SortStaple Which paper types can be processed How many pages can be output per Sort Bin Plain paper Recycled paper 10 Bin Sorter up to 25 sheets 20 Bin Sorter up to 50 sheets A4 or smaller Stapling position Stapling position ...

Страница 82: ...5 How Would You Like Your Copy 5 34 Rev 3 Start the copy process The Sorter Bins move up after the copy process is complete Didn t the Sorter Bins move up automatically Ü Press the RESET Key ...

Страница 83: ...y Only the A3 horizontal and A4 vertical paper sizes can be selected in this mode This mode can be combined with the following modes l Non Sort l Sort l Sort Staple l Grouping 1 Insert the originals 2 In the Finishing Menu touch the HolePunch box HolePunch Punched Hole Position Punched Hole Position ...

Страница 84: ...5 How Would You Like Your Copy 5 36 Rev 3 Start the copy process The Sorter Bins move up after the copy process is complete Didn t the Sorter Bins move up automatically Ü Press the RESET Key 3 2 1 1 1 1 ...

Страница 85: ...How Would You Like Your Copy 5 Rev 5 37 5 4 Auxiliary Modes Use the Finishing Menu to l Add Front and Back Covers l Insert interleaves l Set up a file margin l Erase margins l Make OHP interleaves ...

Страница 86: ...Front or Back box The display will change 3 Choose the desired Front Back Cover type and confirm your selection with Enter The display will change What will be copied onto the Front Cover when using the Front Image setting The first page of your original stack will be copied onto the Front Cover Ü Place the original to be copied onto the Front Cover onto your original stack as its first page Cover...

Страница 87: ... and confirm your selection with Enter 6 Touch the of Origs 7 Touch the Input box and enter the exact number of originals on the 10 Key Pad or Touch the Auto Count box followed by START The originals will be counted automatically The display will change Place the originals back in the Document Feeder and touch the of Origs box 8 Touch the Enter box to confirm or the Cancel box to cancel the proces...

Страница 88: ...nder Copy onto Inserts touch the Yes box to copy onto the insert or Touch the No box to add a blank insert 3 Under Insert Paper select the box for the paper size A4 as shown in the illustration on the right The display will change 4 Select the Paper Drawer containing the paper for the inserts Confirm the selection with Enter The display will change Page Insertion ...

Страница 89: ...to the original stack in those positions in which an insert is to be added see ill to the right This paper must be aligned differently or must be of a different size than the original stack Press the Start Key The originals will be counted automatically 8 Remove the inserts fromthe original stack and place the originals back in the Document Feeder 9 Start the copy process 1149O050AA 1149O051AA Bla...

Страница 90: ...sert the originals 2 In the Auxiliary Menu touch the File Margin box The display will change 3 Under File Margin touch the top box to place the File Margin on the left hand side or Touch the bottom box to place the File Margin on the right hand side File Margin Margin on Left Edge Margin on Left Edge ...

Страница 91: ... button to make the File Margin with Shift for Margin or touch the bottom button to make the File Margin by reducing the original 5 Under Mode select the desired Margin Width 6 Touch the Enter box to confirm or the Cancel box to cancel the process 7 Start the copy process ...

Страница 92: ...ations for example 1 Insert the originals 2 In the Auxiliary Menu touch the File Margin box The display will change 3 Select the desired Edge Frame Erase position Under Position select the top left box to activate the Edge Frame Erase on the left hand side Edge Frame Erase Left Edge Frame Erase Left Edge Frame Erase ...

Страница 93: ...refer to The original or the copy The Edge Frame Erase width refers to that of the copy Ü Please note that the Edge Frame will become narrower or wider when making Reductions or Enlargements Adjust the Edge Frame Erase width accordingly 5 Touch the Enter box to confirm or the Cancel box to cancel the process 6 Start the copy process ...

Страница 94: ...mode can only be selected if one of the Paper Drawers contains the sizes A4 or B5 2 sided copying is not possible 1 Place the OHP Films on the Manual Bypass Tray max 20 sheets 2 In the Auxiliary Menu touch the OHP Interleaving box The display will change 3 Under Copy onto Inserts touch the Yes box to copy onto the insert or Touch the No box to add a blank insert OHP interleaving ...

Страница 95: ...Paper Drawer containing the paper for the inserts and Multiple Copies Confirm the selection with Enter The display will change 6 Under Multi Copy enter the desired number of copy sets using the 10 Key Pad 7 Touch the Enter box to confirm or the Cancel box to cancel the process 8 Start the copy process 2 1 2 2 1 1 2 1 2 1 1149O065AA Copy to Insert Yes Multiple Copies 2 Example ...

Страница 96: ...5 How Would You Like Your Copy 5 48 Rev ...

Страница 97: ...de box on the Control Panel The display will change 3 Touch the Job Memory Input box The display will change 4 Touch the Store box followed by a Program Memory Key from 1 to 10 to store your settings at the selected program location or Touch the Account Job box to display supplementary program locations for your access number 5 Touch the Check box followed by the box for the program location at wh...

Страница 98: ...s Is one of the settings incorrect Ü Press the appropriate key to go straight to the area in which you can correct your setting Are your settings correct Ü Touch the Exit box The display will change 7 Touch the Exit box to confirm your program location inputs ...

Страница 99: ...gram locations for your access number The display will change 3 Check your function settings Is one of the settings incorrect Ü Press the appropriate key to go straight to the area in which you can correct your setting Are your settings correct Ü Touch the Exit box The display will change 4 Touch the Exit box to confirm your program location selection Why enter the Number of Originals The Number o...

Страница 100: ...e Job Memory Input box The display will change 3 Touch the Delete box followed by a Program Memory Box from 1 to 10 to store your settings at the selected program location or Touch the Account Job box to display supplementary program locations for your access number 4 Touch the Exit box to confirm your program location inputs occupied program location free program location ...

Страница 101: ...s made since the installation of the copier l Size Counter Shows the number of copies made on the copy paper of a preset size The size will be set by your Technical Representative l 2 Sided Total Counter Shows the total number of 2 sided copies made since the installation of the copier l 2 Sided Size Counter Shows the total number of copies made on the copy paper of a preset size The size correspo...

Страница 102: ... Replenisher box While this mode is active m Do not turn the copier off m Do not open the Front Door of the copier The mode deactivates automatically 6 6 Activating the Drum Dehumidifier Periods of high humidity or sudden rapid changes in humidity can cause condensation to form on the surface of the PC Drum This results in unsharp copies with missing text In such a case manually activate the Drum ...

Страница 103: ... disable the Mixed Original Detection Mode in the initial mode The default setting is Off Changing the Display Language Select the language to be displayed on the Touch Panel Ü Touch the box with the desired language The default setting is English Setting the Paper Priority Specify the Paper Drawer to be selected automatically in Auto Size and Manual Modes Ü Touch the box with the desired Paper Dr...

Страница 104: ...er Auto Detect touch the Lighter Normal or Darker boxes The default setting is Normal Ü Under Manual touch the Lighter Normal or Darker boxes The default setting is Normal Setting the Exposure Manually Set the fine adjustment for the Manual Exposure Mode Ü Touch the Mode 1 box if you wish to maintain a broad grayscale in your copies or Touch the Mode 2 box if you wish to maintain a balanced graysc...

Страница 105: ...ing is 1 Minute Setting the Energy Saver Mode Set the amount of time that should elapse after the last copy process or user input on the copier before the copier automatically returns to Energy Saver Mode If the copier is only in intermittent use use the Energy Saver Mode during the copier s idle time This lowers the copier s energy consumption and only requires a 30 second warm up phase Ü Touch t...

Страница 106: ...ss Counter Reset Specify whether the copier should automatically return to its Default Settings when the counter is read Ü Touch the On box to reset the copier to its Default Settings when the counter is read The default setting is Off ...

Страница 107: ...uch the On box to automatically activate Sort Mode The default setting is On Toggling the Confirmation Beep Specify whether a Confirmation Beep should sound whenever the Touch Panel is used Ü Touch the On box to activate the Confirmation Beep The default setting is On Setting the Original Thickness Specify whether the Document Feeder should also process extremely thin original documents Ü Touch th...

Страница 108: ...if either an undersize original or no original at all is on the Original Glass Ü Touch the On box if the copy process should be started or Touch the Off box if the copy process should not be started A warning message will displayed requesting the user to set the paper size manually The default setting is Off ...

Страница 109: ...tivated Ü Touch the Paper box to select a specific Paper Drawer The default setting is AUTO Paper Ü Touch the Zoom box to select a Zoom Ratio preset Zoom ratios only The default setting is x0 707 Selecting the 2 in 1 Separation Settings Specify the paper size and Zoom Ration to be preselected automatically when 2 in 1 Separation Mode is activated Ü Touch the Paper box to select a specific Paper Dr...

Страница 110: ...cycled paper This Paper Drawer is not used in Auto Paper Mode To use this Paper Drawer select it manually Insert This Paper Drawer is not used in Auto Paper Mode or when the paper source is changed automatically Use this Paper Drawer for paper types which are not used frequently such as colored paper for inserts The copy paper for inserts is taken from the Paper Drawer with this designation when t...

Страница 111: ...efault setting is 1 2 Setting the Auto Shut Off Mode Set the amount of time that should elapse after the last copy process before the copier automatically switches off Ü Touch the Cancel box and enter a value in minutes from 1 to 120 using the 10 Key Pad The default setting is 60 Minutes The Auto Shut Off Mode may also be disabled See Administrator Mode on page 6 16 Original on Original Glass Spec...

Страница 112: ... Number when selecting the Administrator Modes The following settings can be made l Toggling the Copy Track See Toggling Copy Track Data on page 6 17 l Copy Track Information See Setting Up Access Numbers on page 6 19 l Max Copy Sets Limits the number of copies within an individual copy process l Disable Auto Shut Off Toggles the Auto Shut Off function ...

Страница 113: ... Mode any number from 1 to 999 such as your job number can be used to access the copier The copies made are registered under the number that you entered 1 Touch the User Mode box on the Control Panel The display will change 2 Touch the User s Choice box on the Touch Panel The display will change 3 Touch the Tab 6 6 The display will change 4 Touch the Administrator Mode box The display for the inpu...

Страница 114: ... Accounts box to define 1000 accounts as a pure copy recording system without personal access numbers or copy limits or Touch the Off box to disable Copy Track Mode The display will change 8 Touch the Yes box to delete the current copy tracking data only appears when switching from 100 to 1000 Accounts or vice versa The display will change 9 Touch the Exit box to confirm your inputs in the Adminis...

Страница 115: ... the User Mode box on the Control Panel The display will change 2 Touch the User s Choice box on the Touch Panel The display will change 3 Touch the Tab 6 6 The display will change 4 Touch the Administrator Mode box The display for the input of the access number appears 5 Enter your 4 digit Administrator Number on the 10 Key Pad ...

Страница 116: ... use the 10 Key Pad to enter a copy limit for that account or Touch a box under No and use the 10 Key Pad to enter a personal access number for that account or Touch the Next box to display the next Copy Track Data set Confirm the selection with Enter The display will change 9 Touch the Exit box to confirm your inputs in the Administrator Area ...

Страница 117: ...box on the Control Panel The display will change 2 Touch the User s Choice box on the Touch Panel The display will change 3 Touch the Tab 6 6 The display will change 4 Touch the Administrator Mode box The display for the input of the access number appears 5 Enter your 4 digit Administrator Number on the 10 Key Pad ...

Страница 118: ...t Reset box and confirm the selection with Enter to reset all accounts The display will change 8 The Meter Counts will be displayed m Total Shows the total number of copies recorded m Size Shows the number of copies made of a specific size 9 Touch the Exit box to confirm your inputs in the Administrator Area ...

Страница 119: ...x on the Control Panel The display will change 2 Touch the User s Choice box on the Touch Panel The display will change 3 Touch the Tab 6 6 The display will change 4 Touch the Administrator Mode box The display for the input of the access number appears 5 Enter your 4 digit Administrator Number on the 10 Key Pad ...

Страница 120: ...irm the selection with Enter to reset all accounts or Touch the box for an account grouping The display will change Under Total select a box containing a value and touch the C key to reset it to 0 Confirm the selection with Enter 8 Touch the Exit box to confirm your inputs in the Administrator Area ...

Страница 121: ...er Bottle see page 4 17 The paper is damp Replace the paper The Image is too dark The exposure level for the Auto Exposure mode is set on a dark value Change the exposure level in under User s Choice see page 6 8 Manually set the exposure to a lighter level see page 5 3 The exposure level has been manually set too dark Manually set the exposure to a lighter level see page 5 3 The entire surface of...

Страница 122: ... to a lighter level see page 5 3 The Edge of the Copy is dirty The Original Cover or Document Transport Belt is dirty Clean the Original Cover or Document Transport Belt see page 8 1 Original is not placed in the correct position Place the original on the Original Glass correctly see page 4 3 The paper size is larger than the original Select the same copy paper size as the original The Zoom Ratio ...

Страница 123: ...ing toner are on the inside of the front cover The Toner is used up Replace the Toner Bottle Please replenish toner soon The Toner will run out soon Replace the Toner Bottle The Staple Cartridge is empty Please replace The staples have run out Replace the Staple Cartridge A paper misfeed has been detected Please remove the misfed paper at A paper misfeed has occurred Clear the paper misfeed see pa...

Страница 124: ...ontal or vertical Change the orientation of the original Auto Sizing is not possible Select another zoom method or paper size The calculated Zoom Ratio is outside the available range x0 5 to x2 0 Disable Auto Size Mode or select a different copy paper size Please load Cover paper into the source indicated below The current Paper Drawer is empty Load cover sheets into the appropriate Drawer The sel...

Страница 125: ...mbined Select Auto Paper or Size Frame Erase Mode is only available in Auto Paper and Auto Size Modes Select Auto Paper or Auto Size Mode The only matching paper size is in the Special Tray If OK press START The selected Paper Drawer was defined for special paper under User s Choice If you do not want to use the special paper load the desired copying paper using the Manual Bypass Your account has ...

Страница 126: ...Power Switch Pressing the Start Key does not start a copy cycle The copier was just turned ON Wait about 60 seconds The copier is warming up The copier has developed a malfunction Please read the message on the Display Panel Control Panel Keys do not respond The copier is in the interrupt mode The Interrupt key is lit up Press the Interrupt Key to cancel the interrupt mode The copier is not activa...

Страница 127: ...ll appear when you select a mode affected by the malfunction Following mode cannot be used Please call your Technical Rep Your Technical Representative will ask you for the malfunction code on the display Call up the malfunction code 1 Touch the tool symbol The display will change 2 Inform your Technical Representative of the code being shown on the Touch Panel Example Code C0920 3 Touch the Exit ...

Страница 128: ...t may reach temperatures of up to 120 C Ü To tilt the Heating Unit touch the lever with the yellow marking only 1 Open the Front Door Turn the Lock Release Lever counterclockwiseand tilt thetop half of the copier upwards until the Stopper M2 locks 2 Tilt the Fusing Unit M1 away and pull the sheet of paper out in the direction of the arrow ...

Страница 129: ...Troubleshooting 7 Rev 7 9 3 Pull out the sheet of paper from the Transport Section 4 Release the Stopper M2 Lower the top half of the copier and close the Front Door ...

Страница 130: ...ckwiseand tilt thetop half of the copier upwards until the Stopper M2 locks 2 Open the Right Door and pull out the sheet of paper from the Transport Section Close the Right Door 3 Release the Stopper M2 Lower the top half of the copier and close the Front Door 4 Remove the current Paper Drawer and take out the paper ...

Страница 131: ...Troubleshooting 7 Rev 7 11 5 Fan the paper stack reload it and slide the Paper Drawer into the copier ...

Страница 132: ...emove the original stack from the Document Feed Tray 2 Open the Document Feed Unit Door F1 and pull out the original 3 Pull out the original from the Document Exit Unit 4 Lift the Document Feeder and remove the original 5 Close the Document Feed Unit Door F1 ...

Страница 133: ...7 13 6 Remove the original from the Original Glass and close the Automatic Document Feeder 7 Place the number of originals indicated on the Display at the back of the original stack and reload it onto the Document Feed Tray ...

Страница 134: ...l stack from the Document Feed Tray 2 Open the Document Feed Unit Door F1 and pull out the original 3 Press the Release Key and open the Document Turnover Exit Unit Door F2 Gently pull the original out of the Document Exit Tray 4 Close the Document Turnover Exit Unit Door F2 ...

Страница 135: ...original from the Turnover Unit 6 Close the Document Feed Unit Door F1 7 Remove the original from the Original Glass and close the Document Feeder 8 Place the number of originals indicated on the Display at the back of the original stack and reload it onto the Document Feed Tray ...

Страница 136: ...n the Front Door Turn the Lock Release Lever counterclockwiseand tilt thetop half of the copier upwards until the Stopper M2 locks 3 Pull out the sheet of paper from the Transport Section 4 Releasethe Stopper M2 and lower the top half of the copier To reset the paper misfeed indication close the Front Door ...

Страница 137: ... tilt the top half of the copier upwards until the Stopper M2 locks 2 Open the upper and lower left doors and pull out the sheet of paper Close the doors 3 Open the Lower Right Door and pull out the sheet of paper Close the door 4 Release the Stopper M2 Lower the top half of the copier and close the Front Door ...

Страница 138: ... out the Duplex Unit and open the Misfeed Removal Guide D Remove the paper from the Duplex Unit 6 Close Misfeed Removal Guide Plate D and slide the Duplex Unit back into the copier 7 Close the Front Door to reset the Misfeed Indicator ...

Страница 139: ...rter Staple Sorter 1 Press the Lock Release Lever on the Sorter and pull the Sorter off the copier 2 Pull out the copy from the Transport Section 3 Slide the Sorter back to the copier 4 Close the Front Door to reset the Misfeed Indicator ...

Страница 140: ...Lever on the Sorter and pull the Sorter off the copier 2 Open Misfeed Clearing Guide S and on the ST 210 only turn the green wheel clockwise 3 Remove the paper and close Misfeed Clearing Guide Slide the Sorter back to the copier 4 Close the Front Door to reset the Misfeed Indicator ...

Страница 141: ... Right Door pull out the sheet of paper and close the door 2 Press the Paper Descent Key and pull the Paper Drawer out 3 Fan the paper thoroughly and reload it Push the Paper Drawer back again and press the Paper Descent Key 4 Close the Front Door to reset the Misfeed Indicator ...

Страница 142: ...s 1 Open the Lower Right Door pull out the sheet of paper and close the door 2 Remove the current Paper Drawer and take out the paper 3 Fan the paper stack reload it and slide the Paper Drawer into the copier 4 Close the Front Door to reset the Misfeed Indicator ...

Страница 143: ... been set manually Mode Not or partly compatible with Auto Paper Mode Manual Paper Drawer Selection Auto Size Mode Book 1 sided Book 2 sided OHP interleave Manual Bypass Tray X X X X G Manual Paper Drawer Selection Auto Paper Mode OHP interleave Reduction copying for File Margin Manual Bypass Tray X C B X Auto Size Mode Auto Paper Mode Standard stored Zoom Ratios Separation Book 1 sided Book 2 sid...

Страница 144: ...one another x 1 2 OHP interleave Interrupt Mode Manual Bypass Tray A A G 2 1 Interrupt Mode X 2 2 OHP interleave Interrupt Mode Manual Bypass Tray A A G 2 in 1 Cover Insert OHP interleave Interrupt Mode Manual Bypass Tray A A A X G Separation 2 in 1 1 sided 2 sided OHP interleave OHP interleave Interrupt Mode Manual Bypass Tray A A A G Book Separation Auto Paper Mode Auto Size Mode Mixed Original ...

Страница 145: ...manually H Combination possible with restrictions may result in bad copies Mode Not or partly compatible with NonSort Sorting Grouping SortStaple Manual Staple OHP Interleaving single copy OHP Interleaving multiple copies X X X D F X Sorting NonSort Grouping SortStaple Interrupt Mode Manual Bypass Tray X X X X G Grouping NonSort Sorting SortStaple OHP interleave Interrupt Mode Manual Bypass Tray X...

Страница 146: ...d Original Selection OHP interleave Interrupt Mode Manual Bypass Tray A A A A A A Insert 2 in 1 Book Separation Mixed Original Selection OHP interleave Interrupt Mode Manual Bypass Tray Job Recall Key A A A A A A X OHP Interleaving Single Copy Multi Copy Auto Paper Mode Manual Paper Drawer Selection 1 2 2 in 1 2 2 Separation Grouping Punching Cover Sheet Page Insertion Interrupt Mode Manual Bypass...

Страница 147: ...Inside of Front Door CAUTION Improper cleaning can damage the copier Ü Wipe the surface of the Control Panel clean with a soft dry cloth Cleaning the Document Transport Belt 1 Wipe the surface of the Document Transport Belt clean with a soft cloth dampened with mild home detergent 2 Pull the Document Transport Belt carefully to the left to clean the covered areas of the Belt Repeat this process un...

Страница 148: ...te cleaning process two or three times to ensure that the Corona Wires are thoroughly clean 1 Carefully pull the upper Corona Unit Cleaner out as far as it will go 2 Push the Corona Unit Cleaner back fully 3 Repeat Steps 1 and 2 with the lower Corona Unit Cleaner ...

Страница 149: ...0mmL 220mm x 280mmL 297mm x 430mmL 210mm x 330mmL 2nd Paper Drawer A3L B4L A4L A4C B5L B5C A5L LetterL LetterC 11 x14 L 11 x17 L Multi Bypass Tray Width 100 mm to 297 mm Length 140 mm to 432 mm Paper Feeding System 1st Paper Drawer 500 sheets 2nd Paper Drawer 500 sheets Manual Bypass Tray 50 sheets 80 g m 20 sheets recycled special paper Warm up Time 60sec or less 30sec or less in Energy Saver Mod...

Страница 150: ...ions Non Sort Mode Sort Mode Group Mode Paper Types Non Sort Plain paper recycled paper Special paper thick paper transparencies translucent paper Sorting Grouping Plain paper recycled paper Paper Size A5L to A3L Capacity of Bins Non Sort Plain paper recycled paper 1st bin 50 sheets 2nd to 10th bin 25 sheets bin Special paper 1st bin only 10 sheets Sort Mode Group Mode Plain paper recycled paper 1...

Страница 151: ... paper recycled paper Non Sort 100 sheets 1st to 20th bin 50 sheets bin Total A4 or smaller 80 g m2 1 100 sheets larger than A4 80 g m2 600 sheets Special paper transparencies 10 sheets max A4 thick paper transparencies 10 sheets Sort Mode Group Mode Plain paper recycled paper 1st to 20th bin 50 sheets bin Total A4 or smaller 80 g m2 1 000 sheets larger than A4 80 g m2 600 sheets Power Requirement...

Страница 152: ...ize Non Sort Mode Sort Mode Group Mode A5L to A3L Sort Staple Mode B5L to A3L Capacity of Bins Non Sort Plain paper recycled paper 1st bin 50 sheets 2nd to 10th bin 25 sheets bin Special paper 1st bin only 10 sheets bin Sort Group Sort Staple Plain paper recycled paper 1st to 10th bin 25 sheets bin Power Requirements DC 24V supplied from copier Power Consumption 72W or less Dimensions Width 400 mm...

Страница 153: ...Non Sort Plain paper recycled paper Non Sort 100 sheets 1st to 20th bin 50 sheets bin Total A4 or smaller 80 g m2 1 100 sheets larger than A4 80 g m2 600 sheets Special paper transparencies 10 sheets max A4 thick paper transparencies 10 sheets Sort Group Sort Staple plain paper recycled paper 1st to 20th bin 50 sheets bin Total A4 or smaller 80 g m2 1 000 sheets larger than A4 80 g m2 600 sheets P...

Страница 154: ...riginals 2 in 1 50 g m2 to 110 g m2 Mixed Original Detection Mode 60 g m2 to 90 g m2 Single Feed Tray 35 g m2 to 157 g m2 Lightweight originals 40 g m2 to 110 g m2 Original Sizes 1 sided originals A3L B4L A4L A4C A5L 210 mm x 330 mm 2 in 1 A4C Capacity of Document Feeder A4 or smaller 50 sheets 80 g m2 A3 B4 30 sheets 80 g m2 Copy Productivity 100 Power Requirements DC 24V supplied from copier Pow...

Страница 155: ...5 g m2 to 200 g m2 Lightweight originals 40 g m2 to 110 g m2 Original Sizes 1 sided 2 sided originals A3L B4L A4L A4C A5L 210 mm x 330 mm 2 in 1 A4C Capacity of Document Feeder A4 or smaller 50 sheets 80 g m A3 B4 30 sheets 80 g m Copy Productivity 100 Power Requirements DC 24V supplied from copier Power Consumption 48W or less Dimensions Width 610 mm Depth 505 mm Height 125 mm Weight 13 0 kg Spec...

Страница 156: ...pier Dimensions Width 610 mm Depth 595 mm Height 472 mm Weight 35 2 kg Specifications Paper Types Plain paper recycled paper 60 g m to 90 g m Paper Size 3rd Paper Drawer A4C Capacity Automatic feeding from Drawer Total Drawer Capacity 2 500 sheets 80 g m Power Consumption DC 24V supplied from copier Dimensions Width 610 mm Depth 595 mm Height 472 mm Weight 36 5 kg Specifications Paper Types Plain ...

Страница 157: ...splay 7 segments 16 digits Copy Track Data Display Max number of copies 9 999 999 By size 9 999 999 By key 999 999 By job mode 999 999 By key job mode 99 999 Number of job modes Up to 16 types Power Requirements DC 24V supplied from copier Power Consumption 5W or less Dimensions Width 180 mm Depth 64 mm Height 111 mm Weight approx 550 g Misc Provision for an external printer optional accessory wit...

Страница 158: ... Size Inch Size mm Ledger 11 x 17 279 x 432 mm 11 x 14 11 x 14 279 x 356 mm Computer 10 1 8 x 14 257 x 356 mm 10 x 14 10 x 14 254 x 356 mm 9 1 4 x 14 9 1 4 x 14 236 x 356 mm Legal 8 1 2 x 14 216 x 356 mm Foolscap Government Legal 8 1 2 x 13 246 x 330 mm Foolscap 8 x 13 203 x 330 mm Foolscap 8 2 3 x 13 220 x 330 mm Foolscap Folio 8 1 4 x 13 210 x 330 mm 8 1 4 x 11 3 4 8 1 4 x 11 3 4 210 x 301 mm Le...

Страница 159: ...7 B4 x 0 866 B5 x 0 707 B5 x 0 610 B6 x 0 500 A4 A5 x 0 707 A3 x 1 145 A6 x 0 500 B5 A5 x 0 816 B5 x 0 866 A6 x 0 577 B6 x 1 224 B6 x 0 707 A3 x 1 414 A3 x 1 640 B4 x 1 224 A4 x 1 154 A5 A6 x 0 707 B4 x 1 414 B6 x 0 866 B6 A6 x 0 816 A4 x 1 414 A4 x 1 640 A3 x 2 000 A5 x 1 154 B4 x 1 733 B4 x 2 000 B5 x 1 224 B5 x 1 414 A6 A4 x 2 000 A5 x 1 414 B5 x 1 733 B6 x 1 224 ...

Страница 160: ...4 Letter x 0 647 11 x 17 x 1 076 Invoice x 0 500 Letter Invoice x 0 647 11 x 15 11 x 14 x 0 933 11 x 17 x 1 294 Legal x 0 772 11 x 14 x 1 272 Foolscap x 0 722 Invoice 11 x 17 x 2 000 Letter x 0 733 11 x 14 x 1 647 Invoice x 0 500 Legal x 1 545 11 x 14 Legal x 0 772 Foolscap x 1 529 Foolscap x 0 772 Letter x 1 294 Letter x 0 772 Invoice x 0 500 Legal Legal x 0 928 Foolscap x 0 785 Letter x 0 607 In...

Страница 161: ...gy equipment including electronic components EMC EN 55 022 Class B 1994 A1 A2 Limits and method for measurement of radio disturbance characteristics of information technology equipment ITE EN 50 082 1 1992 Electromagnetic compatibility EMC Part 1 Residential commercial and light industry IEC 801 2 1991 Electrostatic discharge requirement IEC 801 3 1984 and IEC 801 3 1992 draft Radiated electromagn...

Страница 162: ...le Margin 5 42 Adding a Margin 5 42 Adding inserts 5 40 Administrator Mode Toggling Copy Track 6 16 Administrator Modes Copy Track Information 6 16 Disable Auto Shut Off 6 16 Max Copy Sets 6 16 Auxiliary Modes 5 37 B Basics 5 1 Book Separation 5 24 C Care of the Unit 8 1 Changing Default Settings 6 7 6 8 6 9 6 11 6 13 6 15 Changing the Staple Cartridge 10 Bin Sorter 4 17 20 Bin Sorter 4 19 Changin...

Страница 163: ...l Keys 3 14 Copier malfunctions 7 6 Copies darkening 5 3 grouped output 5 31 lightening 5 3 Output sorted and stapled 5 33 punched output 5 35 sorted output 5 29 Unsorted output 5 28 Copy job program storing 6 1 Copy job programs deleting 6 4 recalling 6 3 Copy process interrupting 4 9 stopping 4 9 Copying photographs 5 4 Cover 5 38 D Dehumidifier 6 6 Deleting a stored copy job program 6 4 Deletin...

Страница 164: ...ions 7 23 Finishing 7 25 Original to Copy Modes 7 24 Intended use 3 16 L Limiting Copy Sets 6 16 Loading originals books 4 4 in the Automatic Document Feeder 4 5 in the Duplexing Document Feeder 4 5 on the Original Glass 4 3 on the Single Feed Tray 4 6 paper originals 4 3 transparent originals 4 3 loading originals bound originals 4 4 M Making 1 sided copies 5 17 Making 1 to 1 copies 5 17 Making 1...

Страница 165: ...d Original Detection setting priority 6 7 Mixed Original Detection Mode disabling 5 15 enabling 5 15 Mode selection sequence 4 1 N Non Sort 5 28 O Operating conditions 3 11 Optional Accessories Automatic Duplexing Document Feeder 3 5 Data Controller 3 8 Duplex Unit 3 6 Paper Feed Cabinet 3 7 optional accessories 10 Bin Sorter Staple Sorter 3 3 20 Bin Sorter Staple Sorter 3 4 Original on Original G...

Страница 166: ...ing a Paper Drawer manually 5 12 Separating 2 in 1 copies 5 24 Separating 2 sided originals 5 20 Separation 5 24 Setting Paper Drawers for Special Paper 6 14 Setting the Access Counter Reset 6 10 Setting the Auto Panel Reset of the copier 6 9 Setting the Auto Shut Off Mode 6 15 Setting the Copy Priority 6 7 Setting the Display Language 6 7 Setting the Drum Dehumidifier 6 9 Setting the Energy Saver...

Страница 167: ... Document Feeder 3 5 Auxiliary Modes 5 37 Basics 5 1 Data Controller 3 8 Duplex Unit 3 6 EP3010 Copier 3 1 Finishing 5 27 Original to Copy Modes 5 16 Paper Feed Cabinet 3 7 T Toggling Auto Exposure 5 2 Toggling Auto Paper Mode 5 11 Toggling Auto Size Mode 5 5 Toggling Copy Track 6 16 Toggling Copy Track Data 6 17 Toggling the Key Confirmation Beep 6 11 Toner Replenisher 6 6 Tool symbol appears 7 7...

Страница 168: ...8 Appendix 8 22 Rev V vertical format 2 5 Viewing Meter Counts 6 21 Voltage tolerances 3 12 Z Zoom ratio keys standard 5 6 Zoom Ratio Tables 8 13 Zooming 5 7 ...

Отзывы: