background image

3

Making Copies

3-36

CF9001

3

Touch [STAPLE]

The sheets of paper are stapled.

Useful Tip
This feature is efficient to staple originals after making copies.

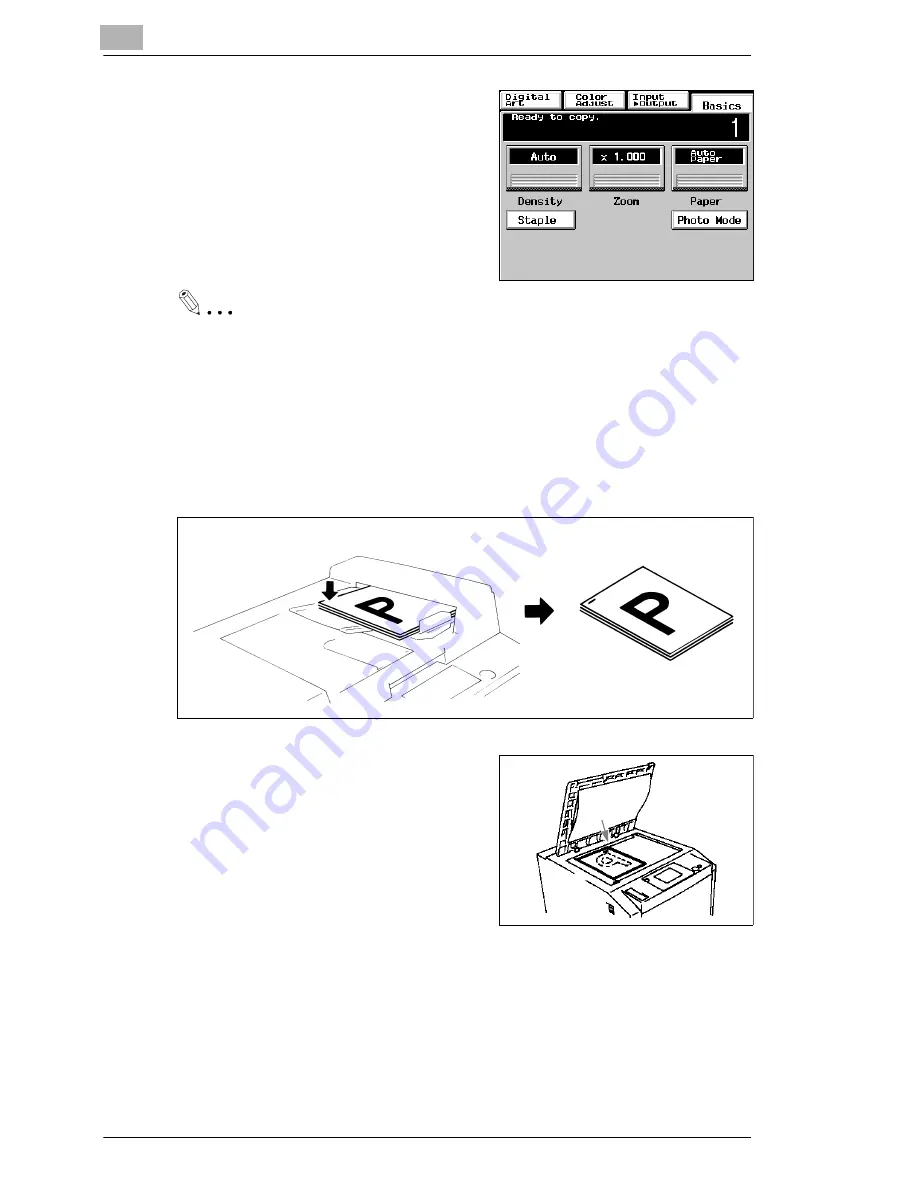
Original Direction for Stapling

If the originals are loaded in the duplexing document feeder as shown, the
stapling corner is at the rear left side as indicated by the arrow.

If the originals are placed on the original
glass as shown, the stapling corner is at
the rear right corner as indicated by the
arrow.

Originals Loaded crosswise

Copy

Stapling Position

Stap

ling

Corn

er

Содержание CF 9001

Страница 1: ...CF 9001 User Manual ...

Страница 2: ......

Страница 3: ... 10 Ozone Release X 12 1 Safety Notes 1 1 Important Safety Information 1 1 1 2 Installing the Copier 1 5 Installation Site 1 5 Power Source 1 5 Space Requirements 1 6 1 3 Precautions for Use 1 7 Operating Environment 1 7 Using the Copier Properly 1 7 Moving the Copier 1 9 Care of Copier Supplies 1 9 Storage of Copies 1 10 Legal Restrictions on Copying 1 11 2 Getting to Know Your Copier 2 1 System ...

Страница 4: ...ctions 2 13 Panel Resetting 2 13 Auto Panel Reset Function 2 13 Energy Saver Mode 2 13 Auto Copy Start Function 2 14 Interrupt Mode 2 14 Access Number 2 15 Entering the Access Number 2 15 Using the Copier as a Printer 2 16 Transfer Drum Cleaning Function 2 16 3 Making Copies 3 1 Basic Copying Overview 3 1 Selecting the Color mode 3 2 Selecting the basic functions 3 2 Selecting the Input Output 3 2...

Страница 5: ...Image 3 19 Using Zoom Up Down Keys 3 20 Using the 10 Key Pad 3 20 Calling up a Ratio from Memory 3 21 Storing a Ratio in Memory 3 22 Image Density 3 23 Adjusting the background level 3 24 Auto Exposure 3 24 Manual Exposure 3 24 Adjusting the Image Density 3 24 Manual Exposure 3 24 3 4 Input Output Mode 3 25 Original Copy Types 3 25 Selecting Input Output Mode 3 28 Input the number of originals 3 2...

Страница 6: ...e 3 42 Making Copies from a Photo 3 42 Photo Sizing Mode Scale to Page 3 42 Photo Sizing Mode Manual Zoom Input 3 44 Setting Mirror Image in Photo Mode 3 46 Storing the Photo Size in Memory 3 47 4 Professional Way to Make Color Copies 4 1 Using the Applied Input Output Functions 4 1 Frame Erase 4 2 Frame Erase Setting Procedur 4 2 File Margin 4 4 Functions 4 4 File Margin Setting Procedure 4 5 OHP...

Страница 7: ... 35 Mirror Image Setting Procedure 4 35 Postcard 4 37 Postcard Setting Procedure 4 37 5 Setting the Utility Mode 5 1 Default Settings 5 1 Default Settings Changing Procedure 5 1 5 2 Meter Count 5 2 Calling up Meter Count 5 2 Glossary of Touch Panel Terms 5 3 Printing the Meter Count Data 5 3 5 3 Copy Track Functions 5 4 Setting the Copy Track Functions 5 4 Changing the Account Number 5 6 Programmi...

Страница 8: ...6 1 When the Message Load paper in the XXXX Tray Appears 6 1 Paper Loading Procedures 6 2 Upper and Lower Trays 6 2 Middle Tray 6 2 Changing the Paper Size for the Middle Tray Universal Tray 6 3 When loading the Inch size paper 6 3 Large Capacity Cassette 6 4 6 2 When the Message Please add Toner Appears 6 5 Replenishing Toner 6 5 6 3 When the Message The Staple Cartridge is empty Appears 6 8 Repl...

Страница 9: ... CF9001 8 1 Duplexing Document Feeder AFR 12 8 3 Large Capacity Cassette C101 8 3 10 Bin Sorter S 105 8 4 10 Bin Staple Sorter ST 103 8 5 Duplex Unit AD 7 8 6 8 2 Care of the Copier 8 7 Cleaning 8 7 Housing Cover 8 7 Control Panel 8 7 Document Transport Belt 8 8 Original Glass 8 8 Front Door 8 8 8 3 Function Combination Matrix 8 9 Precautions for Setting the Color Adjust Function 8 9 Function Comb...

Страница 10: ...TOC 8 CF9001 ...

Страница 11: ...d this manual carefully until you familiarize yourself thoroughly with its operation and features After you have read through the manual keep it for ready reference Please use this manual as a quick and handy reference tool for immediately clarifying any questions which may arise These documents may not be reproduced transmitted transcribed stored in an archive system or translated without the exp...

Страница 12: ...nary measure required to avoid the danger WARNING This is a warning The warning points out a hazardous situation for persons and or products Not observing the warning can lead to personal injury and or serious damage to the unit è The arrow marks the precautionary measure required to avoid the danger CAUTION This is a caution The caution points out a potential and dangerous situation Not observing...

Страница 13: ...This page explains about these terms and symbols Feeding Direction copy paper path In this copier system copy paper is taken up from the left hand side of the copier and fed through the copier toward the right hand side out face down onto the exit tray In the figure below the direction in which the copy paper is fed as indicated by the arrow is called the feeding direction ...

Страница 14: ...A width and side B length A Width B Length Terms and Symbols Used Lengthwise When the original or copy has a length longer than its width we call it length wise and use symbol L or Crosswise When the original or copy has a length shorter than its width we call it cross wise and use symbol C or ...

Страница 15: ... methods of measurement EN61000 4 2 1995 Electromagnetic compatibility EMC Part 4 Testing and measurement techniques Section 2 Electrostatic discharge immunity test EN61000 4 3 1996 Electromagnetic compatibility EMC Part 4 Testing and measurement techniques Section 3 Radiated radio frequency electromagnetic field immunity test EN61000 4 4 1995 Electromagnetic compatibility EMC Part 4 Testing and m...

Страница 16: ...ty EMC Part 3 Limits Section 2 Limits for harmonics current emissions equipment input 16A per phase EN61000 3 3 1995 Electromagnetic compatibility EMC Part 3 Limits Section 3 Limitation of voltage fluctuations and flicker in low voltage supply systems for equipment with current 16A NOTES 1 EMC performance This product was designed for operation in a typical office environment 2 First year of label...

Страница 17: ...his machine is certified as a Class 1 laser product This means the machine does not produce hazardous laser radiation Internal Laser Radiation Maximum Average Radiat Power 78 1 µW at the laser aperture of the print head unit Wavelength 675 695 nm This product employs a Class IIIb laser diode that emits an invisible laser beam The laser diode and the scanning polygon mirror are incorporated in the ...

Страница 18: ... åbning når sikkerhedsafbrydere er ude af funktion Undgå udsættelse for stråling Klasse 1 laser produkt der opfylder IEC60825 sikkerheds kravene Dansk Dette er en halvlederlaser Laserdiodens højeste styrke er 35 mW og bølgelængden er 675 695nm For Finland Sweden Users LOUKAN 1 LASERLAITE KLASS 1 LASER APPARAT VAROITUS è Laitteen Käyttäminen muulla kuin tässä käyttöohjeessa mainitulla tavalla saatt...

Страница 19: ...è Avattaessa ja suojalukitus ohitettaessa olet alttiina näkymättömälle lasersäteilylle Älä katso säteeseen VARNING è Osynlig laserstrålning när denna del är öppnad och spärren är urkopplad Betrakta ej strålen For Norway Users ADVERSEL è Dersom apparatet brukes på annen måte enn spesifisert i denne bruksanvisning kan brukeren utsettes for unsynlig laserstråling som overskrider grensen for laser kla...

Страница 20: ...0 CF9001 Laser Safety Label A laser safety label is attached to the outside of the machine shown below Location of Laser Warning Labels Inside the copier front CLASS 1 LASER PRODUCT LASER KLASSE 1 PRODUKT ...

Страница 21: ...CF9001 X 11 Internal right side view Rear side view ...

Страница 22: ...om well ventilated REMARQUE è Placer l appareil dans une pièce largement ventilée Une quantité d ozone négligable est dégagée pendant le fonctionnement de l appareil quand celui ci est utilisé normalement Cependant une odeur désagréable peut être ressentie dans les pièces dont l aération est insuffisante et lorsque une utilisation prolongée de l appareil est effectuée Pour avoir la certitude de tr...

Страница 23: ...eam source inside that could cause an electrical shock or blindness è Only use the power cord supplied in the package Failure to use this cord could result in a fire or electrical shock è Use only the specified power source voltage Failure to do that could result in a fire or electrical shock è Do not use a multiple outlet adapter to connect any other appliances or machines Use of a power outlet f...

Страница 24: ...r outlet and then call your authorized service representative è If this product becomes inordinately hot or emits smoke or unusual odor or noise immediately turn OFF the power switch unplug the power cord from the power outlet and then call your authorized service representative If you keep on using it as is a fire or electrical shock could result è If this product has been dropped or its cover da...

Страница 25: ...t could drop or fall causing personal injury or mechanical breakdown è After installing this product mount it on a secure base If the unit moves or falls it may cause personal injury è Do not store toner units and PC drum units near a floppy disk or watch that are susceptible to magnetism They could cause these products to malfunction è The inside of this product has areas subject to high temperat...

Страница 26: ...al injury The product may also be damaged or malfunction è Remove the power plug from the outlet more than one time a year and clean the area between the plug terminals Dust that accumulates between the plug terminals may cause a fire è When unplugging the power cord be sure to hold onto the plug Pulling on the power cord could damage the cord resulting in a fire or electrical shock ...

Страница 27: ...onditioner heater or ventilator l A well ventilated place l A dry place l A dust free location l An area not subject to undue vibration l A stable and level location l An area where neither ammonia nor other gases nor chemicals are present Failure to do so may shorten the service life of the product cause damage or decrease performance l A place which does not put the operator in the direct stream...

Страница 28: ...peration supply replacements and service maintenance adhere to the recommended space requirements detailed below Be sure to allow a clearance of 150 mm or more at the back of the copier as there is a ventilation duct 511 1276 1476 1119 765 921 1543 1086 622 640 Unit mm ...

Страница 29: ... of the copier follow the precautions listed below l NEVER place a heavy object on the copier or subject the copier to shocks l NEVER open any doors or turn OFF the copier while the copier is making copies l NEVER bring any magnetized object or use flammable sprays near the copier l NEVER remodel the copier as a fire or electrical shock could result l ALWAYS insert the power plug all the way into ...

Страница 30: ...om be well ventilated REMARQUE è Placer le copieur dans une pièce largement ventilée Une quantité d ozone négligable est dégagée pendant le fonctionnement du copieur quand celui ci est utilisé normalement Cependant une odeur désagréable peut être ressentie dans les pièces dont l aération est insuffisante et lorsque une utilisation prolongée du copieur est effectuée Pour avoir la certitude de trava...

Страница 31: ...th toner wash them with soap and water immediately l Do not attempt to replace the toner unit and PC drum unit in a place exposed to direct sunlight If the PC drum is exposed to intense light poor image quality could result l Do not unpack a toner unit or PC drum unit until the very time of use Do not leave an unpacked unit standing Install it immediately or poor image quality could result l Do no...

Страница 32: ...pies have a toner layer thicker than the normal black and white copies When a color copy is folded therefore the toner at the fold can be separated NOTE è This copier is equipped with a counterfeit preventive function that can cause slight noise on the copy image Useful Tip By activating the Copy Track Functions offered by this copier nobody can use the copier unless he or she enters an access num...

Страница 33: ...edness m Stock Certificates l Legal Documents m Food Stamps m Postage Stamps cancelled or uncancelled m Checks or Drafts drawn by Government Agencies m Internal Revenue Stamps cancelled or uncancelled m Passports m Immigration Papers m Motor Vehicle Licenses and Titles m House and Property Titles and Deeds l General m Identification Cards Badges or Insignias m Copyrighted Works without permission ...

Страница 34: ...1 Safety Notes 1 12 CF9001 ...

Страница 35: ... or grouping of copies into 10 copy sets or stacks In addition the staple sorter automatically staples the copy sets or stacks that are sorted or grouped Duplexing Document Feeder AFR 12 Option In addition to being capable of feeding in sheet originals one at a time it can automatically turn over the original for the making of copies from 2 sided originals ...

Страница 36: ...ty Cassette C 101 Option Holds up to 1 000 sheets of A4C copy paper 80 g m2 Printer Controller Fiery X3e Fiery Z4 Option Allows the copier to be used as a color printer and color scanner configured in a computer network For details see the operator s manual for Fiery provided separately Fiery is the trademark of Electronics for Imagings Inc ...

Страница 37: ...trol panel keys and touch panel see page 2 6 4 Front Door Open to clear a paper misfeed or add toner see page 6 5ff 5 Upper Tray Holds up to 500 sheets of paper see page 6 2 6 Middle Tray Universal Holds up to 250 sheets of paper see page 6 2 7 Lower Tray Holds up to 500 sheets of paper see page 6 2 8 Manual Bypass Tray Use for manual feeding of copy paper into the copier see page 3 15 9 Exit Tray...

Страница 38: ...oller Fiery For details see the operator s manual for printer controller 5 Cassette Release Lever Use to release the cassette from the copier for clearing a misfed sheet of paper or other service job 6 Cassette Door Open to add paper or clear a misfed sheet of paper 7 Paper Plate Descent Key Press to lower the paper plate 8 Stapler Door Open to replace the staple cartridge see page 6 8 9 Sort Bins...

Страница 39: ... Know Your Copier 2 CF9001 2 5 Inside the Copier Pos Specification Description 1 M1 M9 Operate these parts to clear misfed sheets of paper see page 6 11 2 Toner Hopper Lid Open when adding toner see page 6 5 2 1 ...

Страница 40: ...creens and messages see page 2 8 3 Job Recall Key Press to select the Job Recall screen on which you can recall or check a copy job program previously stored in memory Calling up a Job see page 5 29 4 Utility Key Press to select the Utility mode setting screen Functions in Utility mode l Default Settings l Meter Count l Admin Mode l Scanner Address Input l Job Memory Input l User s Choice l Image ...

Страница 41: ...ode clearing all settings made previously on the control panel see page 2 13 It does not however clear the settings made immediately before the Interrupt mode 11 Clear Key Press to l Reset the multi copy entry to 1 l Clear a zoom ratio entered when setting one using the 10 key pad 12 Stop Key Press to stop a multi copy cycle 13 Start Key l Press to start a copy cycle l If pressed while the copier ...

Страница 42: ...your copier How the Screen is Organized Message Display Shows the current copier status operating instructions and precautions and other data including the number of copies selected Exampl Add paper Pos Specification Description 1 Supplementary Function Keys Digital Art Color Adjust Input Output and Basics keys are displayed When any of these keys is touched the corresponding supplementary functio...

Страница 43: ...n inside the key is the current setting Set Function Display Shows graphic representations of functions set other than the initial ones including the INPUT OUTPUT and DIGITAL ART TYPES 1 2 File Margin 2 1 Cover Sheet 2 2 OHP 1 2 in 1 Monotone 1 2 2 in 1 Background Color Book 1 Neg Pos Reverse Book 2 Color Separation 3 Color Sort Color Separation 4 Color Group X Y Zoom Sort and Staple Image Repeat ...

Страница 44: ...the Touch Panel You need only to lightly touch the key shown on the touch panel to select or activate the function represented by the key NOTE è NEVER press the touch panel hard or use a hard or pointed object to press it as a damaged panel could result ...

Страница 45: ...ction Auto Copy Start function see page 2 14 Pressing the Start key at this point does not start a copy cycle You re going to have to wait for approx 9 minutes at an ambient temperature of 20 C 68 F Initial Mode When the power switch is turned ON the basic screen appears on the touch panel The settings on this screen are called the initial mode The basic screen serves as the reference for all pane...

Страница 46: ...copies If the fusing temperature drops excessively during a multi copy cycle there is a possibility that the copying speed will be reduced The copying speed will automatically return to normal when the fusing temperature rises enough to ensure good fusing performance ...

Страница 47: ...s 5 min after the copier has been touched last Useful Tip The time for the copier to enter the Auto Panel Reset function can be selected from 1 to 9 min by using User s Choice Also the Auto Panel Reset function can be disabled by the User s Choice see page 5 30 Energy Saver Mode If the copier is shut down when it is not in use it takes the copier approx 9 min to complete the warm up cycle Instead ...

Страница 48: ...nterrupt mode allows you to interrupt a current job and run a different one Pressing the Interrupt key once sets the copier into the Interrupt mode Pressing the key again cancels the Interrupt mode and returns to the previous settings NOTES è Pressing the Interrupt key resets all settings to the initial ones For details see Default Settings see page 5 1 è Some functions set before the Interrupt mo...

Страница 49: ...e this function you must first turn ON the Copy Track function of the Administrator mode available from User s Choice see page 5 4 Entering the Access Number 1 Using the 10 key pad enter the 4 digit access number and press the OK key NOTE è To correct the 4 digit access number entered first press the Clear key then enter the new number 2 The touch panel changes from the Access prompt to the initia...

Страница 50: ...tion For more details see the operator s manual of the printer controller Transfer Drum Cleaning Function To maintain optimum copy quality this copier automatically enters the Transfer Drum Cleaning mode at the following timing Cleaning takes about 40 seconds Timing will differ based on selected paper size and other settings Color Mode Timing Full Color 24 or 48 copies in multicopy mode Mono Color...

Страница 51: ...or copies on paper of the same size as the original NOTE è Automatically selected in the initial mode are Auto Paper Full Size and Manual Exposure The selections you make on the touch panel will change the exposure level zoom ratio the type of copy and so on 1 Placing the original m Load the originals face up on the duplexing document feeder see page 3 4 m Raise the original cover and place the or...

Страница 52: ... according to the original è Full Color The copier makes a full color copy regardless of the type of original è Black The copier makes a black and white copy regardless of the type of original Selecting the basic functions 3 Touch PAPER see page 3 11 m To change the copy paper size 4 Touch ZOOM see page 3 18 m To change the zoom ratio 5 Touch DENSITY see page 3 23 m To change the exposure level Se...

Страница 53: ...To make a very large copy Multi Page Enlargement copy 9 Setting the number of copies m Using the 10 key pad set the desired number of copies to be made If you have entered an incorrect number press the Clear key then enter the correct number 10Press the Start key m To stop the copy cycle press the Stop key NOTE è Some functions are not compatible with others when set at the same time For more deta...

Страница 54: ... and place the original face down on the glass 2 Align the rear left corner of the original with the marker on the width scale of the copier glass NOTES è To make an A3 Wide copy with a copier equipped with a duplexing document feeder align the rear left edge of the original with the photo mark on the length scale to avoid lost image see page 3 6 è To make copies using the Photo mode on a copier e...

Страница 55: ... or duplexing document feeder Making Copies from A Book Using Book Copy Mode Book refers to an open bound original 1 Place the open book so that its top edge is at the rear of the copier and the center of the book is aligned with the book marker indicated on the original length scale 2 Gently lower the duplexing document feeder or original cover NOTES è If the book is thick make a copy with the du...

Страница 56: ...e è Making A3 Wide copies 1 Place the original by aligning the rear edge with the length scale and the left edge with the Photo mark 2 Gently lower the duplexing document feeder or the original cover 3 Make settings in the Photo Mode see page 3 42 Instructions for Original Placement Be sure to raise the duplexing document feeder 15 or more before placing the original If the duplexing document feed...

Страница 57: ...may not be suitable for reliable operation of the duplexing document feeder Here is a guideline Originals Suitable for the Duplexing Document Feeder Type of originals Sheets Plain paper Normal mode l 1 sided original weighing 50 g m to 110 g m l 2 sided original weighing 60 g m to 90 g m l Mixed Original Detection mode weighing 60 g m to 90 g m Original Size l 1 sided original 2 sided original mod...

Страница 58: ...t paper l Wrinkled dog eared curled or torn originals l Clipped or stapled originals l Carbon backed originals NOTE è For any of these types of originals raise the duplexing document feeder and place the original manually on the glass to make a copy see page 3 5 Typing paper paraffin paper and other thin paper Thick paper Continuous forms Stapled originals Wrinkled or originals dog eared ...

Страница 59: ...inal stack If it s not pressed snugly against the original stack skewed feeding could result Using the Single Automatic Document Feeding Mode SADF Mode This is the mode in which you insert your originals one by one into the duplexing document feeder to make a copy or copies from it When you load the original the copier automatically starts the copy cycle Originals available for the SADF Mode l Typ...

Страница 60: ...tart key is lit green and insert the original face down into the document feed table NOTES è Be sure to place one original at a time è Be sure to correct any fold or curl in the original 3 The original is automatically taken up and the copy cycle is started 4 Making sure that the Start key lights up green again load the next original ...

Страница 61: ... the basic screen then touch AUTO PAPER to set the copier into the Auto Paper mode 2 Touch OK Useful Tip This mode is efficient when you want to automatically make copies on paper of the same size as your originals Pos Specification Description 1 Paper key Touch this key to show the screen that allows you to select the paper size 2 Zoom key Touch this key to show the screen that allows you to sele...

Страница 62: ... 4 13L and 11 17L ask your Tech Rep for these capabilities è When using the document feeder the original sizes that can be detected in the Auto Paper mode are A3L A4L A4C A5L A5C B4L FLS 8 1 4 13L A5L cannot be used for the Mixed Original Detection Mode è The copier fails to detect or wrongly detect the size of a wrinkled dog eared or curled originals Manual Selection The copy paper size can be se...

Страница 63: ...o 74 g m2 This setting excludes the paper source from selection for Auto Paper Make this setting for the source loaded with thin paper to prevent the paper from being used for a wrong purpose Thick Paper 1 91 g m2 to 128 g m2 This setting excludes the paper source from selection for Auto Paper Make this setting for the source loaded with thick paper to prevent the paper from being used for a wrong...

Страница 64: ...arge capacity cassette is additionally fitted to the copier A tray with any kind of paper other than plain paper can also be set as a candidate for Auto Tray Switching For more details consult your Technical Representative Manual Bypass Copying Use the manual bypass to make copies on paper not loaded in any tray or to copy onto OHP films or any other special paper The setting of copy paper sizes i...

Страница 65: ...rt a neat stack of copy paper into the manual bypass tray until it stops and slide the paper guide plates to the size of the copy paper NOTES è Load the OHP films so that the front side on which the white line is printed faces up in the direction as shown è Use only the recommended OHP filmes è Only plain paper can be used for 2 sided copies è When inserting paper with one side previously printed ...

Страница 66: ... of the copy select NO for 2nd Side for Dup If this is going to be the copy cycle for making the second side of the copy select YES Useful Tip The copy is also made on the lower face of the copy paper loaded in the bypass tray when Yes of 2nd Side for Dup is selected 7 Touch OK 8 Make the necessary copy function settings Useful Tip Using A3 Wide paper ensures a good copy of the entire image of an ...

Страница 67: ...o a sorter or staple sorter try to remove the copy OHP films from the bin as soon as it is fed in If the copy is left a while in the bin it can curl If the original is non standard size è Touch CUSTOM SIZE on the screen given in step 4 è Touch X and enter the length of the copy paper into the 10 key pad Then touch Y and enter the width of the copy paper into the 10 key pad è Touch OK ...

Страница 68: ...one according to your need Auto Size In the Auto Size mode the copier automatically selects the zoom ratio according to the size of the original being used and the copy paper size selected for use 1 Touch AUTO SIZE to set the copier into the Auto Size mode 2 Select the paper size 3 Touch OK Useful Tip This mode is very helpful for neat filing when you need to make copies from originals of assorted...

Страница 69: ...he document feeder is used the copier determines the zoom ratio when the first original is taken up and fed in and uses that zoom ratio for the subsequent originals except in the Mixed Original Detection mode 2 Touch OK For a Slightly Smaller Image This function lets you make a copy slightly reduced in image size from that of the original 1 Touch MINIMAL Useful Tip It comes in handy for making a c...

Страница 70: ...t select the fixed zoom ratio nearest to the target ratio before using the or key You can change the zoom ratio between the range of 0 250 and 6 000 2 Touch OK Using the 10 Key Pad You may use the 10 key pad to directly enter the zoom ratio 1 Touch USER SET 2 Enter the desired zoom ratio into the 10 key pad Example 1 300 è Press 1 3 0 and 0 in that order To correct a ratio press the Clear key and ...

Страница 71: ...a Ratio from Memory You can store some of the most frequently used zoom ratios in memory and recall them later as necessary 1 Touch USER SET 2 From among the three ratios previously stored in memory select the desired one Useful Tip It s a good idea for you to store frequently used zoom ratios in memory see page 3 22 3 Touch OK ...

Страница 72: ...r To correct a ratio press the Clear key and then enter the correct one again Useful Tip The zoom ratio can be entered between the range of 0 250 and 6 000 3 Touch STORE 4 Touch the memory location key in which to store the set zoom ratio When the key is touched the ratio is shown on the key indicating that it has been stored in memory 1 2 3 4 5 6 7 8 9 0 C 1139O4870A ...

Страница 73: ...d level Slide the level towards the Lighter side if you don t want the data on the back side of a newspaper or magazine page copied Slide it towards the Darker side if you want to reproduce pale colors of a bright area of the original When you adjust the level towards the Darker side the copier also copies the background If you slide the level towards the Lighter side the resultant copy will becom...

Страница 74: ...Manual Exposure In the Manual Exposure mode you can vary the exposure level in eight steps 1 Touch Lighter or Darker as necessary 2 Touch OK Adjusting the Image Density Manual Exposure In the Manual Exposure mode you can vary the exposure level in seven steps 1 Touch LIGHTER or DARKER as necessary m To make the image darker Touch DARKER m To make the image lighter Touch LIGHTER 2 Touch OK ...

Страница 75: ...hen the Duplex Unit is mounted Select 1 2 to make 2 sided copies from 1 sided originals Two originals can be copied onto one sheet of paper è Touch 1 2 Pos Specification Description 1 Setting based on original Choose the setting based on your original and your desired end result copy see page 3 28 2 Special functions If required select the appropriate special function s see page 4 1ff 3 Finishing ...

Страница 76: ...through reduction from two 1 sided originals side by side You need half as many sheets of copy paper as the number of originals The size of the original should be A4C and B5C for 2 in 1 è Touch 1 2IN1 Only when Duplexing Document Feeder and Duplex Unit are mounted Select 1 2 2in1 to make a 2 sided copy through reduction from four 1 sided originals Each pair of originals will be placed side by side...

Страница 77: ...ch BOOK 1 2 Then touch STD BOOK or RIGHT BOUND 2 Sided Book Only when the duplex unit is mounted The two pages of an open book are copied onto opposite sides of a sheet of paper 1 Touch BOOK 2 2 Then touch STD BOOK or RIGHT BOUND NOTE è Only plain paper can be used for 2 sided copies Book Original 1 Sided Copy Book Original 2 Sided Copy ...

Страница 78: ...y type separates options into 1 Sided 2 Sided and Book Touch any of these base keys 1 Side 2 Side and Book to make settings in greater detail NOTES è When you make copies from a book select the correct key according to whether the book is bound on the left or on the right R Book è When making copies in 1 2 1 2in1 or 1 2 2in1 mode input the number of originals see page 3 29 ...

Страница 79: ...the pages in correct order When you know the number of originals Setting Even Odd 1 Touch OF ORIGS 2 Touch EVEN or ODD as appropriate 3 Touch OK Using the 10 key pad 1 Touch OF ORIGS 2 Touch INPUT 3 Enter the number of originals into the 10 key pad NOTES è The maximum number of originals you can set is 50 è To correct a wrong number press the Clear key then enter the correct number 4 Touch OK ...

Страница 80: ... reload them onto the document feed tray Then press the Start key to make copies Mixed Original Detection Mode You may sometimes need to make copies from originals of assorted sizes and perhaps you want to use the duplexing document feeder mounted on your copier You can by using this function In the default settings the MIXED SIZE key does not appear on the touch panel indicating that the Mixed Si...

Страница 81: ...r edge of each original is pressed against the rear document guide plate Then slide the front document guide plate against the front edges of the widest originals è When using large size original flip up the document tray extender 2 Touch INPUT OUTPUT 3 Select ON or OFF for the Mixed Size NOTE è This function cannot be set when the copier is set in the Interrupt OHP Interleaving Cover Sheet Monoto...

Страница 82: ...he center of the book is aligned with the book marker indicated on the original length scale è Make copies in descending order of page è Select the desired zoom ratio and copy paper size è Placing the book on the glass correctly Precautions for 2 in 1 Copying When the 2 in 1 mode is selected the copier automatically selects a reduced zoom ratio However you can choose another zoom ratio by changing...

Страница 83: ...de Sort Only when the sorter or staple sorter is mounted Copies are sorted into complete sets of the originals This mode is effective when making multiple copies from multiple originals è Touch SORT Sort and Staple Only when the staple sorter is mounted Copies are sorted into complete sets of the originals and each set is stapled together è Touch STAPLE Originals Copies Originals Copies 1st Bin 2n...

Страница 84: ...Sort mode or copy stacks made in the Group mode è Touch STAPLE on the basic screen This feature is efficient for stapling originals after making copies see page 3 35 Useful Tip In the initial mode the copier automatically switches between Non Sort and Sort depending on the number of originals loaded in the duplexing document feeder and the number of copies to be made User s Choice can however be u...

Страница 85: ...eets of paper neatly 2 Insert the paper stack into the 2nd bin Up to 25 sheets of plain paper can be stapled NOTES è Make sure of the stapling position and press the paper stack against the bracket è Never attempt to reach for the stapling position This can be dangerous Stapling Position ...

Страница 86: ...Direction for Stapling If the originals are loaded in the duplexing document feeder as shown the stapling corner is at the rear left side as indicated by the arrow If the originals are placed on the original glass as shown the stapling corner is at the rear right corner as indicated by the arrow Originals Loaded crosswise Copy Stapling Position Stapling Corner ...

Страница 87: ... Number of Copies Selected Exceeds 25 in the Group Mode When more than 25 copies are to be grouped together into one group the staple sorter uses the next bin to continue grouping the copies If the Number of Copies Selected Exceeds 50 in the Non Sort Mode The capacity of the 1st bin is 50 If more than 50 copies are made in the Non Sort mode the sorter uses the 1st 2nd and subsequent bins to hold t...

Страница 88: ... the red component of the original to make it appear redder or less red GREEN Adjusts only the green component of the original to make it appear greener or less green BLUE Adjusts only the blue component of the original to make it appear bluer or less blue SHARPNESS Enhances the outline of characters making it sharper or less sharp BRIGHTNESS Adjusts to make the original image brighter or darker P...

Страница 89: ... 3 CF9001 3 39 CONTRAST Makes an original image look less distinct or a blurred image look clearer and more distinct SATURATION Makes the colors appear duller or vivid PORTRAIT Adjusts the flesh tone of the portrait ...

Страница 90: ...3 Position the image area in the original you want to check for color in the Test Area on the glass 4 Press the Start key This causes the copier to output a sample copy showing seven images each representing a different level of adjustment for the selected item 5 Select the sample you like best then touch OK 6 Place the original in position again and press the Start key ...

Страница 91: ...per PRINTED IMAGE When making a copy from a gravure photo of a magazine this mode is effective in preventing moire from occurring on the copy TEXT This mode is just right for making copies from an original that contains texts and fine lines MAP If you want to make a copy from an original which has a text on a relatively dark colored background such as a map this mode is just right for the job repr...

Страница 92: ...fy the zoom ratio for the copy Touching the PHOTO MODE sets the copier into the Photo mode Making Copies from a Photo Photo Sizing Mode Scale to Page 1 Select the size of your photo and touch OK If an appropriate size is not available enter the size into the 10 key pad Using 10 key pad Touch X and enter the length of the photo into the 10 key pad If a value has already been set press the Clear key...

Страница 93: ... Copying see page 3 14 5 Select the appropriate Scale to Page mode Useful Tips When Fit Entire Image is selected the copier fits the entire image of the photo onto the copy paper When Fit Entire Page is selected the copier produces the image on the copy paper with a uniform margin along four edges NOTE è FIT ENTIRE PAGE may result in part of the image being lost on the copy ...

Страница 94: ... copy from a colored or black and white photo see page 4 18 Touch Mirror Image if you want to make a copy whose image is identical to the original except reversed as viewed in a mirror see page 4 35 7 Place the original and press the Start key Loading the Originals see page 3 9 8 Touch EXIT Photo Sizing Mode Manual Zoom Input 1 Select the size of your photo and touch OK If an appropriate size is n...

Страница 95: ... Photo Type 3 Touch MANUAL ZOOM INPUT under the Photo Sizing Mode and touch OK 4 Select the appropriate Copy Size See Manual Bypass Copying see page 3 14 5 Enter the desired zoom ratio into the 10 key pad When FULL SIZE is touched you can make a full size copy 6 Touch OK The touch panel shows the settings made prompting you to check them ...

Страница 96: ...ge 3 38 Touch Monotone if you want to make a single color copy from a colored or black and white photo see page 4 18 Touch Mirror Image if you want to make a copy whose image is identical to the original except reversed as viewed in a mirror see page 4 35 7 Place the original and press the Start key Loading the Originals see page 3 9 8 Touch EXIT Setting Mirror Image in Photo Mode 1 On the screen ...

Страница 97: ... 10 key pad If a value has already been set press the Clear key then enter the new value 2 Touch Y and enter the width of the photo into the 10 key pad 3 Touch STORE AS PRESETS 4 Touch any of the non labeled keys NOTE è If you touch a key in which a size has previously been stored the old data is erased 5 Touch OK ...

Страница 98: ...3 Making Copies 3 48 CF9001 ...

Страница 99: ...hen you touch Input Output on the touch panel a screen appears that allows you to set the applied functions For copy samples see the Creative Image Book separately provided Pos Specification Description 1 Input Output settings Make the input output settings for 2 sided and book copying see page 3 25 2 Applied function keys 3 Finishing function Select the finishing function only when the copier is ...

Страница 100: ... effective in erasing the communications record on a document received by fax The copier provides a margin along the four edges on the copy Frame Erase Setting Procedur When the original is non standard size 1 Touch FRAME ERASE 2 Touch CUSTOM SIZE 3 Touch X and enter the length of the original into the 10 key pad Then touch Y and enter the width of the original To correct a value entered press the...

Страница 101: ... of 8 mm on the leading edge 4 mm on the trailing edge and 3 mm each on the front and rear edges in the full size mode Set a frame erase Width wider than each of these values to have a frame erase effect at all A shadow can at times be produced along the edges when you make an A3 Wide copy We recommend that Frame Erase be used in such cases When the original is standard size 1 Touch FRAME ERASE 2 ...

Страница 102: ...alues to have a frame erase effect at all A shadow can at times be produced along the edges when you make an A3 Wide copy We recommend that Frame Erase be used in such cases File Margin The copier provides a file margin along the leading edge for your ease in filing There are four different ways available for making a file margin Use the one that is most suited to your need Functions Shift for Mar...

Страница 103: ...he sides is reduced to make a wider margin along the top edge of the copy Useful Tip If the image of the original covers the entire surface of the original Margin by Reduction will ensure a copy with no lost image along the edges File Margin Setting Procedure 1 Touch FILE MARGIN 2 Place the original on the original glass or in the duplexing document feeder NOTE è Make sure to correctly place the o...

Страница 104: ... the applicable File Margin Mode 5 Enter the File Margin Width into the 10 key pad 6 Touch OK NOTE è If the margin width is set larger than necessary in Shift for Margin a void image can occur Try to keep a good margin Useful Tip Touch C cancel to cancel the settings made for and exit from File Margin ...

Страница 105: ...Professional Way to Make Color Copies 4 CF9001 4 7 Original Placement Key to be Selected Margin on Left Edge Margin on Right Edge Margin on Top Edge ...

Страница 106: ...re available Select the appropriate one according to your need Functions SINGLE COPY The copier copies onto OHP transparencies and after each transparency inserts a copied or non copied blank sheet of paper OHP Setting Procedure 1 Place the original on the original glass or in the duplexing document feeder 2 Touch OHP 2 1 2 2 1 1 Copied Copies Originals OHP Interleaves 2 1 2 1 Non Copied Copies Or...

Страница 107: ... NOTES è If you make copies from an original set one page after another via the original glass make them in descending page order è If you want to use a sorter or staple sorter for the copy run remove the copy OHP films as soon as it is fed into the bin If it is left in the bin for a while it can curl 7 Select whether you want to copy on the interleaves Yes or not No at Copy onto Inserts 8 Touch O...

Страница 108: ...olored paper There are six different Cover functions available Select the appropriate one according to your need This function can be used only when the duplexing document feeder is mounted Functions Front Cover Copied Back Cover None Front Cover Blank Back Cover None Front Cover Copied Back Cover Blank Front Cover Blank Back Cover Blank Front Cover Copied Back Cover Copied Front Cover Blank Back ...

Страница 109: ... duplexing document feeder 2 Touch COVER SHEET 3 Place the copy paper for the cover sheet on the manual bypass tray 4 Make the necessary settings for the copy paper loaded in the manual bypass tray Size Type and 2nd Side for Dup Manual Bypass Copying see page 3 14 5 Touch OK 6 Select the copy paper and touch OK ...

Страница 110: ...ect a particular function for Front 8 Select a particular function for Back 9 Touch OK Useful Tips Touching the Cover Paper or Paper Source key allows you to change the previous settings Touch C cancel to cancel the settings made for and exit from Cover Sheet ...

Страница 111: ...can select one of seven samples each having a specific saturation level to obtain the best possible saturation on the copy You can further fine tune the saturation level over 19 steps BRIGHTNESS You can select one of seven samples each having a specific brightness level to obtain the best possible brightness on the copy You can further fine tune the brightness level over 19 steps SHARPNESS You can...

Страница 112: ... 0 and 200 in 1 increments DENSITY You can select one of seven samples each having a specific density level to obtain the best possible density on the copy You can further fine tune the density level over 19 steps Color Adjust Procedure Professional Other Than Color Balance 1 Touch PROFESSIONAL and select the item for adjustment 2 Touch TEST PRINT Ex When Hue is selected 3 Position the image area ...

Страница 113: ...senting a different level of adjustment for the selected item 5 Select the sample you like best then touch OK If you would like something in between e g a hue level between 2 and 3 touch FINE TUNE Then touch or as necessary to fine tune the level NOTE è Sharpness does not permit fine tuning 6 Place the original in position again and press the Start key ...

Страница 114: ... Color Balance 1 Touch PROFESSIONAL and touch COLOR BALANCE 2 Select the color you want to adjust for balance from among C cyan M magenta Y yellow and BK black 3 Touch the or key to change the value as necessary 4 Adjust the balance of another color if necessary and touch OK ...

Страница 115: ...riginal are separated into four color channels yellow magenta cyan and black and the particular color data is processed to make one copy of each in black 3 Color Each The colors on the original are separated into three color channels yellow magenta and cyan and the particular color data is processed to make one copy in each of the three colors extracted Black The colors on the original are separat...

Страница 116: ... of your choice 3 Touch REPRODUCTION and select SHADE or SOLID as necessary SHADE is selected in the initial mode SHADE Shade will reproduce the colors in the original relative to the brightness of each color Therefore red will appear lighter than black Shade will convert the original colors to different gradations of monotone This mode would be excellent for reproducing photographs SOLID Solid wi...

Страница 117: ...C cancel to cancel the settings made for and exit from Monotone Background Color The background of the original can be copied in any one of 18 single colors For copy samples and the output produced from each color specified on screen see the Creative Image Book separately provided ...

Страница 118: ... BACKGROUND 2 as necessary to reach the color of your choice 3 Touch OK Useful Tip Touch C cancel to cancel the settings made for and exit from Background Color NOTES è This function is valid only when the background of the original is white è All white areas of the original are regarded as the background and copied in the specified color è The entire tone of colors may change if you use a colored...

Страница 119: ... Monotone to produce a monotone copy and with full color to produce a full color copy with reversed tonal arrangements For copy samples see the Creative Image Book separately provided Neg Pos Reverse Setting Procedure 1 Touch NEG POS REVERSE on the Digital Art menu screen 2 Touch ON Useful Tip Touch Off to cancel the settings made for and exit from Neg Pos Reverse ...

Страница 120: ...ssed to make one copy in each of the colors extracted The particular color data is also processed to make one copy of each in black For copy samples see the Creative Image Book separately provided Color Separation Setting Procedure 1 Touch COLOR SEPARATION on the Digital Art menu screen 2 Select either 4 COLOR or 4 COL OR 3 Select either EACH or BLACK 4 Touch OK Useful Tip Touch C cancel to cancel...

Страница 121: ...hich you enter the sizes of the original and copy paper into the 10 key pad For copy samples see the Creative Image Book separately provided X Y Zoom Setting Procedure When ZOOM RATIO is selected 1 Touch X Y ZOOM on the Digital Art menu screen 2 Select ZOOM RATIO and then touch OK 3 Touch X and enter the zoom ratio in the length direction into the 10 key pad Touch Y and enter the zoom ratio in the...

Страница 122: ...ch X Y ZOOM 2 Select OUTPUT SIZE and then touch OK 3 Touch X under Original and enter the length of the original into the 10 key pad Touch Y under Original and enter the width of the original into the 10 key pad 4 Touch X under Copy and enter the length of the copy paper into the 10 key pad Touch Y under Copy and enter the width of the copy paper into the 10 key pad 5 Touch OK ...

Страница 123: ... Copies 4 CF9001 4 25 Useful Tip Touch C cancel to cancel the settings made for and exit from X Y Zoom NOTE è For OUTPUT SIZE you cannot enter a length or width which results in a zoom ratio falling outside the 0 250 to 6 000 range ...

Страница 124: ...y provided Image Repeat Setting Procedure 1 Touch Image Repeat on the Digital Art menu screen 2 Select your Original Size and touch OK m Touch CUSTOM SIZE if your original is a non standard size m Touch PHOTO SIZE if your original is a photo size 3 Select a copy paper size and touch OK 4 Touch ZOOM and set the zoom ratio into the 10 key pad 5 Touch OF IMAGES and into the 10 key pad enter the numbe...

Страница 125: ... Size key allows you to change the previous settings 7 Touch OK Useful Tip Touch C cancel to cancel the settings made for and exit from Image Repeat If the original is a non standard size è Touch CUSTOM SIZE on the screen given in step 2 è Touch X and enter the length of the original into the 10 key pad Then touch Y and enter the width of the original into the 10 key pad To correct a value entered...

Страница 126: ...an appropriate size is not available enter the size into the 10 key pad Using 10 key pad è Touch X and enter the length of the photo into the 10 key pad If a value has already been set press the Clear key then enter the new value è Next touch Y and enter the width of the photo into the 10 key pad Useful tip A frequently used photo size can be stored in copier memory see page 3 47 ...

Страница 127: ...s ZOOM RATIO with which you specify the zoom ratio manually or CUSTOM SIZE with which you need to enter the size of the copy into the 10 key pad For copy samples see the Creative Image Book separately provided Multi Page Enlargement Setting Procedure When STANDARD SIZE is selected 1 Touch MULTI PAGE ENLARGEMENT on the Digital Art menu screen 2 Select your Original Size Touch OK m Touch CUSTOM SIZE...

Страница 128: ...and change any incorrect settings you have made Useful Tip Touching the Original Size Paper Size or Standard Size key allows you to change the previous settings 7 Touch OK Useful Tip Touch C cancel to cancel the settings made for and exit from Multi Page Enlargement When ZOOM RATIO is selected 1 Touch MULTI PAGE ENLARGE MENT on the Digital Art menu screen ...

Страница 129: ...original is a photo size see page 4 36 3 Select a copy paper size and touch OK 4 Touch ZOOM RATIO and touch OK 5 Enter the zoom ratio from the 10 key pad 6 When OK is touched the Check Change screen appears allowing you to check and change any incorrect settings you have made Useful Tip Touching the Original Size Paper Size or Zoom key allows you to change the previous settings 7 Touch OK ...

Страница 130: ...ent When CUSTOM SIZE is selected 1 Touch MULTI PAGE ENLARGE MENT on the Digital Art menu screen 2 Select your Original Size Touch OK m Touch CUSTOM SIZE if the original is a non standard size see page 4 36 m Touch PHOTO SIZE if your original is a photo size see page 4 36 3 Select a copy paper size and touch OK 4 Touch CUSTOM SIZE and touch OK ...

Страница 131: ... you have made Useful Tip Touching the Original Size Paper Size or Custom Size key allows you to change the previous settings 7 Touch OK Useful Tip Touch C cancel to cancel the settings made for and exit from Mult Page Enlargement If the original is a non standard size è Touch CUSTOM SIZE on the screen given in step 2 è Touch X and enter the length of the original into the 10 key pad Then touch Y ...

Страница 132: ...f an appropriate size is not available enter the size into the 10 key pad Using 10 key pad Touch X and enter the length of the photo into the 10 key pad If a value has already been set press the Clear key then enter the new value Next touch Y and enter the width of the photo into the 10 key pad Useful Tip A frequently used photo size can be stored in copier memory see page 3 47 ...

Страница 133: ...les see the Creative Image Book separately provided Mirror Image Setting Procedure 1 Touch MIRROR IMAGE on the Digital Art menu screen 2 Select the original size m Touch CUSTOM SIZE if the original is a non standard size m Touch PHOTO SIZE if the original is a photo size 3 Touch OK Useful Tip Touch C cancel to cancel the settings made for and exit from Mirror Image ...

Страница 134: ...ey è Touch OK If the original is a photo size è Touch PHOTO SIZE on the screen given in step 2 è Select the size of your photo and touch OK If an appropriate size is not available enter the size into the 10 key pad Using 10 key pad Touch X and enter the length of the photo into the 10 key pad If a value has already been set press the Clear key then enter the new value Next touch Y and enter the wi...

Страница 135: ...s Or Custom Size or Photo Size may be selected to enter the size manually For copy samples see the Creative Image Book separately provided Postcard Setting Procedure When the original is a standard size 1 Touch POSTCARD on the Digital Art menu screen 2 Select the size of your Original 3 In the of sheets box enter the number of postcard sheets desired Useful Tip Enter 1 for 4 postcards and 2 for 8 ...

Страница 136: ... Touch C cancel to cancel the settings made for and exit from Postcard For the copy paper for Postcard consult the service shop you purchased your copier from When the original is a non standard size 1 Touch POSTCARD on the Digital Art menu screen 2 Touch CUSTOM SIZE 3 Touch X and enter the length of the original into the 10 key pad Then touch Y and enter the width of the original To correct a val...

Страница 137: ...ace your original and paper as shown on the touch panel and press the Start key Useful Tips Touching the Original or of sheets key allows you to change the previous settings Touch C cancel to cancel the settings made for and exit from Postcard For the copy paper for Postcard consult the service shop you purchased your copier from When the original is a photo size 1 Touch POSTCARD on the Digital Ar...

Страница 138: ...e 10 key pad If a value has already been set press the Clear key then enter the new value Next touch Y and enter the width of the photo into the 10 key pad Useful Tip A frequently used photo size can be stored in copier memory see page 3 47 4 In the of sheets box enter the number of postcard sheets desired Useful Tip Enter 1 for 4 postcards and 2 for 8 postcards 5 Touch OK 6 Place your original an...

Страница 139: ... Useful Tips Touching the Original or of sheets key allows you to change the previous settings Touch C cancel to cancel the settings made for and exit from Postcard For the copy paper for Postcard consult the service shop you purchased your copier from ...

Страница 140: ...4 Professional Way to Make Color Copies 4 42 CF9001 ...

Страница 141: ...pressed The Utility mode lets you change the default settings Default Settings Changing Procedure 1 Press the Utility key 2 Touch DEFAULT SETTINGS 3 Select either CURRENT SET TINGS or FACTORY SETTINGS 4 Touch OK Useful Tips When you select Current Settings the settings made on the control panel are the default settings When you select Factory Settings the settings made in the factory become the de...

Страница 142: ... since the installation of your copier Calling up Meter Count 1 Press the Utility key 2 Touch METER COUNT 3 The touch panel shows the count data for the copies made in full color and in black 4 When MONOTONE is touched the panel shows the count data for the copies made in monotone 5 When you have checked the count data touch OK ...

Страница 143: ...controller by a computer Full Color Number of copies made in the full color mode Black Number of copies made in the black mode Duplex Number of 2 sided copies made using the duplex unit C M Y Number of copies made in cyan magenta or yellow in the monotone mode 3C Monotone Number of copies made in a color other than cyan magenta and yellow in the monotone mode Printing the Meter Count Data To print...

Страница 144: ...rolled by defining a unique access number for each account Setting the Copy Track Functions 1 Press the Utility key and touch ADMIN MODE 2 Enter your administrator code number into the 10 key pad then touch OK NOTES è Your Technical Representative sets or changes the administrator code number Consult him or her for more details è Be sure to remember your administrator code number 3 Touch COPY TRAC...

Страница 145: ...5 CF9001 5 5 4 Touch ON or OFF to activate or deactivate the Copy Track Functions NOTE è If ON is selected program an access number for each account If OFF is selected touch YES to reset the Copy Track Functions Data 5 Touch OK ...

Страница 146: ...IN MODE 2 Enter your administrator code number into the 10 key pad then touch OK NOTES è Your Technical Representative sets or changes the administrator code number Consult him or her for more details è Be sure to remember your administrator code number 3 Touch COPY TRACK FUNC TIONS 4 Touch ACCESS INPUT ...

Страница 147: ...CCOUNT and then using the or key select the account number which you want to change 6 Press the Clear key and enter the desired account number up to 3 digits into the 10 key pad and touch OK NOTES è An account number cannot be duplicated è If you want to change the account number for another account repeat steps 4 to 6 ...

Страница 148: ...DMIN MODE 2 Enter your administrator code number into the 10 key pad then touch OK NOTES è Your Technical Representative sets or changes the administrator code number Consult him or her for more details è Be sure to remember your administrator code number 3 Touch COPY TRACK FUNC TIONS 4 Touch ACCESS INPUT ...

Страница 149: ... to program an access number 6 Enter the desired 4 digit access number into the 10 key pad and touch OK NOTES è If you set a new access number for an account which already has an access number the old number will be erased è If an access number entered already exists it is canceled Please enter a new number again è If you want to program an access number for another account repeat steps 4 to 6 ...

Страница 150: ...nd touch ADMIN MODE 2 Enter your administrator code number into the 10 key pad then touch OK NOTES è Your Technical Representative sets or changes the administrator code number Consult him or her for more details è Be sure to remember your administrator code number 3 Touch COPY TRACK FUNC TIONS 4 Touch COUNTER CHECK ...

Страница 151: ...unt for which you want to check the number of copies made Useful Tips If you touch All Accts the display shows the total number of copies made by all accounts programmed You can press the Start key to let the copier print a tally sheet of the number of copies made 6 Touch OK ...

Страница 152: ...ODE 2 Enter your administrator code number into the 10 key pad then touch OK NOTES è Your Technical Representative sets or changes the administrator code number Consult him or her for more details è Be sure to remember your administrator code number 3 Touch COPY TRACK FUNC TIONS 4 Touch COUNTER RESET ...

Страница 153: ...ct the Account for which you want to reset the counter and touch CANCEL Useful Tip To clear the counters of all accounts at once touch All Accts 6 Touch YES and touch OK Useful Tip If you want to clear the counter of another account repeat steps 5 and 6 7 Touch OK ...

Страница 154: ...count 1 Press the Utility key and touch ADMIN MODE 2 Enter your administrator code number into the 10 key pad then touch OK NOTES è Your Technical Representative sets or changes the administrator code number Consult him or her for more details è Be sure to remember your administrator code number 3 Touch COPY TRACK FUNC TIONS 4 Touch PERMISSION LEVEL ...

Страница 155: ...ey select the Account for which you want to prohibit copying 6 Touch the PROHIBIT key of Color Count or Black Count whichever is necessary Useful Tip If you want to prohibit color copying or black copying for another account repeat steps 5 and 6 7 Touch OK ...

Страница 156: ...ing or black copying or both for each account 1 Press the Utility key 2 Touch ADMIN MODE 3 Enter your administrator code number into the 10 key pad then touch OK NOTES è Your Technical Representative sets or changes the administrator code number Consult him or her for more details è Be sure to remember your administrator code number 4 Touch COPY TRACK FUNC TIONS ...

Страница 157: ... the maximum number of copies to be made 7 Select COMMON for both or INDIVIDUAL for setting the color and black copy limits then touch the ON key 8 Touch the respective Copy Limit key and then enter the copy limit into the 10 key pad Useful Tip If you want to set a Copy Limit for another account repeat steps 6 to 8 9 Touch OK ...

Страница 158: ...ecomes foggy as you make a number of color copies Gradation Adjust Sequence 1 Press the Utility key 2 Touch ADMIN MODE 3 Enter your administrator code number into the 10 key pad then touch OK NOTES è Your Technical Representative sets or changes the administrator code number Consult him or her for more details è Be sure to remember your administrator code number ...

Страница 159: ...t 7 Place the test print produced on the Original Glass as shown 8 Cover the test print with 10 sheets of blank white A3 or 11 17 size paper 9 Close the Original Cover and press the Start key 10When the copier is through with the Gradation Adjust sequence the menu screen reappears è Repeat steps from 4 to 9 three times ...

Страница 160: ... 6 copies min The initial setting is OFF If you are satisfied with the copy quality keep the setting as is Changing Dummy Rotation Setting 1 Press the Utility key 2 Touch ADMIN MODE 3 Enter your administrator code number into the 10 key pad then touch OK NOTES è Your Technical Representative sets or changes the administrator code number Consult him or her for more details è Be sure to remember you...

Страница 161: ...Setting the Utility Mode 5 CF9001 5 21 4 Touch DUMMY ROTATION 5 Touch either ON or OFF 6 Touch OK ...

Страница 162: ... image failure If it is turned OFF high image density can be faithfully reproduced The initial setting is ON Gamma Curve Limitation Setting 1 Press the Utility key 2 Touch ADMIN MODE 3 Enter your administrator code number into the 10 key pad then touch OK NOTES è Your Technical Representative sets or changes the administrator code number Consult him or her for more details è Be sure to remember yo...

Страница 163: ...Setting the Utility Mode 5 CF9001 5 23 4 Touch GAMMA CURVE LIMITA TION 5 Touch either ON or OFF 6 Touch OK ...

Страница 164: ...he exclusive use for setting the Thick 2 Duplex function that ensures a noise free 2 sided copy or not No The initial setting is No Thick 2 Duplex Setting 1 Press the Utility key 2 Touch ADMIN MODE 3 Enter your administrator code number into the 10 key pad then touch OK NOTES è Your Technical Representative sets or changes the administrator code number Consult him or her for more details è Be sure...

Страница 165: ...Setting the Utility Mode 5 CF9001 5 25 4 Touch THICK 2 DUPLEX 5 Touch YES or NO 6 Touch OK ...

Страница 166: ...t NO for 2nd Side for Dup 3 Press the Start key to make a copy of the first side of the original 4 Place the 1 sided copy made in step 3 on the manual bypass tray and touch PAPER TYPE 5 Touch THICK 2 DUPLEX and select YES for 2nd Side for Dup 6 Press the Start key to make a copy of the second side of the original Useful Tip See p 3 11 for the manual bypass copying procedures ...

Страница 167: ...for quick job setup Job Memory Input Procedure 1 Make the necessary control panel settings for the job 2 Press the Utility key 3 Touch JOB MEMORY INPUT 4 Touch the number to assign the programmed job to then touch INPUT Useful Tip If a new program is stored in a job number in which another one has previously been stored the old one is erased ...

Страница 168: ...28 CF9001 5 Name the job Touch the alphanumeric keys on the touch panel to enter the name then touch OK Useful Tip If you touch Check a screen appears that allows you to check the programmed job settings stored in memory 6 Touch OK ...

Страница 169: ...ng up a Job 1 Press the Job Recall key 2 Touch the number that your programmed job has been assigned to Useful Tip If you touch Check a screen appears that allows you to check the programmed job settings stored in memory 3 Touch RECALL 4 Touch OK ...

Страница 170: ... 10 key pad The initial setting is 5 min Confirmation Beep Select whether to turn ON or OFF the confirmation beep that sounds when any of the keys on the touch panel is pressed The initial setting is ON Key Counter Select whether to reset ON the control panel settings or not OFF when the plug in counter is unplugged or magnetic card is removed The initial setting is ON Intelligent Sort Select whet...

Страница 171: ... that you want to change As an example ENERGY SAVER is touched Useful Tip Touch as necessary to reach the other functions 4 When ON is touched it is highlighted and the touch panel allows you to enter the time to the right of the ON key 5 Enter the time into the 10 key pad To correct a number press the Clear key then enter the correct one 6 Touch OK ...

Страница 172: ...5 Setting the Utility Mode 5 32 CF9001 Useful Tip If you want to change the setting for another function or functions repeat steps 3 to 6 ...

Страница 173: ...enter of the copy paper as it is reproduced on the copy paper Turning ON or OFF Image Centering 1 Press the Utility key 2 Touch IMAGE CENTERING 3 Select either ON or OFF 4 Touch OK NOTE è When Centering is set to ON and when an original with a dark image is copied the copier may detect a wrong original size making the copy on small size paper If this happens turn OFF Centering ...

Страница 174: ...lity Mode 5 34 CF9001 5 11 Scanner Address Input Scanner Address Input Scanner Address Input is used when a printer controller is connected to the copier For details see the manual that comes with the printer controller ...

Страница 175: ...t copy cycle is interrupted and you cannot start a new copy cycle Load the tray with paper by using the following procedure NOTES è Only the following type of paper can be loaded in the tray Use of paper recommended by us is encouraged to keep a given level of copy quality and prevent paper misfeed m Paper weight 64g m to 128g m m Size A3 lengthwise to A5 lengthwise è Thick paper 2 and OHP films c...

Страница 176: ...y back in NOTES è Up to 500 sheets of paper 80g m can be loaded è The paper should be loaded no higher than the max level indicator Middle Tray 1 Slide the tray out 2 Load the paper stack into the tray so that its front side the side facing up when the package was unwrapped faces down Then slide the tray back in NOTES è Up to 250 sheets of paper 80g m can be loaded è The paper should be loaded no ...

Страница 177: ...ing the plastic part of the trailing edge stop slide it to the size of the paper to be loaded NOTE è When loading 11 17 inch paper Move the trailing edge stop all the way to the right Then pinch the lever as shown and remove it from the stop Next fit the lever into position as shown When loading the Inch size paper è Flip the switch located in the right rear corner of the tray to Inch ...

Страница 178: ...he paper stack onto the paper plate so that its front side faces up and close the cassette door This causes the paper plate to rise automatically NOTES è Make sure that the leading edge of the paper stack is pressed tightly up against the guide plate on the take up side of the cassette è The paper should be loaded no higher than the max level indicator è The paper plate may not ascend if the casse...

Страница 179: ...lenish the toner as soon as possible When toner has run out the message shown on the left appears and you can no longer start a new copy cycle Replenish the toner by following the procedure given below Replenishing Toner 1 Open the front door Example Yellow toner is empty 2 Slide out the toner hopper unit 3 Sharply tap the new toner bottle against a desk or other hard object four to five times The...

Страница 180: ...ke absolutely certain that the color of the toner matches the color of the toner hopper lid 7 Align the tab on the bottle with the cut out on the toner receptacle and turn the bottle clockwise until it engages 8 Wait until the toner stops falling in approx 60 seconds then tap the bottle a few times to ensure that all the toner falls into the hopper ...

Страница 181: ... and lift it out from the receptacle Close the toner hopper lid NOTE è Please wait for a while after the toner has fallen in completely If not toner powder may be blown up from the toner hopper 10Slide the toner hopper unit back in and close the front door 11Use the same procedure to add toner for the other three main hoppers ...

Страница 182: ...g the Staple Cartridge 1 Grasping the lock release lever slide the staple sorter away from the copier 2 Open the stapler door 3 While pushing up the staple cartridge release lever pull the staple cartridge out of its port 4 Pull the staple sheet about 3 cm out of the new staple cartridge and break off that portion NOTE è Check that no portion of the staple sheet hangs out of the cartridge Break of...

Страница 183: ...the copier 7 Place a sheet of paper into the 2nd bin of the staple sorter 8 Touch STAPLE on the touch panel Then the staple sorter test staples the paper several times automatically 9 Remove the sheet of paper from the 2nd bin and check that it has been stapled If no staples are evident place another sheet of paper into the 2nd bin and repeat steps 7 8 and 9 ...

Страница 184: ...ompted to do so by the message Removing the staple cartridge before then will result in stapling trouble è Immediately after the new staple cartridge has been loaded be sure to test staple the paper following steps 7 through 9 è DO NOT turn the green gear near the cartridge inside the staple unit ...

Страница 185: ...isfeed Location Displays Different procedures are used to clear a misfed sheet of paper depending on the location First isolate the location then clear the misfeed following the appropriate procedure depending on where the misfeed occurred Pos Specification Description 1 Duplexing Document Feeder see page 6 12 2 Copier see page 6 13 3 Paper Trays see page 6 15 4 Manual Bypass Tray see page 6 16 5 ...

Страница 186: ...pull out the original 3 Holding down the lock release button swing open document turnover exit unit door F2 and carefully pull out the original from the exit unit 4 Close F1 and F2 5 Raise the duplexing document feeder Opening the document turnover feed unit guide plate gently pull out the original from the unit 6 Remove the original from the original glass and lower the duplexing document feeder ...

Страница 187: ...e display to the bottom of the original stack removed in step 1 and reload it onto the document feed tray Copier 1 Open the left door L1 2 Pull out the sheet of paper from the transport section 3 Raise guide plate M2 and turning knob M1 pull out the sheet of paper 4 Press down guide plate M3 and pull out the sheet of paper 5 Close the left door L1 L1 M2 M1 M3 L1 ...

Страница 188: ...out the sheet of paper 8 Grasp lever M6 and slide out the transfer fusing unit 9 Grasp the fusing unit lever M7 and open the fusing unit CAUTION è DO NOT touch any parts except paper as the fusing unit and its surrounding areas are extremely hot 10Turning knob M5 pull out the sheet of paper and close the fusing unit L2 M4 M5 M4 M6 M7 M5 ...

Страница 189: ...ing edge of the paper and remove it with care not to damage the transfer film 13Press down the roller as shown and remove the sheet of paper if present inside 14Slide the transfer fusing unit back into the copier and turn the release lever M4 to the right 15Close the front door Paper Trays 1 Open the left door L1 and pull out the sheet of paper from the transport section 2 Close the left door L1 3...

Страница 190: ...sfeed indication message on the touch panel Manual Bypass Tray 1 Unload the paper stack from the manual bypass tray Then open the left door L1 2 Raise guide plate M2 and turning knob M1 pull out the sheet of paper Then close the left door 3 Fan the paper stack thoroughly and place it back on the tray 4 Open the front door and then close it to reset the misfeed indication message on the touch panel...

Страница 191: ...descent key 2 Grasping the door lock release lever open the cassette door and remove the sheet of paper 3 Close the cassette door 4 Grasp the cassette release lever and slide the cassette away from the copier 5 Remove the sheet of paper 6 Slide the cassette back against the copier ...

Страница 192: ...he duplex unit 2 Open the misfeed removal guide D and pull out the sheet of paper 3 Close the duplex unit Sorter Staple Sorter 1 Grasping the lock release lever slide the sorter away from the copier 2 Pull out the copy from the transport section 3 Slide the sorter back against the copier D ...

Страница 193: ...r start a new copy cycle Replenish the fuser oil by following the procedure given below Usually the fuser oil replenishment should be performed by a qualified service representative However on an as need basis the copier can be set so that a trained operator can replenish the fuser oil In this case we recommend that only a trained key operator replenish the fuser oil according to the following pro...

Страница 194: ... 5 Replenish the fuser oil NOTES è You will replenish approximately a half bottle of the fuser oil usually Therefore please be careful not to overfill the fuser oil reservoir especially when replenishing from a new bottle è The fuser oil should be replenished no higher than the max level indicator 6 Remove the oil supply spout and refit the cap to the fuser oil bottle ...

Страница 195: ... CF9001 6 21 7 Refit the cap to the oil supply port 8 Slide the transfer fusing unit back in and turn the lever M4 to the right 9 Close the front door 10Press the Utility key on the control panel 11Touch FUSER OIL REFILL M4 M6 ...

Страница 196: ...6 When a Message Appears 6 22 CF9001 12Touch YES and then touch OK 13Press the Panel Reset key ...

Страница 197: ...is wrong with the image stabilization function of the color copier Call your Tech Rep IMPORTANT è When on the touch panel is touched the following screen appears When calling your Tech Rep inform him her of the number or numbers under which NG is shown in the above example no P 3 When you touch OK after these procedures the normal copying screen reappears ...

Страница 198: ...r lower drawer is disabled Call your Technical Representative IMPORTANT è Touching on the touch panel will show the following screen When calling your Technical Representative inform him or her of the name of the drawer being displayed the upper drawer in the above example When you touch OK after these procedures the normal copying screen reappears ...

Страница 199: ...e see page 6 8 Misfeeding is detected Please remove paper at A misfeed has occurred and no copy cycle can be initiated Clear the misfed sheet of paper see page 6 11 The section indicated by is open Please close it properly A copier door is left open or an option is not attached properly and the copier is unable to make copies Close the door or cover and attach the option properly The Fuser Oil has...

Страница 200: ...nter 1 for the number of copies to be made Original size cannot be detected Original is not placed in the correct position Place the original correctly see page 3 4 A non standard size original is used Cancel the Auto Paper mode and select the appropriate copy paper size see page 3 11 Matching size is not available No trays contain paper of the right size to run a copy cycle in the Auto Paper Mode...

Страница 201: ...other than the above Refer to the Gradation Adjust see page 5 18 The image is too dark The manual exposure level is set on the darker side Touch the LIGHTER key as necessary to obtain a lighter image see page 3 24 The entire surface of the original glass is dirty Wipe the glass clean with a soft dry cloth see page 8 7 The original is not held tightly against the original glass Place the original i...

Страница 202: ...dirty Wipe the original pad or document transport belt clean with a soft cloth dampened with mild detergent see page 8 7 You have selected a paper size larger than the original Zoom Ratio is set at full size 100 Select the same copy paper size as the original see page 3 11 Or use the Auto Size mode to enlarge the copy to the appropriate size see page 3 18 The original is not placed in the correct ...

Страница 203: ...g the document guide plates see page 3 9 The originals may not be suitable for use in the duplexing document feeder When duplexing document feeder is being used Raise the duplexing document feeder and place the originals on the glass one at a time instead of using the duplexing document feeder see page 3 4 The original glass is dirty When duplexing document feeder is being used Wipe the glass clea...

Страница 204: ...ss number entered Enter your Access number see page 2 15 No copies are fed out when the Start key is pressed The copier was just turned ON and is warming up It takes the copier about 9 minutes to be ready for making copies after it has been turned ON Please wait The copier has developed a malfunction Check the touch panel and take action according to the message on the panel see page 6 25 Control ...

Страница 205: ...ck Paper 1 91 to 128g m Manual Feeding l Thin Paper 64 to 74g m l Plain Paper 75 to 90g m l Thick Paper 1 91 to 128g m l Thick Paper 2 129 to 209g m l OHP Films recommended by us Copy Paper Size Upper Lower Trays l A3L B4L A4L A4C A5L l 8 13L 203mm 330mm 8 10L 203mm 254mm l 8 1 4 13L 210mm 330mm Middle Tray l A3L B4L A4L A4C A5L Manual Bypass Tray l A3 Wide L 305mm 457mm A3L B4L A4L A4C A5L A6L l ...

Страница 206: ...copies min A3L l 4 copies min B4L Black l 32 copies min A4C l 16 copies min A3L l 16 copies min B4L Magnification Ratios Fixed ratios l Full size 1 1 0 005 l Reduction ratios 0 707 0 816 0 866 l Enlargement ratios 1 154 1 224 1 414 l Zoom ratios From 0 250 to 6 000 in 0 001 increments Multiple Copies Up to 99 copies in 1 sided Copy Mode Exposure Control Auto and Manual Power Requirements 100V 50 6...

Страница 207: ... 200g m Original Size l 1 sided 2 sided Original Mode A3L B4L A4L A4C A5L l 2 in 1 Mode A4C l 1 sided 2 sided Mixed Original Detection Mode A3L B4L A4L A4C Capacity of Document Feed Tray A4L A4C A5L 50 sheets 80g m A3L B4L 30 sheets 80g m Copy Productivity Full color 8 copies min A4C Black 32 copies min A4C Power Source DC 24 V supplied from copier Power Consumption 48W or less Dimensions Width 61...

Страница 208: ...ode A3 Wide A3L B4L A4L A4C A5L Sort Mode Group Mode A3L B4L A4L A4C A5L Capacity of Bins Non Sort Mode l Plain paper Max 50 sheets A3L 80g m paper l Special paper OHP Transparencies 10 sheets in 1st bin Max paper size A4 l Thick paper 10 sheets in 1st bin Sort Mode Group Mode l Plain paper 1st bin to 10th bin 25 sheets bin 80g m total 250 sheets Power Source DC24V supplied from copier Power Consu...

Страница 209: ...L B4L A4L A4C A5L Sort and Staple Mode A3L B4L A4L A4C Capacity of Bins Non Sort Mode l Plain paper Max 50 sheets A3L 80g m paper Special paper l OHP Transparencies 10 sheets in 1st bin Max paper size A4 l Thick Paper 10 sheets in 1st bin Sort Mode Sort and Staple Mode l Plain paper 1st bin to 10th bin 25 sheets bin 80g m total 250 sheets Staple Capacity 2 to 25 sheets 80g m Power Source DC24V sup...

Страница 210: ...4C A5L Up to 2 copies A3L A4L l 2 sided Original Up to 2 copies A4C A5L Up to 2 copies A3L B4L A4L When the Automatic Document Feeder is not used l 1 sided 2 sided Original Up to 2 copies A4C A5L 1 copy A3L B4L A4L l Book Original 99 copy Power Source DC24V 5 supplied from copier Power Consumption 30W or less Dimensions Width 121mm Depth 536mm Height 345mm Weight 7 0kg Excluding Mounting Brackets ...

Страница 211: ...cleaning Housing Cover è Wipe the surface of the housing cover clean with a soft cloth dampened with mild home detergent Control Panel è Wipe the surface of the control panel clean with a soft dry cloth NOTE è NEVER use a glass cleaner or any other detergent to avoid damage to the control panel keys and touch panel ...

Страница 212: ...rt belt at both edges and pull it to the left to expose a fresh surface 3 Wipe the fresh surface clean using the soft cloth dampened with mild home detergent Repeat these steps until the entire surface of the belt is wiped clean Original Glass è Wipe the surface of the original glass clean with a soft dry cloth Front Door è Wipe the inside of the front door clean with a soft dry cloth ...

Страница 213: ...tness Sharpness Density Contrast Color Balance Basic Red Green Blue Sharpness Brightness Contrast Saturation Portrait Professional Hue Saturation Brightness Sharpness Density Contrast Color Balance Original Image Type Symbol Description The functions can be combined The functions can be combined though a miscopy could result The functions cannot be combined The function set first takes precedence ...

Страница 214: ...ze Zoom Ratio Density Background Level Image Density F 1 sided Orig 1 1 1 2 J J E 1 2in1 2 sided Orig 2 1 2 2 J J E 1 2 2in1 J J E Book Book 1 E E H Book 2 E J E E H Finishing Non Sort C Sort C Group C Staple C Auxiliary Frame Erase File Margin Cover E A E E E E E E OHP Interleaving E B E E E E E C C E E Color Adjust F D D D Create Monotone D Background Color Neg Pos Reverse Color Separation E E E...

Страница 215: ...Interleaving Non Sort is automatically selected D In Monotone Black or Black of Color Separation only the following Color Adjust functions can be adjusted Sharpness Brightness and Contrast under Basic and Sharpness Density Contrast and Color Balance for Monotone only under Professional E These functions cannot be set last as the display does not provide keys for setting if you go the other way aro...

Страница 216: ...m 4 5 3 4 Name Size Inch Size Metric LEDGER 11 17 279 mm 432 mm 11 14 11 14 279 mm 356 mm COMPUTER 10 1 8 14 257 mm 356 mm 10 14 10 14 254 mm 356 mm 9 1 4 14 9 1 4 14 236 mm 356 mm LEGAL 8 1 2 14 216 mm 356 mm FOOLSCAP GOVERNMENT LEGAL 8 1 2 13 216 mm 330 mm FOOLSCAP 8 13 203 mm 330 mm FOOLSCAP 8 2 3 13 220 mm 330 mm FOOLSCAP FOLIO 8 1 4 13 210 mm 330 mm 8 1 4 11 3 4 8 1 4 11 3 4 210 mm 301 mm LET...

Страница 217: ...0 866 B5 0 610 A4 210 297 mm 8 1 4 11 3 4 A5 0 707 A6 0 500 B5 0 866 B6 0 610 A3 1 414 B4 1 224 A5 148 210 mm 5 3 4 8 1 4 A6 0 707 B6 0 866 A4 1 414 A3 2 000 B4 1 733 B5 1 224 A6 105 148 mm 4 1 4 5 3 4 A4 2 000 A5 1 414 B5 1 733 B6 1 224 B4 257 364 mm 10 14 1 4 A4 0 816 A5 0 577 B5 0 707 B6 0 500 A3 1 154 B5 182 257 mm 7 1 4 10 A5 0 816 A6 0 577 B6 0 707 A3 1 640 A4 1 154 B4 1 414 ...

Страница 218: ... 14 0 823 Legal 0 772 Foolscap 0 764 Letter 0 647 Invoice 0 500 11 15 279 4 381 mm 11 14 0 933 Legal 0 772 Foolscap 0 772 Letter 0 733 Invoice 0 500 11 14 279 4 355 6 mm Legal 0 772 Foolscap 0 772 Letter 0 772 Invoice 0 500 Legal 8 1 2 14 215 9 355 6 mm Foolscap 0 928 Letter 0 785 Invoice 0 607 11 17 1 214 Foolscap 8 1 2 13 215 9 330 2 mm Letter 0 846 Invoice 0 647 11 17 1 294 11 14 1 076 Metric A...

Страница 219: ...inal Size 1 inch 25 4 mm 1 mm 0 0394 inch Letter 8 1 2 11 215 9 279 4 mm Invoice 0 647 11 17 1 294 11 14 1 272 Invoice 5 1 2 8 1 2 139 7 215 9 mm 11 17 2 000 11 14 1 647 Legal 1 545 Foolscap 1 529 Letter 1 294 Inch Areas Original Size Copy Paper Size Zoom Ratio ...

Страница 220: ...8 Miscellaneous 8 16 CF9001 ...

Страница 221: ... Administrator Code 5 4 Auto Color 2 7 Auto Color Mode 3 2 Auto Copy Start 2 14 Auto Dual Function 3 37 Auto Exposure 3 24 Auto Panel Reset 2 13 Auto Paper 3 11 Auto Reset 5 30 Auto Size 3 18 Auto Tray Switching 3 14 B Background Color 4 19 Basic Adjustment Items 3 38 Black Keys 2 7 Black Mode 3 2 Blue Component 3 38 Book Mode 3 27 Brightness 3 38 4 13 C Calling up a Job 5 29 Cleaning 8 7 Clear Ke...

Страница 222: ...Table 8 12 Copy Track Functions 5 4 Count Data 5 2 Cover Sheet 4 10 Custom 2in1 5 30 D Default Settings 5 1 Density 3 23 4 14 Digital Art Functions 4 17 Display Contrast Control Knob 2 6 Dummy Rotation 5 20 E Energy Saver 5 30 Energy Saver Key 2 7 Energy Saver Mode 2 13 Enter Administrator Code 5 4 Entering the Access Number 2 15 F File Margin 4 4 Flesh Tone 3 39 Frame Erase 4 2 Full Color 2 7 Ful...

Страница 223: ...7 Job Recall Key 2 6 5 29 K Key Counter 5 30 L Language 5 30 Loading Paper 6 2 M Manual Bypass Copying 3 14 Manual Exposure 3 24 Manual Staple 3 34 Messages 6 25 Meter Count 5 2 Mirror Image 4 35 Misfeed Clearing 6 12 Mixed Original Detection Mode 3 30 Monotone 4 18 Multi Page Enlargement 4 29 N Neg Pos Reverse 4 21 Non Sort 3 33 O OHP Interleaving 4 8 Original Copy Types 3 25 ...

Страница 224: ...nishing the Fuser Oil 6 19 Replenishing Toner 6 5 S Sample Copy 3 40 Saturation 3 39 4 13 Scanner Address Input 5 34 Selecting a Ratio 3 19 Sharpness 4 13 Sort 3 33 Sort and Staple 3 33 Start Key 2 7 3 3 Starting the Copy Cycle 3 3 Stop Key 2 7 3 3 Stopping the Copy Cycle 3 3 Storing and Calling Jobs 5 27 System Overview 2 1 T Thick 2 Duplex 5 24 Touch Panel 2 6 2 8 Turning ON and OFF 2 11 U User ...

Страница 225: ...Index 9 CF9001 9 5 W What Does Each Message Mean 6 25 X X Y Zoom 4 23 Z Zoom Ratio 3 18 Zoom Ratio Table 8 13 ...

Отзывы: