background image

10

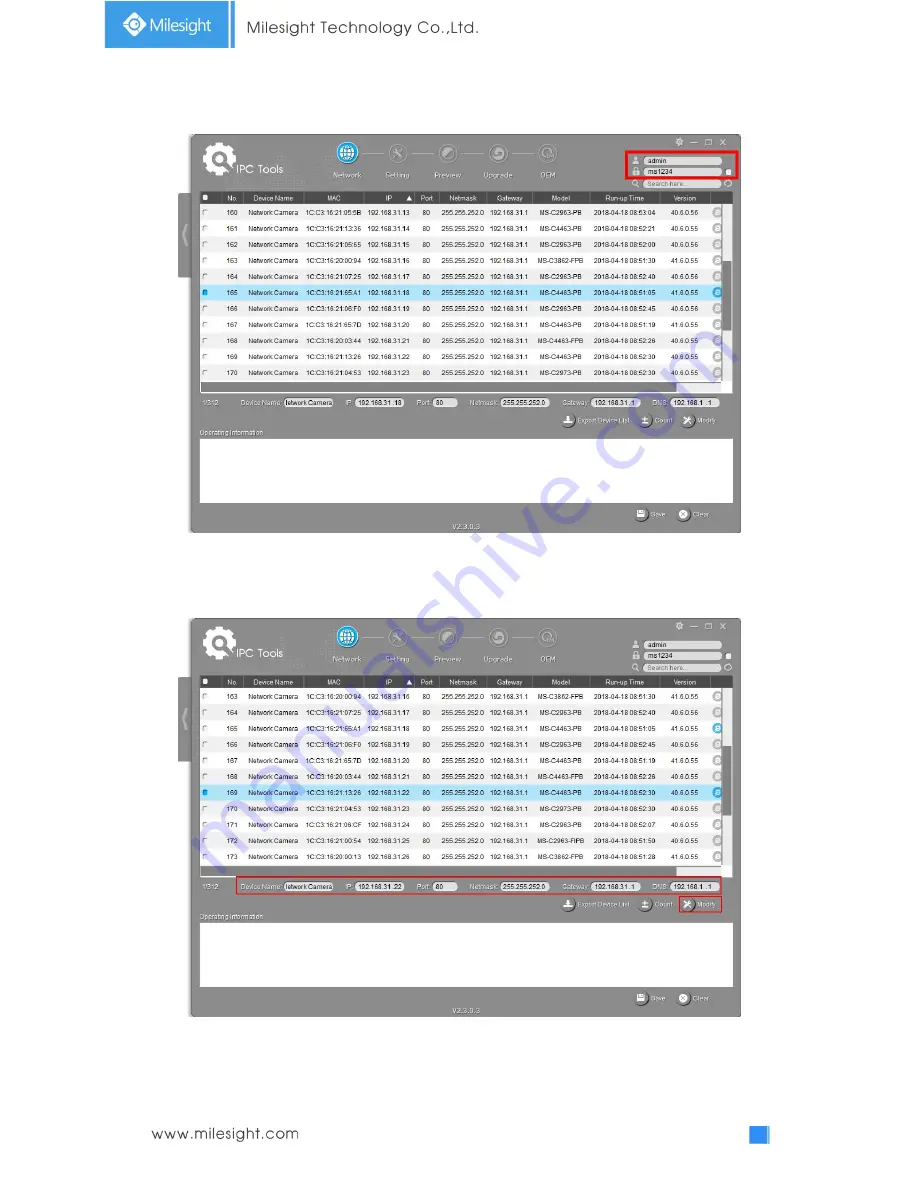
Step4: Type the User Name and Password (admin/ms1234 for default, please change your

password for your device security);

Figure 3-1-4 Type the User Name and Password

Step5: Change the IP address or other network values, and then click “Modify” button;

Figure 3-1-5 Modify

Содержание MS-C2942-B

Страница 1: ...PTZ Network Camera User Manual V2 08 ...

Страница 2: ...ribed in the manual Copyright Statement This manual may not be reproduced in any form or by any means to create any derivative such as translation transformation or adaptation without the prior written permission of Milesight Technology Co Ltd Hereinafter referred to as Milesight Milesight reserves the right to change this manual and the specifications without prior notice The latest specification...

Страница 3: ... When the product is installed on a wall or ceiling the device should be firmly fixed If the product does not work properly please contact your dealer Never attempt to disassemble the camera by yourself Cautions Make sure that the power supply voltage is correct before using the camera Do not store or install the device in extremely hot or cold temperatures as well as dusty or damp locations and d...

Страница 4: ...n points For more information see www recyclethis info 2006 66 EC battery directive This product contains a battery that cannot be disposed of as unsorted municipal waste in the European Union See the product documentation for specific battery information The battery is marked with this symbol which may include lettering to indicate cadmium Cd lead Pb or mercury Hg For proper recycling return the ...

Страница 5: ...signing An IP Address Using Smart Tools 8 3 1 2 Assign An IP Address via Browser 12 3 2 Accessing from the Web Browser 14 3 3 Accessing from Milesight VMS Video Management Software 16 Chapter IV System Operation Guide 17 4 1 Live Video 17 4 1 1 Operations on Live View Page 17 4 1 2 3D Positioning 20 4 1 3 Set Call a preset Patrol Pattern 20 4 2 Playback 24 4 3 Local Settings 26 4 4 Basic Settings ...

Страница 6: ...t is widely used in fields such as finance education industrial production civil defense health care for security s sake 1 2 Key Features Up to 30x Optical Zoom for Speed Dome 12x Optical Zoom for Mini PoE PTZ Bullet 360 continuous pan and 0 90 auto flip tilt for PoE Speed Dome 360 continuous pan and 45 30 tilt for Mini PoE PTZ Bullet 255 Preset Points and 8 Patrols Based on Linux OS with high rel...

Страница 7: ...view 1 PoE Speed Dome Network Camera Figure 1 3 1 PoE Speed Dome Network Camera Note 1 AC 24V and PoE are available for power supply 2 Built in SD card slot can be seen after removing the 4 screws and open the front panel ...

Страница 8: ... Bullet Figure 1 3 2 12x Mini PoE PTZ Bullet Network Camera Note 1 Reset Button Press Reset button for 5 seconds then the device will be restored to factory default 2 Only DC 12V is available for Mini PTZ Bullet power supply DC 12V and PoE 802 3at are available for Mini PoE PTZ Bullet power supply ...

Страница 9: ... 24V DC 1A PIN3 Alarm Input NC NO 12V PIN4 Alarm Input NC NO 12V 1 5 How to Connect the Water proof Connector Step1 Get the network cable through the screw nut rubber ring and the screw bolt Step2 Insert the rubber ring into the screw bolt Step3 Connect the screw nut to the screw bolt Step4 Place the O Ring on the network port connector Step5 Connect the RJ45 to the network port connector and tigh...

Страница 10: ...Windows XP Vista 7 8 10 Server 2000 Server 2008 CPU 1 66GHz or higher RAM 1G or higher Graphic memory 128MB or more Internet protocol TCP IP IPv4 IPv6 Web Browsers Internet Explorer 8 0 and above version Mozilla Firefox Google Chrome and Safari ...

Страница 11: ...e computer Details are shown as the following figure Figure 2 1 1 Connect the camera to the PC directly 2 1 2 Connect via a Switch or a Router Set network camera over the LAN via the switch or router as figure 2 1 2 Figure 2 1 2 Connect via a switch or a Router 2 2 Dynamic IP Connection Connecting the network camera via a router Step1 Connect the network camera to a router Step2 On the camera assi...

Страница 12: ...tep4 Apply a domain name from a domain name provider Step5 Configure the DDNS settings in the setting interface of the router Step6 Visit the camera via the domain name Figure 2 2 Connect the network camera via a router using dynamic IP ...

Страница 13: ...uter 3 1 1 Assigning An IP Address Using Smart Tools Smart Tools is a software tool which can automatically detect multiple online Milesight network cameras in the LAN set IP addresses and manage firmware upgrades It s recommended to use when assigning IP addresses for multiple cameras Step1 Install Smart Tools The software could be downloaded from our website Step2 Start Smart Tools click the IPC...

Страница 14: ...9 Step3 Select a camera or multiple cameras according to the MAC addresses Figure 3 1 2 Select single camera Figure 3 1 3 Select multiple cameras ...

Страница 15: ... Password admin ms1234 for default please change your password for your device security Figure 3 1 4 Type the User Name and Password Step5 Change the IP address or other network values and then click Modify button Figure 3 1 5 Modify ...

Страница 16: ...essfully Step7 By double clicking the selected camera or the browser of interested camera you can access the camera via web browser directly The Internet Explorer window will pop up Figure 3 1 7 Login interface More usage of Smart Tools please refer to the Smart Tools User Manual ...

Страница 17: ...ol Panel Network and Internet Connection Network Connection Local Area Connection and double click it Refer to Figure 3 1 8 Figure 3 1 8 Setting Network Segment IP Address of Computer b Click Advanced and then click IP settings IP address Add See Figure 3 1 9 In the pop up window enter an IP address that in the same segment with Milesight network camera e g 192 168 5 61 but please note that this I...

Страница 18: ...d when the LOGIN page appears Default user name admin Default password ms1234 Figure 3 1 10 Login Step4 After login please select Configuration Basic Settings Network TCP IP The Network Settings page appears Shown as below Figure Figure 3 1 11 IP Address of Camera Step5 Change the IP address or other network values Then click Save button Step6 The change of default IP address is completed ...

Страница 19: ...first time to log in the device the browser will prompt to install Controls please click Click here to download and install controls manually as Figure 3 2 1 Figure 3 2 1 To download and install controls Note 1 During installing the controls please keep the browsers close Step4 Follow the prompts to install the Controls when it s finished it will pop out a window as Figure 3 2 2 Please click Finis...

Страница 20: ...ure 3 2 3 To add the permission Step2 Select Security to Trusted Figure 3 2 4 To trust the control Step3 Enter the IP address of the camera in the blank and click Add Figure 3 2 5 Add the website to the zone ...

Страница 21: ... interface of Milesight VMS is very easy to use intuitive with easy access to the most common activities such as viewing live video searching through recordings and exporting videos and snapshots It s able to be integrated with other devices through ONVIF It is designed to work on Windows XP 7 8 Vista Server 2000 Server 2008 The software could be downloaded from our website www milesight com Pleas...

Страница 22: ... view live video as follows Figure 4 1 1 Live view interface 4 1 1 Operations on Live View Page Table 4 1 1 Description of the buttons No Parameter Description 1 PTZ Control Navigation key is used to control the direction The rotation key is used for auto rotation PTZ Speed To adjust the speed of pan tilt movements from 1 to 10 ...

Страница 23: ... level Default Drag to restore brightness contrast and saturation to default setup 8 Configuration Click to access the configuration page 9 To choose the Stream Primary Secondary Tertiary to be shown on the current video window 10 Web Components Support Firefox Safari Chrome need to install the component to display the view MJPEG Support to display the view on Firefox Safari Chrome NOTE IE chooses...

Страница 24: ...n appears 20 Click to start stop Live View 21 Capture Click to capture the current image and save to the configured path The default path is C VMS 1 IMAGE MANUAL 22 Start Stop Recording Click to start recording video and save to the configured path The default path is C VMS 1 MS_Record Click again to stop recording 23 Play Audio Click to enable Audio Input Output It can also be set in Audio config...

Страница 25: ... mouse to the lower left or upper left on the Live View you can see a blue rectangle The corresponding position will be moved to the center of the Live View and Zoom out The Bigger the rectangle is the smaller zoom in out will be acted 4 1 3 Set Call a preset Patrol Pattern A preset is a predefined image position You can click the call button from the preset list to quickly go to the desired image...

Страница 26: ...xample preset 037 is the Self Check If you call the preset number 037 the PTZ camera will start self check function at once Table 4 1 2 Special Presets Special Preset Function Special Preset Function 33 Auto Flip Speed Dome only 42 Path4 34 Goto Zero 43 Path5 35 Stop Scan 44 Path6 36 Auto Scan 45 Path7 37 Self Check 46 Path8 38 Patrol 47 Pattern1 39 Path1 48 Pattern2 40 Path2 49 Pattern3 41 Path3 ...

Страница 27: ...dd presets to this patrol as shown in Figure 4 1 5 Figure 4 1 5 Configure a Patrol Step4 Configure the preset number patrol speed and patrol time Table 4 1 3 Description of Patrol Settings Name Description Patrol Speed The speed of moving from one preset to another Patrol Time The duration staying on one patrol point The PTZ camera moves to another patrol point after the set patrol time Step5 Clic...

Страница 28: ...s interface Step2 Select a pattern number from the pattern list as shown in Figure 4 1 7 Figure 4 1 7 Set a Pattern Step3 Click to activate recording the panning tilting and zooming actions Step4 Use the PTZ controller buttons to move the lens to the interested position Step5 Click to save all the pattern settings Note The percentage of number on the OSD is the remaining space of pattern Start wit...

Страница 29: ...but the limit stops and auto flip will be invalid Also 3D Positioning operation is not supported 4 2 Playback This section explains how to view the recorded video files stored in SD cards Step1 Click and then click on the menu bar to enter playback interface Figure 4 2 1 Playback interface Step2 Click the date button choose the date when date window pops up ...

Страница 30: ...e background means that the date is selected now Step3 Click to play the video files found on this date The toolbar on the button of playback interface can be used to control playing progress Figure 4 2 3 Playback Toolbar Table 4 2 1 Description of the buttons Button Operation Play Pause Stop Speed Down Speed Up Audio On Off Search Go To Time Narrow Expand Start Stop Recording ...

Страница 31: ...the Set Playback Time filed You can also click to zoom out in the progress bar Figure 4 2 4 Set Payback Time 4 3 Local Settings Record File Length and storage path can be customized in this setting page Figure 4 3 1 Local Settings 4 4 Basic Settings 4 4 1 Video Stream parameters can be set in this module adapting to different network environments and demands Primary Stream Settings ...

Страница 32: ...econdary Stream Settings Figure 4 4 2 Secondary Stream Settings Tertiary Stream Settings Figure 4 4 3 Tertiary Stream Settings Table 4 4 1 Description of the buttons Parameters Function Introduction Video Codec H 265 H 264 MJPEG are available ...

Страница 33: ...h quality of images and it is a 10 level adjustable codec It is optional to turn On Off Smart Stream mode Level Level 1 10 are available to meet your need Bit Rate Control CBR Constant Bitrate The rate of CBR output is constant VBR Variable Bitrate VBR files vary the amount of output date per time segment Image Quality Low Medium High are available this item is optional only if you select VBR Prof...

Страница 34: ...ngs Auto Mode Show in live view based on environment set the sensitivity for switching Day Mode to Night Mode or Night Mode to Day Mode Customize Show in live view based on your own settings time to start end Night Mode Day To Night Value This is the sensitivity for switching Day Mode to Night Mode When IR Light Sensor Current Value is lower than this value it will switch Day Mode to Night Mode Ni...

Страница 35: ...ear view level Adjust the light strength of Low Beams LED light level from 0 to 100 Far view level Adjust the light strength of High Beams LED light level from 0 to 100 IR Strength Value The current value of Low Beams LED and High Beams LED light value Outdoor Indoor Mode Select indoor or outdoor mode to meet your needs Corridor Mode There are three options available you can select one to meet you...

Страница 36: ... for still objects Digital Anti fog Mode This function is only for H 265 series Better image effect in foggy weather refers to Figure 4 4 9 Digital Image Stabilisation This function is only for H 265 series Decrease the blur and shakiness of the image Exposure Mode Auto Mode Manual Mode and Schedule Mode are available Auto Mode The camera will adjust the brightness according to the light environme...

Страница 37: ...gh Light Compensation This function is only for H 265 series to adjust the brightness to a normal range when the light is strong refers to Figure 4 4 10 Off Disable HLC function General Mode Enable the general mode of HLC and there is a setting for HLC Level Enhanced Mode Enable the enhanced mode of HLC and there is a setting for HLC Level HLC Level Select level for HLC Day Enhancement Mode BLC WD...

Страница 38: ... 3 You can customize the schedule to enable disable BLC WDR HLC mode Figure 4 4 8 BLC WDR HLC mode schedule settings 4 WDR HLC has higher priority than exposure settings at the same time frame 5 Anti fog Image Figure 4 4 9 Anti fog Image 6 HLC Image ...

Страница 39: ...s Maximum Exposure Time Set the minimum Shutter to 1 1 100000s Maximum Shutter Maximum Shutter is the same as Minimum Exposure Time Set the maximum Shutter to 1 1 100000s IR CUT Latency The interval time of switching one mode to another IR CUT Turn on or turn off IR CUT LED Choose to turn on or turn off under this mode LED off Turn off all the LEDs on the device IR LED on Turn on the IR LED White ...

Страница 40: ...o Stream Enable to set OSD for primary stream and secondary stream Font Size Smallest Small Medium Large Largest Auto are available for title and date Font Color Enable to set different color for title and date Show Video Title Check the checkbox to show video title Video Title Customize the OSD content Text Position OSD display position on the image Show Timestamp Check the checkbox to display da...

Страница 41: ...tion of the buttons Parameters Function Introduction Enable Check the checkbox to enable the ROI function Clear All Clear all areas you drew before Video Stream Choose the Video Stream Note You can set a low bit rate For example you can set a bit rate of 512Kbps and a resolution of 1080P then you can see the image quality of ROI is more clear and fluent than the other region 4 4 3 Audio This audio...

Страница 42: ... G711 ALaw and AAC LC are available Sample Rate There are 8KHz 16KHz two options Input Gain Input audio gain level 0 100 Alarm Level Alarm will be triggered if voice alarm is enabled and input gained volume is higher than the alarm level 0 100 Audio Output Auto Gain Control Improve the quality of audio Output Volume Adjust volume of output You can upload up to 3 audio files manually to Flash or SD...

Страница 43: ...ns Parameters Function Introduction Get IPv4 Address Automatically Get an IP address from the DHCP server automatically Use fixed IP address IPv4 Address It is used to identify a network camera on the network IPv4 Subnet Mask It is used for identifying the subnet where the network camera is located IPv4 Default Gateway It is the default router address Preferred DNS Server The DNS Server translates...

Страница 44: ... address Note The Test button is used to test if the IP is conflicting HTTP Figure 4 4 17 HTTP Settings Table 4 4 9 Description of the buttons Parameters Function Introduction HTTP Enable Start or stop using HTTP HTTP Port Web GUI login port the default is 80 the same with ONVIF port HTTPS Enable Start or stop using HTTPS HTTPS Port Web GUI login port via HTTPS the default is 443 HTTP Settings Upl...

Страница 45: ...t The port of RTSP the default is 554 Playback Port The port of playback the default is 555 RTP Packet There are Better Compatibility and Better Performance two options If your camera s image mess up please switch this option Multicast Group Address Support multicast function QoS DSCP The valid value range of the DSCP is 0 63 RTSP URL are as below Stream URL Main Stream rtsp username password IP p...

Страница 46: ...ows devices to connect seamlessly and to simplify the implementation of networks in the home and corporate environments With the function enabled you don t need to configure the port mapping for each port and the camera is connected to the Wide Area Network via the router Figure 4 4 19 UPnP Settings Table 4 4 11 Description of the buttons Parameters Function Introduction Enable Check the checkbox ...

Страница 47: ...roduction Enable DDNS Check the checkbox to enable DDNS service Provider Get support from DDNS provider ddns milesight com freedns afraid org dyndns org www no ip com www zoneedit com You can also customize the provider for DDNS Hash A string used for verifying only for freedns afraid org User name Account name from the DDNS provider unavailable for freedns afraid org Password Account password una...

Страница 48: ...Sender Email Address Email address to send video files attached emails Password The password of the sender SMTP Server The SMTP server IP address or host name e g smtp gmail com SMTP Port The port of SMTP server The default TCP IP port for SMTP is 25 not secured For SSL TLS port it depends on the mail you use Recipient Email Address1 Email address to receive video files Recipient Email Address2 Em...

Страница 49: ...where video and image will be uploaded to the FTP server Four FTP storage path types are available including Root Directory Parent Directory Child Directory and Customize Parent Directory Choose IP Address Device Name Date as the folder name of Parent Directory or customize the folder name Child Directory Choose IP Address Device Name Date as the folder name of Child Directory or customize the fol...

Страница 50: ... at the data link layer OSI layer 2 LAN is an abbreviation of local area network VLANs allow network administrators to group hosts together even if the hosts are not on the same network switch This can greatly simplify network design and deployment because VLAN membership can be configured through software Without VLANs grouping hosts according to their resource needs necessitates the labour of re...

Страница 51: ...ore setting the SNMP please download the SNMP software and manage to receive the camera information via SNMP port By setting the Trap Address the camera can send the alarm event and exception messages to the surveillance center Figure 4 4 5 SNMP Settings Table 4 4 15 Description of the buttons Parameters Function Introduction SNMP v1 2 3 The version of SNMP please select the version of your SNMP s...

Страница 52: ...ity There are three levels available auth priv auth no priv and no auth no priv SNMP Port The port of SNMP the default is 161 Note 1 The settings of SNMP software should be the same as the settings you configure here 2 A reboot is required for the settings to take effect 802 1x The IEEE 802 1X standard is supported by the network cameras and when the feature is enabled the camera data is secured a...

Страница 53: ...me Zone Choose a time zone for your location Daylight Saving time Enable the daylight saving time NTP Sync Regularly update your time according to the interval time Synchronize with computer time Synchronize the time with your computer NTP server Input the address of NTP server Encryption Type Synchronize the time with configured SNTP server and select time zone Manual Set the system time manually...

Страница 54: ...otion Detection Check the checkbox to enable Motion Detection function Onvif Motion ActiveCells Settings Normal and Compatible are available for the option If the setting of motion region of the third party software is different from ours please set this option to Compatible Select All Click the button and the motion in the area will be detected Clear All Click the button and the area drawn before...

Страница 55: ...o NAS Save alarm recording files into NAS Upload Via FTP Upload the recording files via FTP Upload Via SMTP Upload the files via SMTP External Output If the camera equips with External Output you can enable the action after configuring the trigger duration Play Audio If the camera equips with Speaker you can enable the action after configuring the audio speaker Play Buzzer If the camera equips wit...

Страница 56: ...and decides what to do after receiving this kind of messages So we can use the HTTP Notification function of our cameras only if the VMS supports this kind of message format Here the Digifort will be taken as an example to introduce the HTTP Notification function The following are the detail steps of setting for HTTP Notification in Digifort VMS and our cameras Step1 Enable Alarm set Motion Region...

Страница 57: ...can set as above to our cameras and get it work well Step3 Choose use motion detection by external notification Step4 If successful you can see the device icon turn yellow in the Surveillance when the camera is under Motion Detection Alarm So it s the VMS Software which decides whether we can use this function successfully Step5 Set alarm settings ...

Страница 58: ... the Alarm Action firstly Audio Action Settings Set the audio schedule to trigger different audio files and action times in different time which is corresponded to alarm action Play Audio Interval Auto 10 seconds 30 seconds 1 minute 5 minutes 10 minutes are available White LED Flash Mode Twinkle The White LED will continuous flashing before recovered Always The White LED will always open before re...

Страница 59: ...e should not be less than flash time 2 You can customize the schedule of Audio Action Figure 4 5 5 Audio Action schedule settings Audio Alarm Enable the Audio before using Audio Alarm function Figure 4 5 6 Schedule Settings ...

Страница 60: ...55 Figure 4 5 7 Alarm Settings Please refer to table 4 5 2 and 4 5 3 to get the meaning of items External Input Figure 4 5 8 Schedule Settings ...

Страница 61: ...56 Figure 4 5 9 Alarm Settings The meaning of items please refer to table 4 5 2 and 4 5 3 here will not repeat again Other Alarm Figure 4 5 10 Other Alarm ...

Страница 62: ...before alarm 0 10 sec Snapshot The number of snapshot 1 5 Snapshot Interval This cannot be edited unless you choose more than 1 to Snapshot Trigger Duration Length of time an alarm lasts this cannot be edited unless when you enable the External Output on the Alarm Action firstly Audio Action Settings Set the audio schedule to trigger different audio files and action times in different time which i...

Страница 63: ...gure 4 5 12 SD Card Table 4 5 5 Description of the buttons Parameters Function Introduction Format Format SD card and the files in SD card will be removed Mount UnMount Mount Dismount SD card Enable Recycle Storage Enable Disable recycle storage Delete Enable cyclic storage When the free disk space reach at a certain value it will automatically delete the files at certain percentage according to y...

Страница 64: ...ess of NAS server File Path Input the NAS file path e g path Mounting Type NFS and SMB CIFS are available And you can set the user name and password to guarantee the security if SMB CIFS is selected Note Up to 5 NAS disks can be connected to the camera Record Schedule Figure 4 5 14 Record Schedule ...

Страница 65: ...save into SD card You can set time schedule every day for recording videos and save video files to your target location SD card video files are arranged by date Each day files will be displayed under the corresponding date from which you can copy and delete files etc You can visit the files in SD card by ftp for example ftp username password 192 168 5 190 User name and password are the same as the...

Страница 66: ...fix or overwrite the base file name Save Into NAS Save the snapshots into NAS and choose the file name to add time suffix or overwrite the base file name Upload Via FTP Upload the snapshots via FTP Upload Via SMTP Upload the snapshots via SMTP Please note If you choose to add time suffix every snapshot picture will be saved but if you choose to overwrite the base file name only one latest picture ...

Страница 67: ...ount Confirm User Password Confirm the password Privilege Set the privilege for the account Administrator An administrator can manage all configuration pages of the device including the change of user password and the addition or deletion of users the default user admin cannot be deleted Operator An operator can manage all configuration pages except the User page Viewer A viewer can t change any s...

Страница 68: ...nt streaming Options include Number Limit 1 9 IP access list Rule Single Network and Range are available IP address Input the address to get the access to the device Enable access list filtering Able to access or restrict access for some IP address Filter type Access or restrict access Security Service Figure 4 5 19 Security Service Table 4 5 10 Description of the buttons Parameters Function Intro...

Страница 69: ...is function the settings in SIP page must be configured properly There are two ways to get video through SIP one is to dial the IP address directly the other is account registration mode the details are as follows Method 1 IP Direct mode Dial on the camera s IP address directly through SIP phone so you can see the video Note SIP phone and the camera should in the same network segment Method2 Accou...

Страница 70: ... without register account just use the IP address to call User ID SIP ID User Name SIP account name Password SIP account password Server Address Sever IP address Server Port Sever port Connection Protocol UDP TCP Video Stream Choose the video stream Max Call Duration The max call duration when use SIP Note 1 SIP supports Directly IP call 2 SIP only supports second stream with H 265 H 264 Video Com...

Страница 71: ...address 4 5 5 Smart Event Smart Event uses Milesight Video Content Analysis technology This technical capability is used in a wide range of domains including entertainment health care retail automotive transport home automation safety and security Milesight VCA provides advanced accurate smart video analysis for Milesight network cameras It enhances the performance of network cameras through 8 det...

Страница 72: ...ion schedule Step4 Set alarm action Step5 Set alarm settings Note The Object Size can be set to define whether an object is big enough for triggering the alarm when enter into the selected region Region Exiting Region exiting is to make sure that any person or object won t exit the area that is being monitored Any exit of people or objects will trigger an alarm ...

Страница 73: ...fferent from traditional motion detection Milesight advanced motion detection can filter out noise such as lighting changes natural tree movements etc When an object moves in the selected area it will trigger alarm Figure 4 5 26 Set Advanced Motion Detection Step1 Set detecting sensitivity Step2 Set advanced motion detection region Step3 Set detection schedule Step4 Set alarm action Step5 Set alar...

Страница 74: ...urity staff immediately when any above mentioned actions occur Figure 4 5 27 Set Tamper Detection Step1 Set detecting sensitivity Step2 Set detection schedule Step3 Set alarm action Step4 Set alarm settings Line Crossing Line Crossing detection is designed to work in most indoor and outdoor environment An event will be triggered every time when the camera detects objects crossing a defined virtual...

Страница 75: ... when there is any object crossing the line from the A side to the B side the alarm will be triggered B A vice versa A B means that the alarm will be triggered when objects cross line from either side Loitering When objects are loitering in a defined area for a specific period of time it would trigger an alarm Figure 4 5 30 Set Loitering Detection Step1 Set minimum loitering time Step2 Set object ...

Страница 76: ...Human Detection Human detection is used for figuring out whether an object is a human or not Once human detection is enabled when there is an object appearing in the detecting area an ID will show on the frame If the object is a person it will mark as person When the Show Tracks is enabled the tracks of the moving object will show on the screen Figure 4 5 31 Set Human Detection People Counting Peo...

Страница 77: ...when the thresholds reaches to a certain value from 1 to 9999 Setting Milesight VCA provides the primary setting for the whole VCA functions Minimum Size is to set the whether an object is big enough to trigger other settings The frame you draw on the screen means that only if the object size is bigger than the frame the settings for other VCA functions will take effect Maximum Size means opposite...

Страница 78: ...orizontal View and Overhead View Analysis Type Select Standard or Advanced analysis type License Generated by camera s information License Status Show present license status including Valid Invalid Expired Unactivated 4 5 6 PTZ PTZ Settings provides you to configure the functions and parameters about Pan Tilt Zoom PTZ parameters are mainly include the Basic parameters Auto Home Config Clear PTZ Li...

Страница 79: ...presets Level 1 10 are available Manual Speed Speed Dome It determines the PTZ speed of Manually control Low Medium High are available Scan Speed Speed Dome It determines the speed of Auto Scan Level 1 10 are available Patrol Recovering Mini PTZ Bullet Click to enable Patrol Recovering Patrol Recovery Time Mini PTZ Bullet Set time for Patrol Recovering which is between 5 and 720 seconds Focus Mode...

Страница 80: ...able the Auto Home mode Table 4 5 16 Description of the buttons Parameters Function Introduction Latency Time Set a latency time to trigger Auto Home mode 5 720s Auto Home Mode Preset A preset point will take effect when triggering the Auto Home Auto Home Mode Number Select a predefined preset in the list press Call to check the location Also support to select current location ...

Страница 81: ...o scan is performed only in the limited surveillance area Step3 Click the PTZ controller buttons to set the left right limit stops you can also call the defined presets and set them as the limits of the PTZ camera Step4 Click Set to save the limits or Clear to clear the limits Initial Position You can configure the Initial Position for Mini PTZ Bullet as a zero point Step1 Click the PTZ control bu...

Страница 82: ...n areas on the live video to prevent certain spots in the surveillance area from being viewed and recorded The mask area does not move as the lens moves You can set eight mask areas at most Figure 4 5 40 Privacy Mask Table 4 5 18 Description of the buttons Parameters Function Introduction Enable Check the checkbox to enable the Privacy Mask function Add Add the current drawing area as Privacy Mask...

Страница 83: ...ure 4 5 41 Scheduled Task interface Step2 Check the checkbox to Enable Scheduled Task Step3 Set the schedule and task details Step4 Set the Task Recovery Time from 5 to 720 seconds You can set the time a period of inactivity before the PTZ camera starts the schedule and task details Step5 Click button to save all the configurations Note 1 The time of each task cannot be overlapped Up to 10 tasks c...

Страница 84: ...asks and Scheduled Tasks RS485 Figure 4 5 43 RS485 Here you can clear configure RS485 serial port to control the PTZ of Speed Dome Protocol Baudrate Data Bit Stop Bit Parity Flow Control PTZ Address should be exactly the same as those of the control device Note This function is only for Speed Dome 4 5 7 Logs The logs contain the information about the time and IP that has accessed the camera throug...

Страница 85: ...ain type has been selected select the sub type to narrow the range of logs Start Time The time log starts End Time The time log ends Log Export Export the logs Save Period Set the period of log saving There are eight options to choose Permanent and 30 60 120 180 240 300 360 Days Go Input the number of logs page 4 6 System All information about the hardware and software of the camera can be checked...

Страница 86: ...on of the camera Software Version The software version of the camera can be upgraded MAC Address Media Access Control address Device Information The device information including information about alarm I O and clipper chip Alarm Input The number of Alarm Input interface Alarm Output The number of Alarm Output interface Uptime The elapsed time since the last restarted of the device Note The Alarm I...

Страница 87: ...sfully the update is done Note Do not disconnect the power of the device during the update The device will be restarted to complete the upgrading Figure 4 7 1 Maintenance Table 4 7 1 Description of the buttons Parameters Function Introduction System Upgrade Hardware Version The hardware version of the camera Software Version The software version of the camera Kernel Version The kernel version Firm...

Страница 88: ...he IP Configuration Select this option to keep the IP configuration when resetting the camera Export Config File Click this button to export the configuration file Import Config File Click this button to import the old configuration file 4 7 2 Auto Reboot Set the date and time to enable Auto Reboot function The device will restart at the time you set Figure 4 7 2 Auto Reboot ...

Страница 89: ...l support Technical Support Mailbox support milesight com Web http www milesight com Online Problem Submission System http www milesight com service feedback asp MILESIGHT USA TEL 1 800 561 0485 Add 220 NE 51st ST Oakland Park FL 33334 USA MILESIGHT KOREA TEL 82 2 839 3335 Add 9F 901 Star Valley B D Digital ro 9gil 99 Geumcheon gu Seoul Korea MILESIGHT CHINA TEL 86 592 5922772 Add No 23 Wanghai Ro...

Отзывы: