20
OPERATION MANUAL
Review the troubleshooting and procedures in this section if a problem develops with your
machine. If you need replacement parts then follow the procedure in beginning of the spare
parts section or if additional help with a procedure is required, then contact you distributor.
Note:
Make sure you have the model of the machine, serial number,and manufacture date
before calling.
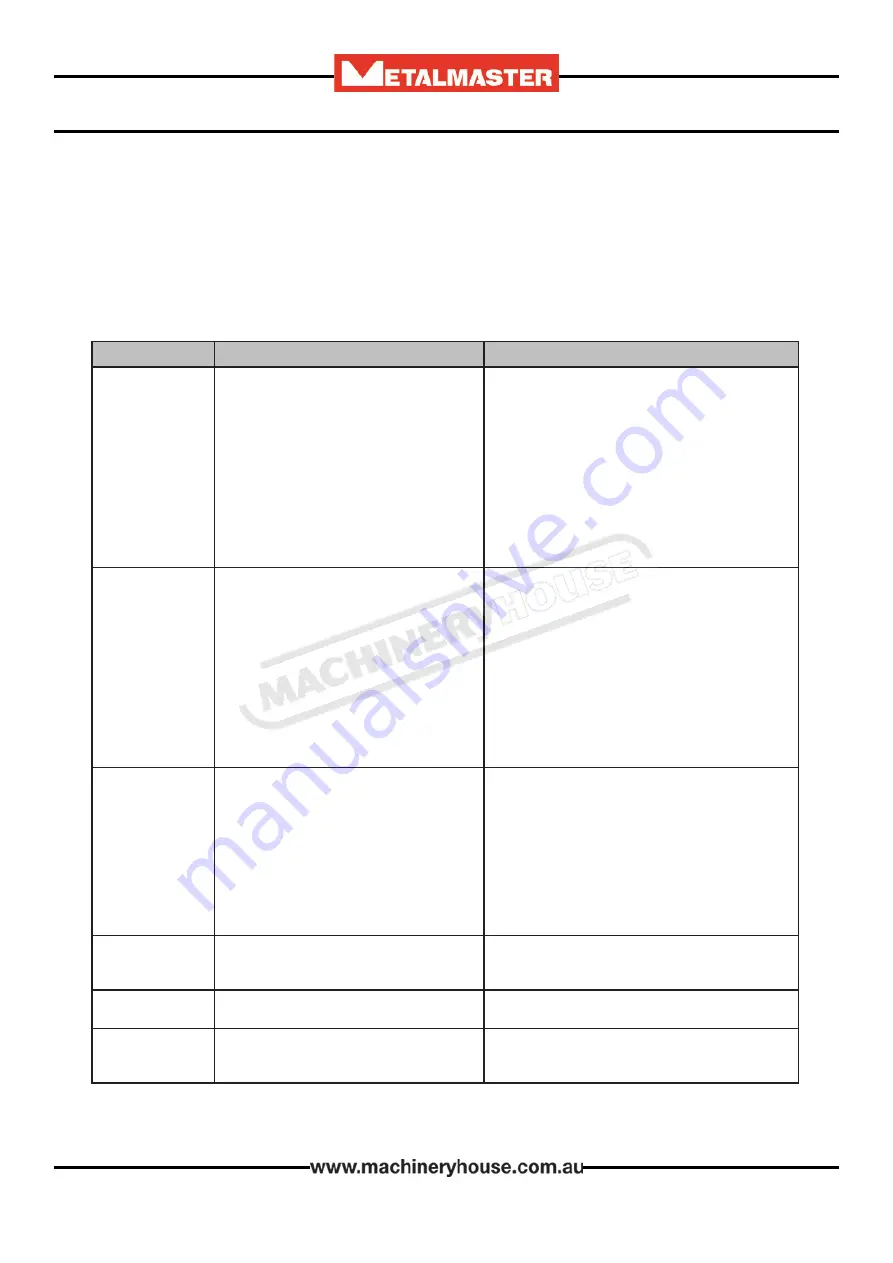
5.2 TROUBLESHOOTING
Symptoms
Possible Cause
Possible Solution
Machine does not
start or a breaker
trips.
1. Main power switch in OFF position/at fault.
2. Plug/receptacle at fault/wired wrong.
3. Incorrect power supply voltage/circuit size.
4. Power supply circuit breaker tripped or
fuse blown.
5. Motor wires connected incorrectly.
6. Contactor not energized/has poor contacts.
7. Wiring open/has high resistance.
8. Foot pedal switch at fault.
9. Start capacitor at fault.
10. Centrifugal switch at fault
11. Motor at fault.
1. Rotate switch to ON position. Replace.
2. Test for good contacts; correct the wiring.
3. Ensure correct power supply voltage/circuit size.
4. Ensure circuit is sized correctly and free of shorts.
Reset circuit breaker or replace fuse.
5. Correct motor wiring connections.
6. Test all legs for power/replace.
7. Check/fix broken, disconnected, or corroded wires.
8. Test/replace switch.
9. Test/replace.
10. Adjust/replace centrifugal switch if available.
11. Test/repair/replace.
Machine stalls or is
underpowered.
1. Machine undersized for task.
2. Wrong workpiece material.
3. Motor overheated.
4. Motor wired incorrectly.
5. Contactor not energized/has poor contacts.
6. Plug/receptacle at fault.
7. Gearbox at fault.
8. Run capacitor at fault.
9. Centrifugal switch at fault.
10. Foot pedal switch at fault.
11. Motor bearings at fault
1. Reduce downward pressure of upper roller.
2. Use correct type/size of sheet metal stock.
3. Clean motor, let cool, and reduce workload.
4. Wire motor correctly.
5. Test all legs for power/replace.
6. Test for good contacts/correct wiring.
7. Replace broken or slipping gears.
8. Test/replace.
9. Adjust/replace centrifugal switch if available.
10. Test/replace switch.
11. Test by rotating shaft; rotational grinding/loose
shaft requires bearing replacement
Machine has
vibration or noisy
operation.
1. Motor or component loose.
2. Motor fan rubbing on fan cover.
3. Motor mount loose/broken.
4. Machine incorrectly mounted on floor.
5. Roll(s) at fault/incorrectly installed.
6. Centrifugal switch at fault.
7. Motor bearings at fault.
1. Inspect/replace damaged bolts/nuts, and
re-tighten with thread-locking fluid.
2. Fix/replace fan cover; replace loose/damaged fan.
3. Tighten/replace.
4. Tighten mounting bolts; relocate/shim machine.
5. Ensure rolls are correctly installed, replace if
necessary.
6. Adjust/replace centrifugal switch if available.
7. Test by rotating shaft; rotational grinding/loose
shaft requires bearing replacement.
Workpiece dorms,
kinks, or is crushed
during operation.
1. Excessive rolling pressure.
2. Rolls not properly aligned.
3. Rolls(s) are damaged.
1. Reduce downward pressure of upper roll.
2. Align rolls (Page 18).
3. Replace rolls(s)
Bead is not deep
enough.
1. Not enough rolling pressure
1. Increase downward pressure of upper roll.
Workpiece does
not move when
rollers rotate.
1. Not enough rolling pressure.
2. Grease/oil on workpiece/rolls, causing
rolls to slip against workpiece
1. Increase downward pressure of upper roll.
2. Thoroughly clean workpiece/rolls to prevent
slipping
Содержание SJM-2.5
Страница 6: ...6 OPERATION MANUAL 1 4 SJM 2 5 DIMENSIONS...
Страница 7: ...7 OPERATION MANUAL 1 5 SJM 4 0 DIMENSIONS...
Страница 22: ...22 OPERATION MANUAL ELECTRICAL DIAGRAM...
Страница 23: ...23 OPERATION MANUAL SJM 2 5 CABINET SPARE PARTS DIAGRAM...
Страница 24: ...24 OPERATION MANUAL SJM 2 5 SPARE PARTS DIAGRAM...
Страница 26: ...26 OPERATION MANUAL SJM 4 0 CABINET DIAGRAM...
Страница 27: ...27 OPERATION MANUAL SJM 4 0 SPARE PARTS DIAGRAM...


