background image

16

OPERATION MANUAL

4. OPERATION

This machine will perform many types of operations that are beyond the scope of this manual. 

Many of these operations can be dangerous or deadly if performed incorrectly.

The instructions in this section are written with the understanding that the operator has the

necessary knowledge and skills to operate this machine. If at any time you are experiencing

difficulties performing any operation, stop using the machine!

If you are an inexperienced operator, we strongly recommend that you read books, trade 

articles, or seek training from an experienced operator before performing any unfamiliar 

operations. 

Above all, your safety should come first! 

4.1 CONTROLS

The purpose of this control overview is to provide the novice machine operator with a basic 

understanding of how the machine is used during operation, and the machine controls and 

what they do. It also helps the operator to understand if they are discussed later in this manual.

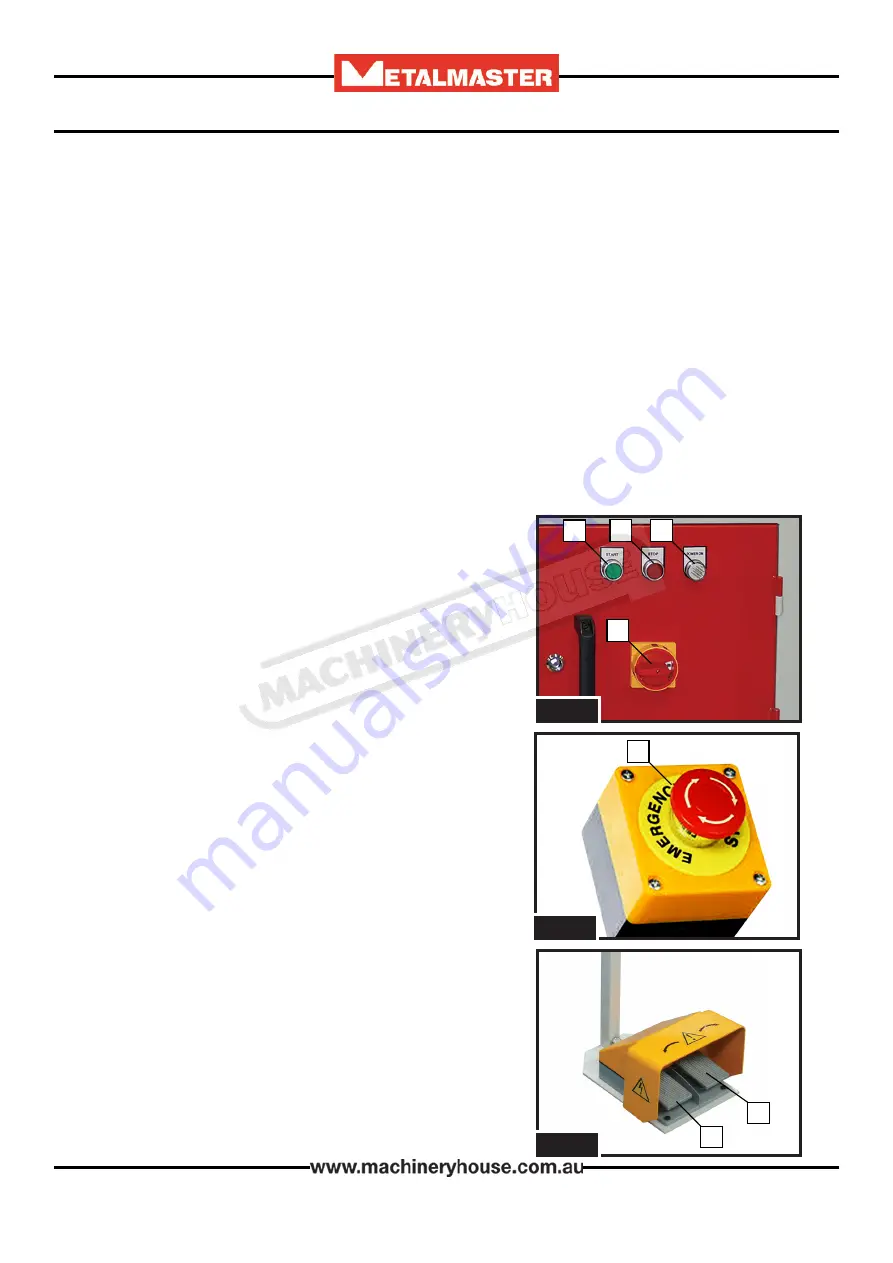
F

ig

. 4.1

F

ig

. 4.2

F

ig

. 4.3

A.  ON Button

. Switches the power ON to the machine.  

 (Fig.4.1)

B.  OFF Button

. Switches the power OFF to the machine.

C.   Power Light

. Illuminates when power is switched on.

D.  Main Isolating Switch

.  Isolates the machine from the  


power supply. (Fig.4.1)

E.  Emergency Stop Button

. When pressed stops the  


machine and locks access to the power supply. To  


unlock and reset the stop button twist the red top  


in the direction of the arrows to allow the red button  


to pop up. (Fig.4.2)

F.  Right Pedal. 

When pressed and held down the rolls  


rotate in a clock wise direction (Fig.4.3)

G.  Left Pedal. 

When pressed and held down the rolls  


rotate in a anti clock wise direction (Fig.4.3)

A

B

C

D

E

G

F

Содержание SJM-2.5

Страница 1: ...OPERATION MANUAL Edition No SJM 2 5 4 0 1 Date of Issue 09 2020 Models SJM 2 5 SJM 4 0 Order Code S636 Order Code S637 Motorised Swage Jenny...

Страница 2: ...JENNY MACHINE MODEL NO SERIAL NO DATE OF MANF Note This manual is only for your reference Owing to the continuous improvement of the Metalmaster machine changes may be made at any time without obliga...

Страница 3: ...ety Features of the Machine 11 2 3 Lifting Instructions 12 3 SETUP 3 1 Clean Up 13 3 2 Site Preparation 13 3 3 Leveling The Machine 14 3 4 Electrical Installation 14 3 5 Full Load Current Rating 15 3...

Страница 4: ...hp 1 5 2 2 2 3 Voltage V 415 415 Amperage amp 15 15 Dimensions L x W x H cm 139 x 51 x 114 155 x 51 x 118 Nett Weight kg 296 403 1 2 ACCESSORIES INCLUDED Roving foot pedal control Adjustable depth gu...

Страница 5: ...Roving Foot Pedal 2 Emergency Stop Button 8 Forward Reverse Pedals 3 ON Switch 9 Bottom Roll Horizontal Adjustment 4 OFF Switch 10 Material Guide 5 Power ON Light 11 Rolls 6 Isolating Switch 12 Top R...

Страница 6: ...6 OPERATION MANUAL 1 4 SJM 2 5 DIMENSIONS...

Страница 7: ...7 OPERATION MANUAL 1 5 SJM 4 0 DIMENSIONS...

Страница 8: ...ctive equipment The manufacturer will not be held liable for injury or property damage from negligence improper training machine modifications or misuse WARNING 2 1 GENERAL METALWORKING MACHINE SAFETY...

Страница 9: ...nd the machine to do the job safely Obtain first aid immediately for all injuries Understand that the health and fire hazards can vary from material to material Make sure all appropriate precautions a...

Страница 10: ...etc Biological contamination and waste Soft tissue injuries for example to the hands arms shoulders back or neck resulting from repetitive motion awkward posture extended lifting and pressure grip Ot...

Страница 11: ...the area is clear before using equipment OPERATIONAL SAFETY CHECKS q Adjust the chosen dies slowly and in small adjustments q Take care during the initial feeding of the workpiece into the dies q Hold...

Страница 12: ...ling angle and the loads that apply When the slings are at a 45 angle then each sling is carrying the equivalent of 50 of load weight Fig 2 1 When the slings are at a 90 angle then each sling will hav...

Страница 13: ...iece that will be processed through the machine and provide enough space around the machine for operat ing the machine safely Consideration should be given to the installation of auxiliary equip ment...

Страница 14: ...ear an existing power source Make sure all power cords are protected from traffic material handling moisture chemicals or other hazards Make sure there is access to a means of disconnecting the power...

Страница 15: ...upply circuit that meets the requirements 3 5 FULL LOAD CURRENT RATING 3 6 TEST RUN Once assembly is complete test run the machine to ensure it is properly connected to the power and safety components...

Страница 16: ...is to provide the novice machine operator with a basic understanding of how the machine is used during operation and the machine controls and what they do It also helps the operator to understand if...

Страница 17: ...to remove the retaining nuts Fig 4 6 NOTE The upper retaining nut is a left hand thread Rotate it clockwise to loosen and counterclockwise to tighten The lower retaining nut is a right hand threads R...

Страница 18: ...the lower shaft in or out until the rolls are correctly aligned Fig 4 7 Fig 4 8 Not Aligned Aligned 4 4 ADJUSTING THE FENCE POSITION To create straight consistent forms that are parallel with an edge...

Страница 19: ...n of the machine these lubrication tasks may need to be performed more frequently than recommended here depending on usage Failure to follow reasonable lubrication practices as instructed in this manu...

Страница 20: ...box at fault 8 Run capacitor at fault 9 Centrifugal switch at fault 10 Foot pedal switch at fault 11 Motor bearings at fault 1 Reduce downward pressure of upper roller 2 Use correct type size of sheet...

Страница 21: ...be found on the specification plate mounted on the machine 2 A scanned copy of your parts list diagram with required spare part s identified 3 Go to www machineryhouse com au contactus and fill out t...

Страница 22: ...22 OPERATION MANUAL ELECTRICAL DIAGRAM...

Страница 23: ...23 OPERATION MANUAL SJM 2 5 CABINET SPARE PARTS DIAGRAM...

Страница 24: ...24 OPERATION MANUAL SJM 2 5 SPARE PARTS DIAGRAM...

Страница 25: ...RING BEARING SCREW BEARING SEAT BLOCK BEARING 51210 GEAR FLAT KEY BOLT 1 1 4 8 1 1 1 2 1 2 2 2 1 6 6 1 2 2 2 1 1 1 1 4 4 1 4 4 1 1 1 4 2 2 2 1 2 4 1 1 2 42 43 44 45 46 47 48 49 50 51 52 53 54 55 56 5...

Страница 26: ...26 OPERATION MANUAL SJM 4 0 CABINET DIAGRAM...

Страница 27: ...27 OPERATION MANUAL SJM 4 0 SPARE PARTS DIAGRAM...

Страница 28: ...G RING BEARING SCREW BEARING SEAT BLOCK BEARING 51210 GEAR FLAT KEY BOLT 1 1 4 8 1 1 1 2 1 2 2 2 1 6 6 1 2 2 2 1 1 1 1 4 4 1 4 4 1 1 1 4 2 2 2 1 2 4 1 1 2 42 43 44 45 46 47 48 49 50 51 52 53 54 55 56...

Страница 29: ...the off position before re connecting 14 Use correct amperage extension cords Undersized extension cords overheat and lose power Replace extension cords if they become damaged 15 Keep machine well ma...

Страница 30: ...a power failure during use of the machine turn off all switches to avoid possible sudden start up once power is restored 11 Work area hazards Keep the area around the Swage Jenny clean from oil tools...

Страница 31: ...ine has fully stopped Isolate power to machine prior to any checks or maintenance being carried out ENTANGLEMENT CUTTING STABBING Ensure machine is bolted down A HIGH Make sure all guards are secured...

Отзывы: