3A - 36 - ENGINES
90-816462 2-695
f.
Install top compression ring with marked side
up, using ring expander.
Installation
IMPORTANT: Cylinder bores must be clean be-
fore piston installation. Clean with a light honing,
as necessary. Then clean with hot water and de-
tergent wash. After cleaning, swab bores several
times with light engine oil and clean cloth, then
wipe with a clean dry cloth.
1. Lubricate connecting rod bearings and install in
rods and rod caps.
2. Lightly coat pistons, rings and cylinder walls with
light engine oil.
3. With bearing caps removed, install connecting
rod bolt guide (3/8-24) (J-5239) on connecting rod
bolts.
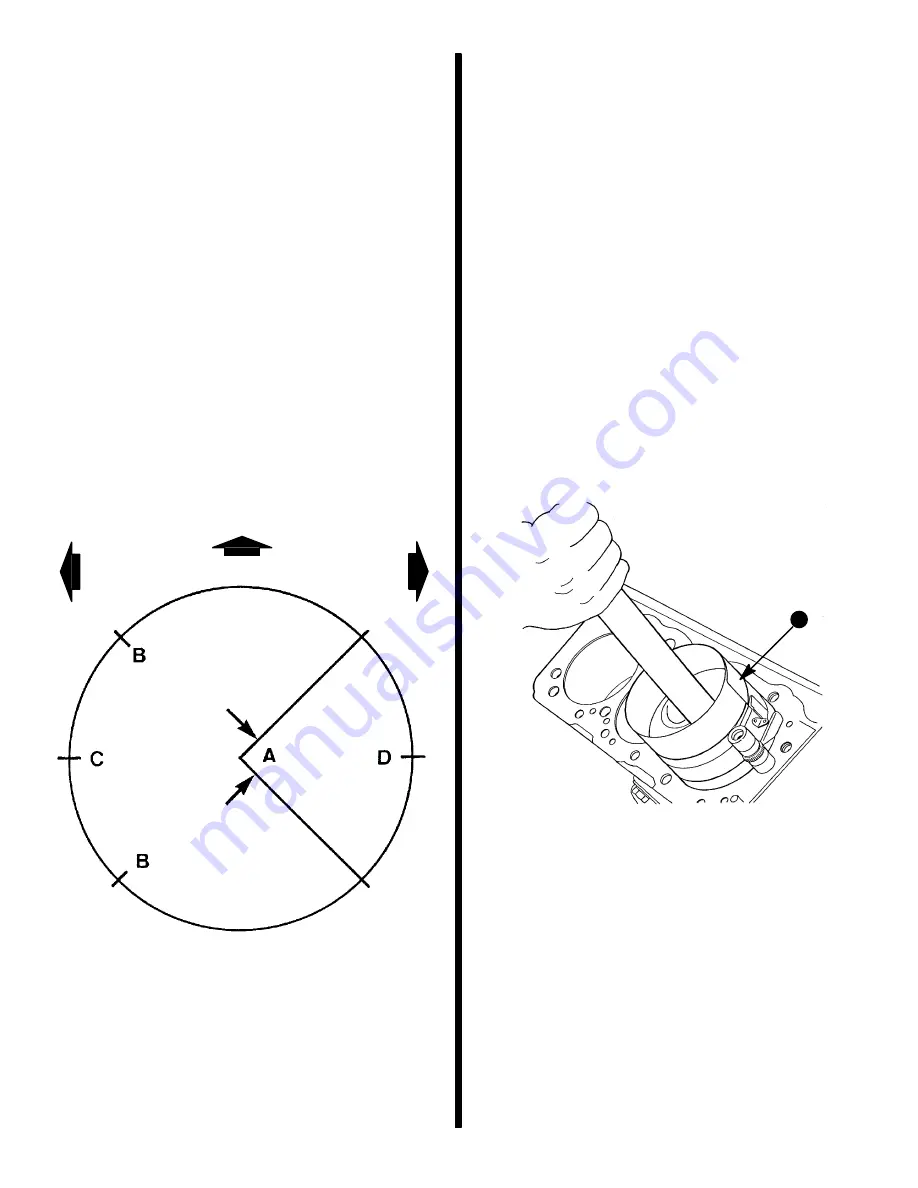
IMPORTANT: Be sure ring gaps are properly posi-
tioned as shown.
72373
ENGINE LEFT
ENGINE RIGHT
ENGINE FRONT
A - Oil Ring Spacer Gap (Tang in Hole or Slot within Arc)
B - Oil Ring Rail Gaps
C - 2nd Compression Ring Gap
D - Top Compression Ring Gap
Ring Gap Location
4. Install each connecting rod and piston assembly
in its respective bore. Install with connecting rod
bearing tangs toward outside of cylinder block.
Use piston ring compressor to compress rings.
Guide connecting rod into place on crankshaft
journal with connecting rod bolt guide. Use a
hammer handle with light blows to install piston
into bore. Hold ring compressor firmly against cyl-
inder block until all piston rings have entered cyl-
inder bore.
IMPORTANT: Be sure to install new pistons in
same cylinders for which they were fitted, and
used pistons in same cylinder from which they
were removed. Each connecting rod and bearing
cap should be marked, beginning at front of en-
gine. Numbers on connecting rod and bearing
cap must be on same side when installed in cylin-
der bore. If a connecting rod is ever transposed
from one block or cylinder to another, new bear-
ings should be fitted and connecting rod should
be numbered to correspond with new cylinder
number.
72898
a
a - Piston Ring Compressor (J-8037)
5. Remove connecting rod bolt guide.
6. Install bearing caps and torque nuts to 20 lb. ft.
(27 N·m), then tighten nuts an additional 60 de-
grees angular torque using a Torque Angle
Gauge.
7. Check connecting rod side clearance as pre-
viously described.
NOTE: If bearing replacement is required, refer to
“Connecting Rod Bearings.”
Содержание 13
Страница 1: ...13 Printed in U S A 90 816462 2 695 1995 Brunswick Corporation GM 4 Cylinder MARINE ENGINES ...
Страница 2: ...90 816462 2 695 0 ...
Страница 7: ...1 A IMPORTANT INFORMATION GENERAL INFORMATION 72000 ...
Страница 15: ...1 B 50617 IMPORTANT INFORMATION MAINTENANCE ...
Страница 36: ...1 C IMPORTANT INFORMATION TROUBLESHOOTING ...
Страница 74: ...2 A 50633 REMOVAL AND INSTALLATION 4 CYL ALPHA ONE DRIVE ...
Страница 88: ...3 A 26790 ENGINE 181 CID 3 0L 4 CYLINDER GM ENGINE ...
Страница 137: ...4 A 72079 ELECTRICAL SYSTEMS STARTING SYSTEM ...
Страница 170: ...4 B 71855 ELECTRICAL SYSTEMS IGNITION SYSTEM ...
Страница 197: ...ELECTRICAL SYSTEMS CHARGING SYSTEM 4 C 72078 ...
Страница 237: ...4 D 72747 ELECTRICAL SYSTEMS INSTRUMENTATION ...
Страница 250: ...4 E 72938 ELECTRICAL SYSTEMS WIRING DIAGRAMS ...
Страница 264: ...5 A FUEL SYSTEM FUEL PUMP ...
Страница 271: ...5 B 72681 FUEL SYSTEM MERCARB 2 BARREL CARBURETOR ...
Страница 300: ...6 A 50628 COOLING SYSTEM SEAWATER COOLED MODELS ...
Страница 309: ...6 B 73665 COOLING SYSTEM CLOSED COOLING MODELS ...
Страница 325: ...C 6 EXHAUST SYSTEM MANIFOLD ...
Страница 331: ...7 A 71317 POWER STEERING PUMP ...


