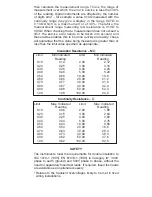
1. Set the selector switch to mA.
2. Connect the test leads.
3. Press and hold down the TEST button for approximately 2 seconds.
4. Select either ac or dc mA using the
key.
5. After a short settling time, the reading will be displayed
automatically.
To view the frequency of the a.c. mA being measured press the
key. The frequency will be displayed in the range 16Hz-
460Hz. To view a.c. mA press the
key again. For inputs
less than 10mA frequency is not displayed.
Using the Megger SP1 Switched Probe
Operation: The Megger SP1 is an accessory for designated
MEGGER installation test instruments. When fitted in the
specially designed connector, in place of the existing ‘Low’ lead,
the SP1 acts as a remote test button to operate the instrument
and as a ‘Low’ probe. This simplifies instrument control and two-
handed probing. The SP1 is suitable for use with Megger
insulation test instruments up to 1kV output test voltage.
Safety: Meets the safety requirements for double insulation to
IEC1010-2-031 (1995), EN61010-2-031 (1995), IEC1010-1
(1995), EN61010-1 (1995) Category III*, 300V phase to earth and
500V phase to phase. The probe is fitted with an internal, non-
replaceable fuse, to protect the user should the probe be used
accidentally in conjunction with a test lead in the low terminal.
* Relates to transient overvoltage likely to be found in fixed
installation wiring.
Do not use the probe if any part of it is damaged.
Battery Replacement
When the low battery symbol
appears, the cells are nearly
exhausted and should be replaced as soon as possible. Use
Alkaline cells IEC LR6 (AA) or NiCd rechargeable. To install or
replace the cells, disconnect the test leads, switch the
instrument to OFF and loosen the captive screws on the rear of
the battery compartment. Remove the cover and disconnect
the battery holder from the battery leads. Ensure that the
replacement cells are fitted with the correct polarity in
accordance with the label in the battery holder. Reconnect the
battery holder to the battery leads. Replace and re-secure the
battery compartment cover. Remove the cells if the instrument
is not going to be used for an extended period of time.
Fuse Checking and Replacement
To check the instrument fuse, switch to an insulation range and
press the TEST button. The symbol
will appear if the fuse
is ruptured. To replace the fuse, disconnect the test leads,
switch the instrument OFF and loosen the captive screws
holding the battery compartment cover in place. Remove the
cover and replace the fuse. Replace and re-secure the battery
compartment cover.
~


