background image

3

14-PRECAUTIONS BEFORE START-UP

Technical Dept. - All rights reserved - Reproduction prohibited

GENERAL PRECAUTIONS

Remove any objects that may burn from the brazier (manual, various adhesive labels or any polystyrene).

Check that the brazier is positioned correctly and rests properly on the base.

The first start-up may not be successful as the feed screw is empty and does not always manage to load the brazier 

with the required amount of pellets in time to light the flame.

CANCEL THE FAILED IGNITION ALARM. REMOVE THE PELLETS LEFT IN THE BRAZIER AND REPEAT THE START-UP. 

If after repeated attempts, the flame fails to ignite, despite a regular flow of pellets in the brazier, which 

must rest snugly against the 

slots and be clean without any ash incrustations.

 If no anomaly is found during this inspection, there may be a problem with the 

product components or installation may not be correct.

REMOVE THE PELLETS FROM THE BRAZIER AND CONTACT AN AUTHORISED TECHNICIAN.

Do not touch the boiler during the first lighting, as it is during this phase that the paint sets. If you touch the paint, 

you may expose the steel surface.

If necessary, touch up the paint with the spray can of the specific colour. (See ‘’Pellet stove accessories’’).

It is good practice to ensure effective ventilation in the room during the initial start-up, as the boiler will emit some 

smoke and smell of paint.

ATTENTION!

Please ensure the brazier is clear of ALL pellets and ash build up following any failed ignitions. Failure to clear out 

the brazier prior to resetting may result in further failed ignitions or in certain conditions an explosive ignition.

Do not stand close to the stove and, as mentioned, air the room. The smoke and smell of paint will disappear after about an hour of 

operation, however, they are not harmful in any case.

The boiler will be subject to expansion and contraction during the lighting and cooling down stages, and may therefore make slight 

creaking noises.

This is absolutely normal as the structure is made of laminated steel and must not be considered a defect.

It is extremely important to make sure the boiler does not reach high temperatures straight away, but to increase the temperature 

gradually using low power at first.

This will prevent damaging the ceramic or serpentine stone tiles, the welds and the steel structure.

DO NOT EXPECT HEATING EFFICIENCY IMMEDIATELY!!!

ATTENTION!

If during operation or initial ignition you encounter combustion smoke spillage in to the room from the 

appliance or the flue then please switch off the appliance, ventilate the room and contact the installation 

/ service technician immediately.

Содержание EGO-STAR Hydromatic 12

Страница 1: ...INSTALLATION GUIDE GB PELLET STOVE EGO STAR Hydromatic 12 PART 2 OPERATION AND CLEANING Instructions in English...

Страница 2: ...FORE START UP 3 15 CONTROL PANEL 4 16 FIRST START UP 5 17 MENU STRUCTURE 8 18 INFORMATION MENU 12 20 TECHNICAL MENU 33 21 SAFETY DEVICES AND ALARMS 34 22 RECOMMENDATIONS FOR SAFE USE 40 23 CLEANING AN...

Страница 3: ...Pellet stove accessories Itisgoodpracticetoensureeffectiveventilationintheroomduringtheinitialstart up astheboilerwillemitsome smokeandsmellofpaint ATTENTION Please ensure the brazier is clear of ALL...

Страница 4: ...tification code of any malfunction B Function selection key indicated by the upper display i e start up shutdown C Function selection key indicated by the upper display i e increase scrolling D Functi...

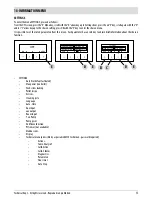
Страница 5: ...n set the next screen will be OFF otherwise one enters the following parameter SELECT LANGUAGE At initial start up if it has never been set the LANGUAGE choice screen appears The system displays all p...

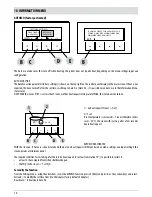
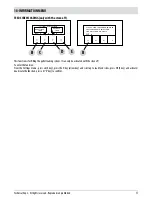
Страница 6: ...l go to OFF By pressing any one of the keys B C D E the first screen will appear with the wording OFF displayed From this screen pressing keys B and E respectivelycorrespondingtoONandMENU willmakeitpo...

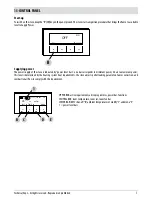
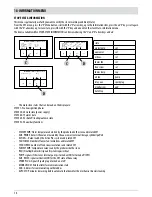
Страница 7: ...evel bars one bar corresponds to minimum power 5 bars to maximum power this level is determined by the heating system heat requirements the stove adjusts pellet loading parameters fumes extraction and...

Страница 8: ...ettings input aux Select what is to be set and then using the C and D keys increase decrease the temperature use the E key to confirm while the B key is used to exit and return to the main MENU PROGRA...

Страница 9: ...VA SAVE key If the same temperature scale of Monday is desired for other weekdays after saving E key press the C key COPIA COPY select the day where the programme is to be copied usingthe D keyandpres...

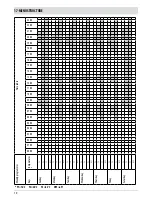
Страница 10: ...0 12 00 11 00 10 00 09 00 08 00 07 00 06 00 05 00 04 00 03 00 02 00 01 00 00 00 Weekly programmes Temperatures T3 T2 T1 OFF T3 T2 T1 OFF T3 T2 T1 OFF T3 T2 T1 OFF T3 T2 T1 OFF T3 T2 T1 OFF T3 T2 T1 OF...

Страница 11: ...nd D it is possible to increase decrease the temperature value while the B key is used to move to the next temperature With the E key OK the set values are confirmed SLEEP FUNCTION Thesleepfunctioniso...

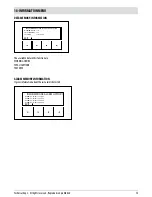
Страница 12: ...n is Software Data memory All memory Stove state SOFTWARE INFORMATION The available data in this function are CODE FIRMWARE DATABASE INTERFACE It is information that can be used to identify the electr...

Страница 13: ...e WORKING HOURS TOTAL IGNITIONS TEST DATE ALARM MEMORY INFORMATION It gives information about the last alarms detected EXIT INFORMATIONS DATA HYSTORY WORKING HOURS 100 TOTAL IGNITIONS 20 TEST DATE 15...

Страница 14: ...probe inside the stove and related SET AUX PROBE detects the value measured by the aux sensor external storage cylinder puffer ACTIVE Value read by the Active Plus system and related SET FAN FUMES Num...

Страница 15: ...key to obtain brief information about the chosen function SETTINGS Auto Eco default activated Max power see boiler Feed screw loading Pellet recipe Active Cleaning cycle Language date time Aux Input a...

Страница 16: ...with start up after a few seconds due to heat request AUTO ECO DEACTIVATED With the stove on if Auto eco is deactivated and there are no heat requests different based on menu settings aux input settin...

Страница 17: ...y be activated with the stove off To enter the function from the Settings menu press ok E key press the D key arrow key and scroll up to load feed screw press OK E key and activate deactivate the func...

Страница 18: ...the flue which with traditional systems may constitute a problem during the installation phase Thanks to an internal sensor the stove is extremely reliable and precise combustion air is constantly ad...

Страница 19: ...hanically cleaning the brazier If the stove is switched off mechanical brazier cleaning is also activated LANGUAGE This function is used to choose the desired language among those set in the control p...

Страница 20: ...C and D keys select the desired heating system type and press ok with the E key It is possible to connect the following to the auxiliary input Room thermostat 2 External probe Storage cylinder probe...

Страница 21: ...by the accumulation temperature marked by a tap in the temperature menu Storage cylinder thermostat To activate this option connect a Normally Open N O contact thermostat to points 1 and 2 of the bac...

Страница 22: ...free contact on terminals 7 8 9 if the system pump is activated in Aux out mode POS 1 2 AUX INPUT EXTERNALTHERMOSTAT THERMOSTAT BOILER PUFFER BOILER PROBE PUFFER POS 10 HEATING 3 WAYVALVE POS 3 4 ROO...

Страница 23: ...local regional or national regulations in force Installation and verification of operation is to be performed only by specialised authorised personnel The manufacturerwillnotbeheldliablefornon compli...

Страница 24: ...T STOVE AND ROOMTHERMOSTAT Adjustable setting SET VALUES WATERTEMP 30 C 80 C Parameters to be set Settings Value Configuration 1 External thermostat ON Hydraulic diagram Num Description Num Descriptio...

Страница 25: ...DHW STORAGE CYLINDER Adjustable setting SET VALUES AMBIENTTEMP 5 C 35 C WATERTEMP 30 C 80 C BOILERTEMP 30 C 80 C Parameters to be set Settings Value Configuration 3 Hydraulic diagram Num Description N...

Страница 26: ...ting SET VALUES WATERTEMP 30 C 80 C BOILERTEMP 30 C 80 C Parameters to be set Settings Value Configuration 3 External thermostat ON Hydraulic diagram Num Description Num Description 1 Pellet Boiler 5...

Страница 27: ...ohibited SYSTEMWITH PELLET STOVE AND PUFFER Adjustable setting SET VALUES PUFFERTEMP 55 C 75 C Parameters to be set Settings Value Configuration 5 Hydraulic diagram Num Description Num Description 1 P...

Страница 28: ...Parameters to be set Settings Value Configuration 5 Auxiliary Boiler ON Hydraulic diagram Num Description Num Description 1 Pellet Boiler 7 Plate heat exchanger 2 Rear terminal block 8 System pump 3...

Страница 29: ...select the Remote Alarm Aux boiler Output in temp and press OK E key If the Aux output is set on Remote Alarm the NO contact is closed when an alarm is present If the Aux output is set to Auxiliary Bo...

Страница 30: ...key andselectroomthermostat press E key to confirm Attention If room temperature is selected weekly hourly Programming is not available PUMP ONT This function enables adjustment of the pump activation...

Страница 31: ...evel 1 anti freeze activation conditions PUMP ON are boiler temp anti freeze set 3 C The level 2 anti freeze activation conditions PUMP and FLAME ON are boiler temp anti freeze set Anti freeze activat...

Страница 32: ...m and press OK E key Set the address and press E key to confirm DISPLAY Adjust display contrast and brightness This function is found in fromtheSettingsmenu pressok Ekey presstheC Dkey arrow andscroll...

Страница 33: ...select Technical menu and press OK E key Enter the password and press the E key to confirm To enter the password using the C and D keys set the numbers 1 2 3 9 with the E OK key confirm and move on t...

Страница 34: ...SAFETY The stove is protected against violent changes in current by a general fuse located in the control panel at the back of the stove Other fuses that protect the circuit boards are located on the...

Страница 35: ...e rules contained in the manual and in particular All the necessary measures and or precautions must be adopted when performing maintenance cleaning and repairs Donottamperwiththesafetydevices Donotre...

Страница 36: ...unburned material Make sure the spark plug warms up Thoroughly empty and clean the brazier before restarting A02 NO FLAME The fire goes out abnormally without acoustic alarm Check the level of pellet...

Страница 37: ...ding SETTINGS MENU Pellet recipe If the alarm persists contact the service centre A14 ACTIVE SENSOR Active sensor anomaly Active Plus sensor operation anomaly Contact an authorised service centre to h...

Страница 38: ...TENTION If during operation or initial ignition you encounter combustion smoke spillage in to the room from the appliance or the flue then please switch off the appliance ventilate the room and contac...

Страница 39: ...NG The brazier mechanical cleaning automatically activates when the AUTO STOP time expires or in case of clogging Activation is signalled by the word CRL At the end of mechanical cleaning if there is...

Страница 40: ...the product is installed in compliance with standards in force Furthermore it is of the utmost importance to respect the following simple rules Every time the brazier is removed for cleaning it must...

Страница 41: ...pellets DAILY ORWEEKLY CLEANING PERFORMED BYTHE USER Ash pan cleaning Press door H at the bottom right and open it Turn the handle of door G to the right and open it by moving it downwards Removeandem...

Страница 42: ...ion but very important if the boiler is to maintain optimal performance We recommend cleaning the turbulators at each pellet loading so with tank empty or however when cleaning the ash pan about 7 day...

Страница 43: ...brazier Use a vacuum cleaner to remove all fallen material PERIODIC CLEANING PERFORMED BY A QUALIFIEDTECHNICIAN CLEANINGTHE SMOKE EXTRACTOR COMPARTMENT In the area behind ash pan D there is the smoke...

Страница 44: ...pellets from the hopper with a vacuum cleaner with a long pipe We recommend removing the unused pellet from the tank because it can retain moisture Disconnect any combustion air ducting that canleadmo...

Страница 45: ...amic panel of the side cladding or the steel panel depending on the type of stove Unscrew the screw washer rubber bushing roller shown in figure A C on both sides of the cover Proceed now with install...

Страница 46: ...S 7 DAYS 1 YEAR UNDER THE USER S RESPONSIBILITY Brazier area Ash pan Glass Lower compartment Turbulators BY THE QUALIFIED TECHNICIAN Complete exchanger Smoke duct Door gasket Internal parts Flue Circu...

Страница 47: ...revious anomaly The pellet temperature safety probe has been triggered Let the stove cool down reset the thermostat until the problem is resolved and switch the stove back on If the problem persists c...

Страница 48: ...thesmokeduct Checktheconditionofthe door gaskets Damp or unsuitable pellets Change the type of pellets Faulty smoke evacuation motor Check the motor and replace it if neces sary The smoke evacuation m...

Страница 49: ...the plug and turning the shaft with a screwdriver Circulator does not go round Check the electrical connections of the circulator replace if necessary Radiators have air in them Vent the radiators Ho...

Страница 50: ...PELLET LEVEL SENSOR OPTIONAL 11 DHW FLOW SWITCH 12 SOFTWARE UPDATE 13 EXPANSION 14 SERIAL COMMUNICATION 15 PWM PUMP CONTROL 16 CONTROL PANEL 17 WATERTEMPERATURE OVERLOAD CUT OUT 18 HOPPER OVERLOAD CUT...

Страница 51: ......

Страница 52: ...REV 0 8901715700 Via La Croce n 8 33074Vigonovo di Fontanafredda PN ITALY Telephone 0434 599599 a s Fax 0434 599598 Internet www mcz it e mail mcz mcz it 13 06 2017...

Отзывы: