background image


Revision 1.4.18 


Page 183 


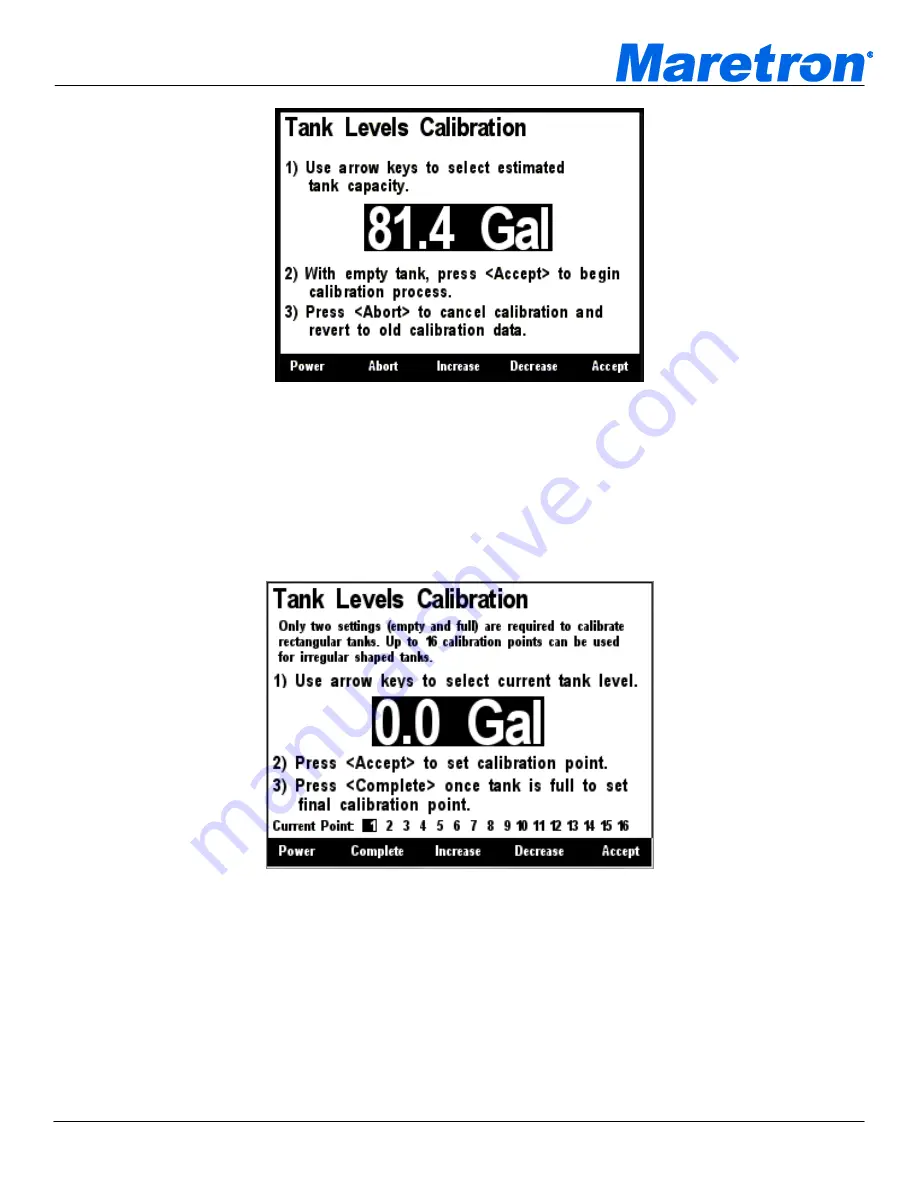
Figure 207 

– Tank Levels Calibration Capacity Estimation 

 
The next step in the calibration process is to fill the tank and indicate the volume of fluid in the tank at 
various points while filling the tank. This process should be started with an empty tank. You only need 
to indicate two calibration points for a rectangular tank, and can use up to 16 calibration points for a 
tank with a more complex shape. Figure 208 shows a screenshot of the first calibration step. Enter 
the first calibration point with an empty tank (0.0 Gallons/liters) by pressing the 

Accept

 key. The 

“Current Point” highlight will advance to the next point. 


Figure 208 

– Empty Level Calibration 

 
Each time you press 

Accept

 during this process and after the Current Point highlight advances, put 

more fluid into the tank, and note the total volume of fluid pumped into the tank at this point. Use the 

Increase

 and 

Decrease

 keys to set the current tank level to the appropriate value, and then press the 

Accept

 key to store the current calibration point and advance to the next calibration point. Figure 209 

shows a screenshot of these intermediate calibration points. 
 

Содержание DSM150

Страница 1: ...NMEA 2000 Multi function Color Graphic Display User s Manual Revision 1 4 18 Copyright 2013 Maretron LLP All Rights Reserved Maretron LLP 9014 N 23rd Ave 10 Phoenix AZ 85021 7850 http www maretron com...

Страница 2: ...d Configuration of VDR100 Network Parameters Removed 127502 from Supported PGN Table Added Configuration of SMS100 1 4 18 Added DSM150CABLE 01 0 to Unpacking the Box section Added Device Configuration...

Страница 3: ...Menu 6 3 3 2 Choosing a Value from a List 6 3 3 3 Entering a Numeric Value 6 3 3 4 Entering a Textual Value 6 4 Important Concepts 9 4 1 Favorite Screens 9 4 2 Categories and Data Types 9 4 2 1 AC Bu...

Страница 4: ...Depth Speed Temperature Transducers 46 6 1 1 Advanced Configuration 46 6 1 2 Device Instance 47 6 1 3 Installation Description 47 6 1 4 NMEA2000 PGN Enable Disable 47 6 1 5 Clear Speed Calibration 47...

Страница 5: ...om local display 78 6 8 8 Label 79 6 8 9 Remote Device Selection 80 6 9 Maretron DST100 Configuration 81 6 9 1 Advanced Configuration 81 6 9 2 Clear Speed Calibration 82 6 9 3 Speed Calibration 82 6 9...

Страница 6: ...1 Advanced Configuration 123 6 15 2 Cold Start GPS 125 6 15 3 Device Label 125 6 15 4 SBAS WAAS EGNOS MSAS Enable Disable 125 6 16 Maretron IPG100 Configuration 127 6 16 2 Device Label 130 6 16 3 N2K...

Страница 7: ...ion Offset Calibration 160 6 23 4 Inverted Installation Entry 161 6 23 5 Label 162 6 23 6 Magnetic Deviation Calibration 162 6 23 7 Magnetic Deviation Status 163 6 23 8 Rate of Turn Damping Period 163...

Страница 8: ...195 6 31 2 Advanced Configuration 196 6 31 3 Device Label 197 6 31 4 Installation Offset Calibration 198 6 31 5 Wind Data Damping Period 200 6 31 6 Barometric Pressure 200 6 31 7 Outside Humidity 201...

Страница 9: ...2 Operating Mode Moored 238 8 3 13 Operating Mode Underway 239 8 3 14 Operating Mode Anchored 239 8 3 15 Scope 239 8 4 Deleting an Alert 239 8 5 Editing an Alert 241 8 6 Setting the Vessel Operating M...

Страница 10: ...een Format 36 Figure 25 Setting the Auto Change Interval 36 Figure 26 Selecting the Data Category 37 Figure 27 Selecting the Data to be displayed 37 Figure 28 DSM150 Units Menu 39 Figure 29 Device Con...

Страница 11: ...igure 69 DSM150 DSM250 copy all settings from local display 79 Figure 70 DSM150 Label Configuration 79 Figure 71 DSM150 DSM250 Remote Device Selection 80 Figure 72 DST100 Configuration Screen 81 Figur...

Страница 12: ...g a Cold Start of the GPS100 120 Figure 117 Configuring GPS Operating Mode on a GPS100 121 Figure 118 Configuring SBAS on a GPS100 122 Figure 119 GPS200 Configuration Screen 123 Figure 120 GPS200 Adva...

Страница 13: ...67 SSC200 Advanced Configuration Screen 157 Figure 168 SSC200 NMEA 0183 Settings Screen 158 Figure 169 SSC200 NMEA 0183 Sentence Rate Selection Screen 159 Figure 170 SSC200 Load Default Periodic Rate...

Страница 14: ...100 Configuration Screen 187 Figure 215 TMP100 Advanced Configuration Screen 187 Figure 216 TMP100 NMEA 2000 PGN Enable Disable Screen 188 Figure 217 TMP100 Channel Configuration Screen 189 Figure 218...

Страница 15: ...Data Unavailable Alert 227 Figure 263 Trigger Configuration On Alert 228 Figure 264 Trigger Configuration Data Unavailable Alert 229 Figure 265 Trigger Configuration Editor Tripped Alert 230 Figure 26...

Страница 16: ......

Страница 17: ...ese instructions for installation configuration and usage of the Maretron DSM150 in order to ensure optimal performance 1 2 Firmware Revision This manual corresponds to DSM150 firmware revision 1 4 18...

Страница 18: ...f the mounting surface The steps for this type of mounting are as follows 1 Attach the Mounting Template see Section 13 to the surface where the DSM150 is to be located a Make sure the template is lev...

Страница 19: ...ector on the DSM150CABLE 01 0 adapter cable note the key on the male connector and keyway on the female connector Be sure the cable is connected securely and that the collar on the cable connector is...

Страница 20: ...below Figure 2 DSM150 Power Up Screen Alternatively you may power down the DSM150 by pressing and holding the power key see Section 3 2 below for details 3 2 Turning the DSM150 Off To turn the DSM150...

Страница 21: ...hree programmed brightness levels see Section 5 2 4 3 on page 30 for details while a long press cycles the DSM150 through 8 programmable color palettes see Section 5 2 4 4 on Page 30 Up Key switches t...

Страница 22: ...Choosing a Value from a List When editing a value chosen from a list the keys on the DSM150 keypad have the following functions Power Key turns the DSM150 off see Section 3 1 on page 4 for details Ba...

Страница 23: ...required repeat this last step or press the Back button top return to the choices on the left To append a numeral use the Scroll Up and Scroll Down buttons to select Numeric and then press Enter to go...

Страница 24: ...time To abort the entire textual edit and return to the original field without changing the contents of the field use the Scroll Up and Scroll Down buttons to select Exit without Saving and then press...

Страница 25: ...bination of display settings data to display and formats in which to display the data The DSM150 supports up to 16 different favorite screens 4 2 Categories and Data Types The DSM150 is capable of dis...

Страница 26: ...ine RMS voltage of the AC power on the generator Total Real Power displays real power output by the generator Total Reactive Power displays reactive power output by the generator Total Apparent Power...

Страница 27: ...Voltage displays phase A Line to Neutral RMS voltage of the Utility Phase AB L L Voltage displays phase A Line to phase B Line RMS voltage of the Utility Phase A Real Power displays real power output...

Страница 28: ...for details Battery Time Remaining displays estimated time remaining for the battery given its current temperature and rate of discharge please consult the battery monitor s documentation for details...

Страница 29: ...isplays the tilt or trim of the drive Voltage displays the electrical power supply voltage measured at the engine Fuel Economy displays the current fuel economy for the engine Fuel Consumption display...

Страница 30: ...d Chill displays the current wind chill based on air temperature and wind speed 4 2 10 Fluid Flow Flow Rate displays the current rate of flow of a fluid Trip Volume displays the total volume of fluid...

Страница 31: ...e DSM150 computes time to empty using total fuel remaining see above and the engine s fuel rate Remember conditions can rapidly change that may drastically effect time to empty For example if you are...

Страница 32: ...of Arrival displays the Estimated Time of Arrival at the waypoint Lat Lon displays the current latitude and longitude of the vessel Rolling Road displays navigation information for the current leg of...

Страница 33: ...trip log value from log transducers that are capable of being reset via the NMEA 2000 command of the Distance Since Last Reset field of the 128275 Distance Log message such as the Maretron DST110 may...

Страница 34: ...The DSM150 supports the display of information for up to four transmissions Gear displays the current gear of the transmission forward neutral or reverse Oil Pressure displays the pressure of the oil...

Страница 35: ...essel s speed is subtracted from Apparent wind direction calculated using speed through water STW or speed over ground SOG depending on the unit setting of the Wind True Vessel Ref Parameter see Secti...

Страница 36: ...rt announcing a condition requiring non immediate attention for precautionary reasons Warnings are shown in yellow when Active and always appear below alarms on the Alert Status Screen 4 3 2 Alert Ter...

Страница 37: ...is state An active alert can be accepted by the user causing it to become an Accepted Alert or disabled by the user causing it to become a Disabled Alert If the condition causing the alert is rectifie...

Страница 38: ...in the Set Delay field GPS Quality Alert The alert will become active if the GPS Quality drops below the level set in the GPS Quality Alert Set field for longer than the time specified in the Set Dela...

Страница 39: ...can show any displayable data in any display type supported by that data In favorite screens mode the DSM150 can operate in one of two ways Manual mode a particular favorite screen remains on the dis...

Страница 40: ...owing structure Alert Setup 5 2 1 Add New Alert 8 2 Delete Alert 8 4 Edit Alert 8 5 Operating Mode 8 6 SMS Text Phone Book 8 7 Advanced Configuration 8 8 Restore Factory Defaults 8 9 Alert Status 5 2...

Страница 41: ...e received The available options within the Configuration screen are shown in Figure 8 Figure 8 Configuration Screen 5 2 3 1 Device Configuration The ability to calibrate and configure other devices o...

Страница 42: ...es Online or has been disconnected from the bus has lost power or for some other reason is not responding to queries Offline The Display column indicates whether data from that particular device is ac...

Страница 43: ...lly advanced configuration is only done at installation and should not need to be done while at sea Figure 11 DSM150 Advanced Configuration 5 2 4 1 1 Installation Description This entry allows you to...

Страница 44: ...ure 12 DSM150 Primary Device Selection 5 2 4 1 3 Refresh Network Information The Device Configuration 5 2 3 1 and Device Selection 5 2 3 2 menus display a list of devices that have been detected on th...

Страница 45: ...nected network given in bits per second bps Voltage the network voltage as measured by the DSM150 in Volts Traffic the percent usage of the total available bandwidth measured by the DSM150 Receive Rat...

Страница 46: ...e Low Medium and High brightness levels The value that appears next to the appropriate setting is measured in percent of full brightness The Backlight menu can be seen in Figure 15 below Figure 15 Bac...

Страница 47: ...ghts key when the DSM150 is operating in favorite screens mode Change the Color Set back to On to enable this color palette Notice that Color Set 1 has a white background 100 Red 100 Green and 100 Blu...

Страница 48: ...ff Normal Use Mode will cause the DSM150 to return to using data from the NMEA 2000 bus In order to be able to demonstrate all of the DSM150 s capabilities the unit allows the user to setup and config...

Страница 49: ...nguages is planned for future firmware releases To change the currently used language use the Scroll Up or Scroll Down keys to move the highlight to the Language menu item and then press the Enter key...

Страница 50: ...s in which the DSM150 will display the next higher or lower numbered favorite screen respectively that is enabled for Manual mode Figure 21 Setting the Favorite Screens Mode 5 2 6 Favorite Screens Set...

Страница 51: ...r will be displayed taking up the entire screen 2 3 Top 1 3 Bottom two parameters will be displayed the first occupying the top 2 3 of the screen and the second occupying the bottom 1 3 of the screen...

Страница 52: ...screen Four Quarters four parameters will be displayed the first occupying the upper left hand corner of the screen the second occupying the upper right hand corner of the screen the third occupying t...

Страница 53: ...pt this category at which time the highlight will move to the data type field where you can display the particular data type from the selected category to be displayed as shown in Figure 27 Figure 27...

Страница 54: ...from multiple products on the network For example fuel economy is a combination of fuel rate and Speed Over Ground SOG so you will see two Instance entries one to specify the engine s and one to speci...

Страница 55: ...on isn t available Likewise the DSM150 can t calculate magnetic course given true course from a GPS if variation isn t available You can setup a favorite screen to display variation which will help yo...

Страница 56: ...ed to the vessel are relative to the water or the ground Sailors are generally interested in measurements relative to the water while power boaters are interested in measurements relative to the groun...

Страница 57: ...es For instance Eastern Standard Time EST would use an offset value of 5 00 5 2 7 13 Date Format This menu item allows you to select the format of any displayed dates Formats that may be selected are...

Страница 58: ...ese steps to reset the appropriate display 1 Press the Enter key for approximately one second This will place the display into Control mode and one of the controllable items on the screen will be high...

Страница 59: ...th offset speed calibration and temperature offset Maretron Engine Monitoring System EMS100 set the gauge types for Boost Pressure Drive Trim Oil Pressure and Water Temperature Preset the Engine Hours...

Страница 60: ...mber set operating mode set tank capacity and calibrate for irregular shaped tanks Maretron Tank Level Monitor Gasoline TLM150 Set tank type and tank number set operating mode set tank capacity and ca...

Страница 61: ...he SN column displays the serial number of the device so that any of two or more devices of the same manufacturer and model number may be distinguished from one another The HW column shows the device...

Страница 62: ...ation functions are supported not all functions apply to every model of transducer Reset trip log Set depth Offset Perform Speed Calibration Program Temperature Offset Figure 30 Airmar Depth Speed Tem...

Страница 63: ...50 display Pressing the Enter key with NMEA2000 PGN Enable Disable menu item selected causes the DSM150 to display the NMEA2000 PGN Enable Disable screen You can enable or disable the transmission of...

Страница 64: ...ce perhaps the GPS speed over ground SOG Remember that the SOG does not necessary reflect the STW because of currents and drift due to winds so you should do this in an area where you are sure there a...

Страница 65: ...t parameter in an Airmar depth transducer If you are interested in the actual water depth as opposed to the depth beneath the keel then you should program a positive value equal to the distance from t...

Страница 66: ...information This means you don t have to program multiple displays each with the corresponding offset information as the information is stored at a single place at the source 6 1 10 Trip Log The DSM15...

Страница 67: ...ingle entry Trim Tabs Calibration Figure 36 EP 30 Trim Tabs Configuration Screen 6 2 1 Trim Tabs Calibration The Bennett EP 30 NMEA1 trim tabs calibration opening screen is shown in Figure 37 below Th...

Страница 68: ...pping in order for the calibration process to succeed Figure 38 EP 30 Intermediate Calibration Screen After you have lowered both trim tabs to their full down position and a few seconds have elapsed t...

Страница 69: ...be performed by an advanced user Typically advanced configuration is only done at installation and should not need to be done while at sea Figure 41 ACM100 Advanced Configuration Screen 6 3 1 1 Curren...

Страница 70: ...Normal Install to Inverse Install to correct for this Valid options are Inverse Install Normal Install Use the Scroll Up and Scroll Down buttons to select the correct option and then press Enter to sa...

Страница 71: ...e it to a value in the range of 0 2 seconds to 10 seconds Use the Increase and Decrease buttons to select the correct option and then press Enter to save the value 6 3 1 9 Installation Description Thi...

Страница 72: ...3 Phase Y Phase A B C use this value when power is connected via the three hot wires 120 out of phase with each other and single neutral wire from a three phase Y connected circuit 6 3 3 AC Device Ty...

Страница 73: ...ced by a Generator or a Utility Pressing the Enter key while this item is highlighted will start the process to reset this value to zero The following confirmation screen is displayed Figure 43 Reset...

Страница 74: ...figuration is only done at installation and should not need to be done while at sea Figure 45 ALM100 Advanced Configuration Screen 6 4 1 1 Device Instance This entry allows you to program the NMEA 200...

Страница 75: ...essing the Enter key on the message to be configured Options are Disable The Annunciator message will not be transmitted Default The Annunciator message will be transmitted at its default NMEA2000 rat...

Страница 76: ...ser s Manual Page 60 Revision 1 4 18 6 4 4 Test Annunciator The Annunciator may be tested by scrolling the cursor to highlight this entry and then pressing the Enter button The ALM100 will emit a sing...

Страница 77: ...only be performed by an advanced user Typically advanced configuration is only done at installation and should not need to be done while at sea Figure 48 DCM100 Advanced Configuration Screen 6 5 1 1 C...

Страница 78: ...N2KAnalyzer allow you to view these values later See section 3 3 4 for details on how to enter a textual value 6 5 1 4 NMEA2000 PGN Enable Disable The DCM100 Annunciator Module transmits the NMEA2000...

Страница 79: ...nt flowing through the current sensor Move the highlight bar to the Current Sensor Zero Offset Calibration and press the Enter button The following confirmation screen will be displayed Figure 50 Curr...

Страница 80: ...rs to be set to appropriate default values 6 5 3 2 Nominal Voltage You may program here the nominal voltage of the battery which is used only for reporting over the NMEA 2000 network Available choices...

Страница 81: ...y Charged Time parameter 6 5 3 10 Battery Temperature In order for the DCM100 to properly determine battery capacity and state of charge it must know the temperature of the battery If you are using a...

Страница 82: ...will not need to modify the default value of 0 unless you have multiple units on the network 6 5 5 Label A label may be assigned to the DCM100 as an aid to identifying the device over the network Typ...

Страница 83: ...iguration Advanced Configuration changes some complex parameters within the device and should only be performed by an advanced user Typically advanced configuration is only done at installation and sh...

Страница 84: ...bration process or Cancel to return to the previous menu During the calibration process all channels will be turned off When the calibration is complete the following screen will be displayed Figure 5...

Страница 85: ...em selected causes the DSM150 to display the following screen Figure 56 Figure 56 DCR100 NMEA2000 PGN Enable Disable Screen 6 6 1 5 Restore Factory Defaults This option restores all settings on the de...

Страница 86: ...d In the Unlocked mode the channel may be turned on and off from network display devices By setting the Switch Lock mode of the channel to Lock then channel will not change state until the Switch Lock...

Страница 87: ...as been set to ALM 6 6 4 2 3 ALM Instance This entry allows you to program the instance number for the ALM function You may use a value between 0 and 15 This instance number is used by the DSM150 DS25...

Страница 88: ...ote DSM200 The Remote Device Selection menu for an example network configuration can be seen in Figure 60 below WARNING Do not select multiple devices of the same type for display This will result in...

Страница 89: ...emote DSM200 On or that the remote DSM200 ignores data transmitted by this device Off By scrolling to the device and pressing the Enter key you may then use the Scroll Up and Scroll Down keys to toggl...

Страница 90: ...gure 61 DSM150 DSM250 Remote Configuration Screen 6 8 1 Remote Device Selection A DSM150 unit can be used to configure a remote DSM150 DSM250 to set which NMEA 2000 devices are selected for display on...

Страница 91: ...d by this device Off By scrolling to the device and pressing the Enter key you may then use the Scroll Up and Scroll Down keys to toggle the Display status for this particular device Once you are sati...

Страница 92: ...it is possible to copy the device selection settings from a DSM150 unit to a remotely located DSM150 DSM250 In this way it is possible to make all device selection changes on a single DSM150 unit and...

Страница 93: ...ting this menu item and pressing Enter all the favorite screen settings will be copied from the local DSM150 DSM250 to the selected remote DSM150 DSM250 unit After copying favorite screen settings it...

Страница 94: ...Copy DST100 calibrations from local display 6 8 7 Copy all settings from local display This is the single operation that makes it easy to have multiple DSM150 DSM250 displays on a boat Set one DSM150...

Страница 95: ...y all settings from local display 6 8 8 Label The Label of the DSM150 DSM250 is used by the Alert System to identify the source of an alert Here the label can be changed using the method described in...

Страница 96: ...DSM150 User s Manual Page 80 Revision 1 4 18 6 8 9 Remote Device Selection Figure 71 DSM150 DSM250 Remote Device Selection...

Страница 97: ...uration Screen 6 9 1 Advanced Configuration Advanced Configuration changes some complex parameters within the device and should only be performed by an advanced user Typically advanced configuration i...

Страница 98: ...speed through water STW initial accuracy is significantly affected by the location or placement of the DST100 within the hull The DSM150 can correct for these inaccuracies using the speed calibration...

Страница 99: ...lue equal to the distance between the DST100 and the bottom of the keel The display will then subtract the programmed offset from the measured depth of the water as seen by the DST100 showing you the...

Страница 100: ...selected will complete the operation Resetting the trip log zeroes the DST100 s trip log such that all displays receive a zeroed value i e you don t have to perform the operation from other DSM200 DS...

Страница 101: ...ed Configuration Advanced Configuration changes some complex parameters within the device and should only be performed by an advanced user Typically advanced configuration is only done at installation...

Страница 102: ...essing the Enter key with NMEA2000 PGN Enable Disable menu item selected causes the DSM150 to display the following screen Figure 79 DST110 NMEA 2000 PGN Enable Disable Screen You can enable or disabl...

Страница 103: ...hat the SOG does not necessary reflect the STW because of currents and drift due to winds so you should do this in an area where you are sure there are no currents and calm winds Finally use the Incre...

Страница 104: ...t parameter in a DST110 depth speed temperature transducer If you are interested in the actual water depth as opposed to the depth beneath the keel then you should program a positive value equal to th...

Страница 105: ...plays each with the corresponding offset information as the information is stored at a single place at the source 6 10 7 Trip Log The DSM150 is capable of clearing the trip log counter within a DST110...

Страница 106: ...nce This entry allows you to program the NMEA 2000 device instance for the unit You usually will not need to modify the default value of 0 unless you have multiple engines on the network By convention...

Страница 107: ...st pressure sender in order to allow you to bring the digital value reported by the EMS100 into agreement with that displayed by the analog gauge 6 11 5 Drive Trim Gauge Type The EMS100 comes from the...

Страница 108: ...VDO YANMAR VDO W THRESHOLD same as YANMAR VDO but will read a value of 0 whenever the pressure reading is 10 of the full scale reading of the sensor Select the required option using the Scroll Up and...

Страница 109: ...r temperature sender present YANMAR YANMAR VDO Select the required option using the Scroll Up and Scroll Down keys followed by the Enter key 6 11 13 Water Temperature Sender Offset Often the character...

Страница 110: ...ternator pulses per revolution in order to correctly calculate engine RPM Use this setting to program the EMS100 with the number of flywheel teeth or alternator pulses per revolution for the engine to...

Страница 111: ...user Typically advanced configuration is only done at installation and should not need to be done while at sea Figure 86 FFM100 Advanced Configuration 6 12 1 1 Device Instance This entry allows you t...

Страница 112: ...the default value of Yes for the FFM100 to output negative fuel flow values if the direction of fuel flow for the Channel 0 sensor is opposite the direction of the arrow on the fuel flow sensor label...

Страница 113: ...6 12 2 Device Label A label may be assigned to the FFM100 as an aid to identifying the device over the network Typically this label will describe the location of the FFM100 6 12 3 Operating Mode The F...

Страница 114: ...eenshots below Figure 88 FFM100 Channel 0 First Configuration Screen Differential Mode Figure 89 FFM100 Channel 0 Second Configuration Screen Differential Mode 6 12 4 1 1Channel Supply Return You may...

Страница 115: ...m this parameter to match the desired instance number of the temperature reading for this channel You can program this parameter to any value between 0 and 252 The default value for this parameter is...

Страница 116: ...this channel Maretron display products will display this label text when you are selecting data to display 6 12 4 2 Channel 0 Configuration Menu Two Independent Sensors Mode This section describes the...

Страница 117: ...sensor connected to this channel 6 12 4 2 5Data Damping Period You can configure a damping parameter to smooth the flow rate readings or make them more responsive The data damping is configurable betw...

Страница 118: ...13 Volume Instance Program this parameter to match the desired instance number of the volume reading for this channel You can program this parameter to any value between 0 and 252 The default value f...

Страница 119: ...ue for this parameter is 0 033 C which corresponds to Diesel fuel This parameter is not available when the Operating Mode is set to Two Individual Flow Sensors 6 12 5 1 4Temperature Instance Program t...

Страница 120: ...3 FFM100 Channel 1 First Configuration Screen Two Independent Sensors Mode Figure 94 FFM100 Channel 1 Second Configuration Screen Two Independent Sensors Mode 6 12 5 2 1Sensor You may select whether t...

Страница 121: ...the total volume recorded to zero 6 12 5 2 7Temperature Instance Program this parameter to match the desired instance number of the temperature reading for this channel You can program this parameter...

Страница 122: ...5 2 14 Volume Label Program this parameter with a text string which identifies the particular volume parameter being monitored by this channel Maretron display products will display this label text wh...

Страница 123: ...xt strings You can enter any information you like here such as the date the unit was installed or the location in which it was installed for later reference Tools such as Maretron N2KAnalyzer allow yo...

Страница 124: ...owed by the Enter key 6 13 1 4 Restore Factory Defaults This option restores all settings on the device to their factory default state 6 13 2 Channel 0 5 This submenu contains configuration parameters...

Страница 125: ...g the specification of the pressure transducer being used 6 13 2 1 4Pressure at 20mA Program this parameter to match the pressure reading of the pressure transducer when it is sourcing a current of 20...

Страница 126: ...ly fill the tank stopping periodically to input the current fluid level The TLA100 will measure the sender resistance at each point and create a custom calibration map which relates the resistance of...

Страница 127: ...d return you to the Tank Levels Calibration menu Figure 102 Tank Levels Calibration Capacity Estimation The next step in the calibration process is to fill the tank and indicate the volume of fluid in...

Страница 128: ...ediate calibration points Figure 104 Intermediate Level Calibration Once the tank is completely full instead of pressing the Accept key to store the current calibration point press the Complete key Th...

Страница 129: ...nter the depth of the fluid when the tank is full this is the distance from the surface of the fluid to the bottom of the tank Fluid Density enter the density of the fluid whose depth is being measure...

Страница 130: ...bes the channel configuration menu when the channel s Function has been set to Pressure Vacuum mode The Channel 0 5 Pressure Vacuum Mode menu is shown below 6 13 2 2 1Function You can set the channel...

Страница 131: ...g period is 16 0 seconds If the channel s Function is set to Pressure Vacuum the default data damping period is 3 0 seconds 6 14 Maretron GPS100 Configuration This describes the configuration of the M...

Страница 132: ...below Figure 109 GPS100 Advanced Configuration Screen 6 14 1 1 Device Instance The Device Instance will be used to identify the GPS100 device on the network Unless there are multiple GPSs on the netwo...

Страница 133: ...which causes the screen shown in Figure 111 to be displayed Figure 111 Configuring Satellite Elevation Mask on a GPS100 The allowable values for Elevation Mask are between 90 and 90 This number repre...

Страница 134: ...fix is obtained Disabling the PDOP Mask by setting the value to will cause the GPS100 to report any position fixes obtained regardless of the accuracy of the fix 6 14 1 5 SNR Mask The DSM150 is capab...

Страница 135: ...splay Pressing the Enter key with NMEA2000 PGN Enable Disable menu item selected causes the DSM150 to display the screen shown in Figure 114 Figure 114 GPS100 NMEA 2000 PGN Enable Disable Screen You c...

Страница 136: ...menu item selected which causes the screen shown in Figure 116 to be displayed This will cause the GPS100 to discard all position and satellite data and compute a position fix Figure 116 Performing a...

Страница 137: ...allows the GPS to report any available data regardless of the quality of the fix 6 14 4 Device Label A label may be assigned to the GPS100 as an aid to identifying the device over the network Typical...

Страница 138: ...18 Figure 118 Configuring SBAS on a GPS100 The allowable option for SBAS configuration are either Disable which causes the GPS100 not to use SBAS satellites or Enable which causes the GPS100 to use SB...

Страница 139: ...ory Defaults configuration which allows you to return the GPS200 to the factory settings Figure 119 GPS200 Configuration Screen 6 15 1 Advanced Configuration Advanced Configuration changes some comple...

Страница 140: ...enu item selected causes the DSM150 to display the screen shown in Figure 114 Figure 121 GPS200 NMEA 2000 PGN Enable Disable Screen You can enable or disable specific transmissions by scrolling or thr...

Страница 141: ...position fix Figure 123 Performing a Cold Start of the GPS200 6 15 3 Device Label A label may be assigned to the GPS200 as an aid to identifying the device over the network Typically this would descr...

Страница 142: ...18 Figure 124 Configuring SBAS on a GPS200 The allowable option for SBAS configuration are either Disable which causes the GPS200 not to use SBAS satellites or Enable which causes the GPS200 to use SB...

Страница 143: ...0 Configuration Screen 6 16 1 Advanced Configuration Advanced Configuration changes some complex parameters within the device and should only be performed by an advanced user Typically advanced config...

Страница 144: ...about the N2KServer running on the IPG100 The following sections describe the entries in this menu Figure 127 IPG100 N2KServer Information Screen 6 16 1 3 1Client List For each N2KView client connecte...

Страница 145: ...ntry shows the number of platinum licenses in use followed by a slash followed by the total number of platinum licenses 6 16 1 3 5Basic Licenses This entry shows the number of basic licenses in use fo...

Страница 146: ...from any N2KView client whether it is a Windows PC or an iOS or Android smartphone or tablet If you have an active Maretron Cloud Services account you must change this setting to Enable so that the IP...

Страница 147: ...ubnet mask the values define the network and must be the same The most common value is 255 255 255 0 If the DHCP parameter is set to Yes you do not need to configure this parameter If the DHCP paramet...

Страница 148: ...Screen 6 17 1 1 Data Damping In order to smooth the results viewed on a display you may individually change the data damping period that the J2K100 uses when sending fuel rate and tachometer engine RP...

Страница 149: ...2000 connected displays can interpret these diagnostic codes To change the transmission status of the J1939 diagnostic messages use the Scroll Up or Scroll Down keys to move the highlighted cursor to...

Страница 150: ...entry allows the engine to be mapped to an NMEA2000 instance number Each engine on an NMEA 2000 network must have a unique instance identifier to allow display devices to distinguish it from other en...

Страница 151: ...enu item allows you to configure the transmission instance identifier which will be sent over the NMEA 2000 network along with transmission related NMEA 2000 messages In order to configure this parame...

Страница 152: ...right as shown in Figure 136 below Because only one such mapping can take place each air conditioner or icemaker on the J1939 network must have its own J2K100 Gateway The J1939 Source Address see sec...

Страница 153: ...t or transmissions for which you desire this J2K100 to translate data onto the NMEA 2000 network 6 17 7 Refresh J1939 source address list The configuration screen for the J2K100 will examine the bus t...

Страница 154: ...le units on the network 6 18 1 2 Installation Description This entry allows you to modify the NMEA 2000 installation description text strings You can enter any information you like here such as the da...

Страница 155: ...stance This entry allows you to program the NMEA 2000 device instance for the unit You usually will not need to modify the default value of 0 unless you have multiple units on the network 6 19 1 2 Ins...

Страница 156: ...mission of the Rudder message by pressing the Enter key on the message to be configured Options are Disable The status message will not be transmitted Default The status message will be transmitted at...

Страница 157: ...ation Options There are three methods of calibrating the rudder angle sender 6 19 3 1 Custom Calibration The Custom Calibration setting will provide the most accurate rudder angle readings under any c...

Страница 158: ...Custom Rudder Calibration menu item highlighted Figure 145 RAA100 Custom Rudder Angle Calibration The first step in the custom rudder angle sender calibration process is to turn the wheel hard over to...

Страница 159: ...e wheel hard over to port and to measure the angle or the rudder angle from center with a protractor or other instrument Use the Increase and Decrease keys until the highlighted rudder angle value is...

Страница 160: ...udder number must be configured For a vessel with a single rudder the number should be set to 0 For a vessel with two rudders the port rudder should be set to 0 and the starboard rudder should be set...

Страница 161: ...rformed correctly in order for the RAA100 to produce correct angle measurements A screenshot showing configuration of the operating mode appears in Figure 151 below To configure the operating mode use...

Страница 162: ...nd finally press the Enter key to confirm your selection and store the value within the RAA100 Figure 152 RAA100 Setting the to Sender Gauge Resistance 6 19 7 Gauge Resistance to Sender If the desired...

Страница 163: ...Revision 1 4 18 Page 147 Figure 153 RAA100 Setting the to Sender Gauge Resistance...

Страница 164: ...Figure 154 RIM100 Configuration Screen 6 20 1 Advanced Configuration Advanced Configuration changes some complex parameters within the device and should only be performed by an advanced user Typically...

Страница 165: ...able Disable Screen You can enable or disable the transmission of the Binary Switch Status message or set the frequency of transmission of the message by pressing the Enter key on the message to be co...

Страница 166: ...RIM100 Channel Configuration Screen 6 20 4 1 Mode Each Channel may be enabled or disabled Valid Modes are Disable the channel is not being used Enable the channel is being used Select the required op...

Страница 167: ...8 SIM100 Configuration Screen 6 21 1 Advanced Configuration Advanced Configuration changes some complex parameters within the device and should only be performed by an advanced user Typically advanced...

Страница 168: ...2000 PGN Enable Disable Screen You can enable or disable the transmission of the Binary Switch Status message or set the frequency of transmission of the message by pressing the Enter key on the mess...

Страница 169: ...end of the circuit in the open state In this case a fully open circuit will reported as a fault condition See the manual for details Valid Modes are Disable the channel is not being used End Of Line R...

Страница 170: ...e displayed Figure 162 SMS100 Configuration Screen 6 22 1 Advanced Configuration Advanced Configuration changes some complex parameters within the device and should only be performed by an advanced us...

Страница 171: ...y the following screen Figure 164 Figure 164 SMS100 NMEA 2000 PGN Enable Disable Screen You can enable or disable the transmission of the various messages or set the frequency of transmission of the m...

Страница 172: ...n by the SMS100 This signal strength is shown on a scale of one to five bars Bit Error Rate This entry shows the bit error rate of the cellular network connection This figure may be requested by Maret...

Страница 173: ...etron DSM150 display The Maretron SSC200 configuration menu can be seen in Figure 166 below Figure 166 SSC200 Configuration Screen 6 23 1 Advanced Configuration Advanced Configuration changes some com...

Страница 174: ...terface Figure 168 SSC200 NMEA 0183 Settings Screen 6 23 2 3 1Baud Rate The SSC200 compass supports NMEA0183 communication at both 4800 baud and 38400 baud All SSC200 Compasses are shipped with a baud...

Страница 175: ...ata it has received is now expired On the NMEA2000 side the Heading PGN has separate fields for heading sensor reading and variation The SSC200 always has magnetic heading available when variation is...

Страница 176: ...isabled Off using the Scroll Up or Scroll Down keys followed by the Enter key 6 23 2 5 Restore Factory Defaults This option restores all settings on the device to their factory default state 6 23 3 In...

Страница 177: ...ntry Normally the SSC200 is mounted so that the label on the compass is facing up and the NMEA 2000 and NMEA 0183 connectors are facing towards the bow of the vessel A recent version of SSC200 firmwar...

Страница 178: ...174 SSC200 Magnetic Deviation Calibration Start Screen Once you have begun the turn press Begin to start the calibration procedure If you do not wish to perform magnetic deviation calibration at this...

Страница 179: ...screen will appear indicating this and you should repeat the calibration procedure 6 23 7 Magnetic Deviation Status Pressing the Enter key with the Magnetic Variation Status menu item selected causes...

Страница 180: ...ou teach the compass these zero offset values by pressing the Enter key with the Rate of Turn Zero Offset Calibration menu item selected which causes the DSM150 to display the screen shown in Figure 1...

Страница 181: ...179 Setting Variation Source to NMEA 0183 or NMEA 2000 factory default You should need to alter this setting only if There are variation sources available on both the NMEA 2000 and NMEA 0183 interfac...

Страница 182: ...t field where you select Manual Entry by scrolling or through the options until you reach Manual Entry Pressing the Enter key with the Manual Entry menu item selected takes you to the screen shown in...

Страница 183: ...variation changes as your location on the earth changes therefore magnetic variation should be adjusted with changes in position Neither the DSM150 nor the SSC200 will make these changes automaticall...

Страница 184: ...re version 1 6 15 The TLA100 configuration menu is shown in Figure 183 below Figure 183 TLA100 Configuration Screen 6 24 1 Advanced Configuration Advanced Configuration changes some complex parameters...

Страница 185: ...el Adapter transmits the NMEA2000 PGN 127505 which can be turned on or turned off by the DSM150 display Pressing the Enter key with NMEA2000 PGN Enable Disable menu item selected causes the DSM150 to...

Страница 186: ...he numerical tank capacity value Use the Increase and Decrease keys to change the value to the desired tank capacity value and finally press the Enter key to confirm your selection and store the value...

Страница 187: ...he TLA100 will measure the sender resistance at each point and create a custom calibration map which relates the resistance of the sender with the fluid levels Figure 188 below shows a screenshot of t...

Страница 188: ...e first calibration step Enter the first calibration point with an empty tank 0 0 Gallons liters by pressing the Accept key The Current Point highlight will advance to the next point Figure 190 Empty...

Страница 189: ...d will also adjust the tank capacity to the currently indicated level Figure 192 below shows the calibration screen at the last point with the full tank level and thus the tank capacity set to 101 gal...

Страница 190: ...this menu item and then press the Enter key to write the calibration values within the TLA100 and complete the calibration process Figure 194 American Standard Sender Calibration 6 24 5 3 European Sta...

Страница 191: ...he highlighted cursor to Tank Number then press the Enter key to move the cursor over to the tank number value Use the Scroll Up or Scroll Down keys to select the desired tank number Finally press the...

Страница 192: ...perating modes depending on the installation NMEA 2000 the only thing that is connected to the resistive sender is the TLA100 NMEA 2000 Analog Gauge in addition to the TLA100 the resistive sender is a...

Страница 193: ...rsor over the Gauge Resistance to Sender menu item Then press the Enter key to move the highlight over the numerical resistance value Use the Increase and Decrease keys to change the value to the meas...

Страница 194: ...the Gauge Resistance to Sender menu item Then press the Enter key to move the highlight over the numerical resistance value Use the Increase and Decrease keys to change the value to the measured resis...

Страница 195: ...onfiguration Screen 6 25 1 6 25 2 Advanced Configuration Advanced Configuration changes some complex parameters within the device and should only be performed by an advanced user Typically advanced co...

Страница 196: ...nary Switch Status message by pressing the Enter key on the message to be configured Options are Off The fluid level message will not be transmitted On The fluid level message will be transmitted at i...

Страница 197: ...ar that warns you that the fluid remaining measurement will change as a result of this change Press the Accept key to accept the change and store the new tank capacity value within the TLM100 or Press...

Страница 198: ...ighted Custom calibration is necessary for non rectangular tanks To perform custom calibration of the tank level sender use the Scroll Up or Scroll Down keys to move the highlighted cursor over the Cu...

Страница 199: ...ibration step Enter the first calibration point with an empty tank 0 0 Gallons liters by pressing the Accept key The Current Point highlight will advance to the next point Figure 208 Empty Level Calib...

Страница 200: ...process and will also adjust the tank capacity to the currently indicated level Figure 210 below shows the calibration screen at the last point with the full tank level and thus the tank capacity set...

Страница 201: ...d you know the capacity of the tank you can easily calibrate the sender by using the Rectangular Tank menu item Figure 212 below shows this option highlighted Use the Scroll Up or Scroll Down keys to...

Страница 202: ...tance used in the data message This can be set from 0 to 15 6 25 7 Tank Type This is set to the type of fluid in the tank Values are Fuel Fresh Water Waste Water Live Well Oil Black Water Reserved 1 R...

Страница 203: ...e top level of the TMP100 configuration menu is shown below Figure 214 TMP100 Configuration Screen 6 28 1 Advanced Configuration Advanced Configuration changes some complex parameters within the devic...

Страница 204: ...off by the DSM150 display For reasons of compatibility with older NMEA2000 devices some of these PGNs are redundant disabling these PGNs will reduce the amount of traffic on the NMEA2000 bus Pressing...

Страница 205: ...A2000 PGNs each temperature is associated with a source type Possible values are Bait Well Temperature Engine Room Temperature Exhaust Gas Temperature Freezer Temperature Heating System Temperature In...

Страница 206: ...er s Manual Page 190 Revision 1 4 18 6 28 4 Device Label A label may be assigned to the TMP100 as an aid to identifying the device over the network Typically this label will describe the location of t...

Страница 207: ...n Figure 218 USB100 Configuration Screen 6 29 1 Advanced Configuration Advanced Configuration changes some complex parameters within the device and should only be performed by an advanced user Typical...

Страница 208: ...220 WARNING Do not select multiple devices of the same type for display This will result in multiple and possibly conflicting readings Figure 220 USB100 Device Selection Screen The NA column of the m...

Страница 209: ...rforming configuration of the VDR100 Vessel Data Recorder This describes the configuration of the Maretron VDR100 firmware version 2 0 0 4 Figure 221 below shows a screenshot of the VDR100 configurati...

Страница 210: ...server on the local area network When set to Yes the default value the VDR100 will obtain all necessary connection settings IP Address Subnet Mask Default Gateway and Default DNS from a DHCP server o...

Страница 211: ...er If the DHCP parameter is set to No you will need to configure this parameter 6 30 8 Default DNS This is the IP address of a computer on the Internet that can identify and locate computer systems an...

Страница 212: ...default value of 0 unless you have multiple humidity sensors on the network 6 31 2 3 Instance Pressure This entry allows you to program the NMEA 2000 device instance for the air pressure transmitted...

Страница 213: ...t be transmitted Default The message will be transmitted at its default NMEA2000 rate 0 5s 5 0s The message will be transmitted at the interval specified Select the required option using the Scroll Up...

Страница 214: ...ct to the factory preset can be easily compensated for using the Installation Offset calibration menu item To perform installation offset calibration use the Scroll Up or Scroll Down keys to move the...

Страница 215: ...If the wind speed is sufficient then a confirmation screen shown in Figure 229 below will appear indicating that a successful installation offset calibration has completed Figure 229 Installation Off...

Страница 216: ...item then press the Enter key to move the highlight to the numerical value on the right This is shown in Figure 231 below Use the Increase and Decrease keys to adjust the damping period to the desire...

Страница 217: ...the current humidity level may be entered in this screen to re calibrate the WSO100 should this be required Figure 233 Setting the Outside Humidity Use the Increase and Decrease buttons to select the...

Страница 218: ...M150 User s Manual Page 202 Revision 1 4 18 Figure 234 Setting the Outside Temperature Use the Increase and Decrease buttons to select the correct temperature and the press the Enter button to store i...

Страница 219: ...set the Anchor Drop position using the display create a screen with an Anchor Watch display In normal operating mode use the Scroll Up and Scroll Down keys to change to the screen containing the Anch...

Страница 220: ...DSM150 User s Manual Page 204 Revision 1 4 18 4 To exit the control mode press the Lights key to return to normal operating mode The highlight will disappear...

Страница 221: ...p where the needle is always pointing straight up and the compass rose rotates to indicate the heading pointed to by the needle Figure 236 and 2 North Up where the rose always has North straight up an...

Страница 222: ...log gauge There is a general gauge format for most types of display and a specialized rudder gauge display A full screen example of a tachometer display can be seen in Figure 238 below Figure 238 Gaug...

Страница 223: ...ected GPS receiver GPS operating mode 2D 3D DGPS Satellite signal strength up to 12 satellites Satellite azimuth and elevation up to 12 satellites Position HDOP Time Date Accuracy of position An examp...

Страница 224: ...rmat on the screen A full screen example of the current depth display can be seen below in Figure 241 Figure 241 Numeric Display Example The upper left hand corner indicates the parameter being displa...

Страница 225: ...the rolling road display COG Course Over Ground SOG Speed Over Ground BTW Bearing to Waypoint DTW Distance to Waypoint VMG Velocity Made Good ETA Estimated Time of Arrival TTG Time to Go XTE Cross Tr...

Страница 226: ...the vertical axis Figure 244 below shows the line graph display for barometric pressure over a time period of one day The line graph display can show the selected data over a time period of 1 2 3 4 5...

Страница 227: ...ather display shows the following information Wind Direction Ground Referenced Wind Speed Ground Referenced Heat Index Wind Chill Outside Temperature Outside Humidity Barometric Pressure Inside Temper...

Страница 228: ...e appears in Figure 246 below Figure 246 Wind Rose Display 7 10 Moon Phase Display The DSM150 supports a moon phase display which shows the current phase of the moon at the current location An example...

Страница 229: ...The swing meter is available in ranges of 30 minute 100 minute or 300 minute A screenshot of the swing meter display appears in Figure 249 below Figure 249 Swing Meter Display 7 13 Tank Gauge Display...

Страница 230: ...display may be set up in several different configurations Single Indicator Light this creates a single switch breaker 2 rows this creates four rows of single switches breakers 3 rows this creates thr...

Страница 231: ...ies for each switch breaker in the window being configured as shown in Figure 252 below Figure 252 Selection of an Individual Switch Breaker Figure 253 below shows the configuration menu for each indi...

Страница 232: ...ings In order to control a switch breaker using the DSM150 create a screen with a switch breaker which has been configured to refer to the switch bank instance and indicator number of the switch break...

Страница 233: ...Revision 1 4 18 Page 217 Figure 254 Favorite Screen Showing Highlighted Switch Breaker...

Страница 234: ...and Message is sent back to the Alert Source 8 1 Displaying Active Alerts Active Alerts are overlaid on all the favorite screens Figure 255 Alert Display The number of Alerts with pending operator act...

Страница 235: ...lert with the highest priority that requires accepting or cancelling is shown at the bottom left of the screen see Figure 255 This Alert may easily be accepted or cancelled without changing screens by...

Страница 236: ...ancel the Alert 8 3 Adding an Alert Alerts are created by selecting the parameter to be monitored e g Depth and then selecting the type of Alert e g High Alert Start by going to the Add New Alert entr...

Страница 237: ...own buttons 8 3 2 Alert Type This allows the selection of the type of Alert see paragraph 0 The options here are Alarm Warning The desired option is selected using the Scroll Up and Scroll Down button...

Страница 238: ...uttons 8 3 5 Description This is a textual field that will be displayed on the DSM150 and transmitted to Alert Slave devices It is intended to describe the alert e g Fire 8 3 6 Location This is a text...

Страница 239: ...temporary transitions of the input signal above the High Alert Set Point lasting less than 5 seconds from triggering an alert Once the alert is triggered it becomes an active alert An alert remains a...

Страница 240: ...his field in order for an alert to become active This can be used to prevent false alerts caused by parameter values that briefly have a value that would cause an alert but quickly return to the norma...

Страница 241: ...etting the Set Delay to 5 seconds will eliminate any temporary transitions of the input signal above the Low Alert Set Point lasting less than 5 seconds from triggering an alert Once the alert is trig...

Страница 242: ...arameter value rises above the value in this field the alert will become inactive Alert Clear Delay The parameter being monitored must rise above the Low Alert Clear Point value for longer than the ti...

Страница 243: ...lay The parameter being monitored must continually be received with a valid value for longer than the time in this field in order for the alert to become inactive 8 3 7 4 Trigger Type is On Alert As o...

Страница 244: ...ggered Alert Clear Delay The condition for the parameter being monitored must be not in its error condition for at least the clear delay time before the alert will become cleared 8 3 7 5 Trigger Type...

Страница 245: ...ntered then the alert will never re trigger Alert Set Delay If the switch being monitored is in the Off state for the amount of time specified in this field the alert will become active Alert Clear De...

Страница 246: ...r than Tripped for the amount of time specified in this field the alert will become inactive 8 3 7 7 Trigger Type is Outside Radius Alert The Outside Radius Alert is used to signal an alert whenever t...

Страница 247: ...d the reference position falls below the value in this field the alert will become inactive Alert Clear Delay The distance between the current GPS position and the reference position must fall below t...

Страница 248: ...is field the alert will become inactive Alert Clear Delay The distance between the current GPS position and the reference position must rise above the Inside Radius Alert Clear value for longer than t...

Страница 249: ...lites is a 3D lock and more than three satellites with SBAS is a 3D DGPS lock These different locks are indicative of the quality or accuracy of the given position with 1D having the lowest quality an...

Страница 250: ...higher than the quality specified in the Alert Clear Point field for longer than the time specified in the Clear Delay field the alert will become inactive 8 3 7 11 Trigger Type is Direction Alert A...

Страница 251: ...me specified in the Clear Delay field the alert will become inactive Reference Heading Reference Direction Reference Course Enter the desired reference heading or direction into this field If the moni...

Страница 252: ...nunciators can be set here This allows the user to configure the Alerts so that the alert can be identified from the tone The values for Tone are Beeps A continuous series of half second on half secon...

Страница 253: ...ition the cursor and then press the Enter button to move to the Tone column The options here are Enable Disable The desired option is selected using the Scroll Up and Scroll Down buttons and then pres...

Страница 254: ...ber field whenever the alert is triggered A Disable value will cause the DSM150 to not send a text message to this number in this case Send When Cleared an Enable value in this field will cause a SMS...

Страница 255: ...en the vessel is in the Anchored state this option must be set to Enabled The options here are Enable Disable The desired option is selected using the Scroll Up and Scroll Down buttons and then pressi...

Страница 256: ...276 Deleting an Alert This brings up the list of Alerts managed by the DSM2590 Figure 277 Deleting Alert List Scroll up and down using the Scroll Up and Scroll Down buttons until the alert that must...

Страница 257: ...278 Deleting an Alert Confirmation Press the Accept button to delete the Alert or the Cancel button to return to the previous screen without deleting the Alert 8 5 Editing an Alert From the Alert Setu...

Страница 258: ...with the parameters of the chosen Alert See section 8 1 for details of these parameters 8 6 Setting the Vessel Operating Mode The Vessel Operating Mode must be set on each DSM150 This is a potentially...

Страница 259: ...lert This menu allows you to program up to eight different phone numbers to which the DSM150 will send alert messages Each alert can send a message to up to three of the numbers in the phone book To e...

Страница 260: ...e section 3 3 4 for details on editing the phone number Starting the phone number with the international prefix will allow the number to work regardless of what country the phone s SIM card phone numb...

Страница 261: ...ne Book Test Message Popup Press Yes to send a test message or press No to skip sending the test message You will be returned to the SMS Text Phone Book screen Once you have created all of the phone b...

Страница 262: ...ons are displayed by setting this parameter to Disable The options here are Enable Disable 8 8 2 Flashing Screen As an extra means to gain the operator s attention to an Active Alert the DSM150 may be...

Страница 263: ...Revision 1 4 18 Page 247 Figure 288 Restore Factory Defaults Confirmation...

Страница 264: ...t use chemical cleaners as they may remove paint or markings or may corrode the DSM150 enclosure or seals Do not use any cleaners containing acetone as they will deteriorate the plastic enclosure Ensu...

Страница 265: ...work is in transmitting a valid data value Data fluctuates between two different values Two devices on the network are transmitting the same data Check the Instance Numbers on all devices transmitting...

Страница 266: ...Frequency Phase A L N Voltage Phase AB L L Voltage Phase B Frequency Phase B L N Voltage Phase BC L L Voltage Phase C Frequency Phase C L N Voltage Phase CA L L Voltage Anchor Watch DC Current Voltag...

Страница 267: ...bs Keel Watermaker Sea Recovery Status Display Wind Apparent Direction and Speed True Direction and Speed Ground Direction and Speed NMEA 2000 Parameter Group Numbers PGNs Description PGN PGN Name Def...

Страница 268: ...er N A 065030 Generator Average Basic AC Quantities N A 065282 Number of Channels Maretron N A 065284 DC Breaker Current Maretron N A 065286 Fluid Flow Rate Maretron N A 065287 Trip Volume Maretron N...

Страница 269: ...130821 Alert Text Maretron N A 130822 Alert Control Maretron N A 130823 Temperature High Range Maretron N A 130824 Annunciator Maretron N A 130825 Data Instance Chan Correlation Maretron N A 130826 Sw...

Страница 270: ...r IEC 60945 8 7 Rain and Spray 12 5mm Nozzle 100liters min from 3m for 30min per IEC 60945 8 8 Solar Radiation Ultraviolet B A Visible and Infrared per IEC 60945 8 10 Corrosion Salt Mist 4 times 7days...

Страница 271: ...support for Maretron products you can reach us in any of the following ways Telephone 1 866 550 9100 Fax 1 602 861 1777 E mail support maretron com World Wide Web http www maretron com Mail Maretron L...

Страница 272: ...1 4 18 13 Installation Template Please check the dimensions before using the following diagram as a template for drilling the mounting holes because the printing process may have distorted the templat...

Страница 273: ...IES ARE EXPRESSLY IN LIEU OF AND EXCLUDES ALL OTHER EXPRESS OR IMPLIED WARRANTIES INCLUDING BUT NOT LIMITED TO THE IMPLIED WARRANTIES OF MERCHANTABILITY AND OF FITNESS FOR A PARTICULAR PURPOSE Stateme...

Страница 274: ...sible for all shipping and insurance charges Maretron will return the replaced or repaired product with all shipping and handling prepaid except for requests requiring expedited shipping i e overnight...

Отзывы: