3 - 26
E - EVERY 1000 HOURS OF SERVICE OR EVERY TWO YEARS
Carry out the operations described previously as well as the following operations.
E1 – DRY AIR FILTER CARTRIDGE
CHANGE
In case of use in a heavily dust laden atmosphere, the cartridge replacement interval
must be reduced (to 250 hours in a heavily dust laden atmosphere).
IMPORTANT
Change the cartridge in a clean location, with the engine stopped.
Never operate the lift truck with the air filter removed or damaged.
If the air filter clogging indicator light comes on
, replace the cartridge with minimum delay (maximum 1 hour).
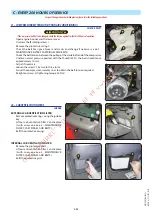
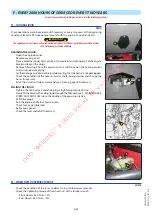
- Open the engine bonnet.
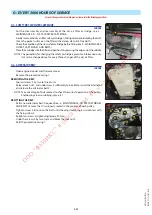
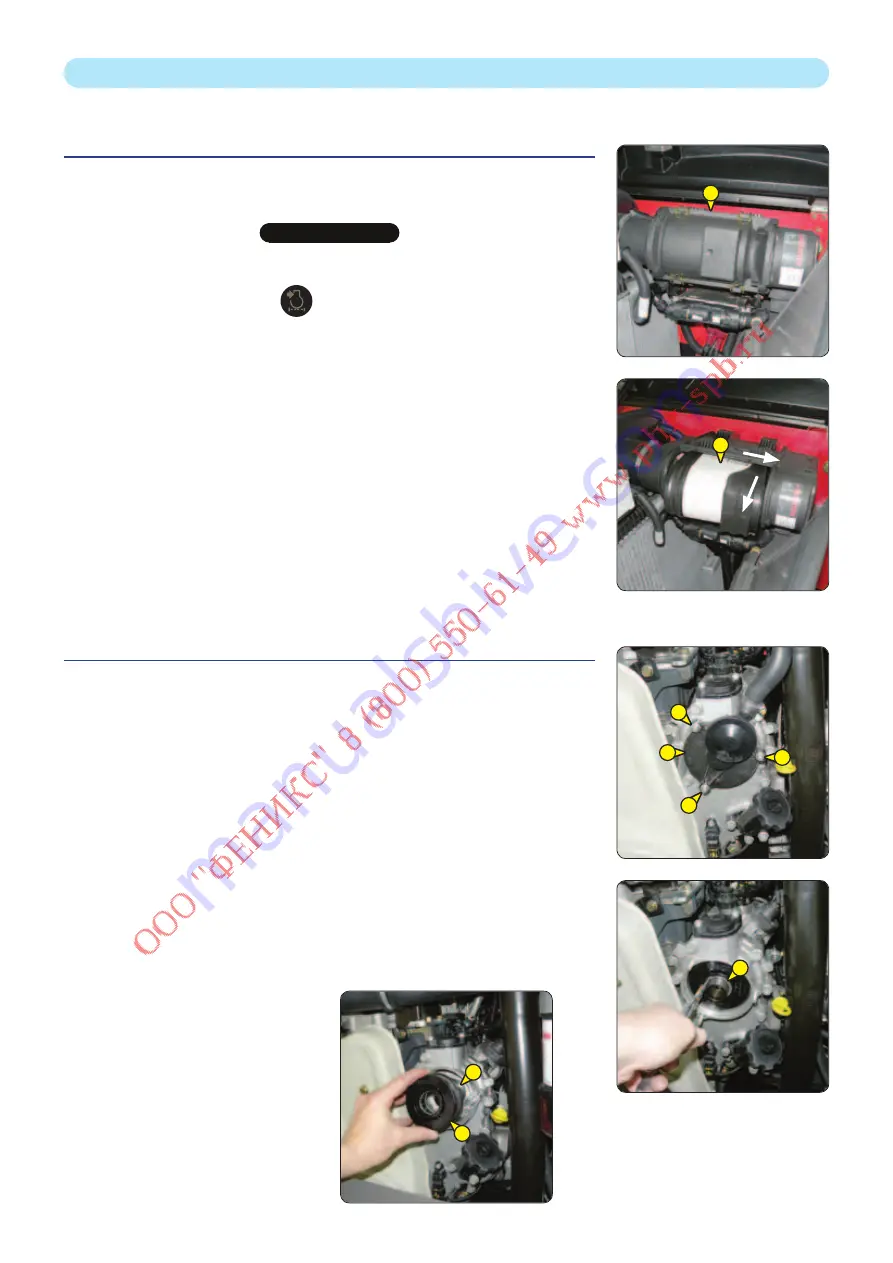
- Loosen the bolts and remove cover 1.
- Pivot cartridge 2 towards the front and carefully remove to avoid spilling the dust.
- Leave the safety cartridge in place.
- The following parts must be cleaned with a damp, clean lint-free cloth.
• The inside of the filter and cover.
• The inside of the filter inlet hose.
• The gasket surfaces in the filter and in the cover.
- Check pipes and connections between the air filter and the engine and the connection
and state of the clogging indicator on the filter.
- Before mounting, check the state of the new filter cartridge (see: 3 - MAINTENANCE:
FILTERS, CARTRIDGES AND BELTS).
- Tilt the cartridge approximately 5° towards the front, insert it into the filter and
position it by pressing the edges and not the middle.
- Refit the cover and ensure that the clips are properly secured. The cover should fit
on easily, if this is not the case, check the position of the cartridges in the filter.
E2 – ENGINE CRANKCASE VENTILATION FILTER
CHANGE
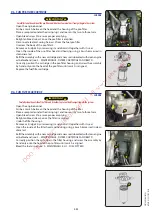
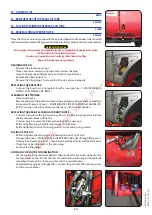
- Open the engine bonnet.
- Carefully clean the outside of the filter and its holder, to prevent dust from getting
into the system.
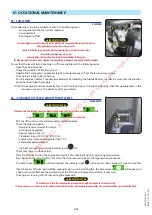
- Undo the nuts 1 and remove the cover 2.
- Remove the circlips 3, extract the filter 4 and discard it together with the seal of
the cover 2.
- Refit a new seal on the cover and insert a new filter (see: 3 - MAINTENANCE: FILTERS
CARTRIDGES AND BELTS).
NOTE: Ensure that the flats of the filter 4 and shaft 5 are aligned.
- Put back the circlips 3, refit the cover 2 and tighten the nuts 1 (tightening torque
25 N.m).
1
1
1
2
3
4
5
1
2
647104
(13/06/2016)
MT
835
/ 1135
/ 1335
ST3B
Содержание MT 1135 ST3B
Страница 4: ...1 1 1 OPERATING AND SAFETY INSTRUCTIONS 647104 13 06 2016 MT 835 1135 1335 ST3B...
Страница 5: ...1 2 647104 13 06 2016 MT 835 1135 1335 ST3B...
Страница 6: ...1 3 647104 13 06 2016 MT 835 1135 1335 ST3B...
Страница 31: ...1 28 647104 13 06 2016 MT 835 1135 1335 ST3B...
Страница 32: ...2 1 2 DESCRIPTION 647104 13 06 2016 MT 835 1135 1335 ST3B...
Страница 33: ...2 2 647104 13 06 2016 MT 835 1135 1335 ST3B...
Страница 50: ...2 19 647104 13 06 2016 MT 835 1135 1335 ST3B...
Страница 96: ...2 65 647104 13 06 2016 MT 835 1135 1335 ST3B...
Страница 103: ...2 72 647104 13 06 2016 MT 835 1135 1335 ST3B...
Страница 104: ...3 1 3 MAINTENANCE 647104 13 06 2016 MT 835 1135 1335 ST3B...
Страница 105: ...3 2 647104 13 06 2016 MT 835 1135 1335 ST3B...
Страница 116: ...3 13 647104 13 06 2016 MT 835 1135 1335 ST3B...
Страница 128: ...3 25 647104 13 06 2016 MT 835 1135 1335 ST3B...
Страница 136: ...3 33 647104 13 06 2016 MT 835 1135 1335 ST3B...
Страница 138: ...3 35 647104 13 06 2016 MT 835 1135 1335 ST3B...
Страница 145: ...3 42 647104 13 06 2016 MT 835 1135 1335 ST3B...
Страница 146: ...4 1 4 OPTIONAL ATTACHMENTS FOR USE WITH THE RANGE 647104 13 06 2016 MT 835 1135 1335 ST3B...
Страница 147: ...4 2 647104 13 06 2016 MT 835 1135 1335 ST3B...
Страница 149: ...4 4 647104 13 06 2016 MT 835 1135 1335 ST3B...
Страница 158: ...4 13 647104 13 06 2016 MT 835 1135 1335 ST3B...

