background image

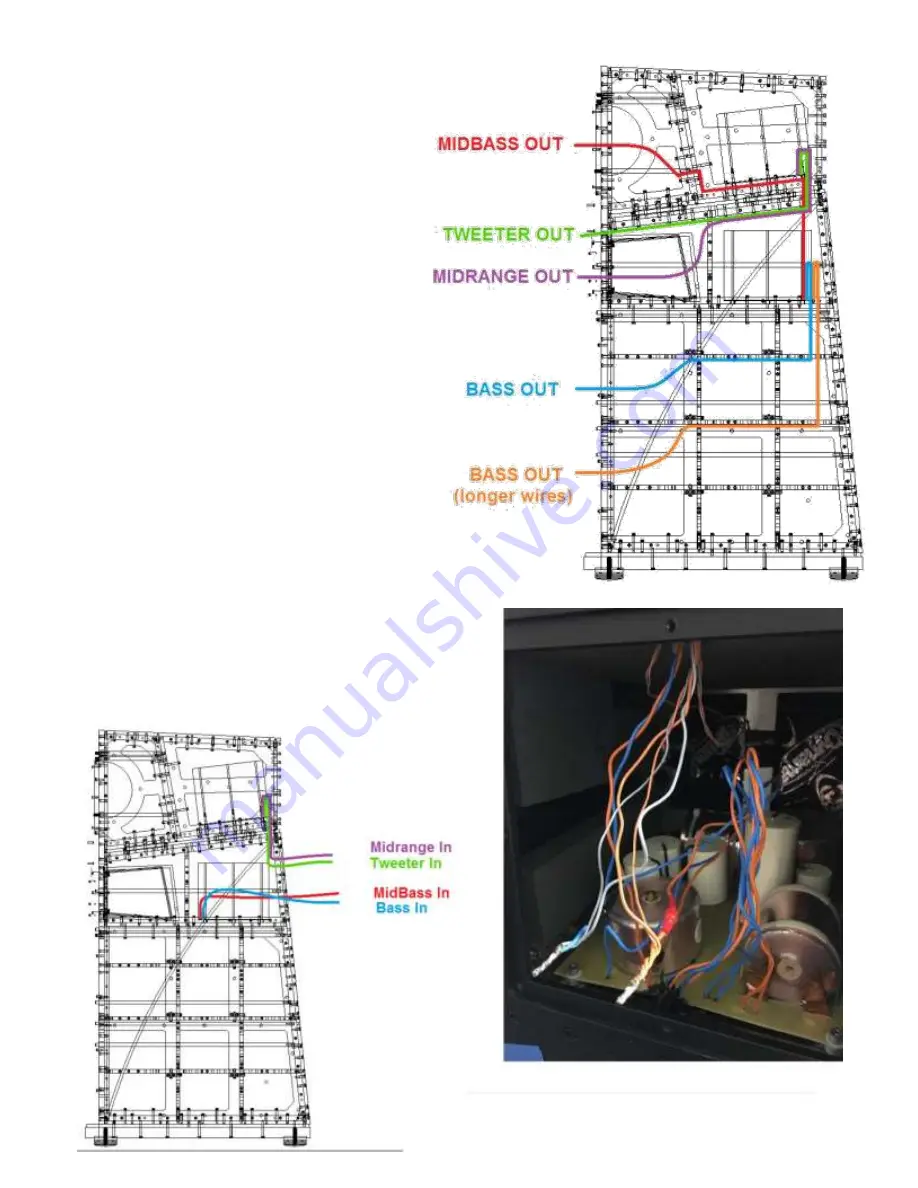
Also route the input wires 
through this hole and out 
through the binding post 


plate cutout. 


Hot glue and vinyl wires 
going through mid-enclosure 


hole. 


Input wires are should be 
bound together using a pair 
of linemans pliers, gather all 
positive input wires in a 
bundle and twist them in to 
a tight, neat, bundle. Solder 
the wires to create a uniform 
wiring harness. Repeat with 


the negative input wires. 


Stuff 1200g of stuff in to 
the back of the cabinet. 25g 
stuff goes in the mid 
enclosure. NOTE: Keep rod 
holes / rod pathways clear. 


53 | 

P a g e 

Содержание Q7

Страница 1: ...Q7 Assembly Procedure 1 P a g e...

Страница 2: ...0 fasteners with washers and red Loctite Locate the 2x Q7 06 Braces You will fasten each of these down to the Q7 10 plate Notice the orientation of the braces The small window cut out of the top of th...

Страница 3: ...these 06 braces To start attach the 65 rails to the 06 braces as shown in the images to the right These rails should be fastened down with 7 8 20 fasteners with washers and red Loctite Use 4 fasteners...

Страница 4: ...rear of the cabinet Fasten the Q7 03 down to the 65s with 7 8 20 fasteners with washers and red Loctite Locate the Q7 02 Mint Brace Find the side of it with the chamfered beveled edge Slide this brace...

Страница 5: ...g it to rest on the inner ledges of the 06 braces Check all braces to insure that every brace has a beveled or chamfered edge and that are angled in the same direction Each brace should be angled like...

Страница 6: ...int Fasten with 7 8 20 fasteners with washers and red Loctite Lift the Q7 05 up and fasten it to the two undrilled Q7 65s Fasten all together with 7 8 20 fasteners with washers and red Loctite Look at...

Страница 7: ...6 P a g e...

Страница 8: ...to force a brace to sit flush with the 04 once flush fasten the 04 to the skeleton assembly There is a chance that the power clamp will not be effective In these cases you will have to loosen the fast...

Страница 9: ...with the front of the 04 braces before fastening down tight with 2 20 fasteners with washers and red Loctite Fasteners should come from the 04 up in to the 14 plate and from the 06 up in the 14 Don t...

Страница 10: ...is flush against the front side of the cabinet which will be the non angled side Fasten battens with a 3 4 20 fastener with washers and red Loctite Next up is the Q7 43 frame batten This frame batten...

Страница 11: ...r top plate Q7 14 should press against the sealant and press up against the two battens Q7 32 and Q7 43 Use small clamps on front and back side to clamp the baseplate to these battens You may need a m...

Страница 12: ...10 P a g e...

Страница 13: ...ove it and the 43 plate below it Fasten the Q7 40 batten underneath the skeleton This batten should fit snugly underneath all braces but there is a slight chance that this batten will stick out past t...

Страница 14: ...fasteners with washers and red Loctite Fasten down the Q7 33 batten This batten goes on the flat side of the cabinet Make it flush to the front edge before fastening it down with 20 fasteners with was...

Страница 15: ...note of the beveled edge it will dictate the orientation of this brace Place the brace down on to the Q7 14 plate the angled edge on top of the 16 should match the angle in which the 31 batten is sit...

Страница 16: ...asten battens with a 3 4 20 fastener with washers and red Loctite Next up is the Q7 43 frame batten This frame batten should be installed near the bottom of the 18 plate Positioning this batten is a b...

Страница 17: ...14 P a g e...

Страница 18: ...2 and 43 battens with 1 1 8 20 fasteners with washers and red Loctite Fasten the Q7 39 frame batten underneath the skeleton Fasten batten down to the 18 using 20 fasteners with washers and red Loctite...

Страница 19: ...15 P a g e...

Страница 20: ...n to the side plates with washers and red Loctite Finally fasten down the Q7 34 This batten must be flush to the ends of the 31 brace and the 32 brace Fasten the 34 brace down with 20 fasteners with w...

Страница 21: ...that it is suspended in the air Loosen and align the Q7 57 Base Plate so that it sits flush or even on either side Tighten the 11 fasteners and then do a second pass and give each fastener a re torque...

Страница 22: ...asters should have brakes Carefully lower the cabinet down until it is standing on its caster wheels Once here move the electric back and away carefully be mindful not to bump the cabinet with the lif...

Страница 23: ...18 P a g e...

Страница 24: ...te does not just slide right off the cabinet Release the clamps and pinch the plate in place Use a soft mallet to tap the plate flush Fasten this top plate to the Q7 31 battens with 1 1 8 20 fasteners...

Страница 25: ...19 P a g e...

Страница 26: ...s underside and fasten to the Q7 14 using 3 4 20 Low Head fasteners with red Loctite Fill the two unused holes with Alex sealant Locate the Q7 42 batten and fasten it to the Q7 10 Use 20 Low Head fast...

Страница 27: ...th washers and red Loctite Alex seal any unused holes Fasten the Q7 37 batten to the Q7 14 plate with 1 1 8 20 fasteners with washers and red Loctite Alex seal any unused holes Fasten down the Q7 41 t...

Страница 28: ...lf cab in a spot where it can sit safely and is free from the possibility of being damaged Mock up and place the Q7 62 Lower Back Plate to check fit and see if shimming is necessary See Rudy or more e...

Страница 29: ...metic defects Attach the Q7 25 batten to the Q7 08 using 20 fasteners with washers and red Loctite Attach the Q7 28 batten to the Q7 08 Fasten it down using 20 fasteners with washers and red Loctite I...

Страница 30: ...The large hole drilled in the middle near the edge of the 13 is the indicator of the rear side of the cabinet The 08 should be flush with the 13 on the bottom and front rear sides Fasten down by feed...

Страница 31: ...asten down the Q7 25 shown as the light grey batten to the 07 plate 20 fasteners with washers and red Loctite Fasten down the Q7 29 to the 07 plate Use 20 fasteners with washers and red Loctite Place...

Страница 32: ...ill sit flush with the tops of the side plates If this plate sits higher than the side plates when fully seated you will have to loosen up the fasteners along both sides of the 25 battens adjust the s...

Страница 33: ...Install the Q7 20 braces and fasten them loosely in to the Q7 13 plate Use 2 20 fasteners with washers and red Loctite Do not tighten these fasteners down yet 27 P a g e...

Страница 34: ...htly The side of the batten that has more the side with the offset should be facing towards you which should be the rear of the cabinet the side of the batten where the through holes are closer to the...

Страница 35: ...Place the upper cabinet down on a piece of foam the small side should be facing down The cabinet should look like the image to the right 29 P a g e...

Страница 36: ...by the through hole position Thread 1 1 8 20 fasteners in through the batten loosely and in to the 09 plate do not tighten down Loosely thread 1 1 8 fasteners in through the batten and in to the 20 p...

Страница 37: ...t Install the Q7 70 batten by placing it down in this joint and loosely fastening 1 1 8 20 fasteners down through the Q7 70 and in to the 20 plate Keep these bolts loose Thread fasteners through the 7...

Страница 38: ...31 P a g e...

Страница 39: ...x to the 09 08 joint Install another Q7 27 in this joint corner Use 3 4 20 fasteners through the 27 and in to the 08 Use washers and red Loctite Fasten the 27 to the 09 using 1 1 8 20 fasteners with w...

Страница 40: ...mine its orientation Install pins to the 30 battens in the location shown in the image to the right Fasten it to the 07 with 20 fasteners with washers and red Loctite Place the second pre pinned Q7 30...

Страница 41: ...s carefully in to this cabinet section Fasten this brace to the 09 and to the 19 with 1 20 fasteners with washers and red Loctite Further fasten these braces in to the 13 plate with 2 20 fasteners wit...

Страница 42: ...be placed on the Q7 13 Apply a bead of sealant down on to the 13 plate Fasten this batten down with 7 8 20 counter sink fastener Thread these fasteners in through the bottom of the 13 plate and faste...

Страница 43: ...of copper with angled edges Install this part on top of the lower cab This part goes to the side of the 45 copper piece on top of the 15 plate Fit the 46 copper piece flush with the flat side of the...

Страница 44: ...to two corners of the Q7 58 Flip this plate over and hammer 2 pins in to 2 opposite corners of the Q7 58 There are reliefs cut out in the 15 plate place the 58 in to these reliefs and set the pins in...

Страница 45: ...ly on to the lower cabinet so that the 58s lock in to the cutouts in the underside of the 13 plate Secure the top half cab to the lower half cab with 8 fasteners 4 on either side of the cab 1 3 8 16 f...

Страница 46: ...this carefully as you run the risk of damaging the side plates Unwrap QC and inspect the Q7 01 Tape over the 2 possibly 4 through holes indicated below with blue circles Fill with hot glue and seal wi...

Страница 47: ...at Socket Cap fasteners from the wooden plate through the mid enclosure box Thread a nut on the mid enclosure box side of the fasteners and with a small wrench over the nut and ratchet tighten down fa...

Страница 48: ...Install BH5 in all places shown 41 P a g e...

Страница 49: ...42 P a g e...

Страница 50: ...ads of sealant This is the front side of the Q7 cabinets Place a bead of Alex down at every single joint between a batten and finished plate You will also have to lay down a few beads in between divid...

Страница 51: ...ld squirt out the sides between the 01 and cabinet assembly Use 94 20 1 fasteners with red Loctite to fasten the 01 to the cabinet assembly Once fasteners are on and the 01 is fastened to the cabinet...

Страница 52: ...he 01 This cutout hole is the MidBass cutout Locate the Q7 55 Ring Press this ring in to the sealant and fasten down with 20 5 8 fasteners with red Loctite QC and inspect the Q7 63 Faceplate Check all...

Страница 53: ...oncentrically Make sure no EAR is overlapping bushing shelves or edges Unpeel and apply rod bushings to the Q7 63 faceplate These bushings should sit inside the EAR gasket openings but should also sit...

Страница 54: ...rod threads Next thread in the two much longer Q7 R2s with red Loctite Thread three Q7 R3s in to the faceplate using red Loctite on each of the rods threads Thread two Q7 R4s in to the faceplate with...

Страница 55: ...ow Look at the assembly from the side to make sure you have all rods in the correct order If a rod is stickup up past another rod out of order it is a clear indicator that you have installed the wrong...

Страница 56: ...e a space uncovered by EAR this space should be about 4 x 1 and start from the front left corner of the XO Consult Rudy for details if those were confusing Hot glue grey half inch spacers to the throu...

Страница 57: ...Route the Bass Output wires and Midbass Output wires The rest will be routed after the next XO is installed Hot Glue and Vinyl on both sides Midbass output wire 50 P a g e...

Страница 58: ...the 3 8 x 1 2 Grey Round Spacer and place it over the white 1 x White Delrin Spacer Wrap electrical tape around the two to join them together Make 6 spacer assemblies Place each spacer assembly over a...

Страница 59: ...studs Once the XO is sitting on the spacers assemblies Slowly start to remove and replace each stud Each stud should be replaced with a 20 1 fastener with a x 0 250 molded nylon top hat washer and red...

Страница 60: ...hould be bound together using a pair of linemans pliers gather all positive input wires in a bundle and twist them in to a tight neat bundle Solder the wires to create a uniform wiring harness Repeat...

Страница 61: ...Alex to the Q7 55 ring Connect the positive output wire to the positive push terminal on the driver Connect the negative output wire to the negative push terminal on the driver Place the driver again...

Страница 62: ...mid enclosure with scrap pieces of BH5 Solder the positive wire to the positive terminal and the negative wire to the negative terminal Solder at 750 Fasten the midrange driver with 8 32 1 fasteners...

Страница 63: ...s driver Connect positive wire to positive push terminal Connect negative wire to negative push terminal Push driver up against sealant bead Fasten driver down with M6 5 32 SS fasteners with red Locti...

Страница 64: ...H5 to the Q7 62 Slide the 62 in to the cabinet carefully place the top corner in first carefully underneath the copper Once firmly placed carefully push tap the middle and bottom of the plate in to pl...

Страница 65: ...e nose pliers With the new MBD5D tweeter you can install it and then solder output wires to it If faceplate has been re machined the Q7 64 ring is required Start by mounting tweeter with 10 24 Hex But...

Страница 66: ...te to sit flush with the 01 Make sure faceplate corners are flush with the 01 If faceplate sits lower than 01 pull the faceplate open and add more blue painters tape Once flush insert all rod bolts do...

Страница 67: ...all set screw and clamp down on input wires Make this snug tight so that these wires will not come out when tugged on but do not overtighten with allen wrench because these threads are prone to stripp...

Страница 68: ...e cabinet angled side first until its leading edge touches the copper IMPORTANT it should not touch the face of the copper but rather it should be resting on the unfinished topside upper surface of th...

Страница 69: ...62 P a g e...

Отзывы: