background image


 7 


Features 


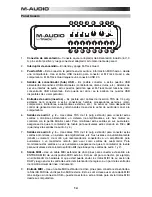
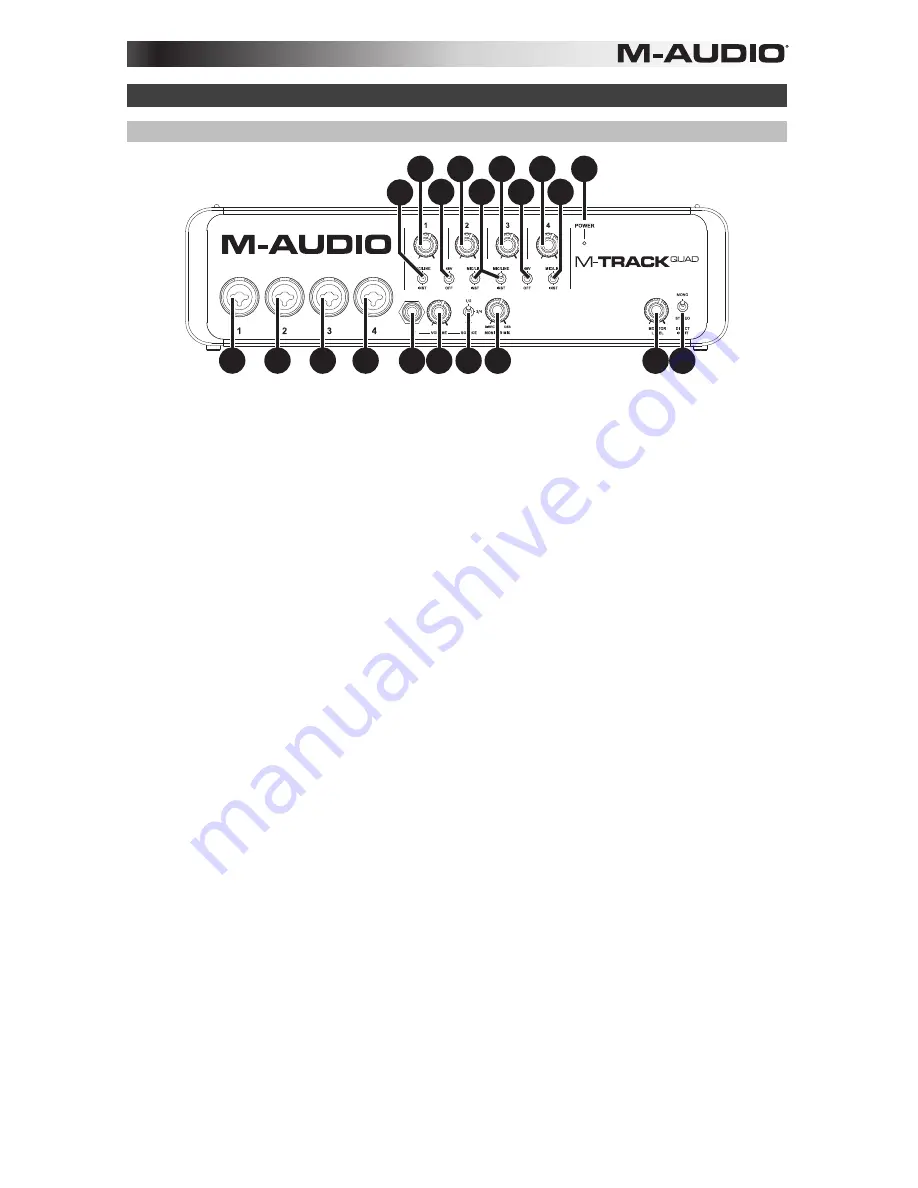
Front Panel 


2

2

2

2

8

4

3 3

3 3

1

5

5

4

4

6 10 11

9 7


1.


Power LED –

 Illuminates when M-Track Quad is on. 

2.


Mic/Line / Inst Input – 

Connect a microphone, line-level device, or guitar to this input with an XLR or 

1/4" TRS cable. (For mic-level signals, use an XLR cable. For line-level signals, use a 1/4" TRS cable.) 

3.


Gain –

 Adjusts the input's gain level. Set this knob so the corresponding level meter in your DAW 

displays a "healthy" level during performance—but not so high that the meter "clips" or peaks, causing 
distortion in the audio. 

4.


Mic/Line / Inst Switch –

 When the switch is in the 

Mic/Line

 position, the channel will accept 

microphone- or line-level signals. When this switch is in the 

Inst

 position, the channel will serve as a 

high-impedance input for connecting guitar or bass instruments.  

5.


Phantom Power Switch – 

This switch activates and deactivates phantom power for each channel pair 

(Channels 1 and 2 and/or Channels 3 and 4). When activated, phantom power su48V to both 
XLR mic inputs. Please note that dynamic microphones and ribbon microphones do not require 
phantom power, while most condenser microphones do. Consult your microphone's documentation to 
find out whether it needs phantom power. 

6.


Master Level – 

Adjusts the output volume of Audio Outputs 1 and 2, which should be connected to 

your powered monitors. 

7.


Mono/Stereo –

 Adjusts the master mix for mono or stereo operation. Use the stereo setting to direct-

monitor the input signal when recording a stereo source, if you want to hear each channel in their 
respective left and right sides. Use the mono setting to direct-monitor the input signal when recording 
only one source or if you want to hear both channels equally on each side. This switch does not affect 
the DAW playback or how your sound is recorded into your DAW; it affects only how you hear the input 
signal in the headphones and Audio Outputs. 

8.


Headphone –

 Connect a set of 1/4" TRS headphones to this output. The mix you hear from this output 

will be determined by the Headphone Source Switch and Monitor Mix knob. 

9.


Monitor Level –

 Adjusts the output volume of the Headphone output. 

10.


Headphone Source Switch –

 This switch selects which inputs are sent to the Headphone output – 

Channels 1 and 2 (

1/2

), Channels 3 and 4 (

3/4

), or all channels (

All

). Monitoring two separate sources 

can be helpful in different scenarios. For instance, a DJ could switch to another channel pair to cue up 
the next track, or a recording engineer could hear the headphone mix for the artists in the studio. 

11.


Monitor Mix – 

Blends any amount of zero-latency signal from all your inputs (

Direct

) with the output of 

your computer (

USB

). When your Headphone Source Switch is set to 

3/4

, this knob will have no effect. 

This knob is useful during recording when dealing with the "buffer size" and "latency." The computer 
takes a short amount of time to process the incoming audio before sending it back out; this time is 
determined by the buffer size setting. Latency is the resulting delay between the incoming sound 
(playing your instrument, singing, etc.) and outgoing sound (when you hear it in the DAW). Higher 
buffer sizes result in higher latency. 

If your computer is powerful enough, you may be able to set your buffer size low enough such that you 
may never need direct monitoring. In this case, set the knob all the way to the "USB" position to monitor 
only the audio output of your DAW. 

In other cases, though, low buffer sizes can consume a lot of your computer's CPU and cause audio 
glitches, so you may need to use a higher buffer setting, resulting in latency. In this case, use a higher 
buffer size and turn the knob more towards the "DIRECT" position to monitor your incoming signal 
without latency. When listening to the playback, turn it all the way to the "USB" position. 

Содержание M-Track Quad

Страница 1: ...User Guide English 3 8 Gu a del usuario Espa ol 9 14 Guide d utilisation Fran ais 15 20 Guida per l uso Italiano 21 26 Benutzerhandbuch Deutsch 27 32 Appendix English 33 34...

Страница 2: ......

Страница 3: ...r complete system requirements compatibility information and product registration visit the M Audio website m audio com For additional product support visit m audio com support Included Software We hi...

Страница 4: ...m your guitar cable and the M Track Quad s channel inputs Setup Scenario 1 General usage Headphones Guitar Vocal Microphone Keyboard synthesizer Monitors Power Use this setup to record in your home st...

Страница 5: ...back see the following Audio Setup section for more information Connect your microphones to Channels 1 and 2 and activate the phantom power switch for those channels Connect your stereo overhead mics...

Страница 6: ...ncluded USB cable to connect the M Track Quad to your computer 3 Click the Apple icon in the menu bar select System Preferences and then click Sound 4 In both the Input and Output tabs select M Track...

Страница 7: ...rded into your DAW it affects only how you hear the input signal in the headphones and Audio Outputs 8 Headphone Connect a set of 1 4 TRS headphones to this output The mix you hear from this output wi...

Страница 8: ...to connect these outputs to your powered monitors an amplifier system etc Their levels are controlled by the Monitor Level knob To monitor these outputs in your headphones make sure the Headphone Sou...

Страница 9: ...nite descargar Soporte Para conocer los requisitos completos del sistema la informaci n de compatibilidad y realizar el registro del producto visite el sitio web de M Audio m audio com Para soporte ad...

Страница 10: ...del cable de su guitarra y las entradas de los canales del M Track Quad Escenario de instalaci n 1 Uso general Auriculares Guitarra Vocal Micr fono Teclado Sintetizador Monitores Suministro el ctrico...

Страница 11: ...consulte la secci n Configuraci n de audio a continuaci n Conecte sus micr fonos a los canales 1 y 2 y active el interruptor de alimentaci n fantasma correspondiente a esos canales Conecte sus micr f...

Страница 12: ...conectar el M Track Quad a su computadora 3 Haga clic en el icono de Apple de la barra de men seleccione System Preferences Preferencias del sistema y haga clic luego en Sound Sonido 4 En las pesta as...

Страница 13: ...cta solo a la manera en que usted oye su se al de entrada en los auriculares y en las salidas de audio 8 Auricular Conecte un juego de auriculares TRS de pulg a esta salida La mezcla que usted oye des...

Страница 14: ...estas salidas a monitores alimentados un sistema de amplificadores etc Sus niveles se controlan con la perilla Monitor Level Para monitorear estas salidas en sus auriculares aseg rese de que el conmu...

Страница 15: ...equise la compatibilit et l enregistrement du produit veuillez visiter le site Internet de M Audio au m audio com Pour toute assistance suppl mentaire veuillez visiter le site m audio com support Logi...

Страница 16: ...alimentation du M Track Quad loign du c ble de la guitare et des canaux d entr es du M Track Quad Sc nario d installation 1 Utilisation g n rale Casque d coute Guitare Voix Microphone Clavier synth ti...

Страница 17: ...nateur pour l enregistrement et la lecture voir la section Configuration audio pour plus d information Branchez vos microphones aux canaux 1 et 2 et activez l alimentation fant me pour ces canaux Bran...

Страница 18: ...re positif 2 Utilisez le c ble USB inclus pour brancher le M Track votre ordinateur 3 Cliquez sur l ic ne Apple dans la barre de menu s lectionnez Pr f rences syst me et puis cliquez sur Son 4 Sous le...

Страница 19: ...ou comment le son est enregistr par le logiciel il affecte uniquement la fa on dont le son est achemin aux sorties casque d coute et principales 8 Sortie casque Cette sortie permet de brancher un casq...

Страница 20: ...ies vos moniteurs amplifi s un syst me d amplification etc Leurs niveaux sont contr l s par le bouton Monitor Level Pour surveiller ces sorties partir de votre casque d coute assurez vous que le s lec...

Страница 21: ...istema completi informazioni in merito alla compatibilit e per la registrazione del prodotto recarsi al sito Web di M Audio m audio com Per ulteriore assistenza recarsi alla pagina m audio com support...

Страница 22: ...si canale dell M Track Quad Configurazione Scenario 1 Utilizzo generico Cuffie Chitarra Voce Microfono Tastiera Sintetizzatore Monitor Alimentazione Servirsi di questa configurazione per registrare ne...

Страница 23: ...e la riproduzione si veda il seguente paragrafo Configurazione Audio per maggiori informazioni Collegare i microfoni ai Canali 1 e 2 e attivare l interruttore di alimentazione phantom per tali canali...

Страница 24: ...e l M Track Quad al computer 3 Cliccare sull icona Apple a livello della barra dei menu selezionare System Preferences e quindi cliccare su Sound 4 In entrambe le schede Input e Output selezionare M T...

Страница 25: ...sce sulla riproduzione del DAW o su come il suono viene registrato nel DAW influisce solo sul modo in cui si sente il segnale di ingresso a livello delle cuffie e delle uscite audio 8 Cuffie Collegare...

Страница 26: ...ficazione ecc I rispettivi livelli sono controllati dalla manopola Monitor Level livello monitor Per monitorare queste uscite in cuffia assicurarsi che l interruttore Headphone Source fonte cuffie sia...

Страница 27: ...en Kompatibilit tsdetails und die Registrierung Ihres Produkts besuchen Sie bitte die M Audio Website m audio com F r zus tzlichen Produkt Support besuchen Sie m audio com support Mitgelieferte Softwa...

Страница 28: ...Gitarrenkabels oder der Kanaleing nge des M Track Quad auf Setup Szenario 1 Allgemeine Verwendung Kopfh rer Gitarre Gesangsstimme Mikrofon Keyboard Synthesizer Monitore Stromversorgung Verwenden Sie...

Страница 29: ...nitt Audio Setup f r weitere Informationen Schlie en Sie Ihre Mikrofone an die Kan le 1 und 2 an und aktivieren Sie die Phantomspeisung f r diese Kan le Verbinden Sie Ihre Stereo Overhead Mikrofone mi...

Страница 30: ...ieferten USB Kabel an Ihren Computer an 3 Klicken Sie auf das Apple Symbol in der Men leiste w hlen Sie Systemeinstellungen und klicken Sie dann auf Ton 4 In den beiden Registerkarten Eingang und Ausg...

Страница 31: ...gezeichnet wird Dieser Schalter hat lediglich einen Einfluss darauf wie das Eingangssignal ber die Kopfh rer und die Hauptausg nge wiedergegeben wird 8 Kopfh rer Schlie en Sie einen Satz 1 4 TRS Kopfh...

Страница 32: ...e an ein Verst rkersystem oder hnliches anzuschlie en Die Pegel werden ber den Regler f r den Monitorpegel gesteuert Um diese Ausg nge ber Ihre Kopfh rer zu berwachen stellen Sie sicher dass der Sourc...

Страница 33: ...max gain Mic gain 43 dB Mic impedance 6 3 k Analog Outputs Output level 6 dBV 0 dBFS SNR 101 dB A weighted Frequency response 20 Hz to 20 kHz 0 25 dB THD N 0 006 1 kHz 0 dBFS Dynamic range 101 dB A we...

Страница 34: ...34 Audio Routing...

Страница 35: ......

Страница 36: ...m audio com Manual Version 1 0...

Отзывы: