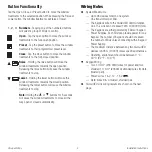
Button Functionality
Tap the Open, Close, or Preset button to move the window
treatments to the selected position. While pressing the Raise or
Lower button, the window treatments will raise or lower.
Numbers
- Tapping one of the numbered buttons
will select a group of EDUs to control.
Open
- Tap the open button to move the window
treatments to the fully-open position.
Preset
- Tap the preset button to move the window
treatments to their programmed preset level.
Close
- Tap the close button to move the window
treatments to the fully-closed position.
Raise
- Holding the raise button will move the
window treatments towards the open position.
Releasing the raise button will cause the window
treatments to stop.
Lower
- Holding the lower button will move the
window treatments towards the closed position.
Releasing the lower button will cause the window
treatments to stop.
Note:
Holding the
or
buttons for 5 seconds
will cause the window treatments to move all the
way open or closed automatically.
3
Occupant Copy
Installation Instructions
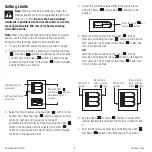
Wiring Notes
System Maximums:
— Up to 96 devices total on one system.
One transformer per EDU.
— The Keypads wire to the
Sivoia QED
Communication
Link. The Link can not exceed 1220 m (4000 ft) total.
— The Keypads are either powered by EDUs or Keypad
Power Supplies. Each EDU can provide power for one
Keypad. The number of Keypads should not exceed
the number of EDUs unless connecting with a Keypad
Power Supply.
— The maximum distance between any two
Sivoia QED
devices is 305 m (1000 ft) unless specified otherwise.
— Operating environment should be between 0 °C -
40 °C (32 °F - 104 °F).
Keypad Wiring
— Two 1.0 mm
2
(#18 AWG) wires for power and two
shielded 1.0 mm
2
(#18 AWG) stranded wires for data
(twisted pair).
— Power: wires 1 & 2, 12 - 15 V
.
— Data: wires 3 & 4, twisted, shielded pair.
Sivoia QED
Link wiring layouts are shown on the next
page.
1, 2, 3


