background image

3.11.1 Configure DMX Startup mode

In order to set the DMX Startup mode, use the following steps:


ƒ

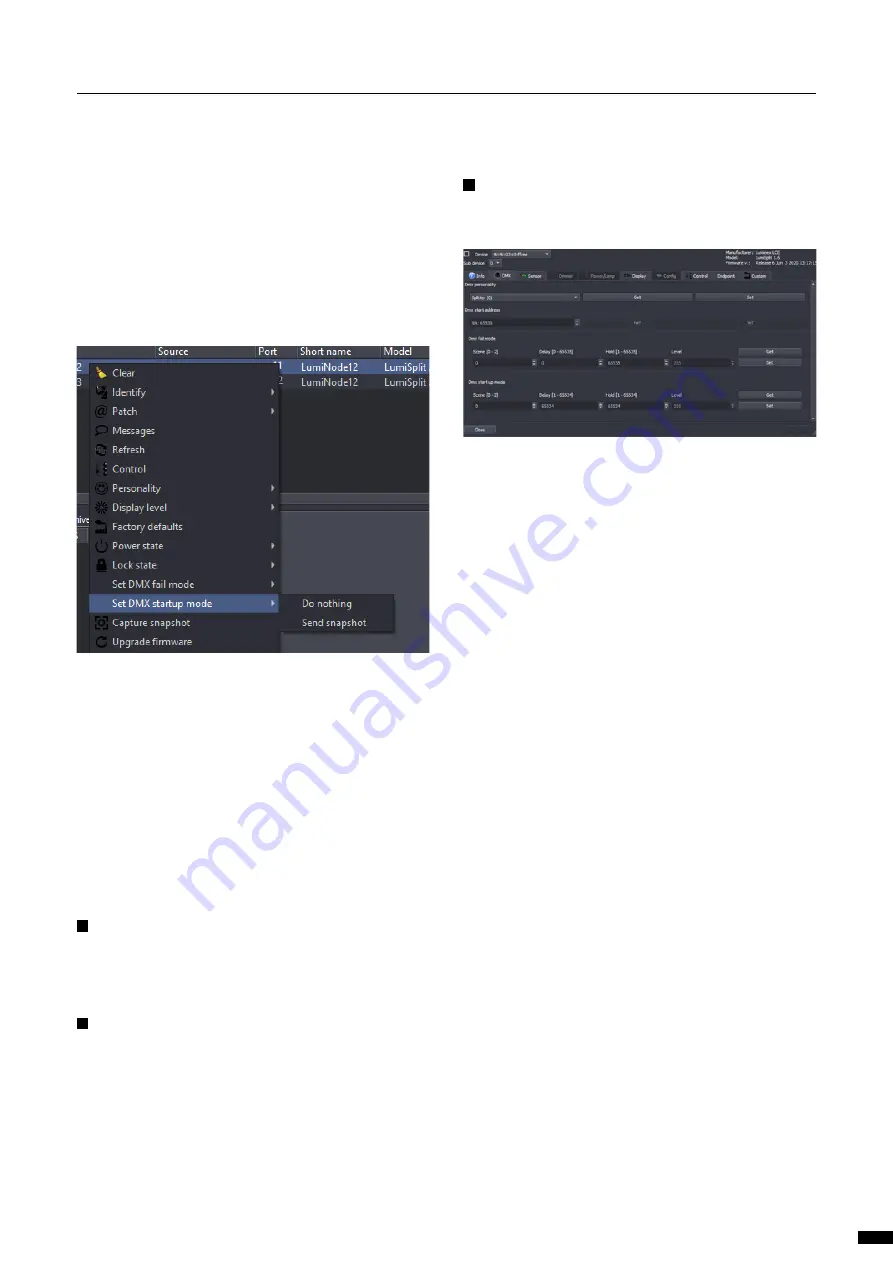
Select the desired responder in the RDM devices list.


ƒ

Right click and select DMX Startup mode.


ƒ

Choose the option you want to use. 


3.11.2 DMX Fail and Startup detailed timing

The Startup and DMX Fail features in LumiSplit are based on 
standard RDM PIDs. These PIDs can be generically controlled in 
detail via the RDM control panel.
DMX Fail mode and DMX Startup mode both make use of 
preset info in case available via RDM. The preset info will set the 
configurable boundaries for setting the details of these modes.

The following attributes can be adjusted:

 DELAY:

 Number of 0.1 seconds delay before the preset gets ac-

tive. 65535 (0xffff) represents infinite time. Mind that LumiSplit already 
takes 800ms (or 0.8 seconds) before detecting DMX signal fail. So, by 
setting the Delay at 1, you set a time out of: 0.8 + 0.1 = 0.9 seconds.

 HOLD:

 The hold time defines how long the mode stays active. After 

the amount of x times 0.1 seconds, the mode will go back to default 
behavior. In case of LumiSplit the minimum hold time is 0.1 second 
and the maximum is infinite (65535 or 0xffff). When the hold time has 
elapsed, the input (zone) of the LumiSplit will go back to “Do nothing”. 
Or as soon the DMX signal has recovered the outputs will follow the 
incoming DMX again.

 LEVEL:

 The level is a value that acts as a master level on the cap-

tured preset. LumiSplit only supports 255 (full) as level.

3.12 Messages

The LumiSplit can send messages over RDM. You can then be notified 
about any change on the LumiSplit. To display the message window, 
right click on one of the responders, and select Messages.
You can save the messages to review later or print them for record 
keeping.

3.13 Factory reset

The unit can be reset via RDM. To proceed, right click on one of the 
responders, and select Factory Default.

3.14 Firmware upgrade

The LumiSplit 2.10 is the first splitter to be upgradable through RDM.
To upgrade the unit, you will need a Luminex LumiNode (firmware 
1.1.0 or higher) or Ethernet-DMX converter (firmware 4.2.0 or higher), 
and LumiNet Monitor 2.1.6 or higher.
Please bear in mind only one instance of LumiNet Monitor should be 
running on the network during the firmware upgrade.


ƒ

Download the latest LumiSplit firmware on our web site and  

  extract the archive. Connect your computer to the node and  
  enable RDM on one port.


ƒ

Connect this port to one of the two inputs of the splitter.


ƒ

In LumiNet Monitor RDM panel, right click on one of the   

  responders, and select Upgrade Firmware.


ƒ

Click on Select file and select the extracted file (.bin).


ƒ

Click on the Upgrade button, and the upgrade procedure will  

 start.


ƒ

The procedure ends once the progression bar reaches 100%.

15

3 | THE NEW RDM EXPERIENCE / 

3.12 MESSAGES / 3.13 FACTORY RESET / 3.14 FIRMWARE UPGRADE

Содержание LumiSplit 2.10

Страница 1: ...USER MANUAL LUMISPLIT PRODUCT FAMILY LumiSplit 2 10 THANKS FOR CHOOSING LUMINEX Description User Manual LumiSplit 2 10 REVISION 20200820 REV 6 0 0...

Страница 2: ...2...

Страница 3: ...e Selection 7 2 4 Modes in detail 8 2 5 Front Panel Lock 8 2 6 Factory Reset 8 3 THE NEW RDM EXPERIENCE 9 3 1 Discovery 9 3 2 Identify a LumiSplit 9 3 3 Lock Unlock the Front Panel 10 3 4 Dark Mode 10...

Страница 4: ...local dealer if you don t have a suitable power cable on hand The device will automatically switch on To shut it down after use just un plug the power cable again After connecting the power cable corr...

Страница 5: ...he selected mode D OUTPUT BUTTON Output selector enable disable RDM filtering per output E OUTPUT LED Indicates the output status and the selected mode 1 3 2 Rear Panel F POWER 1x Neutrik powerCONTRUE...

Страница 6: ...ed blink Factory Reset Blue DMX fail mode or Startup mode configured PORT LED STATUS DESCRIPTION Input A front panel Blue DMX RDM Cyan DMX Only White blink RDM activity Input B front panel Red DMX RDM...

Страница 7: ...enable or disable RDM filtering per zone A B The input LED indicator colour will change together with all associated output LED indicators RDM FILTERING PER OUTPUT Press the input button together with...

Страница 8: ...ication with connected endpoints is no longer active 2 4 7 Regeneration Zone A B 7 A B This mode allows you to quickly select regeneration mode for both inputs The timing for each input will be set as...

Страница 9: ...LumiNet Monitor 2 1 6 or higher and LumiSplit firmware v5 or higher are necessary to take full benefit of all the features listed below 3 1 Discovery Wrong text Should be The LumiSplit 2 10 comes wit...

Страница 10: ...ers and select display level Here you can set the brightness either to low or full There is no intermediate value available for the brightness of the LEDs 3 5 Mode Selection Youcanremotelyselectoneoft...

Страница 11: ...nnected to right click on one of the responders of the LumiSplit 2 10 and se lect Control In the control panel click on the endpoint tab If RDM devices are connected to the splitter they will appear o...

Страница 12: ...ify a port If needed you can identify a port To do so tick the corresponding Identify check box and the LED of the selected port will blink white This can come in handy when you need to indicate the p...

Страница 13: ...go to the Backup Recover main option and click on the Set button All output LEDs will turn blue again 3 8 2 Backup Auto Recovery The LumiSplit firmware version 6 onwards offers the option to automati...

Страница 14: ...esending the last frame is the same as set for the regeneration mode default 36 FPS with a break time of 184 s Send snapshot makes it possible to send out the captured snap shot as lighting state with...

Страница 15: ...ill follow the incoming DMX again LEVEL The level is a value that acts as a master level on the cap tured preset LumiSplit only supports 255 full as level 3 12 Messages The LumiSplit can send messages...

Страница 16: ...is a knowledge base available online that gets updated on a regular basis at https support luminex be If you need to ask our team for more help or you need to return a de vice to Luminex for diagnosti...

Страница 17: ...EFFECTIVE RELIABLE ACCESSIBLE YOUR NETWORK SOLUTION FOR AUDIO VIDEO AND LIGHTING 17...

Страница 18: ...Slamstraat 13 3600 Genk Belgium T 32 11 812 189 info luminex be www luminex world...

Отзывы: