- 37 -
DE
FI
FR
SV
EN
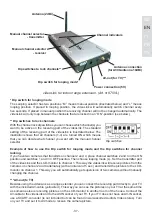
Manual channel selector
- transmitter
Dip switches to lock channels**
Manual channel selector
- receiver
Channel indicators
Antenna (2dBi)
Power connection (5V)
Antenna connection
(for A300-antenna 10dBi)
Dip switch for looping mode*
AV-out (for TV)***
videoLink for indoor range extension. (Art. nr 870VL)
* Dip switch for looping mode
The Looping selector has two positions ”M” means manual position (illustrated below) and ”L” means
looping position. If placed in looping position, the videoLink will automatically switch channel every
five seconds. If placed in manual position the receiving channel will not be changed automatically. The
videoLink will only loop between the channels that are locked in an ”ON”-position (see below).
** Dip switches to lock channels
With the channel lock dip switches you can choose which channel(s) you
want to be active on the receiving part of the videoLink. The standard
setting of the receiving part of the videoLink is illustrated below. The
illustration shows that all channels (1-4) are turned ON which means
that you can decide what channel you want with the manual channel
selector.
Example of how to use the Dip switch for looping mode and the Dip switches for channel
locking.
If you have two cameras that transmits on channel 2 and 4, place channel switches 2 and 4 in the ON
position and switches 1 and 3 in OFF position. Then choose looping mode (L). Set the transmitter part
of the videoLink and the LCD-monitor to channel 1. This way the videoLink will receive pictures from the
cameras on channel 2 and 4 alternately (with an interval of 5 sec.) and transmit the pictures to the LCD-
monitor on channel 1. This way you will automatically get supervision of two cameras without manually
changing the channel.
*** AV-out (to TV)
Besides using the videoLink as a range extender you can connect the receiving part directly to your TV
with the included AV-cable (yellow/red). This way you can see the pictures on your TV at the same time
as someone else is receiving pictures on the LCD-monitor in another room of the house. Connect the
AV-cable to the videoLink and to the AV-IN socket of your TV. If your TV does not have an AV-IN socket,
use a SCART-converter (is not included but can be found in well-assorted Audio & Video stores). Turn
on your TV and set it to AV-mode to receive the camera picture.
Dip switches
Содержание 302K05
Страница 1: ...DE Bedienungsanleitung EN User Guide FI Käyttöopas FR Guide d utilisation SV Användarmanual ...
Страница 3: ... 3 DE FI FR SV EN Deutsch Bedienungsanleitung ...
Страница 30: ... 30 ...
Страница 31: ... 31 DE FI FR SV EN English User guide ...
Страница 59: ... 59 DE FI FR SV EN Suomi Käyttöopas ...
Страница 87: ... 87 DE EN FR SV FI Français Guide d utilisation ...
Страница 115: ... 115 DE EN FR SV FI Svenska Användarmanual ...
Страница 142: ... 142 Declaration of Conformity ...

