background image

 Remote 

Control 


16 

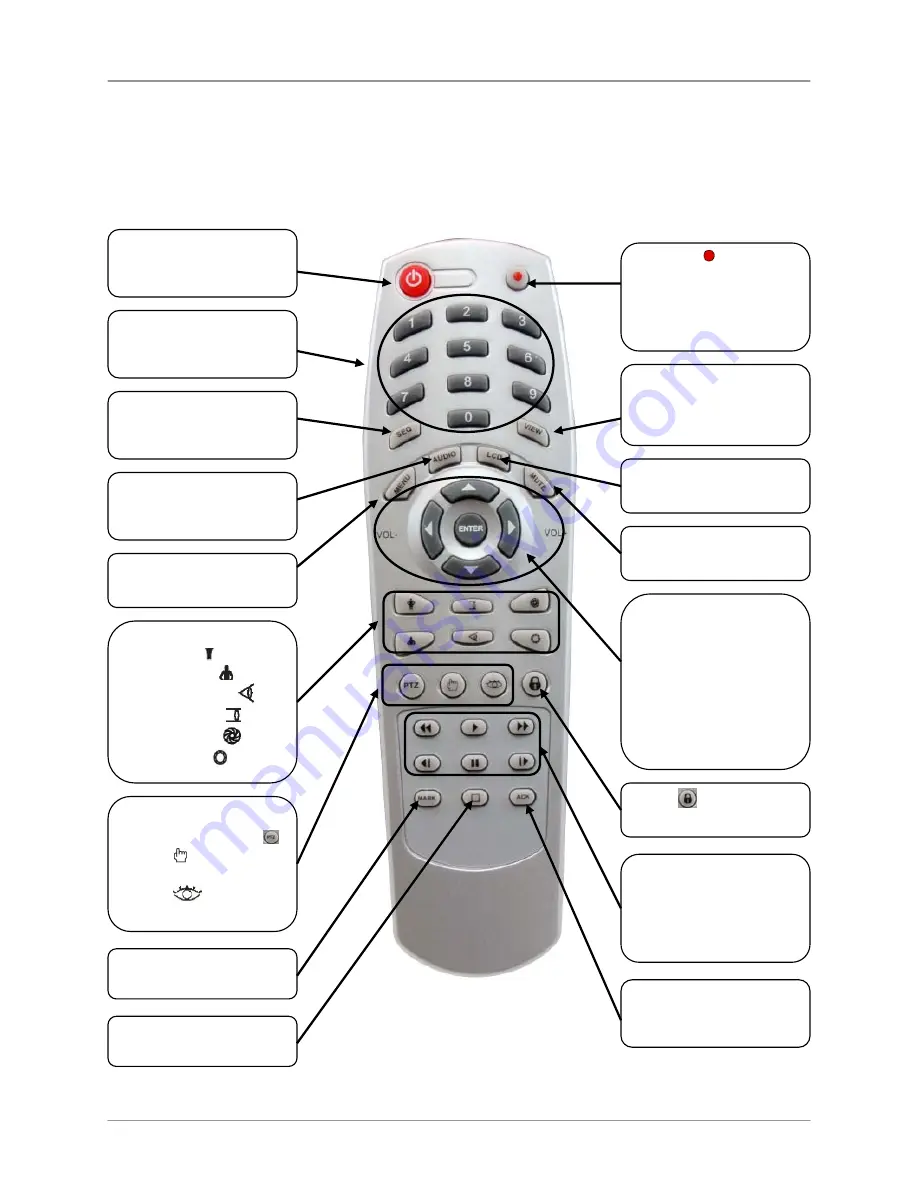
Remote Control 

Listed below is a quick reference for the Remote Control. All Buttons described above function the same 
as the Front Panel buttons. 


POWER 

- Turns the  

LCD Monitor power 
ON/OFF 

CHANNEL BUTTONS

 - 

Press to select a specific 
camera by number 

RECORD


 - Press the 

button to start scheduled 
recording. Pressing the 
button again toggles 
stop and start. 

VIEW 

– Press to view 

the Cameras. 

SEQ

 - Turns camera 

Sequence Mode 
ON/OFF.


MENU

 - Opens the Main 

Menu (system setup). 

AUDIO

 - Press to select 

a channel for listen-in 
audio 

MUTE 

– Turns volume 

OFF. 

LCD 

– Opens the LCD 

Control Menu. 

NAVIGATION 


- Navigates in MENU 
and SEARCH modes.  
- Adjusts the area in 
ZOOM mode. 
 

VOLUME -/+  

-  

Increases/Decreases the 
volume 


ZOOM IN 


ZOOM OUT 


FOCUS NEAR 


FOCUS FAR


IRIS CLOSE


IRIS OPEN

PTZ CONTROLS 

-  


START/STOP PTZ 


SET 

- Press to 

store the preset. 


RUN


 - Press to 

recall the preset. 

PTZ CONTROLS 

-  

LOCK 


– Locks the 

remote control. 

PLAYBACK - 

Controls 

the playback of video 
(Reverse, Play, Fast 
Forward, Step Back, 
Stop and Step Forward.


SEARCH / ACK

 - Press 

the ACK key to reset the 
alarm output. 

MARK

 - Set a bookmark 

in playback mode.  

CAM –

 Single camera 

view  

Содержание L19LD800 Series

Страница 1: ...Copyright 2007 Lorex Technology Inc PROFESSIONAL 19 LCD OBSERVATION SYSTEM WITH BUILT IN 8 CHANNEL DIGITAL VIDEO RECORDER Instruction Manual www lorexcctv com English Version 5 0 MODEL L19LD800 Series...

Страница 2: ...K OF ELECTRIC SHOCK DO NOT OPEN CAUTION TO REDUCE THE RICK OF ELECTRIC SHOCK DO NOT REMOVE COVER OR BACK NO USER SERVICABLE PARTS INSIDE REFER SERVICING TO QUALIFIED SERVICE PERSONNEL The lightning fl...

Страница 3: ...ence receptacles and the point where they exit from the video product 8 Ventilation Slots and openings in the case are provided for ventilation to ensure reliable operation of the video product and to...

Страница 4: ...ds 15 Safety Check Upon completion of any service or repairs to this video product ask the service technician to perform safety checks recommended by the manufacturer to determine that the video produ...

Страница 5: ...er there is no guarantee that interference will not occur in a particular installation If this equipment does cause harmful interference to radio or television reception which can be determined by tur...

Страница 6: ...with mouse driven navigation and multi lingual on screen display High Reliability Surveillance Hard Disk Drive with MPEG4 video compression Hard Drive mirroring feature for backup and redundancy High...

Страница 7: ...21 General Display Overview 21 Onscreen Icons Legend 22 Camera Display Modes 23 Menu Navigation Controls Tips 24 Menu Navigation Controls 24 Virtual Keyboard Control 24 Active Option Indicator 24 Syst...

Страница 8: ...Specifications Appendix 1 59 Connecting Motion Alarm Device Appendix 2 61 Installing a Sensor 61 Connecting RS 485 RS 232 Devices Appendix 3 62 Installing a PTZ RS 485 Type PTZ Camera 62 Installing a...

Страница 9: ...CK YOUR PACKAGE TO CONFIRM THAT YOU HAVE RECEIVED THE COMPLETE SYSTEM INCLUDING ALL COMPONENTS SHOWN ABOVE 1 x LCD DVR COMBO UNIT WITH PRE INSTALLED HDD REMOTE CONTROL 1 x HARDWARE MANUAL 1 x SOFTWARE...

Страница 10: ...ress the key to return to the live screen mode while in the playback mode 5 PAUSE Press the key to freeze the video on the screen in the playback mode 6 CAMERA NUMBER Pressing a numbered button will d...

Страница 11: ...r will be ON when the Monitor display is OFF but will not be illuminated when the monitor display is ON 12 POWER Press to turn the monitor display ON Press key again to turn the monitor display OFF 13...

Страница 12: ...ys are used to move the active selection to each menu or field Pressing the Left and Right arrow keys in a configuration menu changes the value of a selected item PTZ MODE The Arrow keys can be used t...

Страница 13: ...l the preset USB Connection The Two USB ports on the front panel provide a convenient connection point for External Hard Drives Optical Drives CDRW DVDRW and Flash Drives which allow the user to copy...

Страница 14: ...ces such as a keyboard and a POS device not included 3 ETHERNET LAN PORT Connects the monitor to a router for connection to the internet Refer to appendicies for Remote Connection setup 4 6 PIN DIN CA...

Страница 15: ...stand can be removed to mount the monitor directly to other VESA standard mounting brackets Connect the Power Cable Cameras Ethernet Cable and any Alarm Devices to the System by running the cables th...

Страница 16: ...e Main Menu system setup AUDIO Press to select a channel for listen in audio MUTE Turns volume OFF LCD Opens the LCD Control Menu NAVIGATION Navigates in MENU and SEARCH modes Adjusts the area in ZOOM...

Страница 17: ...he camera in a location that has conditions not recommended in this manual consult with a professional installer and consider use of a separate camera cover or housing Before starting permanent instal...

Страница 18: ...e are pointed together when connecting the cable If the pins in the DIN Cable are bent the Camera will NOT function 2 Connect the male end of the supplied 100 extension cable to an open DIN camera inp...

Страница 19: ...ect the BNC connector to the Camera 2 Connect the Power Adaptor to a wall outlet IMPORTANT NOTE The ends of the extension cable are NOT the same one end has a Male power port and the other has a Femal...

Страница 20: ...the right mouse button during live monitoring displays a Quick Links Menu Selecting the SETUP MENU option accesses the System Configuration menu same as pressing the MENU button Selecting all other op...

Страница 21: ...nd a system legend in a 3x3 Screen View NOTE Pressing the POWER button located on the front panel of the Observation System turns the Monitor ON OFF only and does not affect the actual power state of...

Страница 22: ...Mute The Audio for the current channel is OFF 4 SYSTEM STATUS BAR Displays the System status for Date Time Set in the System Menu HDD Full Status Displays the amount of HDD used or displays OVER when...

Страница 23: ...te Control To view a single camera press the corresponding number key on the Front Panel or Remote Control SINGLE CHANNEL VIEW Press the corresponding Channel Number to view QUAD CHANNEL VIEW CAM 1 4...

Страница 24: ...A Z 0 9 Symbols _ and SPACE Use the for backspace and the X for delete Navigate using the arrow keys on the Front Panel Remote Control or Mouse Use the ENTER key to choose the letters numbers and symb...

Страница 25: ...the input and output of the system DISPLAY You can change configurations of information to be displayed on the screen PTZ This menu enables PTZ camera related configurations such as controlling the d...

Страница 26: ...SYSTEM MENU EVENT RECORD ARCHIVE CAMERA DISPLAY PTZ NETWORK DATE TIME LANGUAGE USER DISK MANAGEMENT INFORMATION FACTOR DEFAULTS SETUP UPDATE MANAGER SYSTEM LOG SCREENSAVER ALARM IN TEXT IN VIDEO LOSS...

Страница 27: ...e configurations for the system o Date Set the Year Month Day o Time Set the Time in either 12 or 24 hour format set in the Format Section o Time Zone Set the Time Zone local to the System GMT 0 o DST...

Страница 28: ...n login has full permissions to the system Select the PASSWORD SET Figure 1 option to change the password USER The User login has variable permissions to the system Select the PASSWORD SET Figure 1 an...

Страница 29: ...e and can be backed up to a USB storage device The Disk Management section displays the name and basic hardware information of each device RECORD MODE Sets the system to either o OVERWRITE old data on...

Страница 30: ...te an e mail notification If the USB cable is disconnected while mirroring mirrored data might be lost System Information Displays details about the System and System Setup This information is View on...

Страница 31: ...the most up to date version from the web at http www lorexcctv com and save the file to a USB Memory Stick Once the Memory stick is connected to the system select the Update version and select OK NOT...

Страница 32: ...recorded Screen Save Setup The Screen Save feature will turn the monitor screen ON OFF automatically NOTE The DVR will continue recording when the Monitor is OFF ON OFF Turns the Screen Save feature O...

Страница 33: ...ength of time that the event action will occur i e Buzzer Onscreen display etc ALM1 8 Sets the alarm for each channel to ON or OFF TYPE Set the Type of Alarm to Normally Open NO or Normally Closed NC...

Страница 34: ...all sections o Inverse Reverses the current setup o Test Test the motion detection on that camera Detected fields are highlighted ACTION Set the behavior for the system when an event is detected on t...

Страница 35: ...Controls the Text In setup for text overlay on the Video Image from another device i e Point of Sale Select each camera to record when Text IN is detected A pop up window will appear for each channel...

Страница 36: ...Temperature Set the actions to take when the system temperature is too high ON OFF Turns the Temperature detection ON or OFF TYPE Set to Fahrenheit or Celsius LIMIT Set the upper temperature limit Onc...

Страница 37: ...HOLD TIME Sets the event hold time from the first detection of the event ACTION Set the behavior for the system when an event is detected on the specified channel o All All actions occur o Relay A rel...

Страница 38: ...Event recording for each channel QUALITY C E Set the recording quality Low Normal High or Best when in Continuous or Event recording for each channel Schedule Setup Set the daily recording schedule fo...

Страница 39: ...ard WRITE STATUS BAR Displays the status of the backup UPDATE BUTTON Refreshes the backup status START BUTTON Starts the backup Note The maximum data size to be copied for CLIP COPY is limited to 2GB...

Страница 40: ...bars RESET Resets the camera to default settings Display Setup Menu Controls the settings for the Onscreen Display SEQUENCE DWELL TIME Sets the time that each camera is displayed onscreen when in Sequ...

Страница 41: ...ll screen mode or the 3x3 screen the onscreen display will appear in sequence as Ff the system is in the 2x2 screen mode Quad the onscreen display will appear in sequence as Press the SEQ key to exit...

Страница 42: ...channel select window for the PTZ cameras will be displayed Select the PTZ camera to control by selecting it from the menu The PTZ icon flickers on the PTZ camera screen That means a live screen mode...

Страница 43: ...a Preset position and enter a preset number A Mouse can be used for easier PTZ control Position the mouse pointer at the bottom of the screen in PTZ mode and the following PTZ toolbar will display Cli...

Страница 44: ...e saved Enter a preset number then press the OK button After that if you select the RUN PRESET the PTZ camera will move to the preset position and exit the PTZ function window Set the feature you wish...

Страница 45: ...etting detection to Manual or DHCP If set to DHCP the network information will be assigned by the network router TCPIP Setup for the system s network settings IF set to DHCP the settings will not be a...

Страница 46: ...arity o Data Bit o Stop Bit NOTE If you select PTZ RS 485 you can t use POS or REMOTE RS 232 DDNS Setup Controls for the settings for DDNS Remote connection ON OFF Turn DDNS ON or OFF DOMAIN NAME USER...

Страница 47: ...ail address of recipients up to 5 Press the CHECK button to test the e mail setup The system displays the status result of connection test for each e mail address Note A correct address for both SENDE...

Страница 48: ...he IP Address location of the Lorex Client Software The PC to receive the event notification on the Network Notification screen These sites are part of the NETWORK section The Lorex Client Software PC...

Страница 49: ...rightness and contrast of the LCD panel Pressing the SET item displays a control bar at the bottom of the live screen as follows Press the MENU or Fn key to exit the LCD adjust mode EVENT RESET Select...

Страница 50: ...nly KEY LOCK Selecting KEY LOCK in the function screen causes the system to lock the buttons on the front panel from functioning 6 2 AUDIO Control Pressing the AUDIO key on the front panel will displa...

Страница 51: ...d Pressing the button again toggles the playback speed between and The screen displays and respectively FF Fast Forward Button Pressing the button plays video forward at high speed Pressing the button...

Страница 52: ...he following functions Go to the first image Fast backward play Play video backward at regular speed Step backward one frame Pause Step forward one frame Play video forward at regular speed Fast forwa...

Страница 53: ...rch function menu This function displays the first recorded image GO TO THE LAST Select GO TO THE LAST in the search function menu This function displays the last recorded image GO TO THE DATE TIME Se...

Страница 54: ...d press the ENTER key to select and a time table window will be displayed as shown below Hours in which video was recorded will be highlighted with red Highlight the hours with recorded video by using...

Страница 55: ...segment consists of 10 numeric blocks which range from 0 to 9 If a number is highlighted in Red it means that video was recorded during that 10 minute time block However it does NOT mean video was re...

Страница 56: ...PTION button and setting up the new search condition The Video can be searched from the first to last recorded images or by using the start and stop times and dates Selecting the FROM and TO fields wi...

Страница 57: ...blank all the Text In events are searched You can enter a maximum of 5 items to be search by and any Text In event containing any of the typed words will be searched Press the SEARCH button in Text In...

Страница 58: ...NOTE The video in the Text In playback mode is played at regular speed BOOKMARK SEARCH Select the BOOKMARK SEARCH in the search function menu to display a bookmark search window as shown below The Boo...

Страница 59: ...eras 30 IPS NTSC 704x480 all cameras Playback Rate Same as Recording Rate Recording Mode Time Lapse Event Pre Event up to 30 sec regardless of IPS Text In Search Mode Calendar Time Date Event Log Text...

Страница 60: ...Angles Left Right Up Down 80 80 80 80 Typical Light Source Lifetime 4CCFT 50 000 Hours Minimum Response Time Tr Tf 1 5 3 5ms Rising Falling GENERAL Dimensions W x H x D 568 mm x 638 mm x 310 mm Inclu...

Страница 61: ...t has been installed on Alarm Block port 4 When this sensor is activated the camera on port 4 will become active if enabled in the MENU on the Observation System Installing a Sensor 1 Connect the GROU...

Страница 62: ...stem 3 Connect the Camera to the desired BNC Channel DIN Channel 1 must be empty 4 Configure PTZ Menu options The PTZ Camera Settings will depend on the Type of Camera refer to the specific Camera Man...

Страница 63: ...am Appendix 4 The following diagram outlines a general set of connections available with the Observation System OBSERVATION SYSTEM PTZ CAMERA RS 485 CONNECTION SENSOR NOT INCLUDED ROUTER NOT INCLUDED...

Страница 64: ...ve Removing the Back Cover and Installed Drive 1 Remove the two screws on the back hard drive cover panel Remove the panel 2 Unscrew the two screws on the Hard Drive bracket 3 Remove all cables from t...

Страница 65: ...ket and reattach the screws Replace the drive cover on the back of the System and reattach with the screws New Hard Drive Format The New Hard Drive MUST be formatted NOTE If a new HARD DRIVE is detect...

Страница 66: ...urge protector try bypassing the bar and connecting the power directly to the wall outlet Confirm that the unit is powered on LED indicators on the front should be ON Problem The Observation System is...

Страница 67: ...on System and at the Camera Clean the camera lens Adjust the CONTRAST and BRIGHTNESS settings in the Menu Check that the Camera is not in direct sunlight Problem There is no picture appearing on a Cha...

Страница 68: ...00 00 OFF 17 00 00 5 MIN ALARM IN HOLD TIME ON OFF TYPE ACTION RECORD 5SEC ON N O RELAY BUZZER LAN Current Channel MOTION HOLD TIME ON OFF SENSITIVITY BLOCKS AREA ACTION RECORD 5SEC ON 3 1 All Block...

Страница 69: ...SIZE USER CAM NAME PTZ 3SEC UNCHANGED ON ON ON ON ON ON ON ON PTZ ON OFF PROTOCOL ID OFF CDC2400 DYNA 0 LAN TYPE TCP IP IP ADDRESS SUBNET MASK GATEWAY DNS SERVER PORT DHCP 0 0 0 0 0 0 0 0 0 0 0 0 0 0...

Страница 70: ...System time zone changed CLIP BEGIN CLIP COPY BEGIN System Clip Copy began CLIP END CLIP COPY END System Clip Copy ended CLIP FAIL CLIP COPY FAIL System Clip Copy failed CLIP CANCEL CLIP COPY CANCEL...

Страница 71: ...ound a new USB device USB DEVICE DETACHED The USB device was extracted from the system ACCESS DENIED User had no access authority THIS CAMERA IS NOT PTZ CAMERA User tried to use PTZ function for the c...

Страница 72: ...the ID already existed Notification Setup mode INVALID ADDRESS The system has an invalid NTP server address during the NTP checking SERVICE FAILED The system can t connect to the NTP server during the...

Страница 73: ...ailable to add to your existing system To order these accessory items or for a complete listing of available products please visit us on the web at WWW LOREXCCTV COM DIN CAMERAS PTZ TYPE CAMERAS BNC C...

Страница 74: ...It s all on the web Product Information User Manuals Quick Start Guides Specification Sheets Software Upgrades Firmware Upgrades Lorex Technology Inc VISIT www lorexcctv com www lorexcctv com...

Отзывы: