background image

9

7000INST       Copyright Lockmasters, Inc. 5/25/11

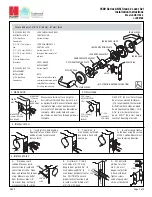
step 4 – Position the Inside Base Plate template

Close the door and align the Inside Base Plate template over the strike and level with 

the indicated horizontal level line on the template.  Make sure to keep equal clearance 

around the strike.  Attach the template to the door with masking tape.  NOTE: If the 

template hits the strike. You can either reposition the template or loosen the strike 

screw and adjust the strike position and retighten the screw.

step 5 – Position the Front Plate template

step 5a

 – Make a small mark on the door’s edge in line with the horizontal level line.  

step 5B

 – Use the combination square to transfer that level line around the edge of 

the door. 

step 5c

 – Use the combination square to extend that level line across the front of 

the door at least 9”. This establishes a horizontal level line from the back of the door 

around to the front.

NOTE - FOR BEVELED DOOR EDGE

If  the  door  has  a  beveled  edge,  establish  the  high  side  of  the  bevel  using  the 

combination square.  If it has a bevel the square must be flat against the door and 

flat against the high edge.  You will see a gap between the door and the combination 

square.  (See Figure 2).

lKM7000 

Installation

4 - Template - Center template & strike to allow 

clearance.

5a - Template - Extending Inside Base Plate (IBP) 

horizontal line to the edge of the door.

5b - Template - Extending Inside Base Plate (IBP) 

horizontal line to the edge of the door. 

5c - Template - Extending level line around to the 

front of the door.

Figure 2 - Establishing the high side of a bevel edged door.

Содержание LKM700

Страница 1: ...In A Single Motion We ll Change The Way You Think About Security Increased Safety Increased Security Increased Functionality 90 minute fire rating alone or with Kaba Mas X09 Not rated when used with...

Страница 2: ...Complete w Screws Hardware 700013WBA Internal Access Control 700016 Handle Tube 700013S01 Extended Spindle Kit 700013S01EXT Complete Wiring Harness 700013S45 Yoke 700013S09 Bolt Spring 700013S18 Slide...

Страница 3: ...field retro fittable Component Part No Handle Screw 700012S13 Lock Washer for Handle Screw 700012S18 Intermediate Gear 700012S14 Hub Handle Half Gear 700012S01 Handle return Spring 700012S12 Outside...

Страница 4: ...k cover is removed the relockers will trigger resulting in a lockout Important Information All seals and gaskets must be applied to the door frame PRIOR to installing a LockOne Series Lock Compression...

Страница 5: ...3 4 Door LKM7000SOK1 2 Door LKM7000SOK INTERNAL HARDPLATE PART NUMBER LKM7000SMHP DOOR COVERS When retro fitting an existing door we recommend using a set of 12 x 18 door covers prior to installation...

Страница 6: ...6 7000INST Copyright Lockmasters Inc 5 25 11 LKM7000 Strikes Strike 1 LKM01S Strike 2 LKM02S Strike 3 LKM03S Strike No 9 Strike 9 LKM09S...

Страница 7: ...ange Key Hole Plug O Filler Blocks 2 P Templates Q Installation Instructions R Operating Instructions LKM7000 Installation Tools Needed Drill Wire Cutters or Strippers Snap Ring Pliers File Chisel Hac...

Страница 8: ...tap and tap the center alignment hole Attach the strike to the door frame with the 10 24x1 pan head machine screw provided and tighten into the center hole only Figure 1 Tip use an automatic center p...

Страница 9: ...ine around the edge of the door Step 5C Use the combination square to extend that level line across the front of the door at least 9 This establishes a horizontal level line from the back of the door...

Страница 10: ...sition the front plate template Align the vertical and horizontal lines printed on the template where they intersect with the vertical and horizontal lines drawn on the door Tape the template to the d...

Страница 11: ...r reference during drilling Tip When labeling the holes note the hole size next to the hole Step 7C Move to the front plate template use your center punch to mark punch the following 1 D spindle hole...

Страница 12: ...pecified on the template for ease of threading screws into hollow metal IMPORTANT NOTE Solid wood doors use a 3 16 drill bit Use masking tape on the bit to mark a depth of 1 Step 9D OPTIONAL 1 F Wire...

Страница 13: ...of the door swing The handle will always point toward the hinge side of the door Figure 5 Step 12B Place the split washer G onto the 20x1 socket head machine screw G insert through the back of the Fr...

Страница 14: ...ep 13 Attach the Front Plate to the door Step 13A On the front side of the door seat the Front Plate into the 6 counter bored E holes until flush and square with the door Hold into position Tip To hol...

Страница 15: ...erative that the door remains open during installation of the LKM7000 If the door closes and latches while the back cover is removed the relockers will trigger into a lock out Step 15 Measure the Spin...

Страница 16: ...front plate once all the screws are tightened Step 16E Re attach the external spindle tube retaining ring and re insert the spindle tube into the Inside Base Plate make sure the grooves on the spindl...

Страница 17: ...g diagram on page 19 NOTE Position the conduit snuggly against the notched filler block DO NOT insert conduit directly into the inside base plate It will interfere with bolt retraction Option 3 If the...

Страница 18: ...upper 4 B holes See photo Snug only After all 4 screws are inserted tighten the screws into the lock STAND OFF KIT OPTION if Stand off Kit is installed use the 4 shorter 20 socket head machine screws...

Страница 19: ...humb screw located on the top of the Access Control Block See Figure 7 for the location of the Access Control Block NOTE The solenoid activation screw SHOULD NOT be removed until the Access Control Un...

Страница 20: ...l the lever handle grip Lubricate the lever handle with liquid soap and with the widest end first slide the foam grip onto the handle LKM7000 Installation 20 Remove all white protective film from fron...

Страница 21: ...ign the screw holes Step 23C Reinstall and secure the cover with 4 8 32 x 3 8 socket head button screws Step 23D Clean the surface of the handle with rubbing alcohol to ensure good label adhesion Step...

Страница 22: ...s cast into the strike Once the strike is correctly aligned with the Inside Base Plate tighten the alignment screw Step 24B Secure the Strike Center punch the 4 remaining strike screw holes Step 24C U...

Страница 23: ...25 11 Final Step Test the Lock After completing the installation please read the enclosed operation instructions and test the functionality of the combination lock access control LKM7000 and the door...

Страница 24: ...plied including without limitation any warranty as to suitability of the product for any particular purpose or use of the merchantability thereof and shall not be liable for any loss or damage sustain...

Отзывы: