AREA 21
RELAY SETUP
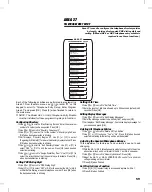
Area 21 is used to program the four relay channels. Each
channel can be given a name and programmed for type of
operation. The contact action and timing, the selection of
which telephone digit and which time zone will cause
activation are also programmed.
Relay Timing Options
Each relay can be programmed for timed, pulse, toggle or
latching modes of operation. With the timed option, the length
of activation time can be set.
Timed Operation
Timed operation makes the relay stay activated for the length
of time that it is programmed.
Pulse Operation
Pulse operation causes the relay to activate for just 1/4 second
each time it is triggered.
Toggle Operation
Toggle operation causes the relay to engage with the first
activation and disengage with the next activation.
Latching Operation
Latching operation causes the relay to stay engaged after
activation until it is reset by pressing ACCESS button for the
relay channel on the AM/II.
☞
NOTE: If relay channels “C” & “D” are used for obstacle
outputs. If they are set to latch, they will only latch when a
trouble signal is sent from an MGT safety edge transmitter.
When the relays are set to latch, a normal obstacle signal
will cause the relays to operate in the timed mode.
Each of the following activities are performed in programming
Area 21. From the main menu, use [
⇑
], [
⇓
] or enter “21” on the
keypad to scroll to “Relay Setup, Enter Program Area 21” and
press [OK]. Press [
*
] when finished to return to the main menu.
Relay Programming
➊
Use [
⇑
] or [
⇓
] to scroll to “Which Relay to Program”.
➋
Use [
⇐
] or [
⇒
] to select “CH-A CH-B CH-C CH-D” relay to program.
Press [OK] when desired selection is blinking.
➌
Unit displays: “Select Operation:”. Use [
⇐
] or [
⇒
] to select “Control
Shunt Alarm Obstacle CCTV” for the relay. Press [OK] when desired
selection is blinking.
☞
NOTE: Relays “A” & “B” can only be programmed as control relays. The
CCTV option can only be used if the Model AE-1 or AE-2 Telephone Entry
module is installed.
➍
Unit displays: “Select Timing Mode:”. Use [
⇐
] or [
⇒
] to select “Time
Pulse Toggle Latch” for the relay. Press [OK] when desired selection is
blinking.
➎
Unit displays: “Enter Activation Time:”. Enter the time in seconds for the
relay to activate. Press [OK].
➏
Unit displays: “Assign Time Zone [1]:”. Use [
⇐
] or [
⇒
] to select a time
zone to cause the relay to activate automatically during the time zone.
(Time zone “0” allows normal activation). Continue for time zones 2,3,
and 4. Press [OK] when desired selection is blinking.
➐
Unit displays: “Enter Channel Name”. Enter a name/location for the relay
channel for the event log. Press [OK].
➑
Unit displays: “Assign Telephone Digit”. Use [
⇐
] or [
⇒
] to select which
telephone digit (1-9) will activate the relay.
☞
NOTE: This option can only be used if the Model AE-1 or AE-2 Telephone
Entry module is installed.
➒
Unit displays: “Channel Control”. Use [
⇐
] or [
⇒
] to activate, lock open
or lock close the relay selected.
To program the other relays, repeat steps 1-8.
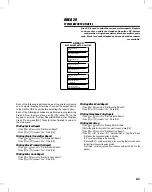
RELAY SETUP
AREA 21
21.1
21.2
21.3
21.4
21.5
21.6
Which Relay to Program.
CH-A CH-B CH-C CH-D
Select Operation:
Control Shunt Alarm Obstacle CCTV
Select Timing Mode:
Time Pulse Toggle Latch
Enter Activation Time:
Time in seconds: 00000
21.7
21.8
Assign Time Zone [1]:
0 1 2 3 4 5 6 7 8 9 10 11 12 13 14 15
21.9
21.10
21.11
Enter Channel Name
Assign Telephone Digit
None 1 2 3 4 5 6 7 8 9
Channel Control
Normal Activate LockOpen LockClosed
Assign Time Zone [2]:
0 1 2 3 4 5 6 7 8 9 10 11 12 13 14 15
Assign Time Zone [3]:
0 1 2 3 4 5 6 7 8 9 10 11 12 13 14 15
Assign Time Zone [4]:
0 1 2 3 4 5 6 7 8 9 10 11 12 13 14 15
53


