11
1-6. Read this first
Before you go to the checkout guide, be sure to read this section.
Important Notes
·
Only trained personnel certified by LG should service the computer.
·
Read the entire FRU removal and replacement page before replacing any FRU.
·
Use new nylon-coated screws when you replace FRUs.
·
Be extremely careful during such write operations as copying, saving, formatting.
Drives in the computer that you are servicing sequence might have been altered. If you selected an
incorrect drive, data or programs might be overwritten.
· Replace FRUs only for the correct mode.
· When you replace a FRU, make sure the model of the machine and the FRU part number are correct by
referring to the FRU parts list.
· A FRU should not be replaced because of a single, irreproducible failure. Single failures can occur for a
variety of reasons that have nothing to do with a hard ware defect, such as cosmic radiation,
electrostatic discharge, or software errors.
· Consider replacing a FRU only when a problem recurs. If you suspect that a FRU is defective, clear the
error log and run the test again. If the error does not recur, do not replace the FRU.
· Be careful not to replace a non-defective FRU.
What to do first
You must fill out the record form first.
During the warranty period, the customer may be responsible for repair costs if the computer damage was
caused by misuse, accident, modification, unsuitable physical or operating environment, or improper
maintenance by the customer. The following list provides some common items that are not covered under
warranty and some symptoms that might indicate that the system was subjected to stress beyond normal
use. Before checking problems with computer, determine whether the damage is covered under the
warranty by referring to the following :
Ch1. Service information
Содержание R580 Series U.ARC3BA9
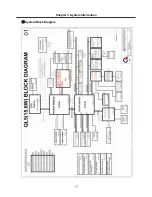
Страница 17: ...17 System Block Diagram Chapter 3 System information ...
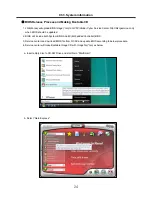
Страница 23: ...23 12 It selects the Exit Saving Change and it stores system a settings and the reboot Ch3 System information ...
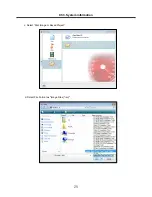
Страница 25: ...25 Ch3 System information c Select Disc Image or Saved Project d Select File Format as Image Files iso ...
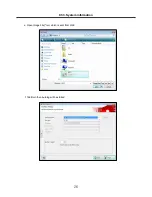
Страница 26: ...26 Ch3 System information e Open Image File iso which is sent from LGE f Tab Burn then burning will be started ...
Страница 27: ...27 Ch3 System information g Burn process completed as below and tab OK ...
Страница 30: ...30 Ch3 System information 5 After flashing is completed you can see the PASS on your screen and reboot your PC ...
Страница 57: ...57 3 Remove the Hook Ch5 Removing and replacing a part Hook Hook Hook Hook 4 Remove the Memory ...
Страница 60: ...60 Ch5 Removing and replacing a part 5 Remove the HDD Shield ...
Страница 63: ...63 Ch5 Removing and replacing a part 3 Remove the WLAN Module ...
Страница 66: ...66 3 Remove the ODD Ch5 Removing and replacing a part 4 Remove the ODD Bezel Bezel ...
Страница 69: ...69 69 Ch5 Removing and replacing a part 5 Remove the Keyboard 6 Remove the Retainer ...
Страница 71: ...71 71 Ch5 Removing and replacing a part 3 Remove the Display Module ...
Страница 74: ...74 Ch5 Removing and replacing a part 3 Remove the Keyboard deck ...
Страница 79: ...79 Ch5 Removing and replacing a part 3 Remove the Mainboard Case ...
Страница 86: ...86 Ch5 Removing and replacing a part 3 Remove the Hinge Cap ...
Страница 98: ...NLCD07 NLCD05 NLCD09 NLCD03 NLCD01 NLCD04 NLCD08 NLCD02 NWEBC01 ...
Страница 100: ...NMINI02 NMINI01 NKDECK01 NKDECK02 NRTN01 NKEYBD01 ...
Страница 102: ...NMRY01 NMRY01 NMINI04 NTHMO01 NRBS01 NMINI03 NCPU01 NMLB01 ...
Страница 105: ...NCVR02 NCVR03 NCVR01 NHDD02 NHDD01 NBATT01 NODD02 NODD01 NBOTM01 NBOTM03 NHDD03 NBOTM02 ...

