background image

11

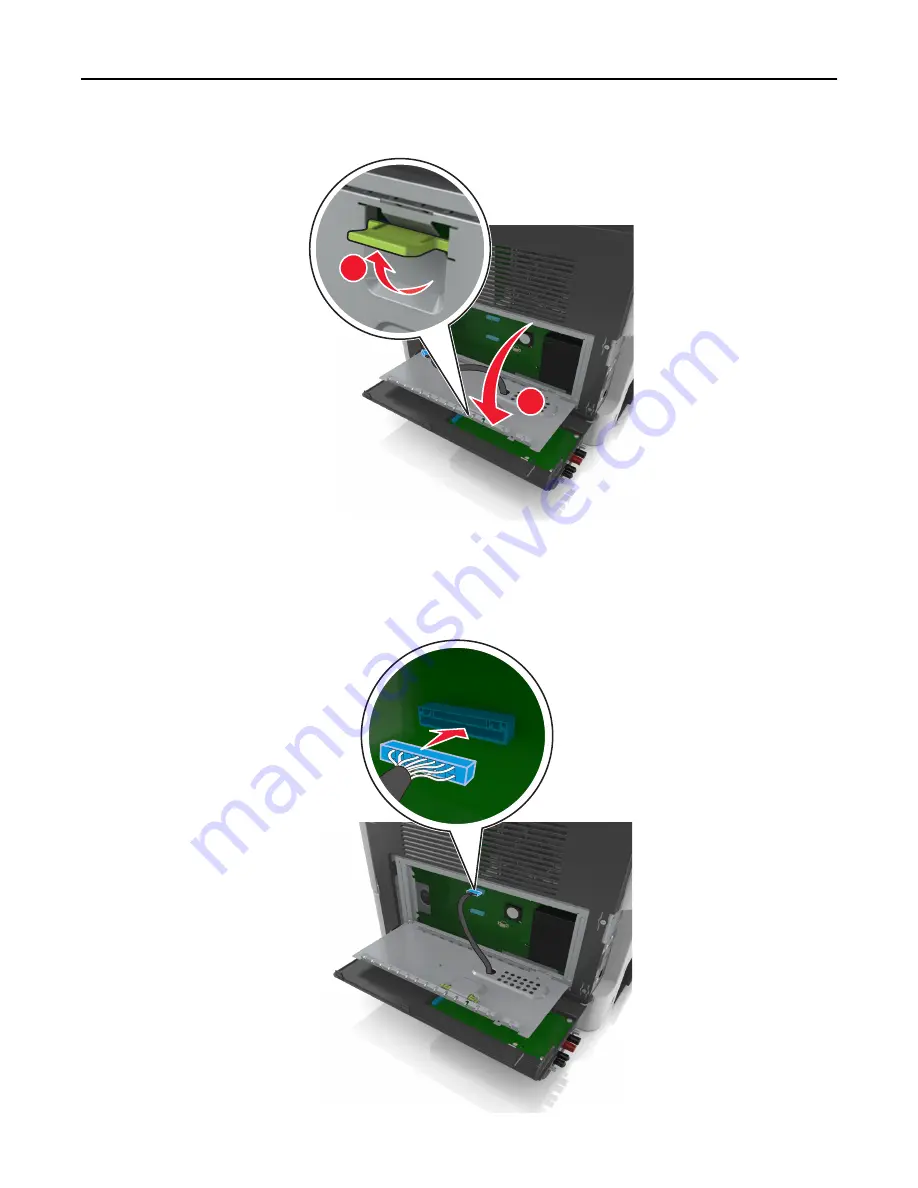
Open the controller board shield using the green handle.

2

1

12

Attach the blue plug of the ISP solution interface cable into the blue receptacle on the controller board.

Note: 

If you have installed a printer hard disk, then you need to remove it. For more information, see

“Removing a printer hard disk” on page 41. To reinstall the printer hard disk, see “Installing a printer hard
disk” on page 38.

Additional printer setup

37

Содержание XM1100 Series

Страница 1: ...XM1100 Series User s Guide September 2012 www lexmark com Machine type s 7015 Model s 679 ...

Страница 2: ... home screen applications 18 Finding the IP address of the computer 18 Finding the IP address of the printer 19 Accessing the Embedded Web Server 19 Customizing the home screen 19 Understanding the different applications 20 Activating the home screen applications 20 Finding information about the home screen applications 20 Setting up Forms and Favorites 20 Setting up Card Copy 21 Using MyShortcut ...

Страница 3: ...g 77 Printing forms and a document 77 Printing from a mobile device 78 Printing from a flash drive 79 Printing confidential and other held jobs 81 Printing information pages 83 Canceling a print job 83 Copying 85 Making copies 85 Copying photos 86 Copying on specialty media 86 Customizing copy settings 87 Placing information on copies 92 Canceling a copy job 93 Understanding the copy options 93 E ...

Страница 4: ...lash drive 130 Understanding the scan options 132 Understanding the printer menus 135 Menus list 135 Paper menu 136 Reports Menu 145 Network Ports menu 146 Security menu 155 Settings menu 158 Help menu 202 Saving money and the environment 204 Saving paper and toner 204 Saving energy 205 Recycling 208 Securing the printer 210 Statement of Volatility 210 Erasing volatile memory 210 Erasing non volat...

Страница 5: ...25 Restoring factory default settings 226 Clearing jams 227 Avoiding jams 227 Understanding jam messages and locations 228 x page jam open front door 20y xx 230 x page jam open rear door 20y xx 233 x page jam clear standard bin 20y xx 234 x page jam remove tray 1 to clear duplex 23y xx 235 x page jam open tray x 24y xx 236 x page jam clear manual feeder 25y xx 237 x page jam open automatic feeder ...

Страница 6: ...Embedded Web Server does not open 301 Contacting customer support 303 Notices 304 Product information 304 Edition notice 304 Power consumption 309 Index 321 Contents 6 ...

Страница 7: ...fore touching CAUTION POTENTIAL INJURY The lithium battery in this product is not intended to be replaced There is a danger of explosion if a lithium battery is incorrectly replaced Do not recharge disassemble or incinerate a lithium battery Discard used lithium batteries according to the manufacturer s instructions and local regulations Use only the telecommunications RJ 11 cord provided with thi...

Страница 8: ...AL INJURY Before moving the printer follow these guidelines to avoid personal injury or printer damage Turn the printer off using the power switch and then unplug the power cord from the electrical outlet Disconnect all cords and cables from the printer before moving it If an optional tray is installed then remove it from the printer To remove the optional tray slide the latch on the right side of...

Страница 9: ...ubleshooting and solving problems User s Guide and Quick Reference Guide The guides are available on the Documentation CD For more information visit http support lexmark com Instructions for Connecting the printer to an Ethernet network Troubleshooting printer connection problems NetworkingGuide OpentheSoftwareCD andthenlook for Printer and Software Documentation under the Pubs folder From the lis...

Страница 10: ...ies and regions See the printed warranty that came with your printer Selecting a location for the printer CAUTION POTENTIAL INJURY The printer weight is greater than 18 kg 40 lb and requires two or more trained personnel to lift it safely When selecting a location for the printer leave enough room to open trays covers and doors If you plan to install any options then leave enough room for them als...

Страница 11: ...t options If you purchased a multifunction printer MFP that scans copies and faxes then you may need additional furniture For more information see www lexmark com multifunctionprinters CAUTION POTENTIAL INJURY To reduce the risk of equipment instability load each tray separately Keep all other trays closed until needed You can configure your printer by adding an optional 250 or 550 sheet tray For ...

Страница 12: ...per stop 10 Standard bin Understanding the basic functions of the scanner Make quick copies or set the printer to perform specific copy jobs Send a fax using the printer control panel Send a fax to multiple fax destinations at the same time Scan documents and send them to your computer an e mail address or an FTP destination Scan documents and send them to another printer PDF through an FTP Learni...

Страница 13: ... up to 50 sheets of plain paper into the ADF tray Scan sizes from 105 x 148 mm 4 1 x 5 8 inches wide to 216 x 368 mm 8 5 x 14 5 inches long Scan media weights from 52 to 120 g m2 14 32 lb Do not load postcards photos small items transparencies photo paper or thin media such as magazine clippings into the ADF tray Place these items on the scanner glass Using the scanner glass When using the scanner...

Страница 14: ...p button Enable Sleep mode or Hibernate mode Do one of the following to wake the printer from Sleep mode Press any hard button Open a door or cover Send a print job from the computer Perform a power on reset with the main power switch 7 Stop or Cancel button Stop all printer activity 8 Submit button Submit changes made in the printer settings 9 Indicator light Check the status of the printer Under...

Страница 15: ...te mode Blinking amber for 0 1 second then goes completely off for 1 9 seconds in a slow pulsing pattern The printer is in Hibernate mode Understanding the home screen When the printer is turned on the display shows a basic screen referred to as the home screen Use the home screen buttons and icons to initiate an action such as copying faxing or scanning to open the menu screen or respond to messa...

Страница 16: ... Jobs Search current held jobs Jobs by user Access print jobs saved by user Profiles and Solutions Access profiles and solutions Features Feature Description Attendance message alert If an attendance message affects a function then this icon appears and the red indicator light blinks Warning If an error condition occurs then this icon appears Printer IP address Example 123 123 123 123 The IP addre...

Страница 17: ...cept button Save a setting 5 Cancel button Cancel an action or a selection Return to the previous screen Other touch screen buttons Touch To Return to the home screen Open a context sensitive Help dialog on the printer control panel Scroll to the left Scroll to the right Understanding the printer control panel 17 ...

Страница 18: ... home screen applications such as Forms and Favorites Multi Send Scan to Network For Windows users 1 Open the command window In Windows 8 From the Search charm type run and then navigate to Apps list Run type cmd OK In Windows 7 or earlier a Click or click Start and then click Run b In the Start Search or Run dialog type cmd c Press Enter or click OK 2 Type ipconfig and then click Go or press Ente...

Страница 19: ... IP address appears as four sets of numbers separated by periods such as 123 123 123 123 2 Open a Web browser and then type the printer IP address in the address field 3 Press Enter Note If you are using a proxy server then temporarily disable it to load the Web page correctly Customizing the home screen 1 Open a Web browser and then type the printer IP address in the address field Note View the p...

Страница 20: ...twork Scan a document and then send it to a network shared folder For more information see Setting up Scan to Network on page 23 Activating the home screen applications Finding information about the home screen applications Your printer comes with preinstalled home screen applications Before you can use these applications you must first activate and set up these applications using the Embedded Web...

Страница 21: ...e bookmark is located For more information on obtaining the IP address of the host computer see Finding the IP address of the computer on page 18 Make sure the printer has access rights to the folder where the bookmark is located 4 Click Apply To use the application touch Forms and Favorites on the printer home screen and then navigate through form categories or search for forms based on a form nu...

Страница 22: ...i for black and white Print Borders Select the check box to print the scan image with a border around it 4 Click Apply To use the application touch Card Copy on the printer home screen and then follow the instructions Using MyShortcut Note A later version of this User s Guide may contain a direct link to the Administrator s Guide of this application To check for updates of this User s Guide go to ...

Страница 23: ...an a document and send it to a shared network folder You can define up to 30 unique folder destinations Notes The printer must have permission to write to the destinations From the computer where the destination is specified use sharing security and firewall settings to allow the printer at least a write access For help see the documentation that came with your operating system The Scan to Network...

Страница 24: ...le to apply the settings to other printers 1 Open a Web browser and then type the printer IP address in the address field Note View the printer IP address on the printer home screen The IP address appears as four sets of numbers separated by periods such as 123 123 123 123 2 To export or import a configuration for one application do the following a Click Settings Apps Apps Management b From the li...

Страница 25: ...tEmbeddedSolutionsSettingsFile andthenfollowtheinstructions on the computer screen to save the configuration file To import a configuration file do the following 1 ClickImportEmbeddedSolutionsSettingsFile ChooseFile andthenbrowsetothesavedconfiguration file that was exported from a previously configured printer 2 Click Submit Setting up and using the home screen applications 25 ...

Страница 26: ... cables going into the printer Warning Potential Damage Controller board electronic components are easily damaged by static electricity Touch a metal surface on the printer before touching any controller board electronic components or connectors Available internal options Memory card DDR3 DIMM Flash memory Fonts Firmware cards Forms Barcode Prescribe IPDS Printcryption Printer hard disk LexmarkTM ...

Страница 27: ... attached to the printer then turn them off as well and unplug any cables going into the printer 1 Open the controller board access door 2 Open the controller board shield using the green handle 2 1 3 Use the following illustration to locate the appropriate connector Warning Potential Damage Controller board electronic components are easily damaged by static electricity Touch something metal on th...

Страница 28: ...devices attached to the printer then turn them off as well and unplug any cables going into the printer Warning Potential Damage Controller board electronic components are easily damaged by static electricity Touch something metal on the printer before touching any controller board electronic components or connectors Note An optional memory card can be purchased separately and attached to the cont...

Страница 29: ...ntil it clicks into place 5 Close the controller board shield and then the controller board access door Note When the printer software and any hardware options are installed you may need to manually add the options in the printer driver to make them available for print jobs For more information see Updating available options in the printer driver on page 45 Additional printer setup 29 ...

Страница 30: ...nto the printer Warning Potential Damage Controller board electronic components are easily damaged by static electricity Touch something metal on the printer before touching any controler board electronic components or connectors 1 Access the controller board For more information see Accessing the controller board on page 27 2 Unpack the optional card Warning Potential Damage Avoid touching the co...

Страница 31: ...rd must touch and be flushed against the controller board 5 Close the controller board shield and then the controller board access door Note When the printer software and any hardware options are installed it may be necessary to manually add the options in the printer driver to make them available for print jobs For more information see Updating available options in the printer driver on page 45 A...

Страница 32: ...inter then turn the printer off and unplug the power cord from the electrical outlet before continuing If you have any other devices attached to the printer then turn them off as well and unplug any cables going into the printer Warning Potential Damage Controller board electronic components are easily damaged by static electricity Touch a metal surface on the printer before touching any controlle...

Страница 33: ...1 2 3 Unpack the ISP kit Note Make sure to remove and discard the small cable attached to the white connector 1 2 4 3 5 6 1 ISP solution 2 Screw to attach the ISP to the bracket 3 ISP exterior cover 4 Screws to attach the ISP metal bracket to the printer cage 5 Plastic bracket 6 Long ISP cable Additional printer setup 33 ...

Страница 34: ...acket inside the ISP exterior cover until it clicks into place 5 Slide and push the ISP solution into the plastic bracket 1 2 6 Secure the ISP solution to the plastic bracket using the long screw Additional printer setup 34 ...

Страница 35: ...7 Tighten the two screws on the end of the ISP solution 8 Attach the white plug of the ISP solution interface cable into the white receptacle on the ISP Additional printer setup 35 ...

Страница 36: ...9 Slightly close the ISP exterior cover up to 65 degrees and then slide the cover to attach 1 2 3 4 10 Run the ISP cable through the controller board shield Additional printer setup 36 ...

Страница 37: ...terface cable into the blue receptacle on the controller board Note If you have installed a printer hard disk then you need to remove it For more information see Removing a printer hard disk on page 41 To reinstall the printer hard disk see Installing a printer hard disk on page 38 Additional printer setup 37 ...

Страница 38: ...from the electrical outlet before continuing If you have any other devices attached to the printer then turn them off as well and unplug any cables going into the printer Warning Potential Damage Controller board electronic components are easily damaged by static electricity Touch a metal surface on the printer before touching any controller board electronic components or connectors 1 Access the c...

Страница 39: ...ead screwdriver loosen the screws b Insert the plug of the printer hard disk interface cable into the receptacle of the controller board Note The plug and the receptacle are color coded blue Additional printer setup 39 ...

Страница 40: ...s 4 Close the controller board shield and then close the controller board access door Note When the printer software and any hardware options are installed you may need to manually add the options in the printer driver to make them available for print jobs For more information see Updating available options in the printer driver on page 45 Additional printer setup 40 ...

Страница 41: ...quires a flat head screwdriver 2 Loosen the screws that connect the printer hard disk to the controller board bracket 3 Unplug the printer hard disk interface cable from the receptacle in the controller board leaving the cable attached to the printer hard disk To unplug the cable squeeze the paddle at the plug of the interface cable to disengage the latch before pulling the cable out 4 Hold the pr...

Страница 42: ...er stand Optional 250 or 550 sheet tray Printer For more information on installing a printer stand optional 250 or 550 sheet tray or spacer see the setup sheet that came with the option Installing optional trays CAUTION POTENTIAL INJURY The printer weight is greater than 18 kg 40 lb and requires two or more trained personnel to lift it safely CAUTION SHOCK HAZARD If you are accessing the controlle...

Страница 43: ...om the base 4 Remove any packing material from inside the tray 5 Insert the tray into the base 6 Place the tray near the printer 7 Align the printer with the tray and then slowly lower the printer into place Note Optional trays lock together when stacked Additional printer setup 43 ...

Страница 44: ...manually add the options in the printer driver to make them available for print jobs For more information see Updating available options in the printer driver on page 45 To uninstall the optional trays slide the latch on the right side of the printer toward the front of the printer until it clicks into place and then remove stacked trays one at a time from the top to the bottom Additional printer ...

Страница 45: ...r the installation dialog to appear If you are using the Software CD and the installation dialog does not appear then do the following In Windows 8 From the Search charm type run and then navigate to Apps list Run type D setup exe OK In Windows 7 or earlier a Click or click Start and then click Run b In the Start Search or Run dialog type D setup exe c Press Enter or click OK Note D is the letter ...

Страница 46: ...tem Preferences Print Scan select your printer Options Supplies Driver System Preferences Print Fax select your printer Options Supplies Driver 2 Add any installed hardware options and then click OK Attaching cables CAUTION POTENTIAL INJURY Do not use the fax feature during a lightning storm Do not set up this product or make any electrical or cabling connections such as the fax feature power cord...

Страница 47: ...ve a dedicated fax line for the printer and if this connection method is supported in your country or region Note Remove the adapter plug to access the port 5 LINE port Connecttheprintertoanactivetelephonelinethroughastandard wall jack RJ 11 DSL filter or VoIP adapter or any other adapter that allows you to access the telephone line to send and receive faxes 6 USB port Attach a supported printer k...

Страница 48: ...A printer nickname can make it easier for you to identify your printer on the network You can choose to use the default printer nickname or assign a name that is easier for you to remember You will need an Ethernet cable to connect the printer to the network and an available port where the printer can physically connect to the network Use a new network cable when possible to avoid potential proble...

Страница 49: ...twork setup page or menu settings page and then finding the TCP IP section Note You will need the IP address if you are configuring access for computers on a different subnet than the printer 3 Install the printer driver on the computer a Download the driver at http support lexmark com b Double click the installer package for the printer and then follow the instructions on the computer screen c Se...

Страница 50: ...ecurity Method WEP key If your network uses more than one WEP key then enter up to four in the provided spaces Select the key currently in use on the network by selecting the default WEP transmit key WPA or WPA2 preshared key or passphrase WPA includes encryption as an additional layer of security The choices are AES or TKIP Encryption must be set for the same type on the router and on the printer...

Страница 51: ...etup Use To Search for networks Show available wireless connections Note This menu item shows all broadcast secured or unsecured SSIDs Enter a network name Manually type the SSID Note Make sure to type the correct SSID Wi Fi Protected Setup Connect the printer to a wireless network using Wi Fi Protected Setup 3 Follow the instructions on the printer display Connecting the printer to a wireless net...

Страница 52: ...A wireless network adapter is installed in your printer and working properly For more information see the instruction sheet that came with the wireless network adapter 1 Open a Web browser and then type the printer IP address in the address field Notes View the printer IP address on the printer control panel The IP address appears as four sets of numbers separated by periods such as 123 123 123 12...

Страница 53: ...ection is active at a time To switch between Ethernet and wireless connection types turn off the printer connect the cable to switch to an Ethernet connection or disconnect the cable to switch to a wireless connection and then turn the printer back on For Windows users 1 Open a Web browser and then type the printer IP address in the address field Notes View the printer IP address on the printer co...

Страница 54: ...X version 10 5 a From the Apple menu navigate to System Preferences Print Fax b Click and then navigate to AppleTalk select the printer Add Setting up serial printing Use serial printing to print when the computer is far from the printer or to print at a reduced speed After installing the serial or communication COM port configure the printer and the computer Make sure you have connected the seria...

Страница 55: ...he COM port parameters After installing the printer driver set the serial parameters in the COM port assigned to the printer driver Note Make sure the serial parameters in the COM port match the serial parameters you set in the printer a Open Device Manager In Windows 8 From the Search charm type run and then navigate to Apps list Run type devmgmt msc OK In Windows 7 or earlier 1 Click or click St...

Страница 56: ... connection is working This page also provides important information that aids network printing configuration Printing a menu settings page From the home screen navigate to Reports Menu Settings Page Printing a network setup page If the printer is attached to a network then print a network setup page to verify the network connection This page also provides important information that aids network p...

Страница 57: ...he printer menus Notes The smallest supported Universal size is 76 2 x 76 2 mm 3 x 3 inches The largest supported Universal size is 215 9 x 359 92 mm 8 5 x 14 17 inches 1 From the home screen navigate to Paper Menu Universal Setup Units of Measure select the unit of measure 2 Touch Portrait Width or Portrait Height 3 Select the width or height and then touch Loading trays CAUTION POTENTIAL INJURY ...

Страница 58: ...2 Squeeze and then slide the width guide tab to the correct position for the size of the paper you are loading 1 LT R LG L E X E C A 4 B 5 A 5 2 Loading paper and specialty media 58 ...

Страница 59: ...h guide extends beyond the base leaving the paper exposed to dust To protect the paper from dust you can purchase a dust cover separately For more information contact customer support If you are loading A6 size paper in the standard tray then squeeze and then slide the length guide tab toward the center of the tray to the A6 size position Make sure the width and length guides are aligned with the ...

Страница 60: ...TR LG L A4 EX EC B5 A5 A6 4 Flex the sheets back and forth to loosen them and then fan them Do not fold or crease the paper Straighten the edges on a level surface 5 Load the paper stack Loading paper and specialty media 60 ...

Страница 61: ...ed printing load letterhead faceup with the bottom edge of the sheet toward the front of the tray Make sure the paper is below the maximum paper fill indicator located on the side of the width guide 6 Insert the tray 7 From the printer control panel set the paper size and paper type in the Paper menu to match the paper loaded in the tray Note Set the correct paper size and type to avoid paper jams...

Страница 62: ...ferent paper sizes and types or specialty media such as card stock transparencies paper labels and envelopes You can also use it for single page print jobs on letterhead 1 Open the multipurpose feeder 1 2 a Pull the multipurpose feeder extender Loading paper and specialty media 62 ...

Страница 63: ...e tab on the left width guide and then move the guides for the paper you are loading 1 2 3 Prepare the paper or specialty media for loading Flexsheetsofpaperbackandforthtoloosenthem andthenfanthem Donotfoldorcreasethepaper Straighten the edges on a level surface Loading paper and specialty media 63 ...

Страница 64: ... edges on a level surface 4 Load the paper or specialty media Notes Do not force paper or specialty media into the multipurpose feeder Make sure the paper or specialty media is below the maximum paper fill indicator located on the paper guides Overfilling may cause paper jams Load paper transparencies and card stock with the recommended printable side faceup and the top edge entering the printer f...

Страница 65: ...against the edge of the paper so that the last few sheets of paper remain in place Load letterhead faceup with the top edge entering the printer first For two sided duplex printing load letterhead facedown with the bottom edge entering the printer first Loading paper and specialty media 65 ...

Страница 66: ...e printer IP address on the printer home screen The IP address appears as four sets of numbers separated by periods such as 123 123 123 123 If you are using a proxy server then temporarily disable it to load the Web page correctly 2 Click Settings Paper Menu 3 Change the paper size and type settings for the trays you are linking To link trays make sure the paper size and type for the tray match th...

Страница 67: ...r Menu Custom Names 2 Select a custom name and then type a custom paper type name 3 Touch 4 Touch Custom Types and then verify that the new custom paper type name has replaced the custom name Assigning a custom paper type Using the Embedded Web Server Assign a custom paper type name to a tray when linking or unlinking trays 1 Open a Web browser and then type the printer IP address in the address f...

Страница 68: ...es View the printer IP address on the printer home screen The IP address appears as four sets of numbers separated by periods such as 123 123 123 123 If you are using a proxy server then temporarily disable it to load the Web page correctly 2 Click Settings Paper Menu Custom Types 3 Select a custom name you want to configure then select a paper or specialty media type and then click Submit Using t...

Страница 69: ...e is set to Rough in the Paper menu then transparencies can be printed at a temperature up to 195 C 383 F Avoid getting fingerprints on the transparencies to prevent print quality problems Before loading transparencies flex fan and straighten the stack to prevent sheets from sticking together Tips on using envelopes Print samples on the envelopes being considered for use before buying large quanti...

Страница 70: ...ate the printer and the cartridge with adhesive and could void the printer and toner cartridge warranties Do not use labels with exposed adhesive Do not print within 1 mm 0 04 inch of the edge of the label of the perforations or between die cuts of the label Make sure the adhesive backing does not reach to the edge of the sheet Zone coating of the adhesive should be at least 1 mm 0 04inch away fro...

Страница 71: ... problems Curl can occur after thepaperpassesthrough theprinter whereit is exposed to high temperatures Storing paperunwrapped inhot humid cold or dry conditions even in the trays can contribute to paper curling prior to printing and can cause feeding problems Smoothness Paper smoothness directly affects print quality If paper is too rough then toner cannot fuse to it properly If paper is too smoo...

Страница 72: ... inks designed for use in xerographic copiers The ink must be able to withstand temperatures up to 230 C 446 F without melting or releasing hazardous emissions Use inks that are not affected by the resin in toner Inks that are oxidation set or oil based generally meet these requirements latex inks might not When in doubt contact the paper supplier Preprinted papers such as letterhead must be able ...

Страница 73: ...urages purchasing paper from suppliers who demonstrate their commitment to sustainable forestry practices Lexmark does not endorse specific suppliers although a converter s product list for special applications is maintained However the following paper choice guidelines will help alleviate the environmental impact of printing 1 Minimize paper consumption 2 Be selective about the origin of wood fib...

Страница 74: ...idual paper packages Take paper out of the carton or wrapper only when you are ready to load it in the printer The carton and wrapper help keep the paper clean dry and flat Supported paper sizes types and weights Supported paper sizes Paper size and dimension Standard 250 sheet tray Optional 250 or 550 sheet tray Multipurpose feeder ADF Scanner glass Duplex mode Business card X X X X X 3 x 5 in X ...

Страница 75: ... 92 mm 8 5 x 14 17 in 7 3 4 Envelope Monarch 98 4 x 190 5 mm 3 875 x 7 5 in X X X X X 9 Envelope 98 4 x 226 1 mm 3 875 x 8 9 in X X X X X 10 Envelope 104 8 x 241 3 mm 4 12 x 9 5 in X X X X X DL Envelope 110 x 220 mm 4 33 x 8 66 in X X X X X C5 Envelope 162 x 229 mm 6 38 x 9 01 in X X X X X B5 Envelope 176 x 250 mm 6 93 x 9 84 in X X X X X Universal is supported in duplex mode only if the width is ...

Страница 76: ... optional tray supports 60 120 g m2 16 32 lb paper weights The multipurpose feeder supports 60 163 g m2 16 43 lb paper weights Paper type 250 or 550 sheet tray Multipurpose feeder Duplex mode ADF Scanner glass Plain paper Card stock X X Transparencies X Recycled Paper labels1 X Bond Envelope2 X X X Rough envelope X X X Letterhead Preprinted Colored paper Light paper Heavy paper Rough Cotton X Cust...

Страница 77: ... type and size to match the paper loaded 2 Send the print job For Windows users a With a document open click File Print b Click Properties Preferences Options or Setup c Adjust the settings if necessary d Click OK Print For Macintosh users a Customize the settings in the Page Setup dialog 1 With a document open choose File Page Setup 2 Choose a paper size or create a custom size to match the paper...

Страница 78: ...o load the Web page correctly 2 Click Settings Print Settings Quality Menu Toner Darkness 3 Adjust the setting and then click Submit Using the printer control panel 1 From the home screen navigate to Settings Print Settings Quality Menu Toner Darkness 2 Adjust the setting and then touch Printing from a mobile device For the list of supported mobile devices and to download a compatible mobile print...

Страница 79: ...sh drive when the printer requires attention such as when a jam has occurred then the printer ignores the flash drive If you insert the flash drive while the printer is processing other print jobs then Busy appears on the printer display After these print jobs are processed you may need to view the held jobs list to print documents from the flash drive Warning Potential Damage Do not touch the USB...

Страница 80: ...ing If you leave the flash drive in the printer after leaving the initial USB menu screen then touch Held Jobs on the home screen to print files from the flash drive Supported flash drives and file types Notes High speed USB flash drives must support the full speed standard Low speed USB devices are not supported USB flash drives must support the File Allocation Table FAT system Devices formatted ...

Страница 81: ...set from the computer It must be four digits using the numbers 0 9 Repeat Job Expiration Print and store print jobs in the printer memory Verify Job Expiration Print onecopy ofa print job and hold theremainingcopies It letsyouexamine if the first copy is satisfactory or not The print job is automatically deleted from the printer memory when all copies are printed Reserve Job Expiration Store print...

Страница 82: ...users 1 With a document open choose File Print If necessary click the disclosure triangle to see more options 2 From the print options or Copies Pages pop up menu choose Job Routing 3 Select the print job type Confidential Repeat Reserve or Verify and then assign a user name For a confidential print job also enter a four digit PIN 4 Click OK or Print 5 From the printer home screen release the prin...

Страница 83: ...ied settings Printing information pages Printing a font sample list 1 From the home screen navigate to Reports Print Fonts 2 Touch PCL Fonts or PostScript Fonts Printing a directory list A directory list shows the resources stored in a flash memory or in the printer hard disk From the home screen navigate to Reports Print Directory Canceling a print job Canceling a print job from the printer contr...

Страница 84: ...ers c Press Enter or click OK 2 Double click the printer icon 3 Select the print job you want to cancel 4 Click Delete For Macintosh users 1 From the Apple menu navigate to either of the following System Preferences Print Scan select your printer Open Print Queue System Preferences Print Fax select your printer Open Print Queue 2 From the printer window select the print job you want to cancel and ...

Страница 85: ...ncies photo paper or thin media such as magazine clippings into the ADF tray Place these items on the scanner glass The ADF indicator light comes on when the paper is loaded properly 2 If you are loading a document into the ADF tray then adjust the paper guides Note To avoid a cropped image make sure the size of the original document and the size of the copy paper are the same 3 From the printer c...

Страница 86: ...home screen navigate to Copy Content Photo 3 From the Content Source menu select the appropriate setting that best matches the original photo 4 Touch Copy It Note If you have more photos to copy then place the next photo on the scanner glass and then touch Scan the next page 5 Touch Finish the Job Copying on specialty media Copying on transparencies 1 Load an original document faceup short edge fi...

Страница 87: ...irst into the multipurpose feeder 5 Select the size of the letterhead and then touch Letterhead Copy It Customizing copy settings Copying to a different size 1 Load an original document faceup short edge first into the ADF tray or facedown on the scanner glass Notes Do not load postcards photos small items transparencies photo paper or thin media such as magazine clippings into the ADF tray Place ...

Страница 88: ... or thin media such as magazine clippings into the ADF tray Place these items on the scanner glass The ADF indicator light comes on when the paper is loaded properly 2 If you are loading a document into the ADF tray then adjust the paper guides 3 From the home screen navigate to Copy Copy from Mixed Sizes Copy to Auto Size Match Copy It The scanner identifies the different paper sizes as they are ...

Страница 89: ...Load an original document faceup short edge first into the ADF tray or facedown on the scanner glass Notes Do not load postcards photos small items transparencies photo paper or thin media such as magazine clippings into the ADF tray Place these items on the scanner glass The ADF indicator light comes on when the paper is loaded properly 2 If you are loading a document into the ADF tray then adjus...

Страница 90: ...rinter Magazine The original document is from a magazine Press The original document was printed using a printing press Black White Laser The original document was printed using a mono laser printer Photo Film The original document is a photo from a film Newspaper The original document is from a newspaper Other The original document was printed using an alternate or unknown printer 7 Touch Copy It...

Страница 91: ...o 1 1 1 2 2 2 then the separator sheets are added to the end of the copy job For more information see Collating copies on page 90 4 Select one of the following Between Copies Between Jobs Between Pages Off 5 Touch Copy It Copying multiple pages onto a single sheet In order to save paper you can copy either two or four consecutive pages of a multiple page document onto a single sheet of paper Notes...

Страница 92: ...y Header Footer 4 Select Header or Footer and then touch 5 Select where you want to insert the header or footer then select a text option and then touch 6 Select where you want to print the header or footer and then touch 7 From the Header Footer menu touch Copy It Placing an overlay message on each page 1 Load an original document faceup short edge first into the ADF tray or facedown on the scann...

Страница 93: ...n original document that contains mixed paper sizes with the same width touch Mixed Sizes To set the printer to automatically detect the size of the original document touch Auto Size Sense Copy to This option opens a screen where you can enter the paper size and type on which your copies will be printed Touch the paper size and type that matches the paper loaded If the settings for Copy from and C...

Страница 94: ... This option lets you set the number of copies to be printed Content This option lets you set the original document type and source Select from the following content types Graphics The original document is mostly business type graphics such as pie charts bar charts and animations Photo The original document is mostly a photo or an image Text The content of the original document is mostly text or l...

Страница 95: ...ase also removes whatever is within the area selected leaving nothing on that portion of the scan Overlay This option lets you create a watermark or message that overlays the content of your copy You can choose from Confidential Copy Draft Urgent and Custom You can type a custom message in the Enter the Custom Text Overlay and press OK field The message will appear faintly in large print across ea...

Страница 96: ...o Edge Shadow Detail Sharpness and Temperature settings before you copy the document Create Booklet This option lets you create a sequence of printed and collated pages that when folded forms a booklet half the page size of the original document and with all the pages in order You can choose between one sided and two sided Note This option appears only when a printer hard disk is installed Custom ...

Страница 97: ... up the printer to e mail Setting up the e mail function 1 Open a Web browser and then type the printer IP address in the address field Notes View the printer IP address on the printer home screen The IP address appears as four sets of numbers separated by periods such as 123 123 123 123 If you are using a proxy server then temporarily disable it to load the Web page correctly 2 Click Settings E m...

Страница 98: ...ttings Note If you change the settings after the e mail shortcut has been created then the settings are not saved 5 Touch Save As Shortcut 6 Type a unique name for the shortcut and then touch 7 Verify that the shortcut name is correct and then touch OK If the shortcut name is incorrect then touch Cancel and then reenter the information Notes The shortcut name appears in the E mail Shortcuts icon o...

Страница 99: ...t into the ADF tray or facedown on the scanner glass Notes Do not load postcards photos small items transparencies photo paper or thin media such as magazine clippings into the ADF tray Place these items on the scanner glass The ADF indicator light comes on when the paper is loaded properly 2 If you are loading a document into the ADF tray then adjust the paper guides 3 Press then enter the shortc...

Страница 100: ...the e mail subject 5 Touch Message type your message Changing the output file type 1 Load an original document faceup short edge first into the ADF tray or facedown on the scanner glass Notes Do not load postcards photos small items transparencies photo paper or thin media such as magazine clippings into the ADF tray Place these items on the scanner glass The ADF indicator light comes on when the ...

Страница 101: ...the Job appears Understanding the e mail options Recipient s This option lets you enter the recipient of your e mail You may enter multiple e mail addresses Subject This option lets you type a subject line for your e mail Message This option lets you type a message that will be sent with your scanned attachment File Name This option lets you customize the attachment file name Save As Shortcut This...

Страница 102: ...and attach a separate file for each page of your original document XPS Use this to create a single XPS file with multiple pages Content This option lets you set the original document type and source Select from the following content types Graphics The original document is mostly business type graphics such as pie charts bar charts and animations Photo The original document is mostly a photo or an ...

Страница 103: ...n the e mail When the first page is scanned the scanning is paused and a preview image appears Note This option appears only when a working printer hard disk is installed Transmission Log This option lets you print the transmission log or transmission error log Edge Erase This option lets you remove smudges or any mark around the edges of a document You can remove an equal area around all four sid...

Страница 104: ... the fax feature during a lightning storm Do not set up this product or make any electrical or cabling connections such as the fax feature power cord or telephone during a lightning storm Note The following connection methods are applicable only in select countries or regions During the initial printer setup clear the Fax funtion and any other function you plan to set up later and then press Conti...

Страница 105: ...el for fax setup When the printer is turned on for the first time a series of start up screens appear If the printer has fax capabilities then the Fax Name and Fax Number screens appear 1 When the Fax Name screen appears do the following a Enter the name to be printed on all outgoing faxes b Enter the fax name and then touch Submit 2 When the Fax Number screen appears enter the fax number and then...

Страница 106: ... with the printer to the port of the printer 2 Connect the other end of the telephone cable to an active analog wall jack Tips for this setup You can set the printer to receive faxes automatically Auto Answer On or manually Auto Answer Off If you want to receive faxes automatically Auto Answer On then set the printer to pick up on any number of rings that you want Faxing 106 ...

Страница 107: ... telephone wall jack PHONE LINE To connect 1 Connect one end of the telephone cable that came with the printer to the port of the printer 2 Connect the other end of the telephone cable to an active analog wall jack 3 Connect the answering machine to the port of the printer Faxing 107 ...

Страница 108: ... calls two rings after the answering machine For example if the answering machine picks up calls after four rings then set the printer to pick up after six rings This way the answering machine picks up calls first and your voice calls are received If the call is a fax then the printer detects the fax signal on the line and takes over the call If you subscribe to a distinctive ring service provided...

Страница 109: ...hen make sure that you set the correct ring pattern for the printer Otherwise the printer does not receive faxes even if you have set it to receive faxes automatically If you have only one telephone number on your line then you need to set the printer to receive faxes manually Auto Answer Off When you answer the telephone and you hear fax tones press 9 or the manual answer code on the telephone to...

Страница 110: ...lephone answering machine in your network Interference causes noise and static on the telephone failed and poor quality faxes for the printer and slow Internet connection on your computer To install a filter for the printer 1 Connect the line port of the DSL filter to the wall jack 2 Connect one end of the telephone cable that came with your printer to the port of the printer Connect the other end...

Страница 111: ...re that the phone port on the VoIP adapter is active plug an analog telephone into the phone port and then listen for a dial tone If you hear a dial tone then the port is active If you need two phone ports for your devices but do not want to pay additional cost then do not plug the printer into the second phone port You can use a phone splitter Plug the phone splitter into the port labeled Phone L...

Страница 112: ...e port of the printer Notes To make sure that the telephone port on the cable modem is active plug an analog telephone into the telephone port and then listen for a dial tone If you hear a dial tone then the port is active If you need two telephone ports for your devices but do not want to pay additional cost then do not plug the printer into the second telephone port You can use a phone splitter ...

Страница 113: ...ve analog telephone wall jack 3 Connect your analog telephone to the port of the printer Scenario 5 Countries or regions with different telephone wall jacks and plugs Some countries or regions may have different types of telephone wall jack connectors than those that came with the printer The standard wall jack adopted by most countries or regions is RJ 11 Your printer comes with the RJ 11 jack an...

Страница 114: ...region may not come with your printer and you may need to purchase it separately There may be an adapter plug installed in the port of the printer If you are using a telephone adapter or a facility that has a cascaded or serial wiring scheme then do not remove the adapter plug from the port of the printer Part name Part number Lexmark adapter plug 40X8519 Faxing 114 ...

Страница 115: ...he wall jack 3 If you want to connect another device telephone or answering machine to the same wall jack and if the device has a non RJ 11 connector then connect it directly to the telephone adapter Notes The port of the printer may have an adapter plug for use with the adapter Do not remove the plug from the port of the printer In some countries or regions the printer may not come with a telepho...

Страница 116: ...all jack in Germany The German wall jack has two kinds of ports The N ports are for fax machines modems and answering machines The F port is for telephones N F N Connect the printer to any of the N ports PHONE LINE N F N Faxing 116 ...

Страница 117: ...ow these steps to connect the equipment 1 Connect one end of the telephone cable that came with the printer to the printer LINE port 2 Connect the other end of the telephone cable to an active analog telephone wall jack 3 Change the distinctive rings setting to match the setting you want for the printer to answer Note The factory default setting for distinctive rings is On This sets the printer to...

Страница 118: ... daylight saving time 1 Open a Web browser and then type the printer IP address in the address field Notes View the printer IP address on the printer home screen The IP address appears as four sets of numbers separated by periods such as 123 123 123 123 If you are using a proxy server then temporarily disable it to load the Web page correctly 2 Click Security Set Date and Time 3 Select the Automat...

Страница 119: ...elect the printer and then click Properties Preferences Options or Setup 3 Navigate to Fax tab Enable fax 4 Enter the recipient fax number or numbers in the Fax number s field Note Fax numbers can be entered manually or by using the Phone Book feature 5 If necessary enter a prefix in the Dialing prefix field 6 Select the appropriate paper size and page orientation 7 If you want to include a cover ...

Страница 120: ... contact your system support person 1 Load an original document faceup short edge first into the ADF tray or facedown on the scanner glass Notes Do not load postcards photos small items transparencies photo paper or thin media such as magazine clippings into the ADF tray Place these items on the scanner glass The ADF indicator light comes on when the paper is loaded properly 2 If you are loading a...

Страница 121: ...pears as four sets of numbers separated by periods such as 123 123 123 123 If you are using a proxy server then temporarily disable it to load the Web page correctly 2 Click Settings Manage Shortcuts Fax Shortcut Setup Note A password may be required If you do not have an ID and password then contact your system support person 3 Type a name for the shortcut and then enter the fax number Notes To c...

Страница 122: ...the resolution you want Note Settings range from Standard fastest speed to Ultra Fine best quality at a reduced speed 5 Touch Fax It Making a fax lighter or darker 1 Load an original document faceup short edge first into the ADF tray or facedown on the scanner glass Notes Do not load postcards photos small items transparencies photo paper or thin media such as magazine clippings into the ADF tray ...

Страница 123: ...ld enter the phone numbers or type the fax names of specific fax callers you want to block Canceling an outgoing fax Canceling a fax while the original documents are still scanning When using the ADF touch Cancel Job on the printer control panel while Scanning appears When using the scanner glass touch Cancel Job on the printer control panel while Scanning appears or while Scan the Next Page and F...

Страница 124: ...select Hold faxes c From the Time menu select the time you want the held faxes released d From the Day s menu select the day you want the held faxes released 5 Click Add Forwarding a fax This option lets you print and forward received faxes to a fax number e mail address FTP site or LDSS 1 Open a Web browser and then type the printer IP address in the address field Notes View the printer IP addres...

Страница 125: ...ss The original document was printed using a printing press Resolution This option lets you adjust the quality of the fax output Increasing the image resolution increases the file size and the time needed to scan your original document Decreasing the image resolution reduces the file size Select one of the following Standard Use this when faxing most documents Fine 200 dpi Use this when faxing doc...

Страница 126: ...u adjust the Background Removal Color Balance Color Dropout Contrast Mirror Image Negative Image Scan Edge to Edge Shadow Detail Sharpness and Temperature settings before you fax the document Edge Erase This option lets you remove smudges or any mark around the edges of a document You can remove an equal area around all four sides of the paper or you can pick a particular edge Edge Erase also remo...

Страница 127: ...ument back to the computer over the network by creating a scan profile on the computer and then downloading the profile to the printer Using Scan to Network Scan to Network lets you scan your documents to network destinations specified by your system support person After the destinations shared network folders have been established on the network the setup process for the application involves inst...

Страница 128: ...s using the Embedded Web Server and using the printer control panel Creating an FTP shortcut using the Embedded Web Server 1 Open a Web browser and then type the printer IP address in the address field Notes View the printer IP address on the printer home screen The IP address appears as four sets of numbers separated by periods such as 123 123 123 123 If you are using a proxy server then temporar...

Страница 129: ...o the ADF tray Place these items on the scanner glass The ADF indicator light comes on when the paper is loaded properly 2 If you are loading a document into the ADF tray then adjust the paper guides 3 From the home screen navigate to FTP FTP Address type the FTP address Scan It Scanning to an FTP address using a shortcut number 1 Load an original document faceup short edge first into the ADF tray...

Страница 130: ...e the printer IP address in the address field Notes View the printer IP address on the printer home screen The IP address appears as four sets of numbers separated by periods such as 123 123 123 123 If you are using a proxy server then temporarily disable it to load the Web page correctly 2 Click Scan Profile Create Scan Profile 3 Select your scan settings and then click Next 4 Select a location o...

Страница 131: ...pported only in Windows Vista or later Make sure that your computer and printer are connected to the same network 1 Open the printers folder In Windows 8 From the Search charm type run and then navigate to Apps list Run type control printers OK In Windows 7 or earlier a Click or click Start and then click Run b In the Start Search or Run dialog type control printers c Press Enter or click OK 2 Dep...

Страница 132: ...riginal document faceup short edge first into the ADF tray or facedown on the scanner glass Notes Do not load postcards photos small items transparencies photo paper or thin media such as magazine clippings into the ADF tray Place these items on the scanner glass The ADF indicator light comes on when the paper is loaded properly 2 If you are loading a document into the ADF tray then adjust the pap...

Страница 133: ...ted PDF file that protects the file contents from unauthorized access TIFF Use to create multiple files or a single file If Multi page TIFF is turned off in the Settings menu then TIFF saves one page in each file The file size is usually larger than an equivalent JPEG JPEG Use to create and attach a separate file for each page of the original document XPS Use to create a single XPS file with multi...

Страница 134: ...t page of the image before it is included in the file When the first page is scanned the scanning is paused and a preview image appears Note This option appears only when a formatted working printer hard disk is installed Edge Erase This option lets you remove smudges or any mark around the edges of a document You can remove an equal area around all four sides of the paper or you can pick a partic...

Страница 135: ...y Audit Log Set Date and Time General Settings Copy Settings Fax Settings E mail Settings FTP Settings Flash Drive Menu Print Settings Help Manage Shortcuts Option Card Menu3 Print All Guides Copy Guide E mail Guide Fax Guide FTP Guide Print Defects Guide Information Guide Supplies Guide Fax Shortcuts E mail Shortcuts FTP Shortcuts Copy Shortcuts Profile Shortcuts Note A list of installed DLEs Dow...

Страница 136: ...ting A4 is the international factory default setting If the same size and type of paper are loaded in two trays and the tray settings for paper size and type match then the trays are automatically linked The multipurpose feeder may also be linked When one tray is empty the job prints using paper from the linked tray A6 is supported only in Tray 1 and in the multipurpose feeder Tray x Type Plain Pa...

Страница 137: ... to appear as a menu item The multipurpose feeder does not automatically detect paper size The paper size value must be set MP Feeder Type Plain Paper Card Stock Transparency Recycled Labels Bond Envelope Rough Envelope Letterhead Preprinted Colored Paper Light Paper Heavy Paper Rough Cotton Custom Type x Specify the type of the paper loaded in the multipurpose feeder Notes Plain Paper is the fact...

Страница 138: ...ain Paper is the factory default setting From the Paper menu set Configure MP to Manual in order for Manual Paper Type to appear as a menu item Manual Envelope Size 7 3 4 Envelope 9 Envelope 10 Envelope DL Envelope C5 Envelope B5 Envelope Other Envelope Specify the size of the envelope being manually loaded Note 10 Envelope is the U S factory default setting DL Envelope is the international factor...

Страница 139: ...tions are allowed Off indicates that no size substitutions are allowed Setting a size substitution lets the print job continue without Change Paper appearing Paper Texture menu Use To Plain Texture Smooth Normal Rough Specify the relative texture of the plain paper loaded Note Normal is the factory default setting Card Stock Texture Smooth Normal Rough Specify the relative texture of the card stoc...

Страница 140: ...d Texture Smooth Normal Rough Specify the relative texture of the preprinted paper loaded Note Normal is the factory default setting Colored Texture Smooth Normal Rough Specify the relative texture of the colored paper loaded Note Normal is the factory default setting Light Texture Smooth Normal Rough Specify the relative texture of the paper loaded Note Normal is the factory default setting Heavy...

Страница 141: ...Specify the relative weight of the labels loaded Note Normal is the factory default setting Bond Weight Light Normal Heavy Specify the relative weight of the bond paper loaded Note Normal is the factory default setting Envelope Weight Light Normal Heavy Specify the relative weight of the envelope loaded Note Normal is the factory default setting Rough Envelope Weight Light Normal Heavy Specify the...

Страница 142: ... two sided printing for all print jobs that specify Recycled as the paper type Bond Loading Duplex Off Determine and set two sided printing for all print jobs that specify Bond as the paper type Letterhead Loading Duplex Off Determine and set two sided printing for all print jobs that specify Letterhead as the paper type Preprinted Loading Duplex Off Determine and set two sided printing for all pr...

Страница 143: ...es menu Use To Custom Type x Paper Card Stock Transparency Rough Cotton Labels Envelope Associatea paper or specialtymediatypewitha factory defaultCustom Type x name or a user defined custom name created in the Embedded Web Server or MarkVisionTM Professional The user defined name appears instead of Custom Type x Notes Paper is the factory default setting for Custom Type x The custom media type mu...

Страница 144: ...rsal Setup menu Use To Units of Measure Inches Millimeters Identify the units of measure Notes Inches is the US factory default setting Millimeters is the international factory default setting Portrait Width 3 8 5 inches 76 216 mm Set the portrait width Notes If the width exceeds the maximum then the printer uses the maximum width allowed 8 5 inches is the US factory default setting You can increa...

Страница 145: ... printers connected to print servers Network x Setup Page Print a report containing information about the network settings of the printer such as the TCP IP address information Note This menu item appears only in network printers or printers connected to print servers and when there is more than one network option installed Shortcut List Print a report containing information about configured short...

Страница 146: ...ncluding the printer serial number andmodelname The report containstext and UPC bar codesthatcan bescanned into an asset database Network Ports menu Active NIC menu Use To Active NIC Auto list of available network cards Notes Auto is the factory default setting This menu item appears only when an optional network card is installed Standard Network or Network x menu Note Only active ports appear in...

Страница 147: ...o is the factory default setting The value can be changed in 1KB increments The maximum size allowed depends on the amount of memory in the printer the size of the other link buffers and whether Resource Save is set to On or Off To increase the maximum size range for the Network Buffer disable or reduce the size of the parallel serial and USB buffers Changing this setting from the printer control ...

Страница 148: ... Job Timeout 0 255 seconds Set the amount of time it takes for a network print job to be canceled Notes 90 seconds is the factory default setting A setting value of 0 disables the timeout If a value of 1 9 is selected then the setting is saved as 10 TCP IP menu To access the menu navigate to either of the following Network Ports Standard Network Standard Network Setup TCP IP Network Ports Network ...

Страница 149: ...otocol Note Yes is the factory default setting Enable HTTP Server Yes No Enable the built in Web server Embedded Web Server When enabled the printer can be monitored and managed remotely using a Web browser Note Yes is the factory default setting WINS Server Address View or change the current WINS server address Enable DDNS Yes No View or change the current DDNS setting Note Yes is the factory def...

Страница 150: ... is available only in printers connected to an Ethernet network and printers with a wireless network adapter attached To access the menu navigate to either of the following Network Ports Standard Network Standard Network Setup Wireless Network Ports Network x Network x Setup Wireless Use To Wi Fi Protected Setup WPS Start Push Button Method Start PIN Method Establish a wireless network connection ...

Страница 151: ...y in printer models connected to a wired network or when an optional network card is installed To access the menu navigate to any of the following Network Ports Standard Network Standard Network Setup AppleTalk Network Ports Network Setup x AppleTalk Use To Activate Yes No Enable or disable AppleTalk support Note Yes is the factory default setting View Name Show the assigned AppleTalk name Note Th...

Страница 152: ...inter to perform the special processing required for bidirectional communication following the conventions defined by the NPA protocol Notes Auto is the factory default setting Auto sets the printer to examine data determine the format and then process it appropriately The printer automatically restarts when changing the setting from the printer control panel The menu selection is then updated USB...

Страница 153: ...ilable only when the printer is attached to an external print server through the USB port ENA Netmask yyy yyy yyy yyy Set the netmask information for an external print server Note This menu is available only when the printer is attached to an external print server through the USB port ENA Gateway yyy yyy yyy yyy Set the gateway information for an external print server Note This menu is available o...

Страница 154: ...te No authentication required is the factory default setting Device Initiated E mail None Use Device SMTP Credentials Specify what credentials will be used when communicating to the SMTP server Notes None is the factory default setting for Device Initiated E mail and User Initiated E mail Device Userid and Device password are used to log in to the SMTP server when Use Device SMTP Credentials is se...

Страница 155: ...Settings range from 1 900 seconds 30 seconds is the factory default setting Remote Login Timeout specifies how long a remote interface remains idle before automatically logging the user off Settings range from 1 120 minutes 10 minutes is the factory default setting Minimum PIN Length 1 16 Limit the digit length of the PIN Note 4 is the factory default setting Confidential Print menu Use To Max Inv...

Страница 156: ...in use by the file system All permanent data on the printer hard disk are preserved such as downloaded fonts macros and held jobs Note This menu appears only when a formatted working printer hard disk is installed Use To Wiping Mode Auto Specify the mode for disk wiping Automatic Method Single pass Multiple pass Mark all disk space used by a previous print job This method does not permit the file ...

Страница 157: ... to send logs to the remote syslog server 4 is the factory default setting If the security audit log is activated then the severity value of each event is recorded 4 is the factory default setting Set Date and Time menu Use To Current Date and Time View the current date and time settings for the printer Manually Set Date and Time input date time Enter the date and time Notes Manually setting the d...

Страница 158: ...age menu settings and device statistics reports Note Show estimates is the factory default setting Eco Mode Off Energy Energy Paper Paper Minimize the use of energy paper or specialty media Notes Off is the factory default setting This resets the printer to its factory default settings Energy minimizes the power used by the printer Performance may be affected but print quality is not Energy Paper ...

Страница 159: ...izard Notes Yes is the factory default setting After completing the setup wizard by selecting Done at the country or region selection screen the default becomes No Keyboard Keyboard Type English Francais Francais Canadien Deutsch Italiano Espanol Greek Dansk Norsk Nederlands Svenska Suomi Portuguese Russian Polski Swiss German Swiss French Korean Magyar Turkish Czech Simplified Chinese Traditional...

Страница 160: ...ers separated by a semicolon Note 9751 12000 is the factory default setting Displayed Information Left side Right side Custom Text x Specify what is displayed on the upper left and right corners of the home screen For the Left side and Right side options select from the following options None IP Address Hostname Contact Name Location Date Time mDNS DDNS Service Name Zero Configuration Name Custom ...

Страница 161: ...t setting for When to display Default is the factory default setting for Message to display Displayed Information continued Paper Jam Load Paper Service Errors Customize the displayed information for Paper Jam Load Paper and Service Errors Select from the following options Display Yes No Message to display Default Alternate Default text entry Alternate text entry Notes No is the factory default se...

Страница 162: ...obs by user Date Format MM DD YYYY DD MM YYYY YYYY MM DD Format the printer date Notes MM DD YYYY is the U S factory default setting DD MM YYYY is the international factory default setting Time Format 12 hour A M P M 24 hour clock Format the printer time Note 12 hour A M P M is the factory default setting Screen Brightness 20 100 Set the brightness of the printer display Note 100 is the factory de...

Страница 163: ...printer Note The contact name will be stored on the Embedded Web Server Location Specify the location of the printer Note The location will be stored on the Embedded Web Server Alarms Alarm Control Cartridge Alarm Set an alarm to sound when the printer requires user intervention When activated Alarm Control lets you set the number of times that the alarm sounds while Cartridge Alarm lets you stop ...

Страница 164: ...bled is the factory default setting for printers except in European Union countries and Switzerland 3 days is the factory default setting for Class B printers in European Union countries and Switzerland Hibernate Timeout on Connection Hibernate Do Not Hibernate Set the printer to hibernate mode even when there is an active Ethernet or fax connection Notes Do Not Hibernate is the factory default se...

Страница 165: ...emulation This has no effect on PCL emulation print jobs Timeouts Job Hold Timeout 5 255 Set the amount of time the printer waits for user intervention before it holds jobs that require unavailable resources and continues to print other jobs in the print queue Notes 30 is the factory default setting This menu item appears only when a printer hard disk is installed Error Recovery Auto Reboot Reboot...

Страница 166: ...ep Button Do nothing Sleep Hibernate Determine how the printer while in idle state reacts to a short press of the Sleep button Note Sleep is the factory default setting Press and Hold Sleep Button Do nothing Sleep Hibernate Determinehowtheprinter whileinidlestate reactstoa longpress of the Sleep button Note Do nothing is the factory default setting Factory Defaults Do Not Restore Restore Now Resto...

Страница 167: ...de and the copy will also have print on one side 1 sided to 2 sided The original document has print on one side while the copy will have print on both sides 2 sided to 1 sided The original document has print on both sides while the copy will have print on just one side 2 sided to 2 sided The original document has print on both sides and the copy will also have print on both sides Paper Saver Off 2...

Страница 168: ...is the factory default setting Transparency Separators On Off Place a sheet of paper between transparencies Note On is the factory default setting Separator Sheets Off Between Copies Between Jobs Between Pages Place a sheet of paper between pages copies or jobs Note Off is the factory default setting Separator Sheet Source Tray x Specify the separator sheet source Note Tray 1 is the factory defaul...

Страница 169: ...rs is allowed Allow priority copies On Off Allow interruption of a print job to copy a page or document Note On is the factory default setting Custom Job scanning On Off Scan a document that contains mixed paper sizes into a single copy job Notes Off is the factory default setting This menu item appears only when a formatted working printer hard disk is installed Allow Save as Shortcut On Off Save...

Страница 170: ...opy Note 3 is the factory default setting Sample Copy Off On Create a sample copy of the original document Note Off is the factory default setting Fax Settings menu Fax Mode Analog Fax Setup menu Analog Fax Setup mode sends the fax job through a telephone line Note The fax function is available only in select printer models Use To Fax Name Specify the name of the fax in the printer Fax Number Spec...

Страница 171: ... jobs Mostly receive specifies that most of the memory is set to receive fax jobs Cancel Faxes Allow Don t Allow Specify whether or not the printer cancels fax jobs Note Allow is the factory default setting Caller ID Off Primary Alternate Specify the type of caller ID being used Fax number masking Off From left From right Specify the direction from where digits are masked in an outgoing fax number...

Страница 172: ...tting for the Include to Field Include from Field Include Message Field Include Logo and Include Footer x options A maximum of 255 characters is allowed for the From option A maximum of 80 characters is allowed for the Footer x option Fax Send Settings menu items and their descriptions Use To Resolution Standard Fine 200 dpi Super Fine 300 dpi Specify quality in dots per inch dpi A higher resoluti...

Страница 173: ...he long edge of the page left edge for portrait and top edge for landscape Short edge assumes binding along the short edge of the page top edge for portrait and left edge for landscape Content Type Text Graphics Text Photo Photo Specify the content of the original document Note Text is the factory default setting Content Source Black White Laser Color Laser Inkjet Photo Film Magazine Newspaper Pre...

Страница 174: ...r driver to send fax jobs Note Yes is the factory default setting Allow Save as Shortcut On Off Save fax numbers as shortcuts in the printer Note On is the factory default setting Dial Mode Tone Pulse Specify the dialing sound either as a tone or as a pulse Note Tone is the factory default setting Max Speed 2400 4800 9600 14400 33600 Specify the maximum speed in baud at which faxes are sent Note 3...

Страница 175: ...er models Scan edge to edge Off On Specify if the original document is scanned edge to edge prior to faxing Note Off is the factory default setting Sharpness 1 5 Adjust the sharpness of a fax Note 3 is the factory default setting Temperature 4 to 4 Specify warm or cool outputs Cool values generate a bluer output than the default while warm values generate a redder output than the default Note 0 is...

Страница 176: ...include separator sheets for incoming fax jobs Note Off is the factory default setting Separator Sheet Source Tray x Manual Feeder Specify where the printer will pick the separator sheet Note Tray 1 is the factory default setting Fax Footer On Off Print the transmission information at the bottom of each page from a received fax Note Off is the factory default setting Max Speed 2400 4800 9600 14400...

Страница 177: ...eceive Error Log Print Never Print on Error Enable printing of a receive error log following a receive error Note Print Never is the factory default setting Auto Print Logs On Off Enable automatic printing of fax logs Notes On is the factory default setting Logs print after every 200 fax jobs Log Paper Source Tray x Manual Feeder Specify the source of the paper used for printing logs Note Tray 1 i...

Страница 178: ...se To All Rings Single Ring Only Double Ring Only Triple Ring Only Single or Double Rings Only Single or Triple Rings Only Double or Triple Rings Only Specify ring patterns when the printer is answering calls Note All Rings is the factory default setting E mail Settings menu Use To E mail Server Setup Subject Message File Name Specify e mail server information Notes You can enter up to 255 charact...

Страница 179: ...ory path Notes The characters are invalid entries for a path name You can enter up to 128 characters for Server Login Password Path and Web Link You can enter up to 53 characters for File Name Format PDF pdf Secure PDF TIFF tif JPEG jpg XPS xps Specify the format of the scanned file Note PDF pdf is the factory default setting PDF Version 1 2 1 6 A 1a Set the version of the PDF file that will be sc...

Страница 180: ...al Auto Size Sense Mixed Sizes A4 A5 A6 JIS B5 Custom Scan Size x Book Original Business Card 3 x 5 in 4 x 6 in Specify the paper size of the document being scanned Notes Letter is the U S factory default setting A4 is the international factory default setting Sides Duplex Off Long edge Short edge Specify the page orientation of text and graphics Notes Off is the factory default setting Long edge ...

Страница 181: ...ment is the factory default setting Use Multi Page Tiff On Off Provide a choice between single page TIFF files and multiple page TIFF files For a multiple page scan to e mail job either one TIFF file is created containing all the pages or multiple TIFF files are created with one file for each page of the job Notes On is the factory default setting This menu item applies to all scan functions Trans...

Страница 182: ...Negative Image Off On Create a negative image of the original document Note Off is the factory default setting Shadow Detail 4 to 4 Adjust the amount of shadow detail visible on a scanned image Note 0 is the factory default setting Fix Scan Skew Auto Off On Correct slight skew in the scanned image Notes Off is the factory default setting This menu item appears only in select printer models Scan ed...

Страница 183: ...ry default setting Content Source Black White Laser Color Laser Inkjet Photo Film Magazine Newspaper Press Other Specify how the original document was produced Note Black White Laser is the factory default setting Resolution 75 dpi 150 dpi 200 dpi 300 dpi 400 dpi 600 dpi Specify the quality of the scan in dots per inch dpi Note 150 dpi is the factory default setting Darkness 1 9 Lighten or darken ...

Страница 184: ...nd left edge for landscape JPEG Quality Best for content 5 90 Set the quality of a JPEG photo image in relation to the file size and quality of the image Notes Best for content is the factory default setting 5 reduces the file size but the quality of the image is lessened 90 provides the best image quality but the file size is very large This menu item applies to all scan functions Text Default 5 ...

Страница 185: ... a base file name Note You can enter up to 53 characters Custom Job Scanning On Off Copy a document that contains mixed paper sizes into a single scan job Note Off is the factory default setting Scan Preview On Off Specify whether a preview will appear on the display for scan jobs Notes Off is the factory default setting This menu item appears only when a formatted working printer hard disk is ins...

Страница 186: ...fault setting Temperature 4 to 4 Enable the user to specify warm or cool outputs Cool values generate a bluer output than the default while warm values generate a redder output than the default Note 0 is the factory default setting Flash Drive menu Scan Settings Use To Format PDF pdf Secure PDF TIFF tif JPEG jpg XPS xps Specify the format of the file to be sent through FTP Note PDF pdf is the fact...

Страница 187: ...rkness 1 9 Lighten or darken the output Note 5 is the factory default setting Orientation Portrait Landscape Specify the orientation of the scanned image Note Portrait is the factory default setting Original Size Letter Legal Executive Folio Statement Oficio Mexico Universal Auto Size Sense Mixed Sizes A4 A5 A6 JIS B5 Custom Scan Size x Book Original Business Card 3 x 5 in 4 x 6 in Specify the pap...

Страница 188: ... and quality Note 75 is the factory default setting Photo Default 5 90 Set the quality of a photo image in relation to file size and quality Note 50 is the factory default setting Use Multi Page TIFF On Off Provide a choice between single page TIFF files and multiple page TIFF files For a multiple page scan to FTP job either one TIFF file is created containing all the pages or multiple TIFF files ...

Страница 189: ... printer models Scan edge to edge Off On Specify whether the original document is scanned edge to edge Note Off is the factory default setting Sharpness 1 5 Adjust the amount of sharpness on a scanned image Note 3 is the factory default setting Temperature 4 to 4 Enable the user to specify warm or cool outputs Cool values generate a bluer output than the default while warm values generate a redder...

Страница 190: ... Border None Solid Print a border on each page image Note None is the factory default setting Paper Saver Ordering Horizontal Reverse Horizontal Reverse Vertical Vertical Specify the positioning of multiple page images Notes Horizontal is the factory default setting Positioning depends on the number of page images and whether they are in portrait or in landscape orientation Separator Sheets Off Be...

Страница 191: ...hen the missing information or options are obtained the stored jobs print Notes Off is the factory default setting This menu setting appears only when a formatted working printer hard disk is installed This requirement ensures that stored jobs are not deleted if the printer loses power Print Area Normal Whole Page Set the logical and physical printable area Notes Normal is the factory default sett...

Страница 192: ...nloads are deleted in order to process print jobs On retains the downloads during language changes and printer resets If the printer runs out of memory then Memory Full 38 appears and downloads are not deleted Print All Order Alphabetical Oldest First Newest First Specify the order in which held and confidential jobs are printed when Print All is selected Note Alphabetical is the factory default s...

Страница 193: ...s are inserted Notes Off is the factory default setting Between Copies inserts a blank sheet between each copy of a print job if Collate is set to 1 2 3 1 2 3 If Collate is set to 1 1 1 2 2 2 then a blank page is inserted between each set of printed pages such as after all page 1 s and after all page 2 s Between Jobs inserts a blank sheet between print jobs Between Pages inserts a blank sheet betw...

Страница 194: ...scape Paper Saver Border None Solid Print a border when using Paper Saver Note None is the factory default setting Quality menu Use To Print Resolution 300 dpi 600 dpi 1200 dpi 1200 Image Q 2400 Image Q Specify the printed output resolution in dots per inch Note 600 dpi is the factory default setting Pixel Boost Off Fonts Horizontally Vertically Both directions Isolated Enablemorepixelstoprintincl...

Страница 195: ...Adjust the contrast of printed objects Note 0 is the factory default setting Job Accounting menu Note This menu item appears only when a formatted non defective printer hard disk is installed Make sure the printer hard disk is not read write or write protected Use To Job Accounting Log Off On Determine and set if the printer creates a log of the print jobs it receives Note Off is the factory defau...

Страница 196: ...ter responds when disk usage reaches the maximum limit 100MB Note None is the factory default setting URL to Post Logs Determine and set where the printer posts job accounting logs E mail Address to Send Logs Specify the e mail address to which the device sends job accounting logs Log File Prefix Specify the prefix you want for the log file name Note The current host name defined in the TCP IP men...

Страница 197: ...eturn to the main Utilities menu for touch screen printer models When selected in non touch screen printer models Do Not Delete sets the printer to return to the originating screen after the deletion Activate Hex Trace Assist in isolating the source of a print job problem Notes When activated all data sent to the printer is printed in hexadecimal and character representation and control codes are ...

Страница 198: ...st not be set to 100 PCL Emul menu Use To Font Source Resident Download All Specify the set of fonts used in the Font Name menu Notes Resident is the factory default setting It shows the factory default set of fonts downloaded in the RAM Download shows all the fonts downloaded in the RAM All shows all fonts available to any option Font Name Courier 10 Identify a specific font and where it is store...

Страница 199: ...scape prints text and graphics parallel to the long edge of the page PCL Emulation Settings Lines per Page 1 255 Specify the number of lines that print on each page Notes 60 is the US factory default setting 64 is the international default setting The printer sets the amount of space between each line based on the Lines per Page Paper Size and Orientation settings Select the paper size and orienta...

Страница 200: ...ignores the Select Paper Feed command This option appears only when it is selected by the PCL 5e interpreter 0 199 allows a custom setting to be assigned Tray Renumber View Factory Defaults MPF Default 8 T1 Default 1 T2 Default 4 T3 Default 5 T4 Default 20 T5 Default 21 Env Default 6 MPaper Default 2 MEnv Default 3 Show the factory default setting assigned to each tray or feeder Tray Renumber Rest...

Страница 201: ...rs Zapf Chancery NewSansMTCS NewSansMTCT New SansMTJA NewSansMTKO Set the default font for HTML documents Note The Times font is used in HTML documents that do not specify a font Use To Font Size 1 255 pt Set the default font size for HTML documents Notes 12 pt is the factory default setting Font size can be increased in 1 point increments Scale 1 400 Scale the default font for HTML documents Note...

Страница 202: ...ht Width Fit Height Fit Width Scale the image to fit the selected paper size Notes Best Fit is the factory default setting When Auto Fit is set to On Scaling is automatically set to Best Fit Orientation Portrait Landscape Reverse Portrait Reverse Landscape Set the image orientation Note Portrait is the factory default setting Help menu The Help menu consists of a series of Help pages that are stor...

Страница 203: ...ddress book and about changing settings FTP Guide Provides information about scanning documents directly to an FTP server using an FTP address shortcut numbers or the address book and about changing settings Print Defects Guide Provides help in resolving repeating defects in copies or prints Information Guide Provides help in locating additional information Supplies Guide Provides part numbers for...

Страница 204: ...on on how you can quickly save paper and energy using one printer setting see Using Eco Mode on page 205 Using recycled paper As an environmentally conscious company Lexmark supports the use of recycled office paper produced specifically for use in laser LED printers For more information on recycled papers that work well with your printer see Using recycled paper and other office papers on page 72...

Страница 205: ...ce energy use especially when the printer is idle Printer engine motors do not start until it is ready to print You may notice a short delay before the first page is printed The printer enters Sleep mode after one minute of inactivity Energy Paper Use all the settings associated with Energy and Paper modes Plain Paper Enable the automatic two sided duplex feature Turn off print log features 3 Clic...

Страница 206: ...dded Web Server 1 Open a Web browser and then type the printer IP address in the address field Notes View the printer IP address on the printer home screen The IP address appears as four sets of numbers separated by periods such as 123 123 123 123 If you are using a proxy server then temporarily disable it to load the Web page correctly 2 Click Settings General Settings Timeouts 3 In the Sleep Mod...

Страница 207: ...lect Hibernate 4 Click Submit Using the printer control panel 1 From the home screen navigate to Settings General Settings 2 Touch Press Sleep Button or Press and Hold Sleep Button 3 Touch Hibernate Adjusting the brightness of the display To save energy or if you are have trouble reading your display adjust the brightness of the display Available settings range from 20 100 The factory default sett...

Страница 208: ...cling Lexmark packaging Lexmarkcontinuallystrivestominimizepackaging Lesspackaging helpstoensurethatLexmarkprintersaretransported in the most efficient and environmentally sensitive manner and that there is less packaging to dispose of These efficiencies result in fewer greenhouse emissions energy savings and natural resource savings Lexmark cartons are 100 recyclable where corrugated recycling fa...

Страница 209: ...ame with your printer or cartridge and use the prepaid shipping label You can also do the following 1 Go to www lexmark com recycle 2 From the Toner Cartridges section select your country or region 3 Follow the instructions on the computer screen Saving money and the environment 209 ...

Страница 210: ...ter is being moved to a different department or location The printer is being serviced by someone from outside your organization The printer is being removed from your premises for service The printer is being sold to another organization Disposing of a printer hard disk Note Some printer models may not have a printer hard disk installed In high security environments it may be necessary to take ad...

Страница 211: ...isk installed Configuring Disk Wiping in the printer menus lets you remove residual confidential material left byprint jobs by securely overwriting files that have been marked for deletion Using the printer control panel 1 Turn off the printer 2 Hold down 2 and 6 while turning the printer on Release the buttons only when the screen with the progress bar appears The printer performs a power on sequ...

Страница 212: ...ontents of the printer hard disk Disk encryption can take from several minutes to more than an hour during which the printer will be unavailable for other user tasks 4 Click Submit Using the printer control panel 1 Turn off the printer 2 Hold down 2 and 6 while turning the printer on Release the buttons only when the screen with the progress bar appears The printer performs a power on sequence and...

Страница 213: ...l data stored in the printer cannot be accessed by unauthorized persons For more information visit the Lexmark security Web page You can also see the Embedded Web Server Administrator s Guide for additional information 1 Go to http support lexmark com and then navigate to Software and Solutions Other Applications 2 Click the Manuals tab and then select the Embedded Web Server Administrator s Guide...

Страница 214: ...AUTION SHOCK HAZARD To avoid the risk of electrical shock when cleaning the exterior of the printer unplug the power cord from the electrical outlet and disconnect all cables from the printer before proceeding 2 Remove paper from the standard bin and multipurpose feeder 3 Remove any dust lint and pieces of paper around the printer using a soft brush or vacuum 4 Dampen a clean lint free cloth with ...

Страница 215: ... scanned images 1 Slightly dampen a soft lint free cloth or paper towel with water 2 Open the scanner cover 3 Clean all the areas shown and then let them dry 1 2 3 4 1 White underside of the scanner cover 2 Scanner glass 3 ADF glass 4 White underside of the ADF cover 4 Close the scanner cover Maintaining the printer 215 ...

Страница 216: ...mption Considerthevariablelevelofaccuracybeforepurchasingorreplacing suppliesbasedontheestimate Untilanadequateprint historyisobtainedontheprinter theestimatedcartridgeyieldis based on approximately 5 coverage per page Ordering supplies To order supplies in the U S contact Lexmark at 1 800 539 6275 for information about Lexmark authorized supplies dealers in your area In other countries or regions...

Страница 217: ...it 24B6040 Ordering a maintenance kit Notes Using certain types of paper may require more frequent replacement of the maintenance kit The separator roller fuser pick rollers transfer roller and redrive assembly are all included in the maintenance kit and can be individually ordered and replaced if necessary Contact your service representative to replace the maintenance kit Recommended maintenance ...

Страница 218: ...right side up in their original packing until you are ready to use them Do not expose supplies to Direct sunlight Temperatures above 35 C 95 F High humidity above 80 Salty air Corrosive gases Heavy dust Replacing supplies Replacing the toner cartridge 1 Press the button on the right side of the printer and then open the front door 2 1 Maintaining the printer 218 ...

Страница 219: ...he toner 5 Insert the toner cartridge into the printer by aligning the side rails of the cartridge with the arrows on the side rails inside the printer Warning Potential Damage Do not expose the imaging unit to direct light for more than 10 minutes Extended exposure to light may cause print quality problems 6 Close the front door Maintaining the printer 219 ...

Страница 220: ...ress the button on the right side of the printer and then open the front door 2 1 2 Pull the toner cartridge out using the handle 3 Lift the green handle and then pull the imaging unit out of the printer Maintaining the printer 220 ...

Страница 221: ... than 10 minutes Extended exposure to light may cause print quality problems Warning Potential Damage Do not touch the photoconductor drum Doing so may affect the print quality of future print jobs 6 Insert the imaging unit into the printer by aligning the arrows on the side rails of the imaging unit with the arrows on the side rails inside the printer Maintaining the printer 221 ...

Страница 222: ...moving the printer CAUTION POTENTIAL INJURY Before moving the printer follow these guidelines to avoid personal injury or printer damage Turn the printer off using the power switch and then unplug the power cord from the electrical outlet Disconnect all cords and cables from the printer before moving it If an optional tray is installed then remove it from the printer To remove the optional tray sl...

Страница 223: ...rinter warranty Moving the printer to another location The printer and its hardware options can be safely moved to another location by following these precautions Any cart used to move the printer must have a surface able to support the full footprint of the printer Any cart used to move the hardware options must have a surface able to support the dimensions of the hardware options Keep the printe...

Страница 224: ...nter control panel Setting up e mail alerts Configuretheprintertosendyoue mailalertswhen thesuppliesaregettingloworwhenthepaperneedstobechanged or added or when there is a paper jam 1 Open a Web browser and then type the printer IP address in the address field Notes View the printer IP address on the printer home screen The IP address appears as four sets of numbers separated by periods such as 12...

Страница 225: ... IP address on the printer home screen The IP address appears as four sets of numbers separated by periods such as 123 123 123 123 If you are using a proxy server then temporarily disable it to load the Web page correctly 2 Click Settings Print Settings Supply Notifications 3 From the drop down menu for each supply select one of the following notification options Notification Description Off The n...

Страница 226: ...m the Wipe All Settings option For more information see Erasing non volatile memory on page 211 Warning Potential Damage Restoring factory defaults returns most printer settings to the original factory default settings Exceptions include the display language custom sizes and messages and network port menu settings All downloads stored in the RAM are deleted Downloads stored in the flash memory or ...

Страница 227: ... jam Doing so could permanently damage the fuser Avoiding jams Load paper properly Make sure paper lies flat in the tray Correct loading of paper Incorrect loading of paper Do not remove a tray while the printer is printing Do not load a tray while the printer is printing Load it before printing or wait for a prompt to load it Do not load too much paper Make sure the stack height is below the maxi...

Страница 228: ...p bent or curled paper Flex fan and straighten paper before loading it Do not use paper that has been cut or trimmed by hand Do not mix paper sizes weights or types in the same tray Make sure the paper size and type are set correctly on the computer or printer control panel Store paper according to manufacturer recommendations Understanding jam messages and locations When a jam occurs a message in...

Страница 229: ...ndard bin x page jam clear standard bin 20y xx Remove the jammed paper 3 Front door x page jam open front door 20y xx Open the front door then remove the toner cartridge and imaging unit and then the jammed paper 4 Multipurpose feeder x page jam clear manual feeder 250 xx Remove all paper from the multipurpose feeder and then remove the jammed paper 5 Tray 1 x page jam remove tray 1 to clear duple...

Страница 230: ...the printer might be hot To reduce the risk of injury from a hot component allow the surface to cool before touching it 1 Press the button on the right side of the printer and then open the front door 2 1 2 Pull the toner cartridge out using the handle Clearing jams 230 ...

Страница 231: ...der the imaging unit Doing so may affect the quality of future print jobs 4 Place the imaging unit aside on a flat smooth surface Warning Potential Damage Do not expose the imaging unit to direct light for more than 10 minutes Extended exposure to light may cause print quality problems 5 Lift the green flap in front of the printer Clearing jams 231 ...

Страница 232: ...t by aligning the arrows on the side rails of the unit with the arrows on the side rails inside the printer and then insert the imaging unit into the printer 8 Insert the toner cartridge by aligning the side rails of the cartridge with the arrows on thesiderailsinside the printer and then insert the cartridge into the printer Clearing jams 232 ...

Страница 233: ...r 20y xx 1 Open the front door to loosen the jammed paper in the rear door 2 1 2 Gently pull down the rear door CAUTION HOT SURFACE The inside of the printer might be hot To reduce the risk of injury from a hot component allow the surface to cool before touching it 3 Firmly grasp the jammed paper on each side and then gently pull it out Note Make sure all paper fragments are removed Clearing jams ...

Страница 234: ...s select Next Clear the jam press OK x page jam clear standard bin 20y xx 1 Firmly grasp the jammed paper on each side and then gently pull it out Note Make sure all paper fragments are removed 2 From the printer control panel touch to clear the message and continue printing For non touch screen printer models select Next Clear the jam press OK Clearing jams 234 ...

Страница 235: ...k of injury from a hot component allow the surface to cool before touching it 1 Pull the tray completely out of the printer 2 Locate the blue lever and then pull it down to release the jam 3 Firmly grasp the jammed paper on each side and then gently pull it out Note Make sure all paper fragments are removed Clearing jams 235 ...

Страница 236: ...lect Next Clear the jam press OK x page jam open tray x 24y xx 1 Pull the tray completely out of the printer Note The message on the printer display indicates the tray where the jammed paper is located 2 Firmly grasp the jammed paper on each side and then gently pull it out Note Make sure all paper fragments are removed Clearing jams 236 ...

Страница 237: ...ar the jam press OK x page jam clear manual feeder 25y xx 1 From the multipurpose feeder firmly grasp the jammed paper on each side and then gently pull it out Note Make sure all paper fragments are removed 2 Flexthesheetsofpaperbackandforthtoloosenthem andthenfanthem Donotfoldorcreasethepaper Straighten the edges on a level surface Clearing jams 237 ...

Страница 238: ...ch screen printer models select Next Clear the jam press OK x page jam open automatic feeder top cover 28y xx 1 Remove all original documents from the ADF tray Note The message is cleared when the pages are removed from the ADF tray 2 Open the ADF cover 3 Firmly grasp the jammed paper on each side and then gently pull it out Note Make sure all paper fragments are removed 4 Close the ADF cover Clea...

Страница 239: ... then load the original documents into the ADF and then adjust the paper guide 6 From the printer control panel touch to clear the message and continue printing For non touch screen printer models select Next Clear the jam press OK Clearing jams 239 ...

Страница 240: ...n the printer control panel to clear the message and continue printing For non touch screen printer models press to confirm Change paper source to custom string load paper orientation Try one or more of the following Load the correct size and type of paper in the tray then verify that the paper size and type settings are specified in thePapermenuontheprintercontrolpanel andthenselectFinishedchangi...

Страница 241: ...an from automatic feeder to continue scanning from the ADF immediately after the last successful scan job Select Scan from flatbed to continue scanning from the scanner glass immediately after the last successful scan job Select Finish job without further scanning to end the last successful scan job Note This does not cancel the scan job All successfully scanned pages will be processed further for...

Страница 242: ...ntrol panel select Continue to ignore the message and continue printing For non touch screen printer models press to confirm Cancel the current print job Disk must be formatted for use in this device From the printer control panel select Format disk to format the printer hard disk and clear the message For non touch screen printer models press to confirm Note Formatting deletes all the files store...

Страница 243: ... printer control panel select Continue to clear the message For non touch screen printer models press to confirm Complete the Analog Fax Setup If the message appears again after completing the setup then contact your system support person Fax Station Number not set up Contact system administrator Try either of the following From the printer control panel select Continue to clear the message For no...

Страница 244: ...Paper menu on the printer control panel Make sure that the paper size is correctly set For example if MP Feeder Size is set to Universal then make sure the paper is large enough for the data being printed Cancel the print job Insufficient memory for Flash Memory Defragment operation 37 Try one or more of the following From the printer control panel select Continue to stop the defragmentation and c...

Страница 245: ...is selected then the printer automatically overrides the request and then prints from an automatically selected tray Cancel the current job Load manual feeder with custom type name paper orientation Try one or more of the following Load the multipurpose feeder with the correct size and type of paper Depending on your printer model touch Continue or press to clear the message and continue printing ...

Страница 246: ...paper source Cancel the current job Load paper source with custom type name paper orientation Try one or more of the following Load the tray or feeder with the correct size and type of paper To use the tray that has the correct size or type of paper select Finished loading paper on the printer control panel For non touch screen printer models press to confirm Note If the printer finds a tray that ...

Страница 247: ... Maintenance kit nearly low 80 xy For more information contact customer support at http support lexmark com or your service representative If necessary select Continue to clear the message and continue printing For non touch screen printer models press to confirm Maintenance kit very low x estimated pages remain 80 xy You may need to replace the maintenance kit very soon For more information conta...

Страница 248: ...Lexmark supplies and parts Use of third party supplies or parts may affect the performance reliability or life of the printer and its imaging components All life indicators are designed to function with Lexmark supplies and parts and may deliver unpredictable results if third party supplies or parts are used Imaging component usage beyond the intended life may damage your Lexmark printer or associ...

Страница 249: ...g the cartridge see the Replacing supplies section of the User s Guide If the toner cartridge is installed then remove the unresponsive toner cartridge and then reinstall it Note If the message appears after reinstalling the supply then the cartridge is defective Replace the toner cartridge Reinstall missing or unresponsive imaging unit 31 xy Try one or more of the following Check if the imaging u...

Страница 250: ...ntinue printing For more information see the instruction sheet that came with the supply or see the Replacing supplies section of the User s Guide Note If you do not have a replacement cartridge then see the Ordering supplies section of the User s Guide or visit www lexmark com Replace cartridge printer region mismatch 42 xy Install a toner cartridge that matches the region number of the printer x...

Страница 251: ...eder to continue scanning from the ADF immediately after the last successful scan job For non touch screen printer models press to confirm Select Scan from flatbed to continue scanning from the scanner immediately after the last successful scan job For non touch screen printer models press to confirm Select Finish job without further scanning to end the last successful scan job For non touch scree...

Страница 252: ...do not want any print jobs to be restored For non touch screen printer models press to confirm Scanner automatic feeder cover open Close the ADF cover Scanner disabled by admin 840 01 Print without the scanner or contact your system support person Scanner disabled Contact system administrator if problem persists 840 02 From the printer control panel try one or more of the following Select Continue...

Страница 253: ...rt person Some held jobs were not restored From the printer control panel select Continue to delete the specified job For non touch screen printer models press to confirm Note Held jobs that are not restored stay in the printer hard disk and are inaccessible Standard network software error 54 Try one or more of the following From the printer control panel select Continue to continue printing For n...

Страница 254: ...al outlet 5 Turn the printer back on Unformatted flash detected 53 Try one or more of the following From the printer control select Continue to stop the defragmentation and continue printing For non touch screen printer models press to confirm Format the flash memory Note If the error message remains then the flash memory may be defective and need to be replaced Weblink server not set up Contact s...

Страница 255: ...ipment work Unplug the other electrical equipment and then turn on the printer If the printer does not work then reconnect the other electrical equipment Go to step 5 Step 5 Check if the cables connecting the printer and the computer are inserted in the correct ports Are the cables inserted in the correct ports Go to step 6 Makesuretomatchthe following The USB symbol on the cable with the USB symb...

Страница 256: ...e printer Step 10 Check if you have selected the correct port settings in the printer driver Are the port settings correct Go to step 11 Use correct printer driver settings Step 11 Check the installed printer driver Is the correct printer driver installed Go to step 12 Install the correct printer driver Step 12 Turn off the printer then wait for about 10 seconds and then turn the printer back on I...

Страница 257: ... if the internal option is listed in the Installed Features list Is the internal option listed in the menu settings page Go to step 4 Reinstall the internal option Step 4 a Check if the internal option is selected It may be necessary to manually add the internal option in the printer driver to make it available for print jobs For more information see Updating available options in the printer drive...

Страница 258: ... the paper size indicators on the tray If you are printing on custom size paper then make sure that the paper guides rest against the edges of the paper Make sure the paper is below the maximum paper fill indicator Make sure paper lies flat in the tray b Check if the tray closes properly Is the tray working The problem is solved Go to step 2 Step 2 a Turn off the printer then wait about 10 seconds...

Страница 259: ...ore information see Installing an Internal Solutions Port on page 32 b Print a menu settings page and then check if the USB or parallel interface card is listed in the Installed Options list Is the USB or parallel interface card listed in the Installed Options list Go to step 2 Check if you have a supported USB or parallel interface card Note A USB or parallel interface card from another printer m...

Страница 260: ... to step 2 The problem is solved Step 2 a Load paper from a fresh package Note Paper absorbs moisture due to high humidity Store paper in its original wrapper until you use it b Resend the print job Do paper jams still occur frequently Go to step 3 The problem is solved Step 3 a Review the tips on avoidingjams For more information see Avoiding jams on page 227 b Follow the recommendations and then...

Страница 261: ...Printing problems Multiple language PDF files do not print Action Yes No Step 1 a Check ifthe printoptions for thePDFoutputareset to embed all fonts For more information see the documentation that came with Adobe Acrobat b Generate a new PDF file and then resend the print job Do the files print The problem is solved Go to step 2 Step 2 a Open the document you want to print in Adobe Acrobat b Click...

Страница 262: ...play b Clear the message Does the error message still appear Go to step 4 The problem is solved Step 4 Check if the flash drive is supported For more information on tested and approved USB flash drives see Supported flash drives and file types on page 80 Does the error message still appear Go to step 5 The problem is solved Step 5 Check if the USB port is disabled by the system support person Does...

Страница 263: ...ly connected to the computer and the printer Note For more information see the setup documentation that came with the printer b Resend the print job Do the jobs print The problem is solved Go to step 5 Step 5 a Turn off the printer then wait for about 10 seconds and then turn the printer back on b Resend the print job Do the jobs print The problem is solved Go to step 6 Step 6 a Remove and then re...

Страница 264: ...ting error or invalid data Delete the print job and then send it again For PDF files generate a new PDF and then print it again If you are printing from the Internet then the printer may be reading multiple job titles as duplicates and deleting all jobs except the first one For Windows users a Open the Print Properties folder b FromthePrintandHolddialog selectthe Keepduplicatedocuments check box c...

Страница 265: ...is solved Go to step 3 Step 3 a Remove held jobs stored in the printer memory b Resend the print job Did the job print The problem is solved Go to step 4 Step 4 a Disable the Page Protect feature From the printer control panel navigate to Settings General Settings Print Recovery Page Protect Off b Resend the print job Did the job print The problem is solved Go to step 5 Step 5 a Check if the cable...

Страница 266: ... the print job Does the print speed increase The problem is solved Contact customer support Job prints from the wrong tray or on the wrong paper Action Yes No Step 1 a Check if you are printing on paper that is supported by the tray b Resend the print job Did the job print from the correct tray or on the correct paper The problem is solved Go to step 2 Step 2 a From the Paper menu on the printer c...

Страница 267: ...k or Network x and then set SmartSwitch to On b Resend the print job Do incorrect characters print Contact customer support The problem is solved Tray linking does not work Notes The trays can detect paper length The multipurpose feeder does not automatically detect the paper size You must set the size from the Paper Size Type menu Action Yes No Step 1 a Open the trays and then check if they conta...

Страница 268: ...2 3 Note Setting Collate to 1 1 1 2 2 2 in the software overrides the setting in the Finishing menu b Resend the print job Did the job print and collate correctly The problem is solved Go to step 3 Step 3 Reduce the complexity of the print job by eliminating the number and size of fonts the number and complexity of images and the number of pages in the job Did the job print and collate correctly T...

Страница 269: ...to use For more information contact your system support person c Resend the print job Do prints still contain characters that have jagged or uneven edges Go to step 2 The problem is solved Step 2 a Use a font that is supported by the printer or install the font that you want to use on your computer For more information contact your system support person b Resend the print job Do prints still conta...

Страница 270: ...em is solved Step 2 a Redistribute the toner in the imaging unit 1 Remove the toner cartridge and then the imaging unit 2 Firmly shake the imaging unit Warning Potential Damage Do not expose the imaging unit to direct light for more than 10 minutes Extended exposure to light may cause print quality problems 3 Reinstall the imaging unit and then the cartridge b Resend the print job Is the printer s...

Страница 271: ... size specified in the tray settings Step 3 a Depending on your operating system specify the paper size from Printing Preferences or from the Print dialog b Resend the print job Is the page or image clipped Go to step 4 The problem is solved Step 4 a Reinstall the imaging unit 1 Remove the toner cartridge 2 Remove the imaging unit Warning Potential Damage Do not expose the imaging unit to direct l...

Страница 272: ...dge Trailing edge Action Yes No Step 1 Load paper with the correct paper type and weight in the tray Is paper with the correct paper type and weight loaded in the tray Go to step 2 Load paper with the correct paper type and weight in the tray Step 2 From the printer control panel set the paper type and weight in the Paper menu to match the paper loaded in the tray Is the tray set to the type and w...

Страница 273: ...ear from the prints The problem is solved Go to step 2 Step 2 Adjust the toner darkness to a lighter setting a From the Quality Menu select a lower value to reduce toner density 4 is the factory default setting IfPrintModeissetto Black Only thenasettingof5increasestoner density and darkness for all print jobs b Resend the print job Did the background disappear from the prints The problem is solved...

Страница 274: ...he margins correct The problem is solved Go to step 2 Step 2 From the printer control panel set the paper size in the Paper menu to match the paper loaded in the tray Does the paper size match the paper loaded in the tray Go to step 3 Do one or more of the following Specify the paper size from the tray settings to match the paper loaded in the tray Change the paper loaded in the tray to match the ...

Страница 275: ...tch the paper loaded in the tray Step 3 a Depending on your operating system specify the paper type and weight from Printing Preferences or from the Print dialog b Resend the print job Is the paper still curled Go to step 4 The problem is solved Step 4 a Remove the paper from the tray and then turn it over b Resend the print job Is the paper still curled Go to step 5 The problem is solved Step 5 a...

Страница 276: ...Preferences or from the Print dialog b Resend the print job Do print irregularities still appear Go to step 4 The problem is solved Step 4 Check if the paper loaded in the tray has texture or rough finishes Are you printing on textured or rough paper From the printer control panel set the paper texture in the Paper menu to match the paper loaded in the tray Go to step 5 Step 5 a Load paper from a ...

Страница 277: ...ance and then contact customer support at http support le xmark com or your service representative Step 2 Replace the imaging unit and then resend the print job Do the repeating defects still appear Contact customer support at http support lexma rk com or your service representative The problem is solved Print is too dark Action Yes No Step 1 a From the Quality menu on the printer control panel re...

Страница 278: ...ht from Printing Preferences or from the Print dialog b Resend the print job Is the print still too dark Go to step 4 The problem is solved Step 4 Check if the paper loaded in the tray has texture or rough finishes Are you printing on textured or rough paper From the printer control panel change the texture settings in the Paper Texture menu to match the paper you are printing on Go to step 5 Step...

Страница 279: ...tray Step 3 a Depending on your operating system specify the paper type texture and weight from Printing Preferences or from the Print dialog b Resend the print job Is the print still too light Go to step 4 The problem is solved Step 4 Make sure that the paper has no texture or rough finishes Are you printing on textured or rough paper From the printer control panel change the texture settings in ...

Страница 280: ...ght Go to step 7 The problem is solved Step 7 Replace the imaging unit and then resend the print job Is the print still too light Contact customer support The problem is solved Skewed print ABCDE ABCDE ABCDE Action Yes No Step 1 a Move the width and length guides in the tray to the correct positions for the size of the paper loaded b Resend the print job Is the print still skewed Go to step 2 The ...

Страница 281: ...p 2 The problem is solved Step 2 Replace the imaging unit and then resend the print job Is the printer printing solid black pages Contact customer support The problem is solved Transparency print quality is poor Action Yes No Step 1 From the printer control panel set the paper type in the Paper menu to match the paper loaded in the tray Is the paper type for the tray set to Transparency Go to step...

Страница 282: ... from a fresh package Note Paper absorbs moisture due to high humidity Store paper in its original wrapper until you use it b Resend the print job Do streaked horizontal lines appear on prints Go to step 4 The problem is solved Step 4 a Reinstall the imaging unit 1 Remove the toner cartridge and then the imaging unit Warning Potential Damage Do not expose the imaging unit to direct light for more ...

Страница 283: ...the tray settings to match the paper loaded in the tray Change the paper loaded in the tray to match the paper texture type and weight specified in the tray settings Step 3 a Load paper from a fresh package Note Paper absorbs moisture due to high humidity Store paper in its original wrapper until you use it b Resend the print job Do streaked vertical lines appear on prints Go to step 4 The problem...

Страница 284: ...mmended type of paper b Resend the print job Do horizontal voids appear on prints Go to step 3 The problem is solved Step 3 a Redistribute the toner in the imaging unit 1 Remove the toner cartridge and then the imaging unit 2 Firmly shake the imaging unit Warning Potential Damage Do not expose the imaging unit to direct light for more than 10 minutes Extended exposure to light may cause print qual...

Страница 285: ...y or feeder with a recommended type of paper b Resend the print job Do vertical voids appear on prints Go to step 4 The problem is solved Step 4 a Redistribute the toner in the imaging unit 1 Remove the toner cartridge and then the imaging unit 2 Firmly shake the imaging unit Warning Potential Damage Do not expose the imaging unit to direct light for more than 10 minutes Extended exposure to light...

Страница 286: ... Yes No Step 1 Reinstall the imaging unit a Remove and then install the imaging unit b Resend the print job Does fog or shading appear on prints Go to step 2 The problem is solved Step 2 Replace the imaging unit and then resend the print job Does fog or shading appear on prints Contact customer support at http support lexmar k com or your service representative The problem is solved Toner rubs off...

Страница 287: ...texture or rough finishes Are you printing on textured or rough paper From the Paper menu on the printer control panel set the paper texture Contact customer support Uneven print density Action Yes No Replace the imaging unit and then resend the print job Is the print density uneven Contact customer support The problem is solved Solving copy problems Copier does not respond on page 288 Scanner uni...

Страница 288: ...g Self Test and Ready appear The problem is solved Contact customer support Scanner unit does not close Action Yes No Check if there are no obstructions between the scanner unit and the printer a Lift the scanner unit b Remove any obstruction that keeps the scanner unit open c Lower the scanner unit Did the scanner unit close properly The problem is solved Contact customer support Poor copy qualit...

Страница 289: ...e the document or photo facedown on the scanner glass in the upper left corner Step 6 Check the copy settings From the Copy screen check if the Content Type and Content Source settings are correct for the document being scanned Are the Content Type and Content Source settings correct for the document being scanned Go to step 7 Change the Content Type and Content Source settings to match the docume...

Страница 290: ...e setting matches the size of the paper loaded in the tray From the Paper menu on the printer control panel check the Paper Size setting Does the paper size setting match the size of the paper loaded in the tray Go to step 3 Change the paper size setting to match the paper loaded in the tray or load the tray with paper that matches the paper size setting Step 3 a Specify the paper size Depending o...

Страница 291: ...and E mail and then touch Next Are fax and e mail functions set up The problem is solved Contact customer support Caller ID is not shown Action Yes No Contact your telephone company to check if your telephone line is subscribed to the caller ID service Notes If your region supports multiple caller ID patterns then you may have to change the default setting There are two settings available FSK patt...

Страница 292: ...es Ready appear on the display Go to step 4 Turn on the printer and then wait until Ready appears on the display Step 4 Check the printer connections If applicable check if the cable connections for the following equipment are secure Telephone Handset Answering machine Are the cable connections secure Go to step 5 Securely connect the cables Step 5 a Check the telephone wall jack 1 Plug the teleph...

Страница 293: ...alog phone service or the correct digital connector Go to step 7 Connect the printer to an analog phone service or the correct digital connector Step 7 Check for a dial tone Did you hear a dial tone Go to step 8 Try calling the fax number to make sure that it is working properly If the telephone lineisbeing used by another device then wait until the other device is finished before sending a fax If...

Страница 294: ...n Yes No Step 1 Check the tray or feeder If empty then load paper in the tray or feeder Can you receive faxes The problem is solved Go to step 2 Step 2 Check the ring count delay settings a Open a Web browser and then type the printer IP address in the address field Notes View the printer IP address on the printer home screen The IP address appears as four sets of numbers separated by periods such...

Страница 295: ...faxes The problem is solved Go to step 2 Step 2 Load the original document properly Load the original document faceup short edge first into the ADF tray or facedown on the scanner glass in the upper left corner Note Do not load postcards photos small items transparencies photo paper or thin media such as magazine clippings into the ADF tray Place these items on the scanner glass Can you send faxes...

Страница 296: ...are using a proxy server then temporarily disable it to load the Web page correctly Print a network setup page or menu settings page and then locate the IP address in the TCP IP section b Click Settings Fax Settings Analog Fax Setup c In the Max Speed menu click one of the following 2400 4800 9600 14400 33600 d Click Submit and then resend the fax Is the fax print quality satisfactory The problem ...

Страница 297: ... the printer display Clear the error message Go to step 3 Step 3 Check the cable connections between the printer and the print server to make sure they are secure For more information see the setup documentation that came with the printer Are the cable connections between the printer and the print server secure Contact customer support Tighten the cable connections Partial document or photo scans ...

Страница 298: ... Go to step 5 Place the document or photo facedown on the scanner glass in the upper left corner Step 5 Send a print job and then check for print quality problems From the General Settings menu adjust the Eco Mode settings From the Copy menu adjust the Darkness setting When the print becomes faded replace the toner cartridge Is the print quality satisfactory Go to step 6 See Print quality problems...

Страница 299: ...selected in the destination configuration settings Is the Append time stamp or Overwrite existing file check box selected in the destination configuration settings Contact customer support SelecttheAppendtime stamp or Overwrite existing file check box in the destination configuration settings Scanner unit does not close Action Yes No Check if there are obstructions in the scanner unit a Lift the s...

Страница 300: ...Is the power cord plugged into the printer and a properly grounded electrical outlet Go to step 4 Connect the power cord to the printer and a properly grounded electrical outlet Step 4 Check if the electrical outlet is turned off by a switch or breaker Is the electrical outlet turned off by a switch or breaker Turn on the switch or reset the breaker Go to step 5 Step 5 Check if the printer is plug...

Страница 301: ...ettings pages and then locate the IP address in the TCP IP section Note An IP address appears as four sets of numbers separated by periods such as 123 123 123 123 b Click Settings Apps Apps Management System tab Log c From the Filter menu select an application status d From the Application menu select an application and then click Submit Does an error message appear in the log Go to step 2 Contact...

Страница 302: ...us is Connected Note If the status is Not Connected then the connection may be intermittent or the network cable may be defective Contact your system support person for a solution and then print another network setup page c Open a Web browser and then type the printer IP address d Press Enter Does the Embedded Web Server open The problem is solved Go to step 4 Step 4 Check if the cable connections...

Страница 303: ...brary of manuals support documentation drivers and other downloads to help you solve common problems E mail You can send an e mail to the Lexmark team describing your problem A service representative will respond and provide you with information to solve your problem Live chat You can chat directly with a service representative They can work with you to solve your printer problem or provide assist...

Страница 304: ...ence to a product program or service is not intended to state or imply that only that product program or service may be used Any functionally equivalent product program or service that does not infringe any existing intellectual property right may be used instead Evaluation and verification of operation in conjunction with other products programs or services except those expressly designated by th...

Страница 305: ...notype Corporation plc Antique Olive Monsieur Marcel OLIVE Apple Chancery Apple Computer Inc Arial The Monotype Corporation plc CG Times Based on Times New Roman under license from The Monotype Corporation plc is a product of Agfa Corporation Chicago Apple Computer Inc Clarendon Linotype Hell AG and or its subsidiaries Eurostile Nebiolo Geneva Apple Computer Inc GillSans The Monotype Corporation p...

Страница 306: ...ence by one or more of the following measures Reorient or relocate the receiving antenna Increase the separation between the equipment and receiver Connect the equipment into an outlet on a circuit different from that to which the receiver is connected Consult your point of purchase or service representative for additional suggestions The manufacturer is not responsible for radio or television int...

Страница 307: ...tronic products in countries of the European Union We encourage the recycling of our products If you have further questions about recycling options visit the Lexmark Web site at www lexmark com for your local sales office phone number Product disposal Do not dispose of the printer or supplies in the same manner as normal household waste Consult your local authorities for disposal and recycling opt...

Страница 308: ...ng wanneer cartridges worden verwijderd en een vergrendeling wordt genegeerd Voorkom blootstelling aan de laser DANGER Rayonnements laser invisibles lors du retrait des cartouches et du déverrouillage des loquets Eviter toute exposition au rayon laser VAARA Näkymätöntä lasersäteilyä on varottava kun värikasetit on poistettu ja lukitus on auki Vältä lasersäteelle altistumista GEFAHR Unsichtbare Las...

Страница 309: ...ct to change See www lexmark com for current values Sleep Mode This product is designed with an energy saving mode called Sleep Mode The Sleep Mode saves energy by lowering power consumption during extended periods of inactivity The Sleep Mode is automatically engaged after this product is not used for a specified period of time called the Sleep Mode Timeout Factory default Sleep Mode Timeout for ...

Страница 310: ...ndard ICES 003 Avis de conformité aux normes de l industrie du Canada Cet appareil numérique de classe B est conforme aux exigences de la norme canadienne relative aux équipements pouvant causer des interférences NMB 003 Licensing notices All licensing notices associated with this product can be viewed from the root directory of the documentation CD European Community EC directives conformity This...

Страница 311: ...red If advance notice is not practical the telephone company will notify the customer as soon as possible You will also be advised of your right to file a complaint with the FCC The telephone company may make changes in its facilities equipment operations or procedures that could affect the operation of this equipment If this happens the telephone company will provide advance notice in order for y...

Страница 312: ... electrical surges This equipment uses CA11A telephone jacks Avis réservé aux utilisateurs du réseau téléphonique du Canada Ce produit est conforme aux spécifications techniques d Industrie Canada Lenuméro REN ringer equivalence number numéro d équivalence de sonnerie fournit une indication du nombre maximum de terminaux pouvant être connectés à l interface téléphonique En bout de ligne le nombre ...

Страница 313: ...ilisation de ce produit en Suisse Cet appareil nécessite l utilisation d un filtre de tonalité de facturation suisse nº de référence Lexmark 80D1877 devant être installé sur toute ligne recevant des impulsions de comptage en Suisse Ce filtre doit être utilisé pour toute installation car ces impulsions existent sur toutes les lignes téléphoniques suisses Verwendung dieses Produkts in der Schweiz Fü...

Страница 314: ...exposurelimitsoftheFCCandotherregulatory agencies A minimum separation of 20 cm 8 inches must be maintained between the antenna and any persons for this device to satisfy the RF exposure requirements of the FCC and other regulatory agencies Notice to users in Brazil Este equipamento opera em carater secundario isto e nao tem direito a protecao contra interferencia prejudicial mesmo de estacoes do ...

Страница 315: ...ervice faisant l objet d une licence cet appareil doit être utilisé à l intérieur et loin des fenêtres afin de garantir une protection optimale Si le matériel ou son antenne d émission est installé à l extérieur il doit faire l objet d une licence L installateur de cet équipement radio doit veiller à ce que l antenne soit implantée et dirigée de manière à n émettre aucun champ HF dépassant les lim...

Страница 316: ...West New Circle Road Lexington KY 40550 USA The authorized representative is Lexmark International Technology Hungária Kft 8 Lechner Ödön fasor Millennium Tower III 1095 Budapest HUNGARY A declaration of conformity to the requirements of the Directives is available upon request from the Authorized Representative This product may be used in the countries indicated in the table below AT BE BG CH CY ...

Страница 317: ...us ir kitas 1999 5 EB direktyvos nuostatas Malti Bil preżenti Lexmark International Inc jiddikjara li dan il prodott huwa konformi mal ħtiġijiet essenzjali u ma dispożizzjonijiet oħrajn relevanti li jinsabu fid Direttiva 1999 5 KE Nederlands HierbijverklaartLexmarkInternational Inc dathettoestelditproductinovereenstemmingismetdeessentiële eisen en de andere relevante bepalingen van richtlijn 1999 ...

Страница 318: ... Maintenance message for such item To obtain warranty service you may be required to present proof of original purchase You may be required to deliver your product to the Remarketer or Lexmark or ship it prepaid and suitably packaged to a Lexmark designated location You are responsible for loss of or damage to a product in transit to the Remarketer or the Lexmark designated location When warranty ...

Страница 319: ...T TO CHANGE AT ANY TIME WITHOUT NOTICE Limitation of liability Your sole remedy under this limited warranty is set forth in this document For any claim concerning performance or nonperformance of Lexmark or a Remarketer for this product under this limited warranty you may recover actual damages up to the limit set forth in the following paragraph Lexmark s liability for actual damages from any cau...

Страница 320: ...rp atthe IETFfor AdditionoftheCamelliaCipherSuitestoTransportLayerSecurity TLS implemented in the product or service The use of certain patents in this product or service is subject to the reasonable non discriminatory terms in the Intellectual Property Rights IPR Disclosure of Certicom Corp at the IETF for AES CCM ECC Cipher Suites for TLS implemented in the product or service The use of this pro...

Страница 321: ... 101 cannot open Embedded Web Server 301 Card Copy setting up 21 card stock loading multipurpose feeder 62 tips 70 Cartridge low 88 xy 240 Cartridge nearly low 88 xy 240 Cartridge very low x estimated pages remain 88 xy 240 Change paper source to custom string load paper orientation 240 Change paper source to custom type name load orientation 240 Change paper source to paper size load orientation ...

Страница 322: ...serting a header or footer 92 multiple pages on one sheet 91 on both sides of the paper duplexing 89 on letterhead 87 on transparencies 86 photos 86 placing separator sheets between copies 91 quick copy 85 reducing 89 selecting a tray 87 to a different size 87 using the ADF 85 using the scanner glass 86 copying different paper sizes 88 copying multiple pages on one sheet 91 copying on both sides o...

Страница 323: ...ed Web Server 24 exterior of the printer cleaning 214 e mail canceling 101 e mail alerts low supply levels 224 paper jam 224 setting up 224 e mail function setting up 97 e mail options advanced imaging 103 custom job 103 darkness 102 edge erase 103 message 101 original size 101 page setup 103 recipient s 101 resolution 102 Save As Shortcut 101 send as 102 subject 101 transmission log 103 e mail sc...

Страница 324: ...ter control panel 128 FTP options 132 FTP address scanning to using a shortcut number 129 using the printer control panel 129 FTP options FTP address 132 FTP Settings menu 183 G General Settings menu 158 green settings Eco Mode 205 Hibernate Mode 207 Quiet Mode 205 H header inserting 92 header footer copy options 95 held jobs 81 printing from a Macintosh computer 82 printing from Windows 82 Help m...

Страница 325: ...multipurpose feeder 62 trays 57 loading the optional tray 57 loading the standard tray 57 M maintenance kit ordering 217 Maintenance kit low 80 xy 247 Maintenance kit nearly low 80 xy 247 Maintenance kit very low x estimated pages remain 80 xy 247 making copies using paper from selected tray 87 memory types installed on printer 210 memory card 26 installing 28 Memory full 38 247 Memory full cannot...

Страница 326: ...nted forms 72 recycled 72 saving 91 selecting 72 storing 74 unacceptable 72 Universal size setting 57 using recycled 204 paper feed troubleshooting message remains after jam is cleared 260 paper jams avoiding 227 paper jams clearing in automatic document feeder top cover 238 in duplex area 235 in front door 230 in manual feeder 237 in rear door 233 in standard bin 234 in tray x 236 paper labels lo...

Страница 327: ...m clear manual feeder 25y xx 237 x page jam clear standard bin 20y xx 234 x page jam open automatic feeder top cover 28y xx 238 x page jam open front door 20y xx 230 x page jam open rear door 20y xx 233 x page jam open tray x 24y xx 236 Cartridge low 88 xy 240 Cartridge nearly low 88 xy 240 Cartridge very low x estimated pages remain 88 xy 240 Change paper source to custom string load paper orient...

Страница 328: ...problem persists 840 02 252 Scanner jam remove all originals from the scanner 2yy xx 252 Scanner jam remove jammed originals from the scanner 2yy xx 252 Serial option x error 54 253 SMTP server not set up Contact system administrator 253 254 Some held jobs were not restored 253 Standard network software error 54 253 Standard USB port disabled 56 253 Supply needed to complete job 254 Too many flash...

Страница 329: ...rce 133 content type 133 Scan to Computer setting up 131 Scan to Network setting up 23 using 127 scan troubleshooting cannot scan from a computer 297 partial document or photo scans 297 scan job was not successful 299 scanner unit does not close 288 299 scanning takes too long or freezes the computer 299 scanner automatic document feeder ADF 13 functions 12 scanner glass 13 Scanner automatic feede...

Страница 330: ...ubject and message information adding to e mail 100 submit button printer control panel 14 Substitute Size menu 139 supplies checking status 216 checking from printer control panel 216 checking using the Embedded Web Server 216 conserving 204 storing 218 using genuine Lexmark 216 using recycled paper 204 supplies ordering ADF separator roller 217 imaging unit 217 maintenance kit 217 toner cartridg...

Страница 331: ... density 287 white streaks on a page 285 troubleshooting printer options internal option is not detected 257 Internal Solutions Port 257 tray problems 258 USB parallel interface card 259 troubleshooting printing printing slows down 266 troubleshooting scan cannot scan from a computer 297 partial document or photo scans 297 scan job was not successful 299 scanner unit does not close 288 299 scannin...

Отзывы: