Temperature information
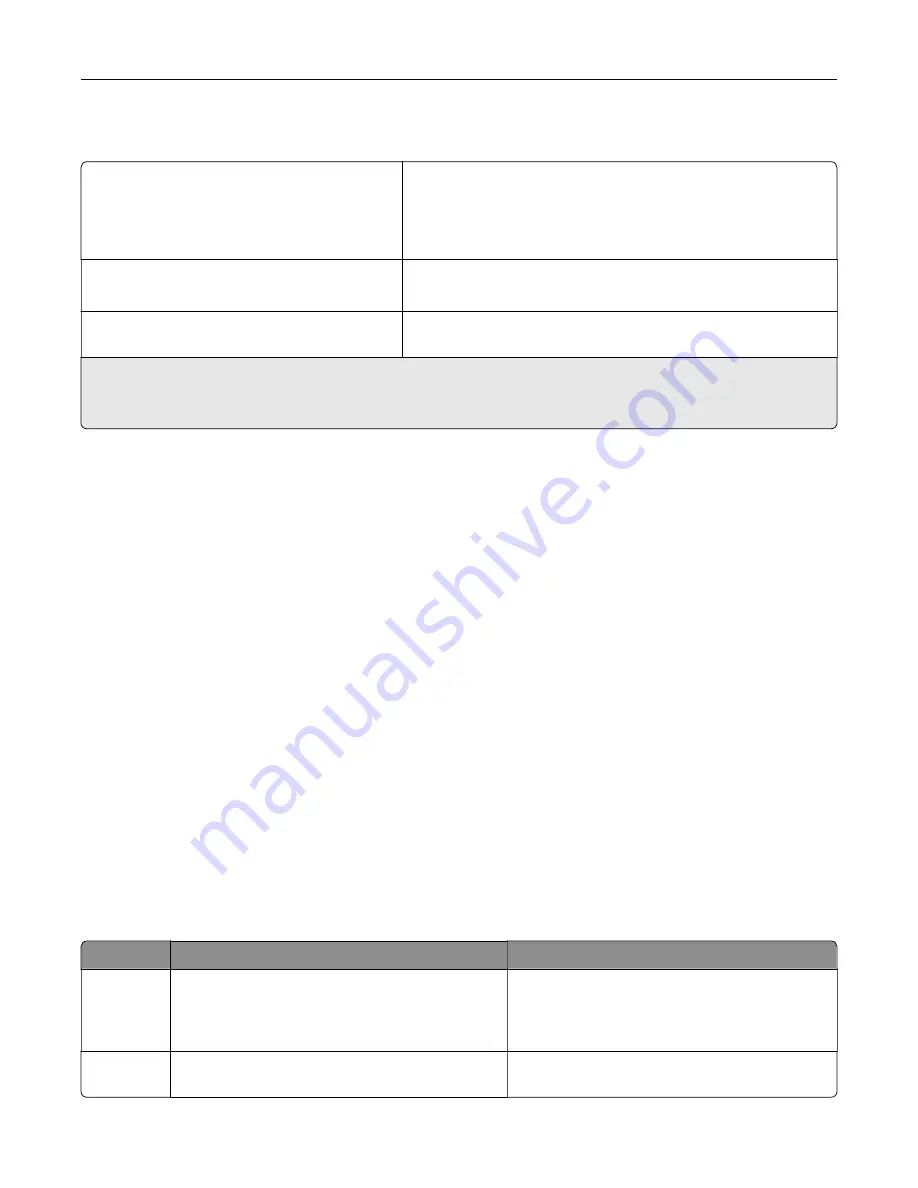
Operating temperature and relative humidity
10 to 32.2°C (50 to 90°F) and 15 to 80% RH
15.6 to 32.2°C (60 to 90°F) and 8 to 80% RH
Maximum wet-bulb temperature
2
: 22.8°C (73°F)
Non-condensing environment
Printer / cartridge / imaging unit long-
term storage
1
15.6 to 32.2°C (60 to 90°F) and 8 to 80% RH
Maximum wet-bulb temperature
2
: 22.8°C (73°F)
Printer / cartridge / imaging unit short-term
shipping
-40 to 40°C (-40 to 104°F)
1
Supplies shelf life is approximately 2 years. This is based on storage in a standard office environment at 22°C (72°F)
and 45% humidity.
2
Wet-bulb temperature is determined by the air temperature and the relative humidity.
Laser notice
The printer is certified in the U.S. to conform to the requirements of DHHS 21 CFR, Chapter I, Subchapter J for
Class I (1) laser products, and elsewhere is certified as a Class I laser product conforming to the requirements
of IEC 60825-1: 2014.
Class I laser products are not considered to be hazardous. The laser system and printer are designed so there
is never any human access to laser radiation above a Class I level during normal operation, user maintenance,
or prescribed service conditions. The printer has a non-serviceable printhead assembly that contains a laser
with the following specifications:
Class: IIIb (3b) AlGaAs
Nominal output power (milliwatts): 8
Wavelength (nanometers): 770–800
Power consumption
Product power consumption
The following table documents the power consumption characteristics of the product.
Note:
Some modes may not apply to your product.
Mode
Description
Power consumption (Watts)
Printing
The product is generating hard
‑
copy output from
electronic inputs.
One-sided: 385 (MC3224); 395 (CX331, MC3326);
400 (CX431, MC3426, XC2326)
Two-sided: 260 (MC3224); 275 (CX331, CX431,
MC3326, MC3426, XC2326)
Copy
The product is generating hard
‑
copy output from
hard
‑
copy original documents.
385 (CX331, MC3224, MC3326); 395 (CX431,
MC3426, XC2326)
Notices
235
Содержание XC2326
Страница 145: ...5 Insert the new print cartridge 6 Insert the print cartridge tray and then close the door Maintain the printer 145 ...
Страница 148: ...4 Insert the new manual feeder 5 Insert the tray Replacing the ADF tray 1 Open the ADF cover Maintain the printer 148 ...
Страница 149: ...2 Remove the used ADF tray 3 Unpack the new ADF tray Maintain the printer 149 ...
Страница 156: ...4 Insert the new separator pad until it clicks into place 5 Close the ADF cover Maintain the printer 156 ...
Страница 205: ...2 Lower the scanner Troubleshoot a problem 205 ...
Страница 208: ... Below the fuser area Duplex unit 3 Close the door Troubleshoot a problem 208 ...
Страница 254: ...Wi Fi Protected Setup wireless network 50 Index 254 ...


