•
When in doubt, contact your paper supplier.
•
When printing on letterhead, load the paper in the proper orientation for your printer. For more information,
see the
Paper and Specialty Media Guide
.
Storing paper
Use these paper storage guidelines to help avoid jams and uneven print quality:
•
Store paper in its original wrapper in the same environment as the printer for 24 to 48 hours before printing.
•
Extend the time several days if the storage or transportation environment is very different from the printer
environment. Thick paper may also require a longer conditioning period.
•
For best results, store paper where the temperature is 21°C (70°F) and the relative humidity is 40 percent.
•
Most label manufacturers recommend printing in a temperature range of 18–24°C (65–75°F) with relative
humidity between 40 and 60 percent.
•
Store paper in cartons, on a pallet or shelf, rather than on the floor.
•
Store individual packages on a flat surface.
•
Do not store anything on top of individual paper packages.
•
Take paper out of the carton or wrapper only when you are ready to load it in the printer. The carton and
wrapper help keep the paper clean, dry, and flat.
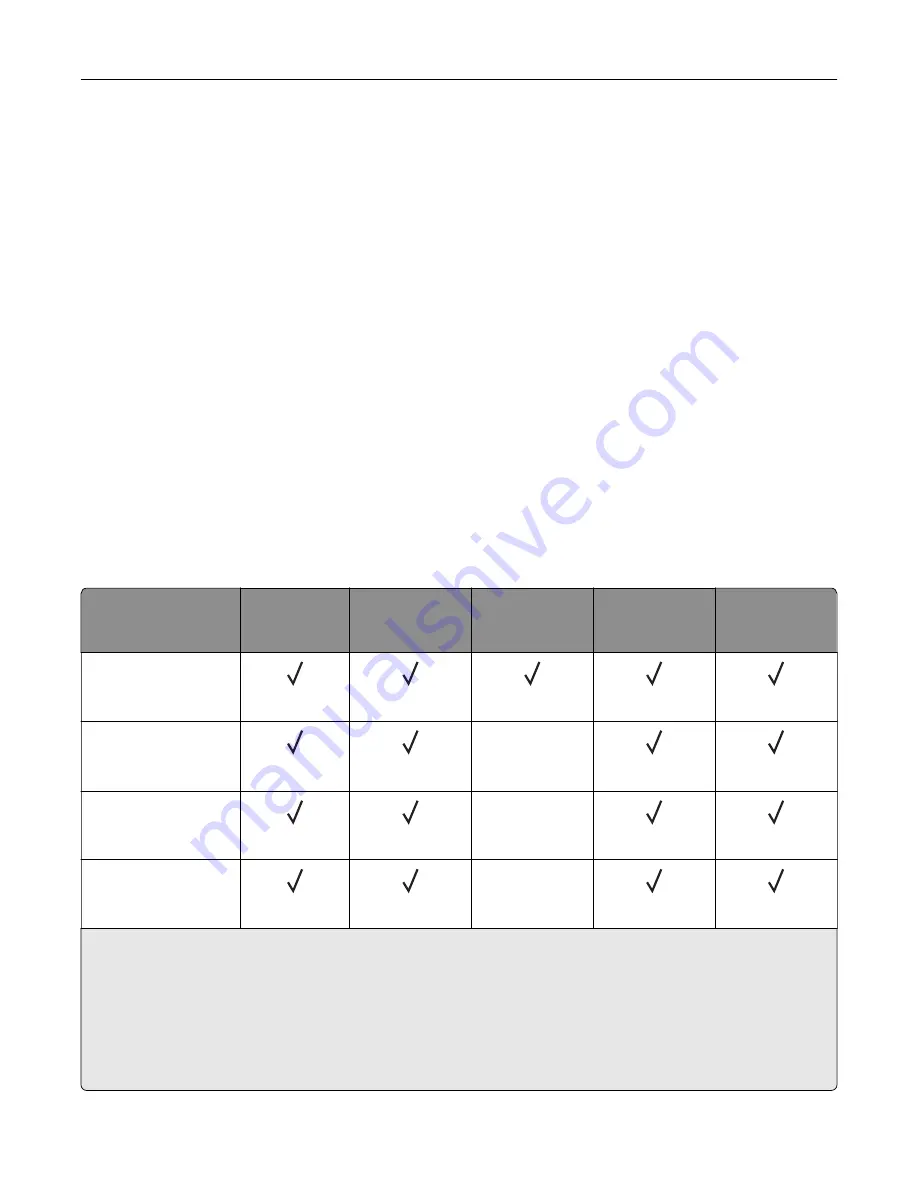
Supported paper sizes
Paper size
Standard or
optional
250
‑
sheet tray
Manual feeder
Two
‑
sided
printing
ADF
Scanner glass
A4
210 x 297 mm
(8.27 x 11.7 in.)
A5
1
148 x 210 mm
(5.83 x 8.27 in.)
X
A6
105 x 148 mm
(4.13 x 5.83 in.)
X
JIS B5
182 x 257 mm
(7.17 x 10.1 in.)
X
1
The default support is long
‑
edge feed. When running on short
‑
edge feed, A5 is treated as narrow paper.
2
When selected, the page is formatted for 215.90 x 355.60 mm (8.5 x 14 in.) unless specified by the software
application.
3
Load narrow paper with the short edge entering the printer first.
4
Supports paper size only up to 216 x 297 mm (8.5 x 11.7 in.).
5
The standard 250
‑
sheet tray supports only up to five envelopes at a time. The optional 250
‑
sheet tray supports
up to 40 envelopes at a time.
Learn about the printer
16
Содержание XC2326
Страница 145: ...5 Insert the new print cartridge 6 Insert the print cartridge tray and then close the door Maintain the printer 145 ...
Страница 148: ...4 Insert the new manual feeder 5 Insert the tray Replacing the ADF tray 1 Open the ADF cover Maintain the printer 148 ...
Страница 149: ...2 Remove the used ADF tray 3 Unpack the new ADF tray Maintain the printer 149 ...
Страница 156: ...4 Insert the new separator pad until it clicks into place 5 Close the ADF cover Maintain the printer 156 ...
Страница 205: ...2 Lower the scanner Troubleshoot a problem 205 ...
Страница 208: ... Below the fuser area Duplex unit 3 Close the door Troubleshoot a problem 208 ...
Страница 254: ...Wi Fi Protected Setup wireless network 50 Index 254 ...


