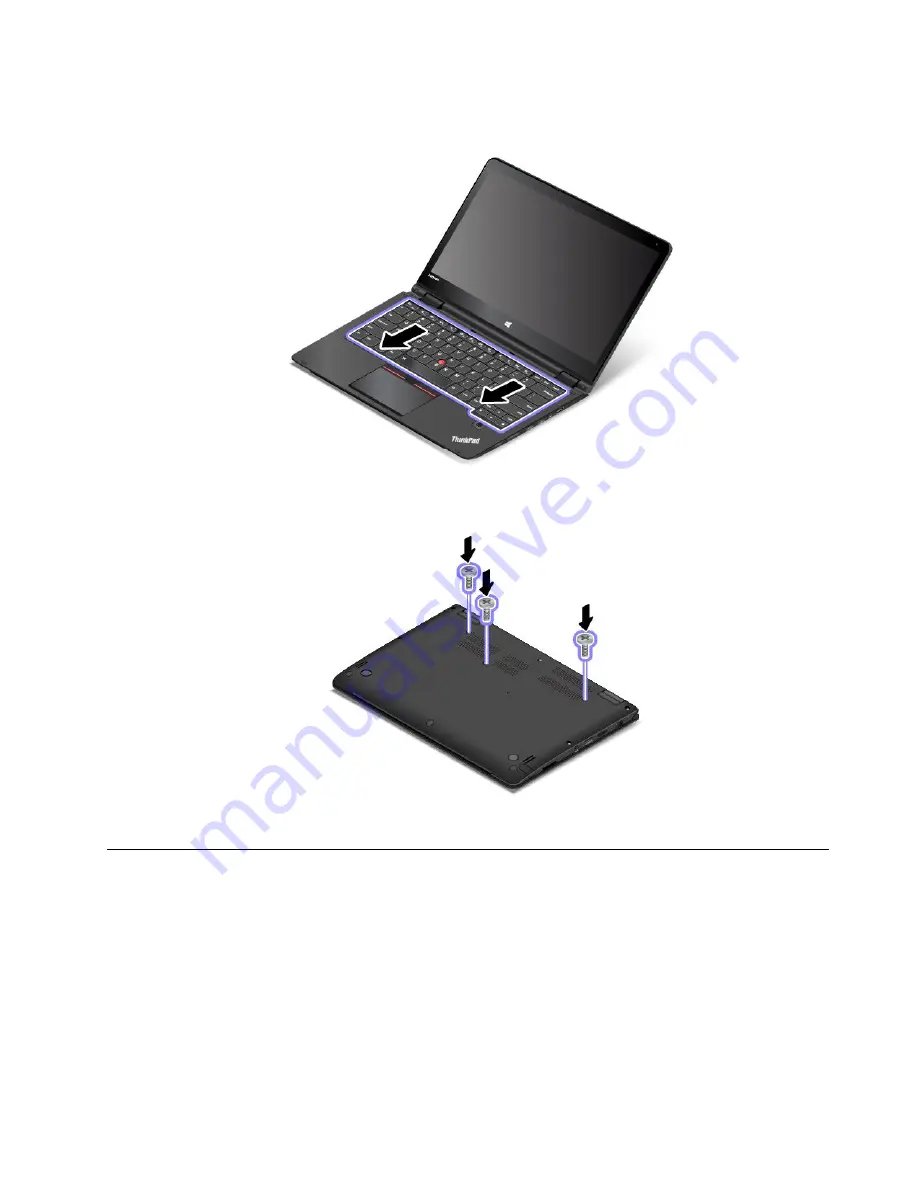
3. Slide the keyboard in the direction shown by the arrows until the latches of the keyboard are hidden
under the keyboard bezel.
4. Turn the computer over and reinstall the screws.
5. Turn the computer over again. Connect the ac power adapter and all cables to the computer.
Replacing the base cover assembly
Before you start, print these instructions. Read the important safety information first. See “Important
safety information” on page vi.
To replace the base cover assembly, do the following:
1. Disable the built-in battery. See “Disabling the built-in battery” on page 107.
2. Close the computer display, and turn the computer over.
113
Содержание ThinkPad Hard Disk Drive
Страница 1: ...ThinkPad S3 ThinkPad Yoga 14 and ThinkPad Yoga 460 User Guide ...
Страница 6: ...iv ThinkPad S3 ThinkPad Yoga 14 and ThinkPad Yoga 460 User Guide ...
Страница 16: ...xiv ThinkPad S3 ThinkPad Yoga 14 and ThinkPad Yoga 460 User Guide ...
Страница 60: ...44 ThinkPad S3 ThinkPad Yoga 14 and ThinkPad Yoga 460 User Guide ...
Страница 68: ...52 ThinkPad S3 ThinkPad Yoga 14 and ThinkPad Yoga 460 User Guide ...
Страница 80: ...64 ThinkPad S3 ThinkPad Yoga 14 and ThinkPad Yoga 460 User Guide ...
Страница 104: ...88 ThinkPad S3 ThinkPad Yoga 14 and ThinkPad Yoga 460 User Guide ...
Страница 120: ...104 ThinkPad S3 ThinkPad Yoga 14 and ThinkPad Yoga 460 User Guide ...
Страница 140: ...6 Remove the dc in bracket 7 Remove the ac power card 124 ThinkPad S3 ThinkPad Yoga 14 and ThinkPad Yoga 460 User Guide ...
Страница 141: ...8 Install the new ac power card in place 9 Install the dc in bracket in place Chapter 10 Replacing devices 125 ...
Страница 150: ...134 ThinkPad S3 ThinkPad Yoga 14 and ThinkPad Yoga 460 User Guide ...
Страница 160: ...144 ThinkPad S3 ThinkPad Yoga 14 and ThinkPad Yoga 460 User Guide ...
Страница 164: ...148 ThinkPad S3 ThinkPad Yoga 14 and ThinkPad Yoga 460 User Guide ...
Страница 169: ......
Страница 170: ......


