


The coin-cell battery normally requires no charging or maintenance throughout its life; however, no battery
lasts forever. If the coin-cell battery fails, the date and time information are lost.
Refer to the “Lithium coin-cell battery notice” in the
Safety and Warranty Guide
for information about
disposing of the coin-cell battery.
To remove and install the coin-cell battery, do the following:
1. Prepare your computer. See “Preparing your computer” on page 98.
2. Lay the computer on its side for easier access to the system board.
3. Locate the coin-cell battery. See “Parts on the system board” on page 38.
4. Remove any PCIe cards that might prevent your access to the coin-cell battery. See “PCIe card” on
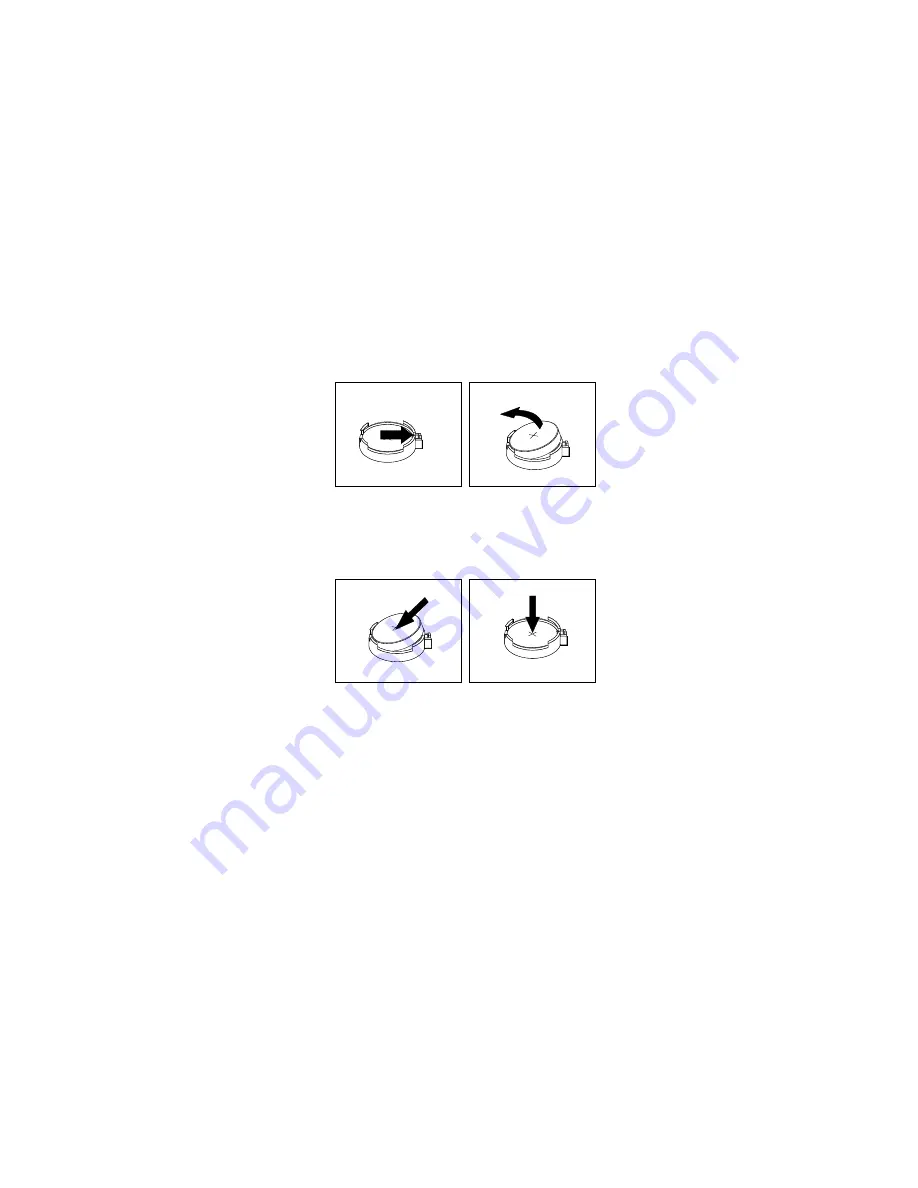
5. Remove the old coin-cell battery as shown.
Figure 82. Removing the coin-cell battery
6. Install the new coin-cell battery as shown.
Figure 83. Installing the coin-cell battery
7. Reinstall the PCIe cards if you have removed them. See “PCIe card” on page 103.
8. Close the drive bay assembly and reinstall the front bezel. Then, reinstall the computer cover and
reconnect the cables. See “Completing the parts replacement” on page 187.
Note:
When the computer is turned on for the first time after replacing the coin-cell battery, an error
message might be displayed. This is normal after replacing the coin-cell battery.
9. Turn on the computer and all attached devices.
10. Use the Setup Utility program to set the date and time. See “Using the Setup Utility program” on page
Cover presence switch
Attention:
Do not open your computer or attempt any repair before reading and understanding the Chapter
1 “Read this first: Important safety information” on page 1.
To remove or install the cover presence switch, do the following:
1. Prepare your computer. See “Preparing your computer” on page 98.
2. Locate the cover presence switch. See “Computer components” on page 33.
132
P330 Hardware Maintenance Manual
Содержание 30CY
Страница 1: ...P330 Hardware Maintenance Manual Machine Types 2nd Gen 30CY 30D0 and 30D3 ...
Страница 6: ...iv P330 Hardware Maintenance Manual ...
Страница 8: ...vi P330 Hardware Maintenance Manual ...
Страница 16: ...8 P330 Hardware Maintenance Manual ...
Страница 17: ... 18 kg 37 lb 32 kg 70 5 lb 55 kg 121 2 lb 1 2 Chapter 1 Read this first Important safety information 9 ...
Страница 20: ...12 P330 Hardware Maintenance Manual ...
Страница 21: ...1 2 Chapter 1 Read this first Important safety information 13 ...
Страница 22: ...14 P330 Hardware Maintenance Manual ...
Страница 28: ...20 P330 Hardware Maintenance Manual ...
Страница 32: ...24 P330 Hardware Maintenance Manual ...
Страница 36: ...28 P330 Hardware Maintenance Manual ...
Страница 56: ...48 P330 Hardware Maintenance Manual ...
Страница 68: ...Figure 10 Padlock 60 P330 Hardware Maintenance Manual ...
Страница 84: ...76 P330 Hardware Maintenance Manual ...
Страница 96: ...88 P330 Hardware Maintenance Manual ...
Страница 202: ...194 P330 Hardware Maintenance Manual ...
Страница 204: ...196 P330 Hardware Maintenance Manual ...
Страница 206: ...198 P330 Hardware Maintenance Manual ...
Страница 214: ...206 P330 Hardware Maintenance Manual ...
Страница 216: ...Ukraine RoHS India RoHS RoHS compliant as per E Waste Management Rules Taiwan RoHS 208 P330 Hardware Maintenance Manual ...
Страница 218: ...210 P330 Hardware Maintenance Manual ...
Страница 220: ...212 P330 Hardware Maintenance Manual ...
Страница 222: ...214 P330 Hardware Maintenance Manual ...
Страница 223: ......
Страница 224: ......


