


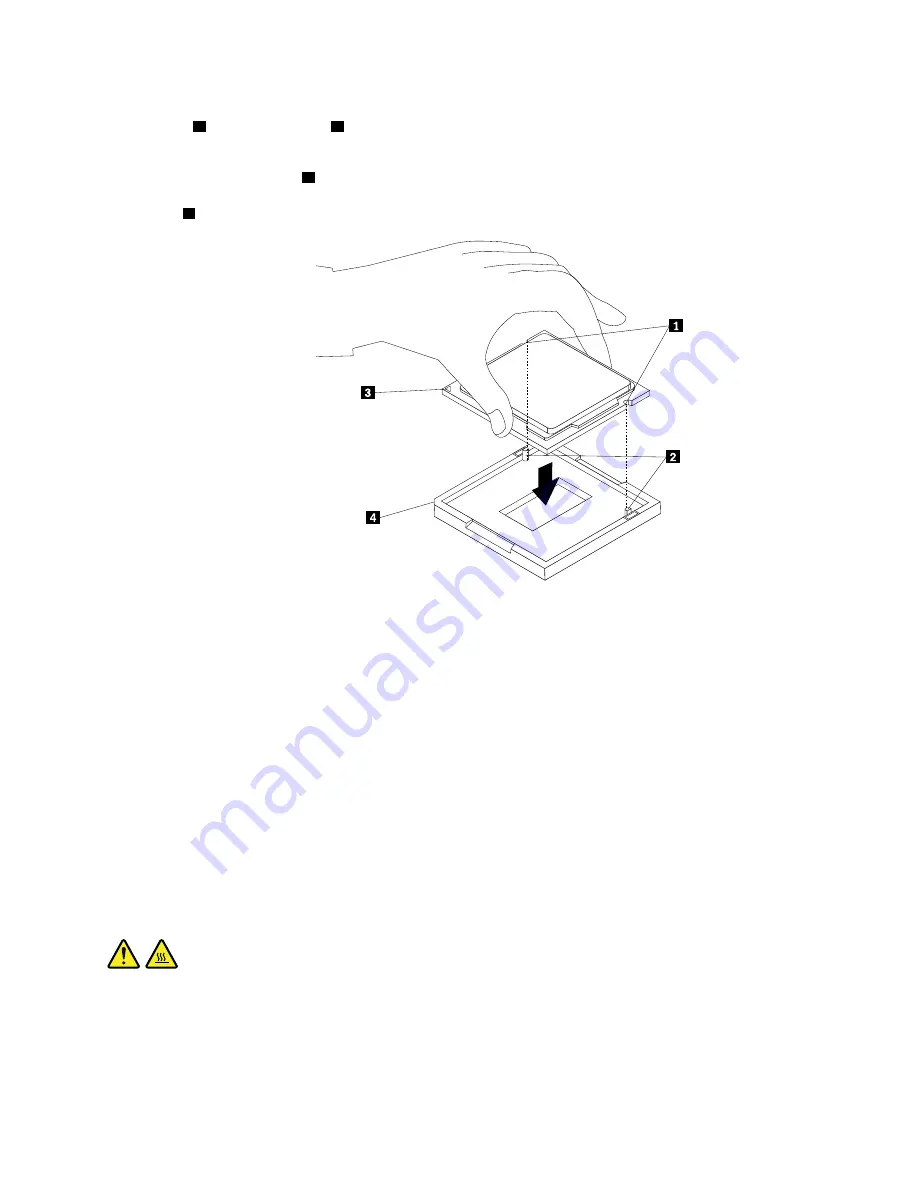
10. Note the orientation of the new microprocessor. Hold the new microprocessor by its edges and align the
notches
1
on it with the tabs
2
in the microprocessor socket. Then, carefully lower the new
microprocessor straight down into the microprocessor socket.
Note:
The small triangle
3
on one corner of the new microprocessor is the microprocessor orientation
indicator. The new microprocessor is in the correct orientation when this indicator faces the beveled
corner
4
of the microprocessor socket.
Figure 153. Installing the microprocessor
11. Close the microprocessor retainer and lock it into position with the small handle. Ensure that the new
microprocessor is securely seated in the socket.
12. Reinstall the heat sink and fan assembly. See “Heat-sink-and-fan assembly” on page 159.
13. If you are instructed to return the old microprocessor, follow all packaging instructions and use any
packaging materials that are supplied to you for shipping.
What to do next:
• To work with another piece of hardware, go to the appropriate section.
• To complete the installation or replacement, go to “Completing the parts replacement” on page 187.
System board
Attention:
Do not open your computer or attempt any repair before reading and understanding the Chapter
1 “Read this first: Important safety information” on page 1.
CAUTION:
The heat-sink-and-fan assembly and microprocessor might be very hot. Before you open the
computer cover, turn off the computer and wait several minutes until the computer is cool.
To remove or install the system board, do the following:
1. Prepare your computer. See “Preparing your computer” on page 98.
2. Lay the computer on its side for easier access to the system board.
Hardware removal and installation
175
Содержание 30CY
Страница 1: ...P330 Hardware Maintenance Manual Machine Types 2nd Gen 30CY 30D0 and 30D3 ...
Страница 6: ...iv P330 Hardware Maintenance Manual ...
Страница 8: ...vi P330 Hardware Maintenance Manual ...
Страница 16: ...8 P330 Hardware Maintenance Manual ...
Страница 17: ... 18 kg 37 lb 32 kg 70 5 lb 55 kg 121 2 lb 1 2 Chapter 1 Read this first Important safety information 9 ...
Страница 20: ...12 P330 Hardware Maintenance Manual ...
Страница 21: ...1 2 Chapter 1 Read this first Important safety information 13 ...
Страница 22: ...14 P330 Hardware Maintenance Manual ...
Страница 28: ...20 P330 Hardware Maintenance Manual ...
Страница 32: ...24 P330 Hardware Maintenance Manual ...
Страница 36: ...28 P330 Hardware Maintenance Manual ...
Страница 56: ...48 P330 Hardware Maintenance Manual ...
Страница 68: ...Figure 10 Padlock 60 P330 Hardware Maintenance Manual ...
Страница 84: ...76 P330 Hardware Maintenance Manual ...
Страница 96: ...88 P330 Hardware Maintenance Manual ...
Страница 202: ...194 P330 Hardware Maintenance Manual ...
Страница 204: ...196 P330 Hardware Maintenance Manual ...
Страница 206: ...198 P330 Hardware Maintenance Manual ...
Страница 214: ...206 P330 Hardware Maintenance Manual ...
Страница 216: ...Ukraine RoHS India RoHS RoHS compliant as per E Waste Management Rules Taiwan RoHS 208 P330 Hardware Maintenance Manual ...
Страница 218: ...210 P330 Hardware Maintenance Manual ...
Страница 220: ...212 P330 Hardware Maintenance Manual ...
Страница 222: ...214 P330 Hardware Maintenance Manual ...
Страница 223: ......
Страница 224: ......


