background image

16

100% GEOTHERMAL HEAT

16

INSTALLER MANUAL

4.1.4. Space requirements

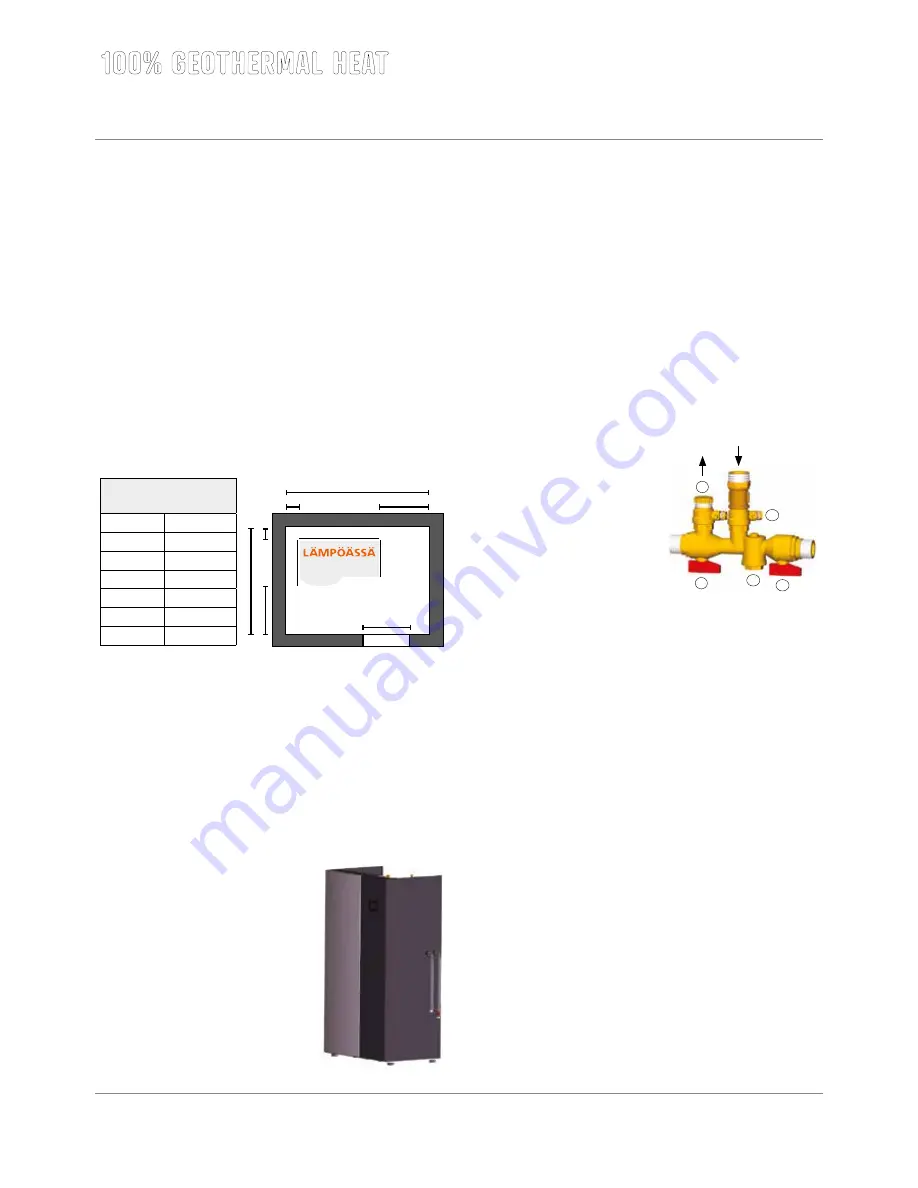
A Lämpöässä Vmi ground source heat pump can conveniently be placed 
into  a  technical  or  utility  room.  The  floor  space  to  be  reserved  for  the 
machine needs not significantly exceed its external dimensions. Approx. 
50-60 cm of installation room should be reserved on the respective side 
for  lateral  ground  circuit  connections.  Considering  possible  equipment 
maintenance, there must be approx. 70 cm of free space in front of the 
geothermal heat pump.

The height of a Lämpöässä Vmi series ground source heat pump (includ

-

ing adjustable feet) is at least 183 cm. The transport platform adds some 
8 cm. Approx. 30 cm of free space must be reserved for connections on 
top of the machine. This should be kept in mind when installing the equip

-

ment into a low room, such as basement.

4.2. HVAC installation

4.2.1. Heat collection circuit and fill group installation

On the right side of the ground source heat pump there are entry points 
for heat collection circuit hoses. Install the flexible supply (1) and return 
(2) hoses included in the accessory package into the heat collection pip

-

ing. See picture. Attach the shut-off valve included in the accessory pack

-

age to the end of the rear hose. The hoses 
and joints must be sealed carefully.

If  cooling  equipment  located  higher  than 
the ground source heat pump is connected 
to the pump, a membrane expansion ves

-

sel  must  be  included  in  the  system.  In 
such cases, a de-aeration connection must 
be  installed  to  the  highest  point  of  the 
system and the fill container removed from 
use  by  closing  the  shut-off  valve  under

-

neath it.

Vmi 6 – 17 space 

requirements (mm)

A

50

B

50

C

500

O

700

X

1570

F

700

Y

1420

B

A

X

Y

F

C

O

670,8

1020

700

4.2.2. Filling and de-aeration of the heat collection circuit

Accessories required for the filling and de-aeration of the ground circuit:

• 

mixing tank, 60 litres

• 

submersible pump fitted with a filter, lifting height approx. 30m

• 

water/ethanol or water/glycol mixture (1:1) with a frost 
resistance of -16 °C

• 

reinforced hose 1” (2 pc.), length approx. 3 m

• 

connector 3/4” (female thread) for reinforced hose

• 

connector 1” (female thread) for reinforced hose

WORK STAGES

Please check that the ground circuit 
has been correctly connected.

1.  Remove the styrox packaging 

protecting the group of fill 

valves.

2.  Detach the expansion vessel 

from the foremost ball valve.

3.  The foremost shut-off valve (2) 

of the group of fill valves must 

always be open.

4.  Attach the submersible pump textile hose to the foremost ball valve 

(3) in the group of fill valves and open the ball valve.

5.  Attach a reinforced hose from the ball valve (4) at the back of the 

group of fill valves to the fill container and open the valve.


NOTE! The flow direction has to be correct since there is a one  


way valve installed between the cooling connections.

6.  Fill the container with water/ethanol or water/glycol (frost r. 

7.  Bleed air from fill hoses by activating the submersible pump and 

keeping the valve (1) open. When air has escaped, close the valve 

(1) to start actual fluid circulation through the ground circuit.

8.  Add fluid until the piping is full. Upon de-aeration, the unit’s own 

brine circulation pump can be used to speed up fluid circulation.

• 

Check that the motor protection switch (QM1) is not on.

• 

Turn master switch (Q1) and control current switch (F10) on.

• 

The forced control of gound circuit pump can be activated  


from the maintenance manual of ÄssäControl. Go to manual  


control and choose manual control on and ground circuit 1  


on.

NOTE

! When using the system’s own brine circulation pump for 

de-aeration purposes, check that the flow direction of the separate 

submersible pump is always the same as that of the unit’s pump.

9.   Keep the submersible pump running until the fluid is clear and no  


gurgling can be heard from the pipes. NOTE! De-aeration usually  


takes several hours and helps to ensure that all the air is remove  


from the system and will not cause any malfunctions once the  


system is started. Leave no pressure in the network! Remove any  


air from the evaporator through the de-aeration connection of the  


pipe located between the ground circuit and the evaporator. 

1

2

4

5

3

-16 °C) mixture (ratio 1:1).

1. 2.

Содержание VMI 6-17

Страница 1: ...L MP SS Vmi 6 17 L MP SS 3 2016 INSTRUCTIONS FOR USE INSTALLATION AND MAINTENANCE...

Страница 2: ...L mp ss for many decades to come Please familiar ize yourself with these instructions for use and maintenance Keep the instructions for future use and reference should problems occur These instructio...

Страница 3: ...rt 15 4 1 2 Ground source heat pump installation area 15 4 1 3 Removing the packaging 15 4 1 4 Space requirements 16 4 2 HVAC installation 16 4 2 1 Heat collection circuit and fill group installation...

Страница 4: ...storage tank Heat collection circuit Heating water Domestic water Compressor Evaporator Superheater Condenser Press this button for additional information on the touch screen data The type plate of th...

Страница 5: ...5 Expansion valve 6a Upper storage tank 6b Lower storage tank 7a Upper storage tank domestic water coil 7b Lower storage tank domestic water coil 2 1 2 Compressor unit From the evaporator refrigerant...

Страница 6: ...oil into two parts allows heating of the domestic water circulation only using the upper storage tank coil so that blending of the storage tank temperature stratifications is avoided 2 2 ss Cooling co...

Страница 7: ...the bottom left corner to return to the home screen Use the arrow button in the bottom right corner to return to previous screen For instructions screen press the i button in the top right corner In...

Страница 8: ...s which can be accessed by pressing the button at the bottom centre of the screen In case of compen sation value 7 the adjustment is seven times faster than in case of value 1 Large compensation value...

Страница 9: ...nd date or time is in the future If the end date is set into the past the mode Home is activated and the mode Away cannot be activated 3 4 5 Measurements This shortcut allows accessing the Measurement...

Страница 10: ...ustment curves are set higher than the storage tank temperature Factory settings for the storage tank bottom section are 40 C min and 45 C max Factory settings for the storage tank top section are 50...

Страница 11: ...ther modifications in adjustment curve set values When using radiator heating temperature change is quicker Conditions in Finland pumps and 60 C bottom section 85 C top section in case of part power g...

Страница 12: ...it value between 0 90 C factory set ting 55 C 3 5 3 Other set values The menu Other set values allows circuit specific programming of maxi mum and minimum heat distribution circuit supply water values...

Страница 13: ...erature is not achieved by the com pressor during the dedicated period from 0 to 24 hours factory setting 12 hours The setting is applicable in full power systems only 3 5 3 5 Bivalent settings in biv...

Страница 14: ...a Use the screen numbering in the bottom bar for navigating between the Measurements screens Measurements screen values describe heat pump operation under various conditions and the values shown canno...

Страница 15: ...ource heat pump s accessory package includes adjustable feet to be screwed into the unit bottom see picture After that remove the wooden platform elements and their fixation screws 4 pc To remove the...

Страница 16: ...1 with a frost resistance of 16 C reinforced hose 1 2 pc length approx 3 m connector 3 4 female thread for reinforced hose connector 1 female thread for reinforced hose WORK STAGES Please check that...

Страница 17: ...11 J hdytys paluu Cooling return 1 12 Aurinkoyhde meno Solar connection flow 13 Aurinkoyhde paluu Solar connection return 14 Kv kierto Hot water circulation Varaajan t yt n yhteydess varaajassa oleva...

Страница 18: ...unit The mixing valve is fitted to the hot water pipe in order to prevent burns The overflow pipe is joined to the floor drain as instructed or to an overflow funnel if the distance to the floor drai...

Страница 19: ...ormal outdoor temperature Device Terminal block No Conductor type Outdoor sensor NTC X1 10 ja X1 2 2 X 0 7 mm2 4 3 2 Room sensor optional In order for the room sensor to detect average indoor temperat...

Страница 20: ...from starting water in the storage tank has been heated by the electric heating element for at least 6 hours Possible problems during startup Problem Cause Solution Fuses always blow when the compres...

Страница 21: ...condition of the fuses in the master switchboard Incorrect power supply phase sequence Contact an electrician The compressor does not start and the display reads Incor rect phase sequence or Motor pro...

Страница 22: ...t of heat is needed for example the outdoor tem perature is very low or the structure is drying during the first year s use of the building No action required Lack of refrigerant Can be detected from...

Страница 23: ...e alarm circuit 1 3 Brine pump 1 Run indicator 12 Compressor 1 Run indicator 4 13 5 14 Soft Starter 6 15 External Alarm 7 Compressor 1 internal alarm 16 8 17 Flow Sensor 9 Phase failure detector 18 Di...

Страница 24: ...t water sensor 4 Boiler foot part temperature sensor 9 Inside temperature sensor 5 Outside temperatur sensor 10 Brine temperature sensor Analog outputs This screen allows checking analog output status...

Страница 25: ...ivative time the more the regulator position changes upon each adjust ment Consider that increase in derivative time may result in increased regulator fluctuation Voltage 0 10 V Position valve control...

Страница 26: ...method to use 5 4 9 Temperature gauges This screen allows choosing the temperature gauges used By default the outdoor temperature gauge is present Indoor temperature gauge is optional 5 4 10 External...

Страница 27: ...percentage indicated in the valve setting point L mp ss unit Factroy setting Vmi 6 11 30 Vmi 14 17 40 5 4 13 Boiler maximum limits Maximum boiler limits are set on this page 5 4 14 Cooling Selectable...

Страница 28: ...ions over 10 of the nominal voltage lightning fire or other respective event Transport damages are not covered by the warranty Also the warranty does not cover situations WARRANTY CONDITIONS caused by...

Страница 29: ...rve 3 Constant curve 3 Constant curve 3 Factory setting of superheat circuit 30 35 35 35 40 40 40 Sound power level 1 dB 38 41 36 41 38 43 42 OPERATION LIMITS Temperature limits brine water C 10 60 15...

Страница 30: ...48 0 59 0 70 0 68 0 89 0 83 1 00 Maximum external pressuredrop kPa 66 65 96 100 84 91 77 HEAT DISTRIBUTION CIRCUIT Energy class of HC pump A inverter A inverter A inverter A inverter A inverter A inv...

Страница 31: ...XL 2015 811 2013 A A A B C D E F G A A A B C D E F G Vmi 6 38 dB 00 dB 8 kW 8 kW 8 kW...

Страница 32: ...A A A A A A A A B C D E F G A A A A B C D E F G XL 2015 811 2013 XL X Vmi 6...

Страница 33: ...Colder 4786 kWh a Warmer 2695 kWh a Annual electricity consumption for water heating under colder and warmer climate conditions Colder 1251 kWh a Warmer 1251 kWh a Energy efficiency for space heating...

Страница 34: ...2 C Operation limit temperatures Heating Average TOL 10 C Warmer TOL 22 C Colder TOL 2 C Seasonal electricity consumption Heating Average QHE A 4116 kWh a Warmer QHE W 4786 kWh a Colder QHE C 2695 kW...

Страница 35: ...XL 2015 811 2013 A A A B C D E F G A A A B C D E F G Vmi 9 41 dB 00 dB 10 kW 10 kW 10 kW...

Страница 36: ...A A A A A A A A B C D E F G A A A A B C D E F G XL 2015 811 2013 XL X Vmi 9...

Страница 37: ...s Colder 6181 kWh a Warmer 3418 kWh a Annual electricity consumption for water heating under colder and warmer climate conditions Colder 1308 kWh a Warmer 1308 kWh a Energy efficiency for space heatin...

Страница 38: ...alent 2 C Operation limit temperatures Heating Average TOL 10 C Warmer TOL 22 C Colder TOL 2 C Seasonal electricity consumption Heating Average QHE A 5296 kWh a Warmer QHE W 6181 kWh a Colder QHE C 34...

Страница 39: ...XL 2015 811 2013 A A A B C D E F G A A A B C D E F G Vmi 11 36 dB 00 dB 11 kW 11 kW 11 kW...

Страница 40: ...A A A A A A A A B C D E F G A A A A B C D E F G XL 2015 811 2013 XL X Vmi 11...

Страница 41: ...ns Colder 6899 kWh a Warmer 3837 kWh a Annual electricity consumption for water heating under colder and warmer climate conditions Colder 1214 kWh a Warmer 1214 kWh a Energy efficiency for space heati...

Страница 42: ...Tbivalent 2 C Operation limit temperatures Heating Average TOL 10 C Warmer TOL 22 C Colder TOL 2 C Seasonal electricity consumption Heating Average QHE A 5296 kWh a Warmer QHE W 6899 kWh a Colder QHE...

Страница 43: ...XL 2015 811 2013 A A A B C D E F G A A A B C D E F G Vmi 11 1x230V 41 dB 00 dB 11 kW 11 kW 11 kW...

Страница 44: ...A A A A A A A A B C D E F G A A A A B C D E F G XL 2015 811 2013 XL X Vmi 11 1x230V...

Страница 45: ...tions Colder 7106 kWh a Warmer 3908 kWh a Annual electricity consumption for water heating under colder and warmer climate conditions Colder 1267 kWh a Warmer 1267 kWh a Energy efficiency for space he...

Страница 46: ...Tbivalent 2 C Operation limit temperatures Heating Average TOL 10 C Warmer TOL 22 C Colder TOL 2 C Seasonal electricity consumption Heating Average QHE A 6082 kWh a Warmer QHE W 7106 kWh a Colder QHE...

Страница 47: ...XL 2015 811 2013 A A A B C D E F G A A A B C D E F G Vmi 14 38 dB 00 dB 14 kW 14 kW 14 kW...

Страница 48: ...A A A A A A A A B C D E F G A A A A B C D E F G XL 2015 811 2013 XL X Vmi 14...

Страница 49: ...ns Colder 8645 kWh a Warmer 4819 kWh a Annual electricity consumption for water heating under colder and warmer climate conditions Colder 1210 kWh a Warmer 1210 kWh a Energy efficiency for space heati...

Страница 50: ...Tbivalent 2 C Operation limit temperatures Heating Average TOL 10 C Warmer TOL 22 C Colder TOL 2 C Seasonal electricity consumption Heating Average QHE A 7443 kWh a Warmer QHE W 8645 kWh a Colder QHE...

Страница 51: ...XL 2015 811 2013 A A A B C D E F G A A A B C D E F G Vmi 14 1x230V 43 dB 00 dB 14 kW 14 kW 14 kW...

Страница 52: ...A A A A A A A A B C D E F G A A A A B C D E F G XL 2015 811 2013 XL X Vmi 14 1x230V...

Страница 53: ...tions Colder 9032 kWh a Warmer 5014 kWh a Annual electricity consumption for water heating under colder and warmer climate conditions Colder 1334 kWh a Warmer 1334 kWh a Energy efficiency for space he...

Страница 54: ...Tbivalent 2 C Operation limit temperatures Heating Average TOL 10 C Warmer TOL 22 C Colder TOL 2 C Seasonal electricity consumption Heating Average QHE A 7627 kWh a Warmer QHE W 9032 kWh a Colder QHE...

Страница 55: ...XL 2015 811 2013 A A A B C D E F G A A A B C D E F G Vmi 17 42 dB 00 dB 17 kW 17 kW 17 kW...

Страница 56: ...A A A A A A A A B C D E F G A A A A B C D E F G XL 2015 811 2013 XL X Vmi 17...

Страница 57: ...s Colder 10145 kWh a Warmer 5634 kWh a Annual electricity consumption for water heating under colder and warmer climate conditions Colder 1272 kWh a Warmer 1272 kWh a Energy efficiency for space heati...

Страница 58: ...Tbivalent 2 C Operation limit temperatures Heating Average TOL 10 C Warmer TOL 22 C Colder TOL 2 C Seasonal electricity consumption Heating Average QHE A 8716 kWh a Warmer QHE W 10145 kWh a Colder QHE...

Страница 59: ...e front part mas ter fuses 25 A Hysteresis 21 Current 25 28 Delay 1s The relay requires external voltage 24 240 V AC External supply is connected to terminals A1 and A2 Terminals 15 and 16 are connect...

Страница 60: ......

Страница 61: ......

Страница 62: ......

Страница 63: ......

Страница 64: ......

Страница 65: ......

Страница 66: ......

Страница 67: ......

Страница 68: ......

Страница 69: ......

Страница 70: ......

Страница 71: ......

Страница 72: ......

Страница 73: ......

Страница 74: ......

Страница 75: ......

Страница 76: ......

Страница 77: ......

Страница 78: ......

Страница 79: ......

Страница 80: ......

Страница 81: ......

Страница 82: ......

Страница 83: ......

Страница 84: ......

Страница 85: ......

Страница 86: ......

Страница 87: ......

Страница 88: ......

Страница 89: ......

Страница 90: ......

Страница 91: ......

Страница 92: ......

Страница 93: ...L mp ss is a trademark of Suomen L mp pumpputekniikka Oy We reserve the right to make changes Suomen L mp pumpputekniikka Oy Unikontie 2 62100 Lapua www lampoassa com R...

Отзывы: