LaCinema Black PLAY
Introduction
User Manual
page 10
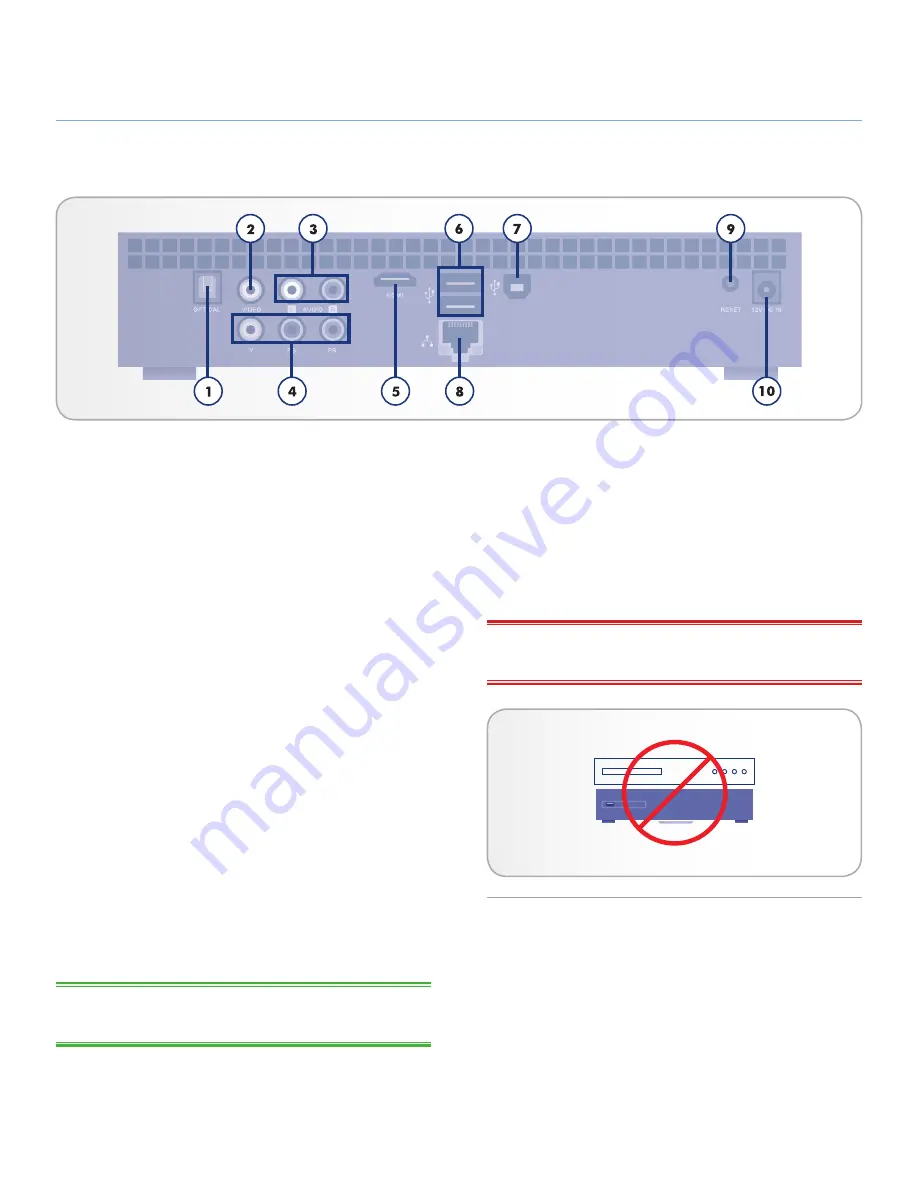
1.
Digital Optical Audio OUT connector –
Use an optical
digital audio cable (not included) to connect to your home
theater system for digital sound
2.
Composite Video (CVBS) OUT connector –
Composite
video provides good video quality for non-high definition
TV. Connect a separate cable for audio output.
3.
Composite (Analog) Audio left (white) and right (red)
OUT connectors –
Stereo audio provides good analog
sound output
4.
Component Video OUT connector –
Component Video
provides high-definition picture up to 1080i using the Com-
ponent Video cable. Connect a separate cable for audio
(stereo cable or digital optical cable).
5.
HDMI connector –
Connects to a TV, A/V receiver, or
home theater system. HDMI provides a pure digital con-
nection for high definition video and digital audio all in one
cable. If your TV has a DVI (Digital Video Interface) jack,
you can use an HDMI-to-DVI adapter (sold separately) for
a digital video connection to your TV. You will need to con-
nect a separate cable for audio.
6.
USB 2.0 connector (for external disk connection) –
Connect USB external storage devices (such as hard disks
or flash keys) or memory card readers to browse, play and
manage content directly from your TV.
7.
USB 2.0 connector (for PC connection) –
Connects to a
computer in order to transfer multimedia files
TECHNICAL NOTE:
Mac OS X users cannot directly connect the
LaCinema Black to their computers via USB.
8.
Ethernet connector –
Connects to a network in order to
transfer multimedia files
9.
Reset to Factory Settings button –
Press this button if
your LaCinema Black PLAY does not respond. All the set-
tings will be reset and the installation wizard will run.
10.
External power supply connector –
Plug in the power
supply
WiFi connection –
Antenna is inside the product. Connect the
LaCinema Black PLAY through WiFi to a network in order to trans-
fer multimedia files
IMPORTANT INFO:
Do not stack objects on top of the LaCin-
ema Black PLAY, as they may interfere with the WiFi antenna.
1.5.3. Rear View


